![]() SpeedCheck-15 Radar
SpeedCheck-15 Radar
Instruction Manual
Warnings and Precautions
The following symbols indicate important safety warnings and precautions throughout this guide:![]() WARNING indicates that serious bodily harm or death may result from failure to adhere to the precautions.
WARNING indicates that serious bodily harm or death may result from failure to adhere to the precautions.![]() CAUTION indicates that damage to equipment may result if the instructions are not followed.
CAUTION indicates that damage to equipment may result if the instructions are not followed.![]() NOTE suggests optimal conditions and provides additional information.
NOTE suggests optimal conditions and provides additional information.
1.1 Warranty Disclaimer
This guide will familiarize you with the installation of Carmanah’s SPEEDCHECK-15 radar replacement kit. Failure to comply with the use, storage, maintenance, installation or placement instructions detailed in this guide could void the warranty.
1.2 Standards
Perform all installation, wiring, grounding and maintenance in conformance with local building and electrical codes. Adherence to the National Electrical Code (NEC) is mandatory to comply with any certification markings. Non-adherence to code may void the warranty.
1.3 Safety and Usage Precautions![]() Use extreme caution when handling the batteries as they can generate hazardous short-circuit currents. Remove all jewelry (bracelets, metal-strap watches, etc.) before handling the batteries.
Use extreme caution when handling the batteries as they can generate hazardous short-circuit currents. Remove all jewelry (bracelets, metal-strap watches, etc.) before handling the batteries.![]() Solar panels produce DC electricity when exposed to light and can therefore produce an electrical shock or burn. To render solar panels inoperative, remove them from sunlight or fully cover their front surface with an opaque material.
Solar panels produce DC electricity when exposed to light and can therefore produce an electrical shock or burn. To render solar panels inoperative, remove them from sunlight or fully cover their front surface with an opaque material.![]() Before lifting any heavy or bulky equipment, ensure the load is secured so moving parts do not shift, and that it can be lifted as far as needed without back strain or loss of grip. Installation may require more than one person.
Before lifting any heavy or bulky equipment, ensure the load is secured so moving parts do not shift, and that it can be lifted as far as needed without back strain or loss of grip. Installation may require more than one person.![]() Ensure the equipment is not powered during installation and wiring of the system.
Ensure the equipment is not powered during installation and wiring of the system.![]() Recheck all completed wiring for proper polarity prior to energizing the system.
Recheck all completed wiring for proper polarity prior to energizing the system.![]() Changes or modifications to Carmanah equipment not expressly approved by Carmanah could void both the user’s authority to operate the equipment and the warranty.
Changes or modifications to Carmanah equipment not expressly approved by Carmanah could void both the user’s authority to operate the equipment and the warranty.![]() This guide is specific to SPEEDCHECK-15 radar installation and is not a replacement for the complete SPEEDCHECK-15 product user manual.
This guide is specific to SPEEDCHECK-15 radar installation and is not a replacement for the complete SPEEDCHECK-15 product user manual.
Visit support.carmanah.com to download the complete product user manual.
SPEEDCHECK-15 Radar Kit Overview
The SPEEDCHECK-15 replacement radar kit includes:
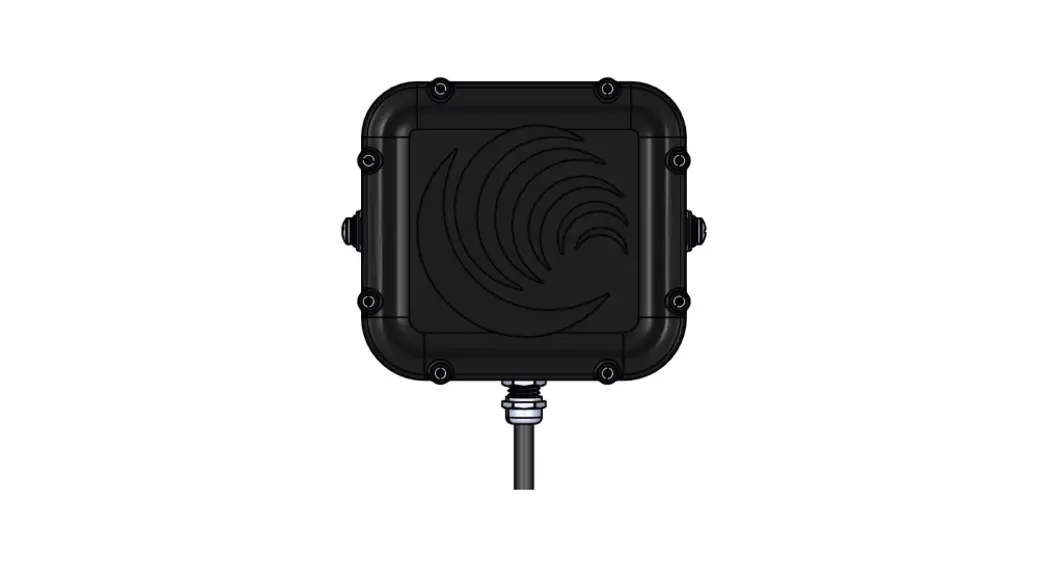
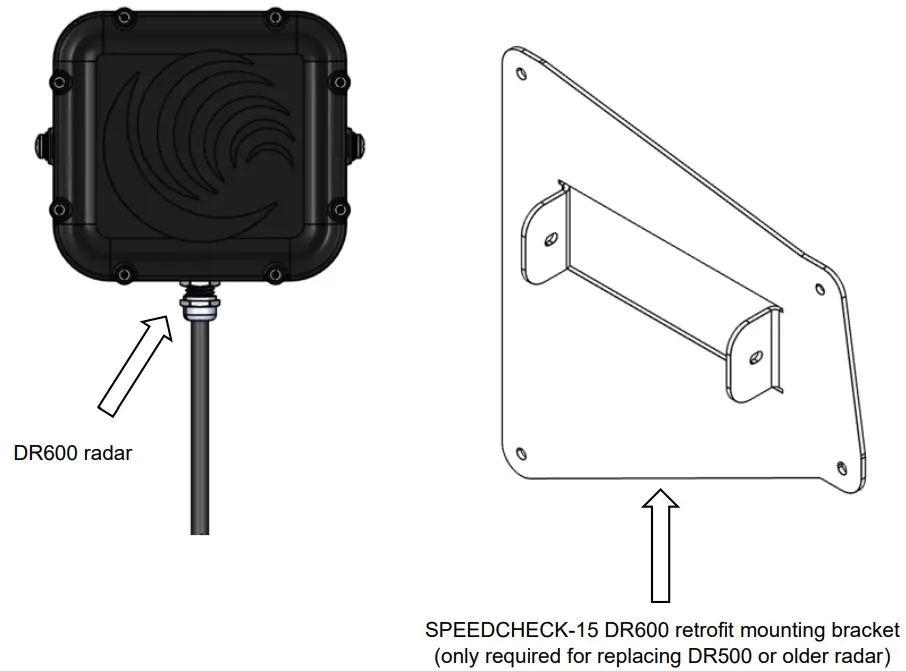
- Radar module, DR600 (1)
- Mounting bracket, DR600, SPEEDCHECK-15 (1)
- Nut, #8-32 (4)

Installation Procedure
This guide is for installing the DR600 radar into a SPEEDCHECK-15 system. Refer to the individual product user manual for more details at support.carmanah.com. The images in this guide may differ from your Speed Check radar speed sign. They are for illustrative purposes only.![]() ENSURE DEVICE IS COMPLETELY POWERED OFF SO THERE IS NO DANGER OF ELECTRICAL SHOCK OR RISK OF DAMAGING EQUIPMENT.
ENSURE DEVICE IS COMPLETELY POWERED OFF SO THERE IS NO DANGER OF ELECTRICAL SHOCK OR RISK OF DAMAGING EQUIPMENT.
- Disconnect power to the SPEEDCHECK-15 sign by turning off the breaker or removing the fuse(s) in the associated power cabinet.
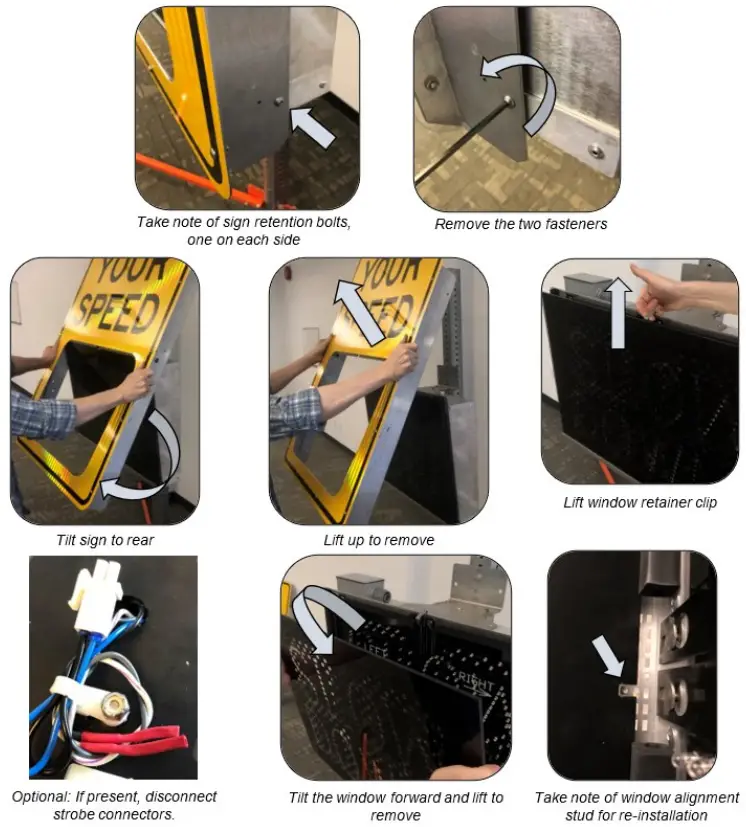
- Remove the two hex head screws, one on each side, holding the sign face to the radar enclosure.
- Tilt the sign to the rear and lift to remove.
- Lift window retainer clip and tilt window forward. Lift and remove window.

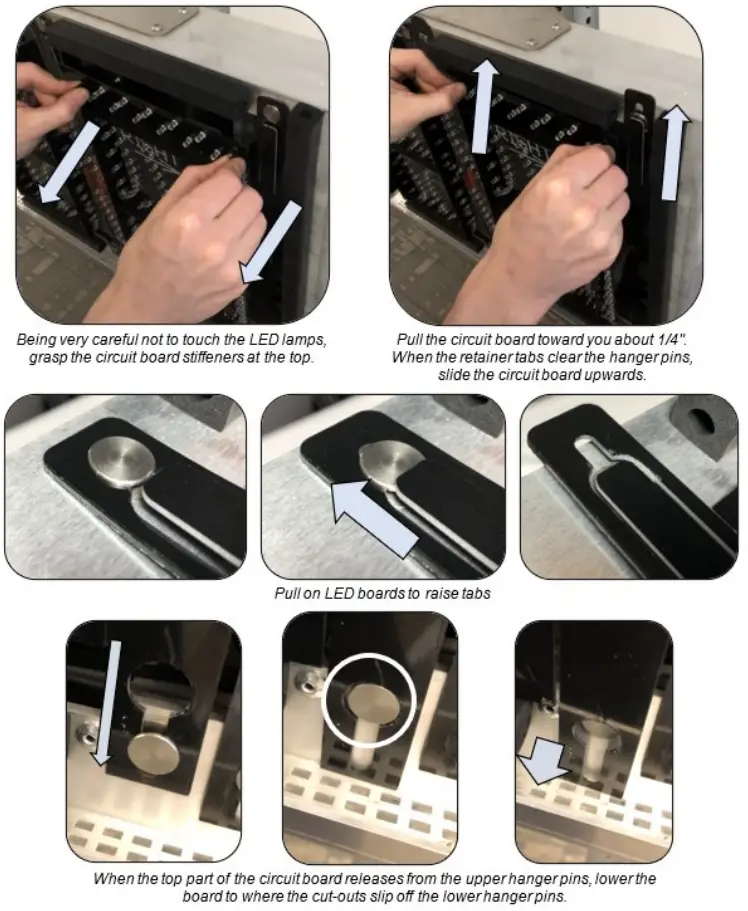
- Remove the right LED board by pulling it towards you about 1/4″. Pull up by grasping the LED board stiffeners only. When the retainer tabs clear the top hanger pins slide the LED board upwards and then pull down to clear the bottom hanger pins.

- Open the DIN rail fuse block(s), DC and AC if equipped, as a precaution to ensure no power will feed the controller during this procedure.

- Disconnect the LED wiring on the back and carefully set aside the right LED board. Perform the same steps for the left LED board. Do not bend the LEDs in this process.
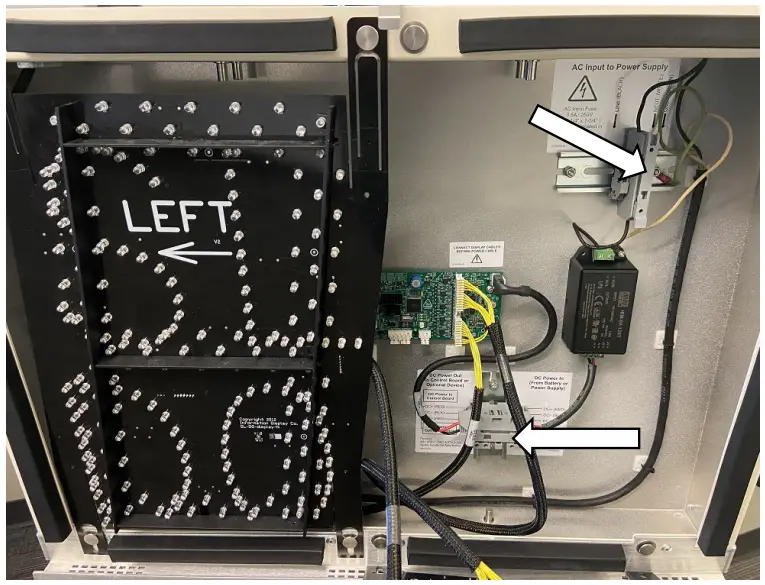
- Remove existing radar cable from the Speed Check control board. Your control board may look different than the one below.
 If this is a retrofit to replace a DR500 or older radar, proceed to step 9, otherwise continue to step 10 as a direct DR600 replacement.
 - Remove existing radar reflector, radar, and radar mount (DR500 or older). Proceed to step 11.
- Remove existing radar (DR600). Proceed to step 12.
- Mount the DR600 radar to the mount bracket tabs using supplied screws and washers (2x).
a. For retrofitting from an older radar model, Install retrofit bracket to radar enclosure with supplied nuts (4x). - Route radar cable as shown below and secure with cable ties. Older systems use cable clips for wire routing.
- Plug radar into control board. Ensure the notched side faces the connector ramp.

- Reinstall the LED display boards removed from step 7. Before securing the right LED to the radar sign close the DIN rail fuse block(s).
- Reinstall the fuse(s) or close the breaker in the power cabinet to apply power to the radar sign. Confirm the control board status LEDs turn on and the display LED boards turn on. It may take up to 60 seconds to confirm all LED segments are operational during the start-up procedure.
- Install the polycarbonate window back onto the radar enclosure and ensure it is secured with the window retention tab. The glossy side faces towards traffic.
- Wait for traffic to activate the system and ensure radar is working properly.
- Reinstall the sign face and secure to the enclosure using the two hex screws.
 If this is a retrofit to replace a DR500 or older radar, proceed to step 9, otherwise continue to step 10 as a direct DR600 replacement.
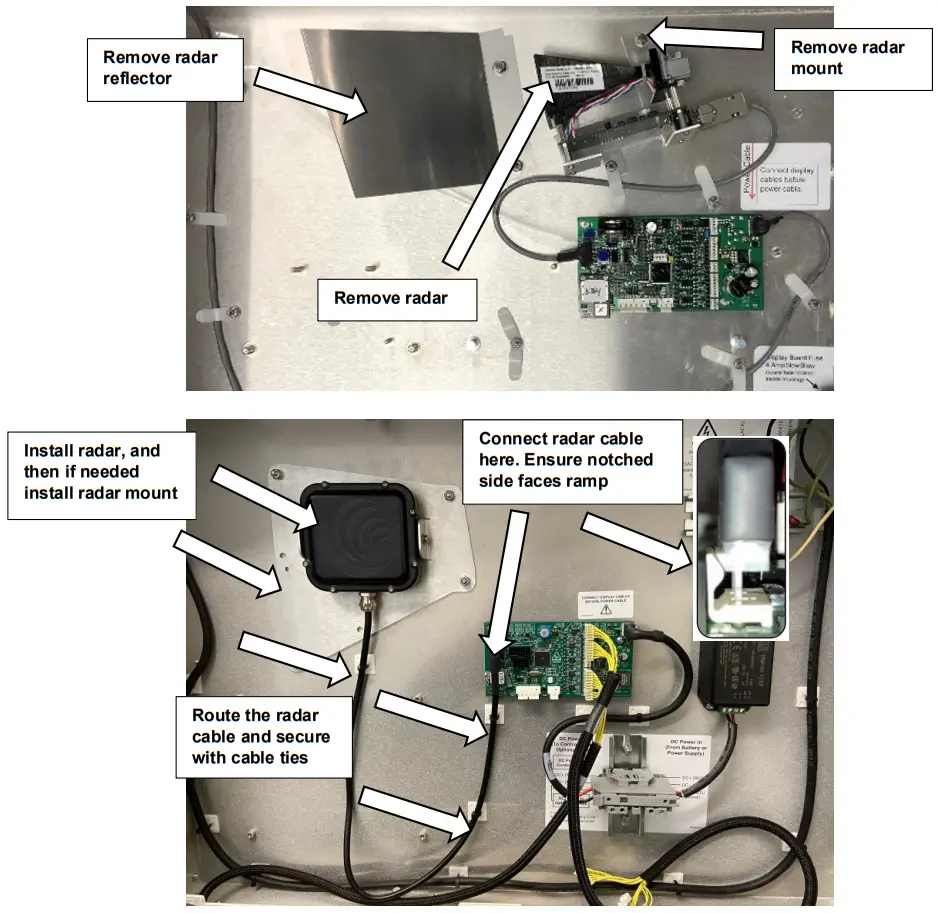
Appendix A – MPH/KPH Programming
The replacement radar will be factory programmed for the correct unit of speed based on your location. This value is field adjustable using Speed Check Manager, which can be downloaded at support.carmanah.com.
Updated Programmable Controller
The controller will read back the current setting programmed within the radar. User must select MPH or KPH under Radar Unit Settings for their application. This sets the programming within the radar itself and is not a controller setting.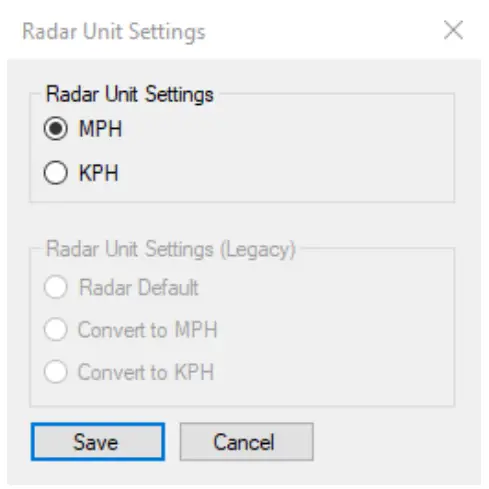
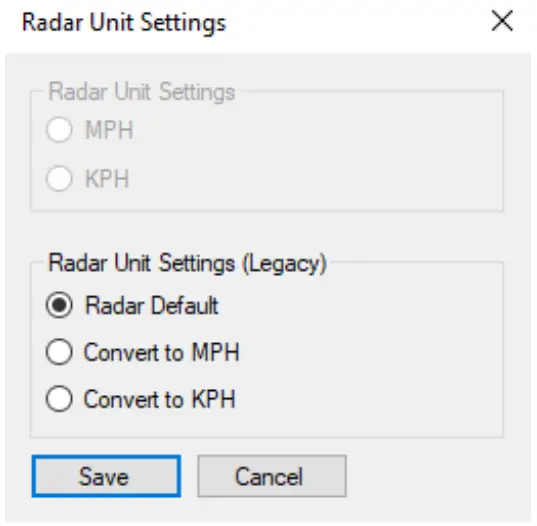
Legacy Programmable Controller
Defaults to Radar Default. This means the controller passes the data through (no conversion is done). This is a controller setting and does not program the radar itself.
- Convert to MPH – the controller will take the data from the radar and apply a conversion to mph.
- Convert to KPH – the controller will take the data from the radar and apply a conversion to kph.
This setting should be left in Radar Default unless the radar is programmed to the incorrect unit of speed for your application. For example, if you notice that speeds are being detected at a much higher number than expected it can be assumed the radar is programmed for a kph application. Simply multiply the expected speed by 1.6 to confirm. In this example you can select Convert to MPH to rectify the issue.
Do not adjust this setting unless you are certain the radar is incorrectly set to the wrong unit of speed.
![]()
© 2022 Carmanah Technologies Corporation
Technical Support:
Email: [email protected]
Toll Free: 1.877.722.8877 (US & Canada)
Worldwide: 1.250.380.0052
Fax: 1.250.380.0062
Web: carmanah.com
Carmanah Technologies Corp.
250 Bay St, Victoria, BC V9A 3K5, Canada
1.250.380.0052
[email protected]
carmanah.com


