![]() USER GUIDE
USER GUIDE
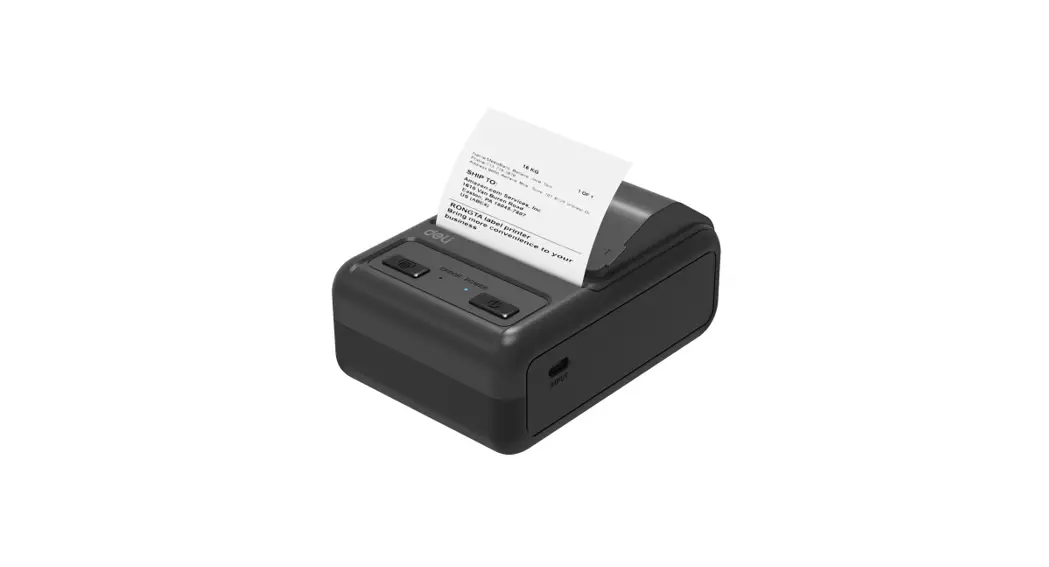
Portable thermal receipt printer
MODEL: 200P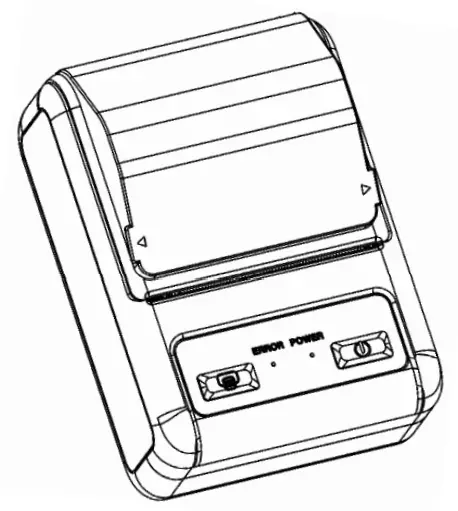
Please read the printer operating Instructions carefully before use
Parts description
Button indicator description
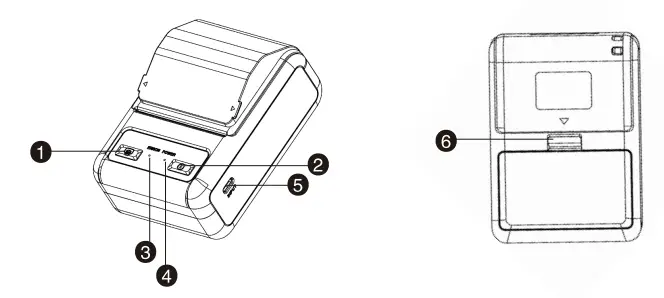
- Paper key
- Bluetooth light
- Power /USB
- Battery buckle
- Power button
- Charging lamp/out of paper lamp
| Green light on | Recharge | Always on when charging / off after full charge |
| Blue light on | Bluetooth | Not connected flashing/connected always on |
| Red light on | Out of paper | Blink when there is no paper/off when there is paper |
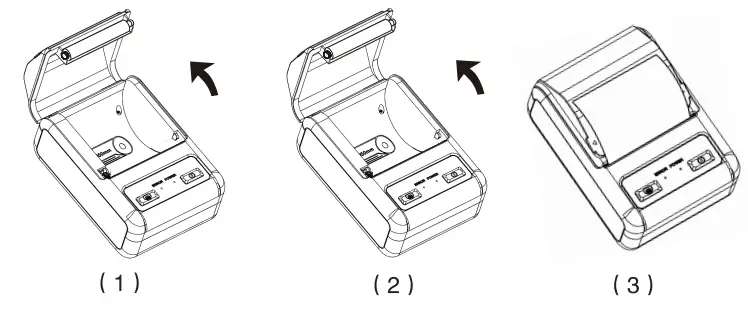
Install paper roll
The small ticket printer uses 58MM thermal paper rolls and adopts an easy-to-install mechanism.Loading paper is very convenient. The paper installation method is as follows:
- Open the flip in the direction of the arrow (as shown in Figure 1)
- Load paper in the direction of the arrow (as shown in Figure 2)
- Snap the flip cover of the paper bin (as shown in Figure 3)
Device parameters
| Printing method | Thermal | Print instructions | ESC |
| Print width | 48mm | Maximum paper width | 58mm |
| Print density | 203 dpi | Connection method | Android / IOS / PC |
| Printing speed | 60 mm/s | Character size | 12×24, 24×24 |
| Print interface | USB+Bluetooth | Paper loading method | Easy paper loading structure |
| Roll paper diameter | Lc 50mm | Targeting | Photoelectric sensor |
| Paper thickness | 0.05-0.15mm | USB interface | Type-C |
| Print head life | 30 km | lithium battery | 1800mAh |
| Adapter | DC 5V-1A | ||
| Barcode type | Code39, CODE 28,QR Code | ||
| Dimensions | 112 x 81x 56mm | ||
| Working environment | Temperature: 0-45t: Humidity 20-90% | ||
| Storage environment | Temperature: -10-60t: Humidity 10-90% ( Except for paper rolls ) | ||
Computer Installation
Software Installation
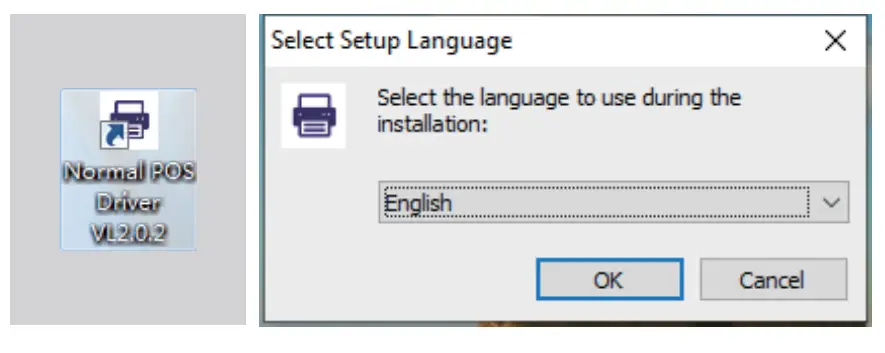
- Turn on the printer and connect the USB to the computer, and then open the small ticket driver Installation program

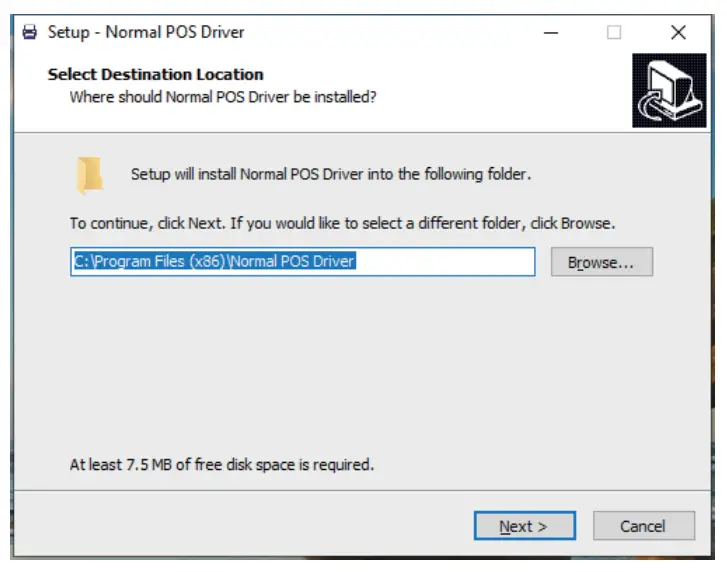
- Select the installation file path (this step is best to keep the default and not modify it, which is convenient for later maintenance)

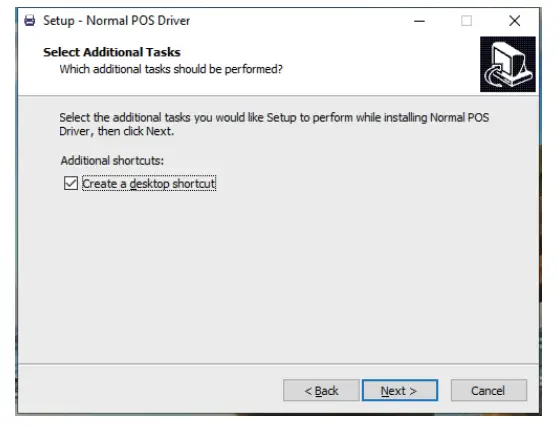
- Select additional tasks (it is recommended to check (create icons on the desktop) for this step to facilitate later maintenance)

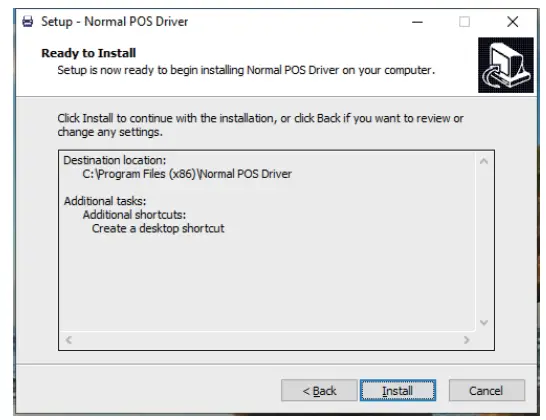
- Click Install

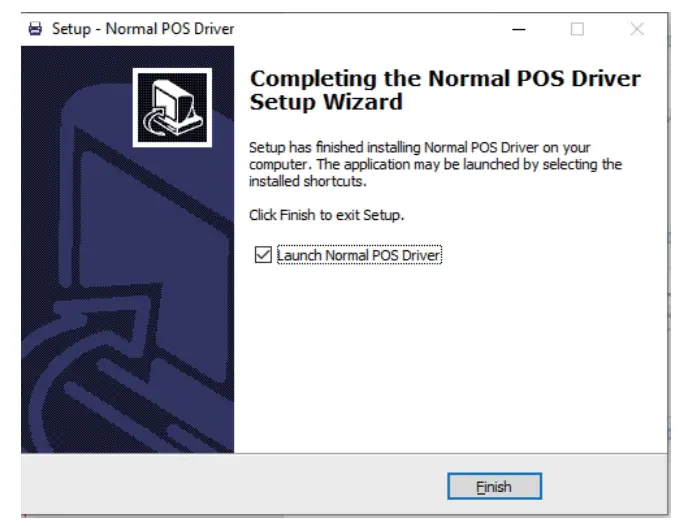
- Run Normal POS Driver after installation

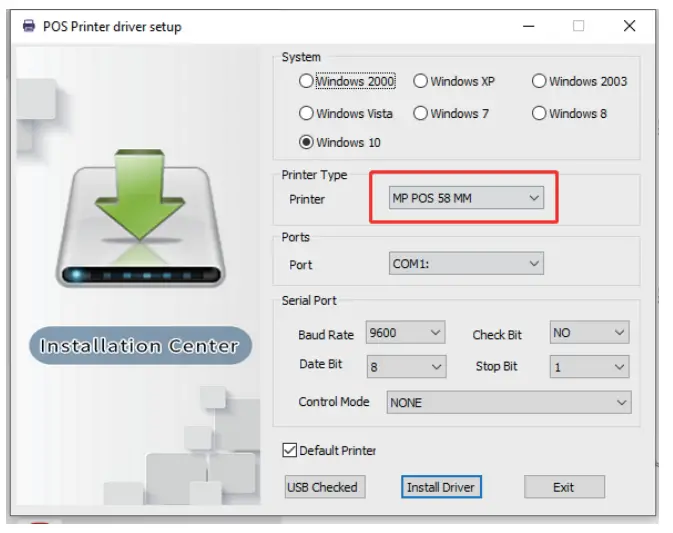
- Select the printer model according to the printing width of the small ticket machine (MP POS 58 MM/MP POS 80 MM)

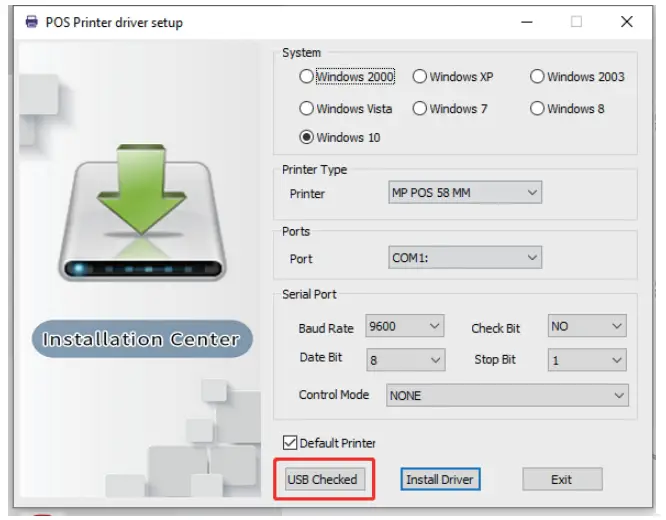
- After selecting the printer model, confirm that the printer is turned on and the USB is connected to the computer, click the “USB port detection” button

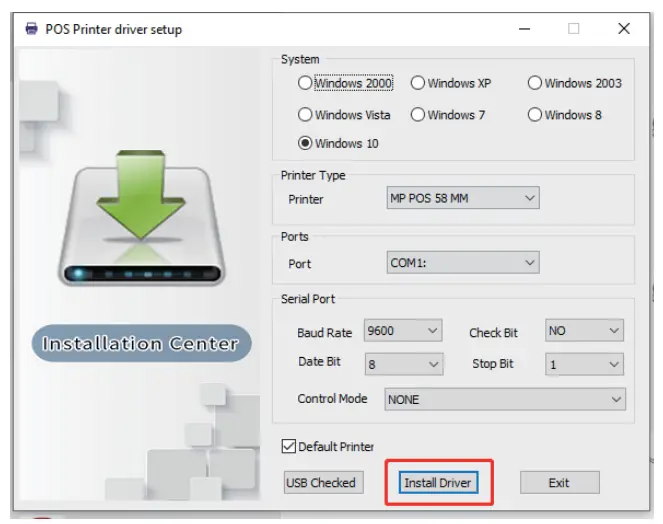
- After the program detects the USB port, click the “install driver” button

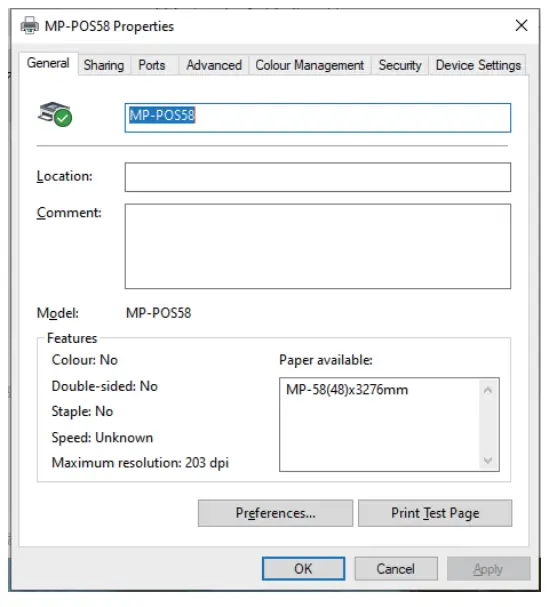
- After waiting for a period of time, the computer will automatically pop up the printer properties of the installed driver

- Click to print a test page, if the printer outputs paper, the printer has been installed
Troubleshooting
| Failure Phenomenon | Cause Of Issue | Solution |
| Printer intermittent | Unstable power supply | Please check whether the adapter has poor contact |
| The printer only feeds paper when printing,No data is printed | Reversed printing paper | Please install the paper in another direction |
| Printer printing is blurry | Printer does not clean for a long time Cause the movement to be contaminated | Need to clean the printer core |
| Bad printing supplies | Please set the print speed and print density Please use our standard printing consumables | |
| Printer second When the indicator light is red | Printer is out of paper | Close the paper compartment cover and install the printing paper correctly |
| Print a small ticket in a few months even Blurred handwriting in a few weeks | Poor quality of consumables | Please use high-quality consumables |
| Printer turns off automatically | Adapter does not supply power | Please check the adapter AC220V and DC12V Whether the power supply terminal is in good contact |
Daily maintenance of the printer
- Cleaning the outside of the printer and the paper compartment: please gently wipe the surface of the printer and the inside of the paper compartment with a wrung wet cloth.
- The cleaning of the printer core: the printer core must be cleaned regularly, especially when the print quality declines.
Common problem
Printer Cleaning
The print head should be cleaned when one of the following conditions occurs in the printer ©Printing is not clear. a column in the vertical direction of the printed page is not clear. ©Loud paper feeding noise.
The steps for cleaning the print head are as follows:
- Turn off the printer, open the top cover, if there is paper, remove the paper.
- If you have just finished printing, wait for the print head to cool down completely.
- Use a soft cotton cloth dipped in absolute ethanol (should be wrung out) to wipe off the dust on the surface of the print head thermal sheet.
- After waiting for the absolute ethanol to volatilize, close the cover and try the printer again.
![]() Attention:
Attention:
- Make sure that the power is turned off during routine maintenance of the printer.
- Do not touch the surface of the print head with your hands and metal objects, and do not use tools such as tweezers to scratch the surface of the print head, print rubber roller and sensor.
- Do not use organic solvents such as gasoline and acetone.
- Wait for the absolute ethanol to completely evaporate, then turn on the power to continue printing.
Software download
Special Disclaimer:
While information of this manual has been rigorously checked and reviewed, we still cannot rule out the possibility of spelling mistakes and technical negligence and/or errors. Such negligence and/or errors will be corrected in the updated version(s) without further notice. The intellectual property of this manual belongs to our company, and no organization or individual is allowed to change the content.
CERTIFICATE
Inspector————–
Dote of Manufacture ——————-
WARRANTY CARD
Thank you for your purchase of our products. The Interests of customers who purchase our products will be protected. For any malfunction due to product quality problems. please contact authorized local dealers or service centers with this receipt and the warranty card. Warranty terms: For product failures occur under normal operating circumstances, free of charge repair and spare parts replacement service shall be provided by our company within one year commencing from date of purchase. Customers are required to present this warranty card and the original purchase invoice to our company upon request for warranty service. This warranty card shall be valid only after the following form is filled out in details and affixed with official seal of the dealer. No free of charge repair service shall be provided in the event of any of the following circumstances:
- Expiration of the warranty period;
- Damages caused by improper use, maintenance or storage not In accordance with the requirements of the user manual;
- Failure ar damage resulting from unauthorized disassembly, repair or modification;
- Failure ar damage caused by force maJeure;
- Wear parts or accessories.
This warranty card is being delivered with the product, one card for one product Please keep this warranty card in proper condition for free warranty service. There is no replacement if lost.
Date of Purchase: —–Y ———–M—————–D
| Product Information | Product Name | Serial Number | ||||||
| Product Model Number | Manufacturing Date | |||||||
| Customer Information | Company Name | Contact | ||||||
| Address | Phone | |||||||
| Sales Information | Dealer Name | Contact | ||||||
| Address | Phone | |||||||
| Date of Purchase | Invoice No. | |||||||
| Maintenance Record | Description of Malfunction | Maintenance Results | Customer Signature | Maintenance Technician Signature | Maintenance Date | |||
This copy shall be cut along the dotted line and kept by the dealer.
| Product Information | Product Name | Serial Number | ||||||
| Product Model Number | Manufacturing Date | |||||||
| Customer Information | Company Name | Contact | ||||||
| Address | Phone | |||||||
| Sales Information | Dealer Name | Contact | ||||||
| Address | Phone | |||||||
| Date of Purchase | Invoice No. | |||||||
| Maintenance Record | Description of Malfunction | Maintenance Results | Customer Signature | Maintenance Technician Signature | Maintenance Date | |||
DELI GROUP CO., LTD.
301 Xuxiake Ave. Ninghai County
Ningbo 315600 China Made in China
[email protected]
www.deliworld.com
KEEP FOR FUTURE USE Version: 1.0 Date: 02-2022


