VOLCORA 500203 Thermal Receipt Printer
Before Use
Please read this user manual carefully before using this printer. Keep this manual handy for immediate reference whenever necessary.
Safety Precautions
- Only use the AC Adapter provided with the printer. Connection to an improper power supply may lead to equipment damage, electric shock or fire.
- Do not touch the thermal head during printing or immediately after printing.
- Touching the cutter blade may cause injury.
- Only use approved accessories and do not try to disassemble, repair or remodel the printer by yourself.
- Keep the product away from water or any other liquid.
- Operational Environment
- Operation temperature: 0~50℃; Relative humidity: 10~80%
- Storage temperature: -20~60℃; Relative humidity: 10~90%
Warning
This is a class A product. In a domestic environment, this product may cause radio interference, in which case the user may be required to take adequate measures.
What’s in the Box
- Thermal Receipt printer Roll Paper 1PC
- AC Adapter 1PC
- AC Cable 1PC
- USB Cable 1PC
- CD 1PC
CD contents
- Printer Driver
- User Manual
- Program Manual
- Setting Tool
Product Specification
| Print method | Direct thermal line |
| Print speed | 220mm/s |
| Interface | USB+Bluetooth® |
| Roll paper | Paper width:79.5±0.5mm Paper diameter: 83mm Paper thickness: 0.06 – 0.08mm |
| Print width | 72 mm |
| Dot Density | 8dot/mm, 576 dot/line |
|
Character size | ANK Character, Font A: 12×24dots Font B: 9×17dots Chinese: 24×24dots |
| Printer command | Compatible with ESC/POS |
| Barcode type | UPC-A/ UPC-E/ EAN13/ EAN8/ CODE39/ ITF25/ CODABAR/ CODE93/ CODE128/ QRCODE/ PDF417/ Data matrix |
| Cash drawer | DC 24V/1A |
| Power supply | DC 24V/2A |
| Power adaptor | Input: AC 110V/240V, 50-60Hz Output: DC 24V/2A |
| Weight | 1.00kg |
| Dimension | 179*152*118mm(W*L*H) |
| Working | Temperature: 5-50℃ Humidity: 10-80% |
| Storage | Temperature:-20-60℃ Humidity: 10-90% |
| Reliability print | 150km |
| Auto cutter | 1.5 million cuts |
Part Names and Functions
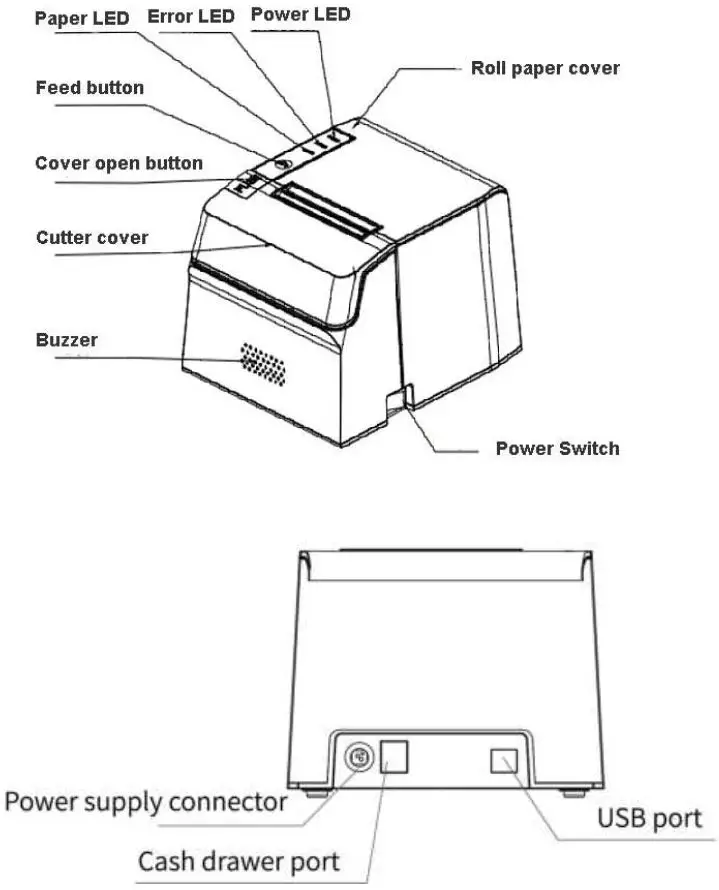
| Name | Functions |
| Power Switch | To turn on/off the printer |
| Cutter | To auto cut the roll paper |
| Cutter cover | When cutter is locked and can’t reset automatically, open this cover to adjust the cutter manually |
| Cover open button | To open the roll paper cover |
| Feed button | Press this button once to feed the roll paper for one line. Hold down this button to continue feeding the roll paper. Press this button and then turn on the printer to print the self-test. |
| Paper LED | On indicates the paper near end or out. Off indicates standby. |
| Error LED | On red indicates an error. |
| Roller paper cover | Open this cover to install/replace the roll paper. |
Setup
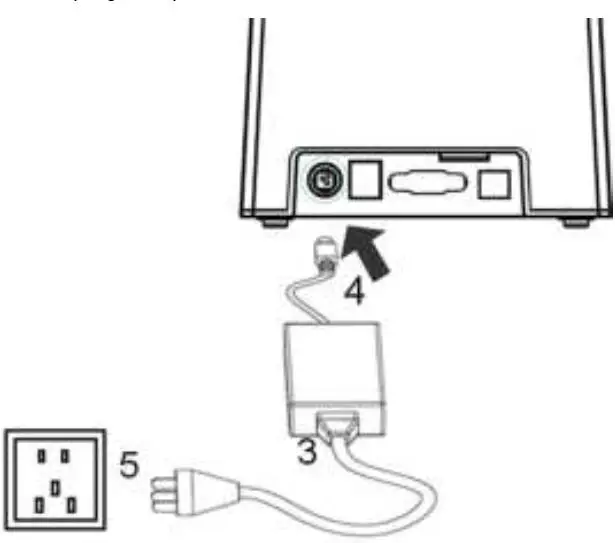
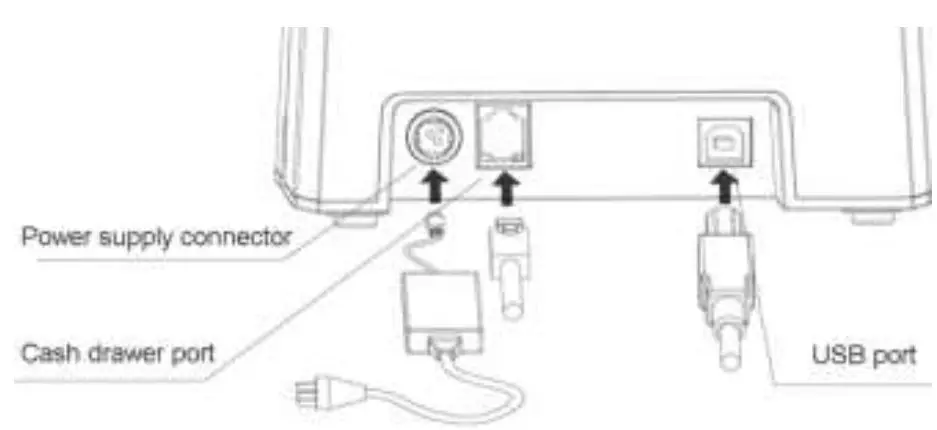
Connecting the AC Adapter
- Install the printer horizontally on a flat surface.
- Make sure the printer is turned off.
- Connect the AC cable to the AC adapter.
- Connect the DC cable of the AC adapter to the power supply connector.
- Connect the AC cable plug to a power outlet.
WARNING:
Only use the AC Adapter provided with the printer. Connection to an improper power supply may lead to equipment damage, electric shock or fire.
Connecting USB
Installing/Replacing the Roll Paper
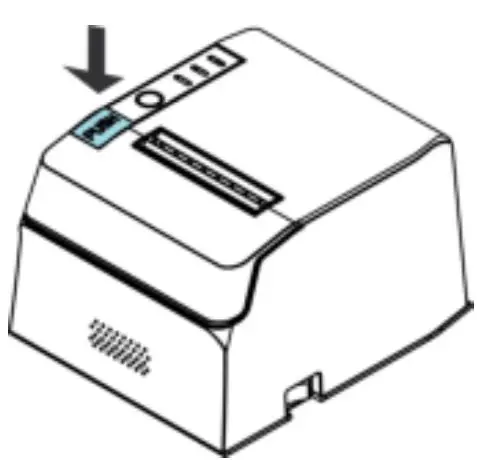
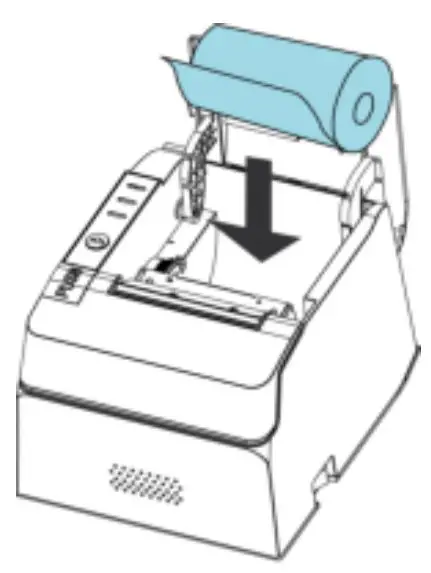
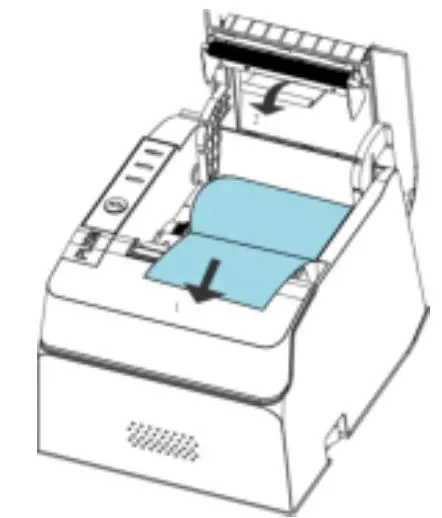
- Open the roll paper cover

- Remove the used roll paper core/self-test receipt if any.
- Install the roll paper in the correct direction.

- Pull out some paper and close the roll paper cover.

Driver Installation
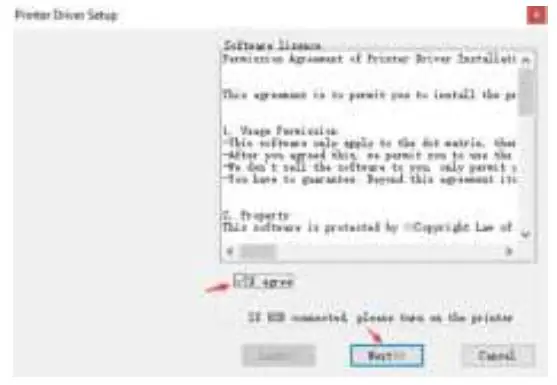
- Double click driver “VOLCORA_THERMAL_PRINTER.exe”
- Click “I agree” and then click “Next”
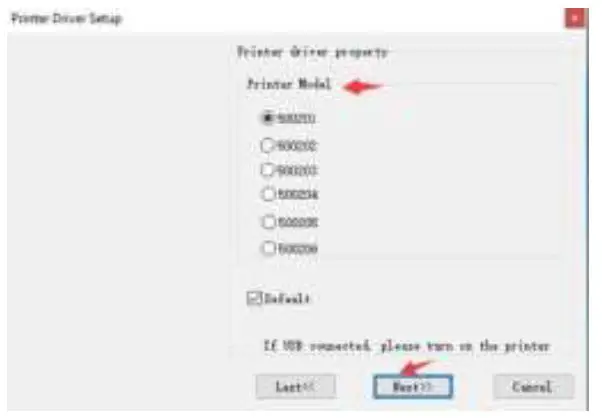
- Select the printer model number and then click “Next”. The model number can be found at the bottom of the machine.
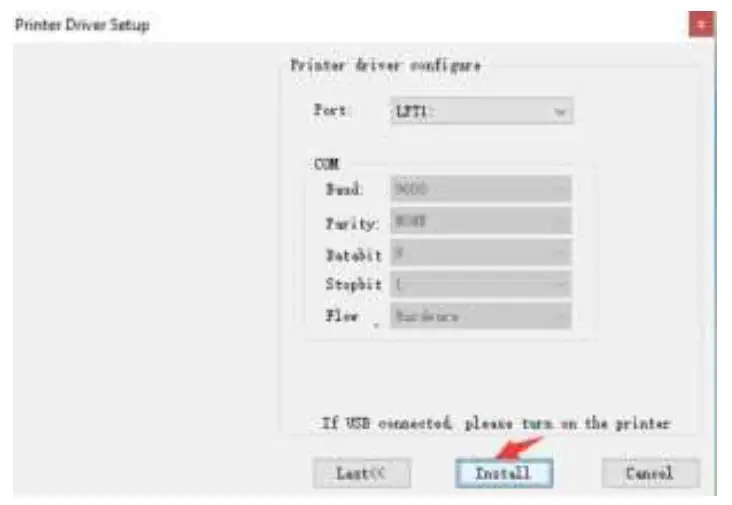
- Click “Install”
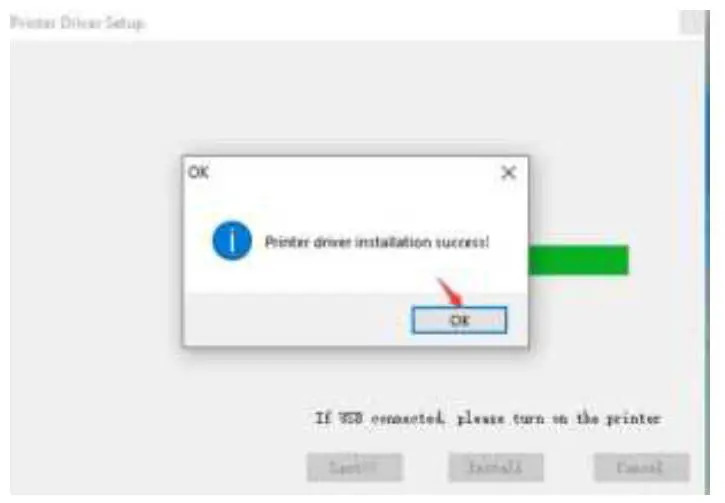
- When “Printer driver installation success!” pops up, click “OK“ to finish the installation.
Interfaces
USB Interface
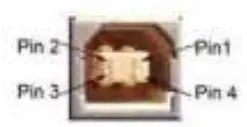
PIN descriptions of Mini-USB
| Pin | Function | Notes |
| 1 | V Bus | Power +5V |
| 2 | Data- | Data- |
| 3 | Data+ | Data- |
| 4 | GND | Ground |
Bluetooth® Interface
Any devices, either wire or wireless, with Bluetooth® interfaces can be paired with a VOLCORA Bluetooth® printer through Bluetooth®.
Bluetooth® Core Specification: Classical/BDR/EDR Proprietary double-mode
RF SOC
- Effective Range: 10m
- Default Bluetooth® Name: VOLCORA 500203(VOLCORA 500204)
- Default Password: 1234
Pairing Instructions:
- Power on printer
- Search for available devices on your device and select the printer under the list of devices
- Enter the default password “1234” to pair your device
Cash Drawer Interface
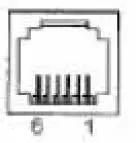
The cash drawer interface adopts RJ-11 6-pin socket.
Pin assignments
| Pin No. | Signal | Direction |
| 1 | Chassis Ground | —— |
| 2 | Cash drawer driver signal 1 | Out |
| 3 | Cash drawer on/off status signal | In |
| 4 | +24VDC | —— |
| 5 | Cash drawer driver signal 2 | Out |
| 6 | Signal ground | —— |
Power Connection

VOLCORA printer uses the external power supply adopter as 24V±10%,2A, the power socket is A-1009-3P model,
The pin assignment:
| Pin No. | Signal |
| 1 | +24VDC |
| 2 | Ground |
| 3 | NC |
Paper Out LED Status and Errors
- Non-recoverable error, the LED flickers several times, then persistent lighting. The times of flickering means the error type.
ERROR Type
ERROR Description
ERROR Indicator Flickering Type
Non-recoverable error
LED Flickers once: Internal memory reading and writing error
LED Flickers twice: over-voltage
LED Flickers three times: under- voltage LED Flickers four times: CPU execution error (wrong address)
LED Flickers five times: UIB error
LED Flickers six times: FLASH writing error
LED Flickers seven times: parameter writing error LED Flickers eight times: Temperature testing circuit error - Recoverable error, LED flickers constantly, then persistent off for one period.
ERROR Type
ERROR Description
ERROR Indicator Flickering Type
Recoverable error LED Flickers once: Cutter position error - Auto-recoverable error, LED flickers constantly, including printing head over-heat error and upper case cover opening error during printing.
Appendix A
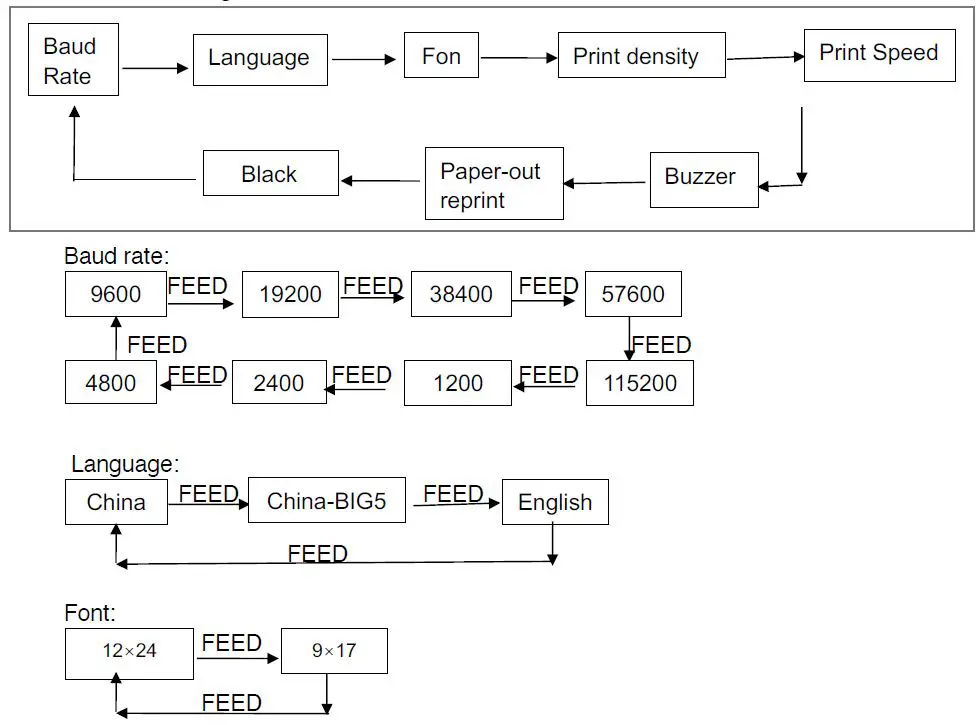
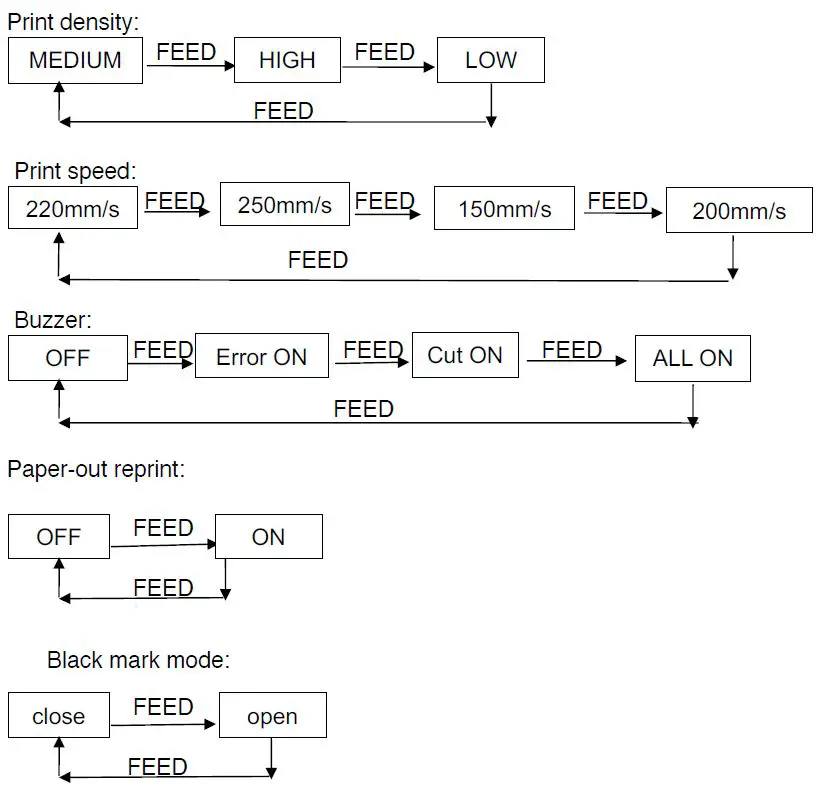
This appendix is the method to set the printer parameter according to button operation. Setting introduction: Press【Paper cover】button to choose a setting, then press it once, the set becomes the next one and it will print the present set value; use 【FEED】button to set the set value, then press it once, the set becomes the next one and it will print the present set value.
General Setting Flow:
FCC Caution
Any changes or modifications not expressly approved by the party responsible for compliance could void the user’s authority to operate the equipment. This device complies with part 15 of the FCC Rules. Operation is subject to the following two conditions: (1) This device may not cause harmful interference, and (2) this device must accept any interference received, including interference that may cause undesired operation.
IMPORTANT NOTE:
This equipment has been tested and found to comply with the limits for a Class A digital device, pursuant to part 15 of the FCC Rules. These limits are designed to provide reasonable protection
against harmful interference when the equipment is operated in a commercial environment. This equipment generates, uses, and can radiate radio frequency energy and, if not installed and used in accordance with the instruction manual, may cause harmful interference to radio communications. Operation of this equipment in a residential area is likely to cause harmful interference in which case the user will be required to correct the interference at his own expense.
FCC Radiation Exposure Statement:
This equipment complies with FCC radiation exposure limits set forth for an uncontrolled environment. This equipment should be installed and operated with a minimum distance of 20cm between the radiator& your body.
The contents of this document are subject to change without notice. For more information, visit www.volcora.com Contact support: [email protected] © 2022 Velcro. All rights reserved.


