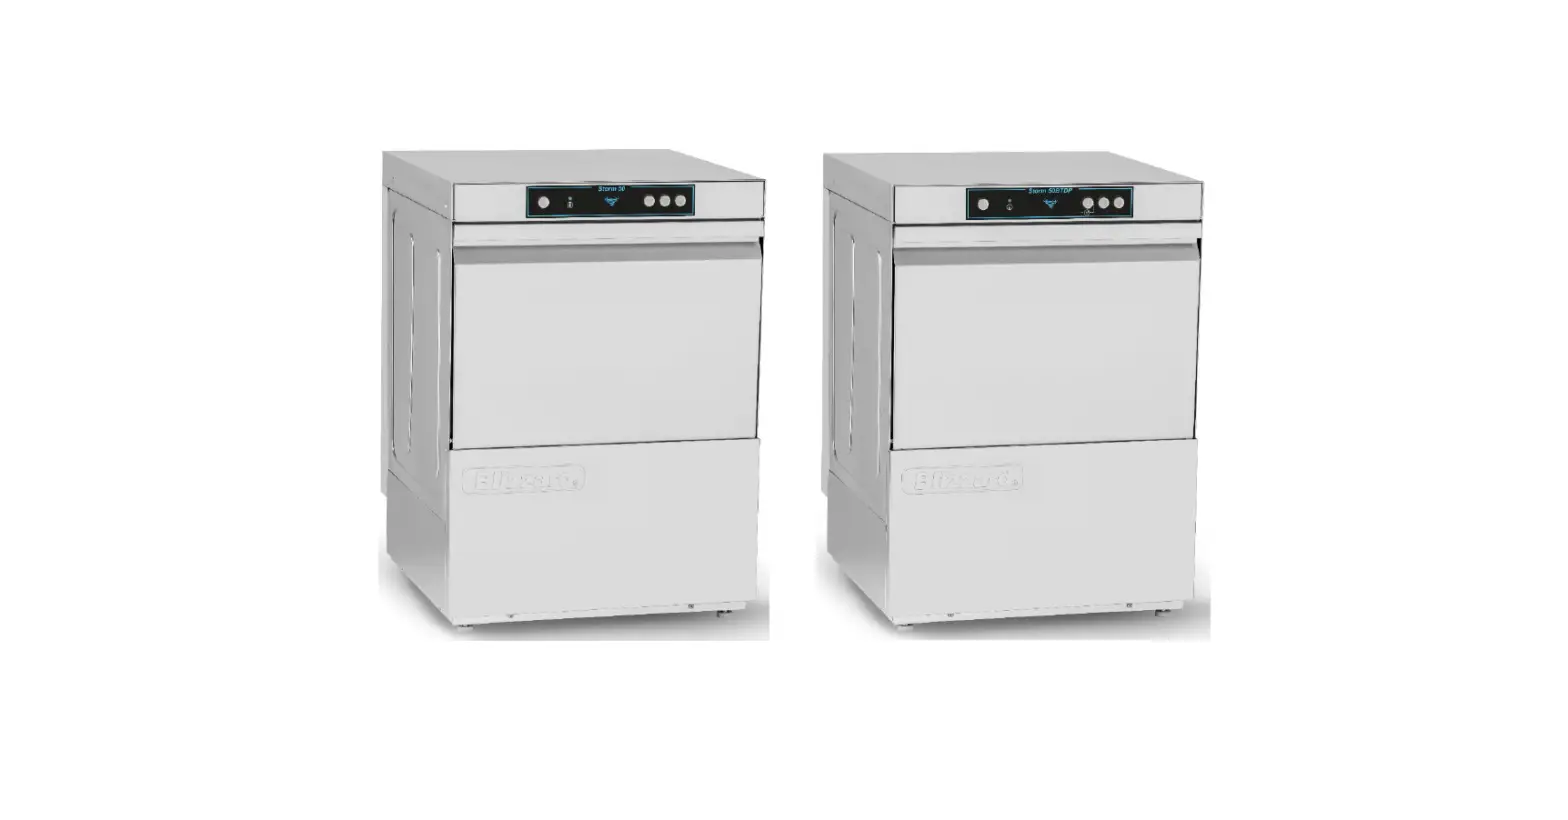
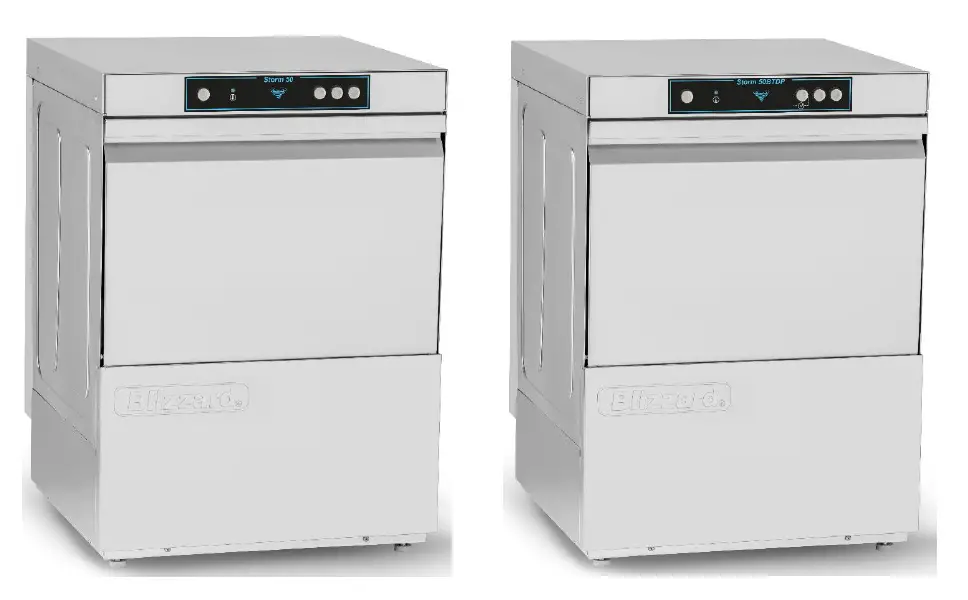
Blizzard STORM50 500mm 25 Pint Undercounter Glasswasher Gravity Drain
Dimensions (mm)
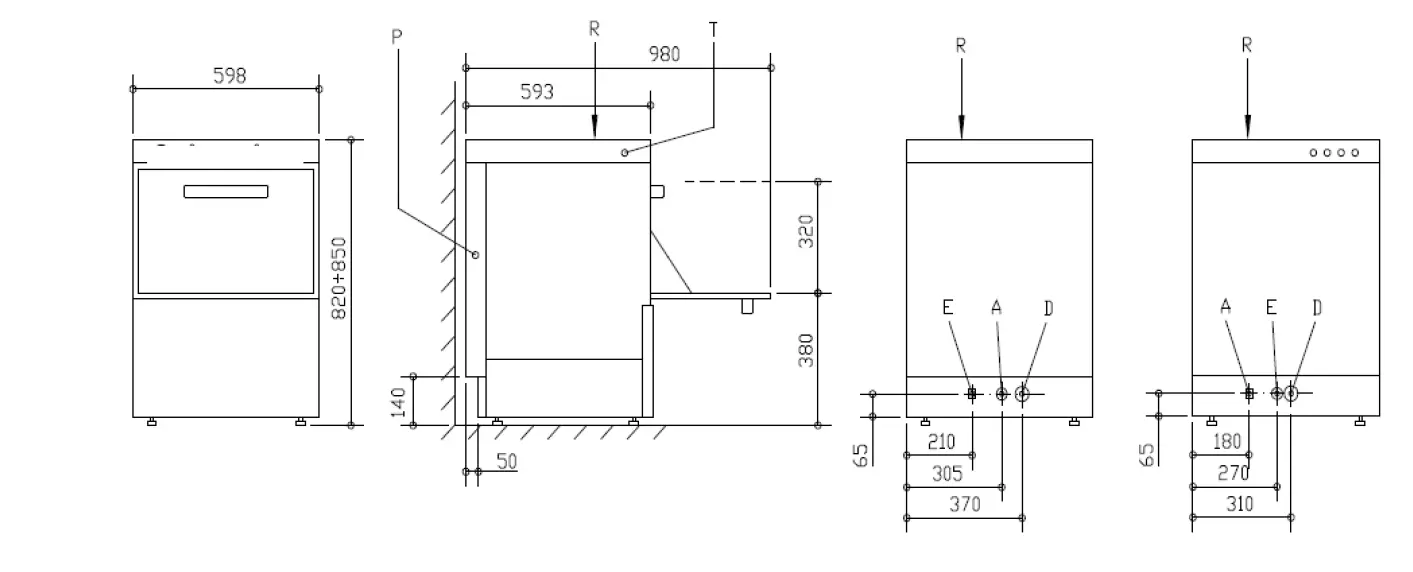 Drain Pump model only:
Control Panel
QUICK GUIDE
Filling and Heating:
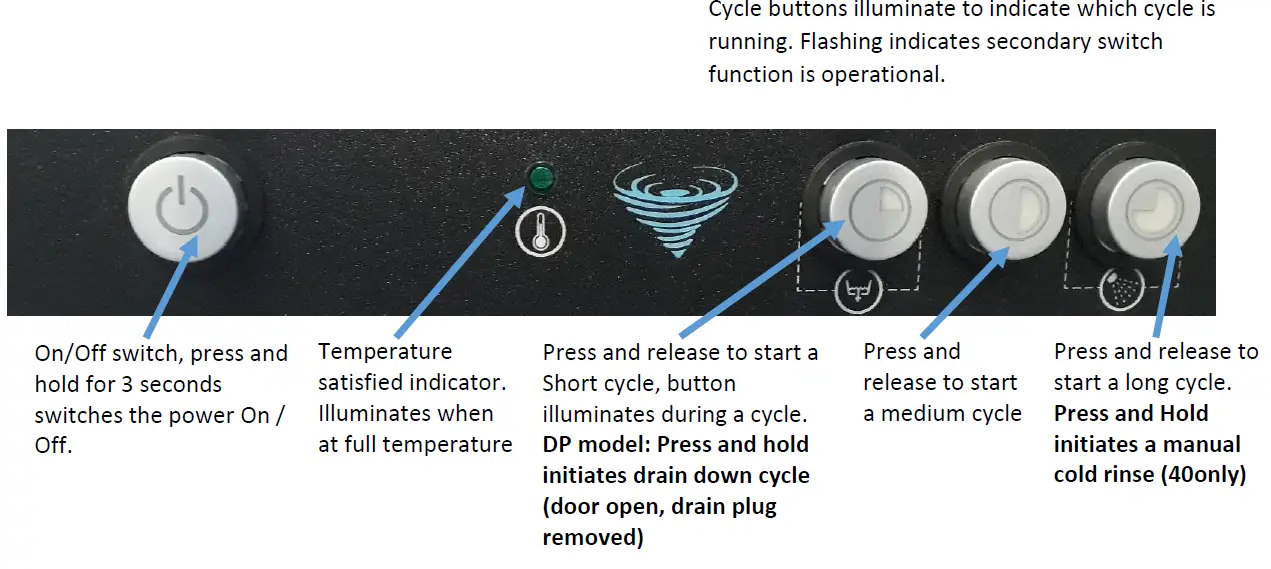
Ensure drain plug and filters are in position, close door and press the on/off button for 3 seconds. The machine fills up and stops when full and heats up, switch on ½ hr before first use, when temperature is fully satisfied the temperature satisfied light illuminates, unit is ready for use.
Wash:
Remove scraps from items before loading into the basket, open the door and insert basket, close door Press and release the cycle button relating to the length of wash required, the cycle button will illuminate when a cycle is in action. The cycle light goes out when the cycle is complete. Open the door when finished and leave tray to dry (2 mins) before handling
Drain:
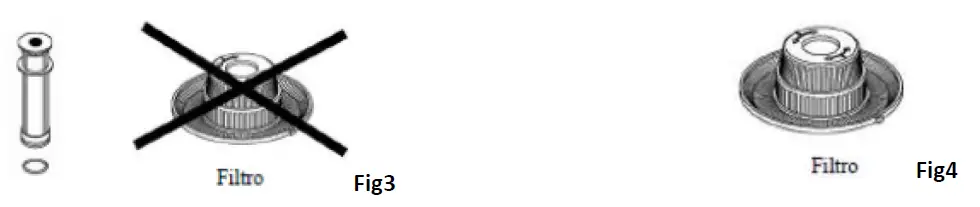
Gravity drain version: Switch off the unit, Open door, remove overflow drain plug, LEAVE FILTER IN POSITION. Fig 3 Pump drain version: Open door, remove overflow drain plug, LEAVE FILTER IN POSITION Fig 3, press and hold the short cycle button for 3 seconds, the drain pump will start and the button will flash, when empty switch off the unit.
Cleaning:
Daily: drain machine, only when fully drained, remove filter fig4 and clean thoroughly, check upper and lower wash arms spin freely by hand. Replace cleaned filter immediately and insert overflow drain plug. Clean and dry the machine with a soft cloth. Check detergent and Rinse-aid chemicals are topped up. Weekly: Check all wash jets and rinse jets for blockages, remove and clean as necessary. If wash arms are stiff, remove wash arms and clean arms and spigot thoroughly.
GENERAL INFORMATION AND WARNINGS
This manual has been created to help you understand the operation, installation and maintenance of the machine. It contains all the necessary information and warnings to ensure that the appliance is installed and used correctly, together with information about the characteristics and possibilities offered, so that you may enjoy your machine to the full.
- The positioning and installation, and all repairs or modifications, should always be carried out by an AUTHORISED TECHNICIAN, in accordance with the applicable legislation of the country. The manufacturer does not accept liability if the machine is incorrectly installed.
- The installation, incorrect adjustment, inappropriate maintenance or use of the appliance may cause material damages and injuries.
- The dishwasher should be correctly levelled and care taken to ensure that none of the electric cables, water or drainage hoses are trapped or kinked.
- DO NOT climb on top of the dishwasher or place heavy objects on top of the machine as it has only been designed to bear the weight of the basket of plates to be washed.
- The dishwasher is designed for washing plates, glasses and other kitchenware with traces of human food. Any other objects must not be washed in the machine.
- If your machine breaks down, please call the Technical Service Centre.
- Unqualified or unauthorised personnel must NOT try to repair the machine.
- Use of spare parts other than original parts will cancel the guarantee.
- During all maintenance operations, the dishwasher must be disconnected from the main supply at the mains power switch, and the water intake tap must be closed.
- Abrasive or corrosive products, acids, solvents and chlorine-based detergents must NOT be used to clean the appliance, as this may damage the components.
- This appliance has been designed for use in ambient temperatures between 5 ⁰C and 40 ⁰C. Only the baskets, soaps and rinse aids recommended by the manufacturer should be used.
- FAILURE TO COMPLY WITH THESE INSTRUCTIONS OR THE INCORRECT USE OF THE APPLIANCE SHALL RELIEVE THE MANUFACTURER OF ANY OBLIGATIONS REGARDING THE GUARANTEE OR POSSIBLE CLAIMS.
PRODUCT DETAILS
The machine which you have just purchased is specially designed for cleaning tableware, glassware and other items of kitchenware used in the hotel and catering sector. As it is an industrial product, it is characterised for having a high dishwashing capacity. All the appliances have a specifications plate which identifies the appliance and indicates its technical characteristics, it is located on one side of the machine. Don`t remove the specifications plate from the unit. SPECIFICATIONS PLATE
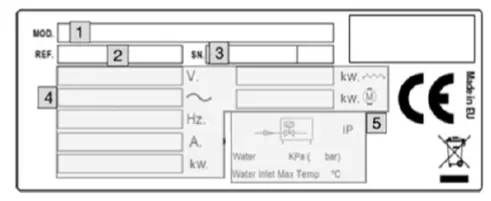
- APPLIANCE MODEL NAME
- APPLIANCE REFERENCE
- SERIAL NUMBER + MANUFACTURE DATE
- ELECTRICAL SPECIFICATIONS
- WATER INLET SPECIFICATIONS
These details should be quoted when the technical service is called.
General specifications
| Model | Voltage supply | Boiler | Reservoir | Water consumption per cycle (Ltr/Cyc) | Sound Level | ||||
| Cap (Ltr) | Temp (°C) | Power (W) | Cap (Ltr) | Temp (°C) | Power (W) | ||||
| Storm50 | 230V 50Hz |
5 |
85 | 2200 |
25 |
60 |
2000 |
2.7 |
65dBA |
| Storm50DP | |||||||||
| Storm50BT | 230V 50Hz | 5600 | |||||||
| Storm50BTDP | |||||||||
Specific Characteristics
| Model | Cold Rinse option | Wash Cycles | Detergent and Rinseaid valves fitted | Thermostop | Wash Capacity (Baskets/hr) | |
| No. | Length (S) | |||||
| Storm50 | NO | 3 | 90 / 120 / 180 |
YES |
YES | 40 |
| Storm50DP | ||||||
| Storm50BT | YES | 3 | 60 / 90 / 180 | 60 | ||
| Storm50BTDP | ||||||
INSTALLATION INSTRUCTIONS
The positioning and installation, and all repairs or modifications, should always be carried out by an AUTHORISED TECHNICIAN, in accordance with the applicable legislation of the country. The installation, incorrect adjustment, inappropriate maintenance or use of the appliance may cause material damages and injuries.
Removal of packaging
Remove packaging from the machine and check for damage during transportation. If any damage is observed, immediately notify the supplier and the transport company. In the event of doubt, do not use the machine until the problem has been assessed. Packaging (plastic, expanded polyurethane, staples, etc…) must not be left in the reach of children, they are a potential hazard. The machine should be moved using a fork-lift truck or similar to avoid damage to the structure. Transport the machine to the installation location and then remove packaging. All the packaging can be recycled. Dispose of packaging correctly.
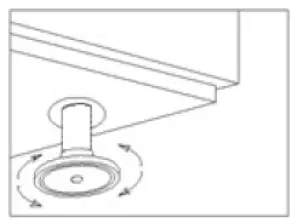
Positioning and levelling
This appliance has adjustable feet to allow it to be adjusted to the correct height, this is done by turning the foot to the desired height. For optimum operation, it is essential that the machine is correctly levelled. The flooring on which the machine is to be installed must be able to bear the full weight of the machine. Inspect final location of the machine prior to installation to prevent damage during use
Electrical connection
An AUTHORISED TECHNICIAN should always carry out the appliance’s electrical connection. The legal standards in force in each country regarding connection to the mains should be taken into account.
- Check that the mains voltage corresponds to that indicated on the nameplate.
- The electric cable should be flexible, with an oil-proof covering, and it should not weigh less than the cable in an ordinary sleeve made of standard polychloroprene or an equivalent synthetic elastomer (H07RN-F ).
- The cross-section of the power cable must be suitable for the rated current of the machine.
- An easily accessible switch device should be installed next to the appliance for all the phases, with a minimum gap of 3 mm between contacts. This switch should be used to disconnect the appliance during installation, repair, cleaning and maintenance work. The switch should have fuses suitable for use with the rated current (A) of the machine.
- Alternatively, a suitable magneto-thermal switch may be used.
Electrical specifications of the installation
| Model | Supply Voltage | Max Electrical power(KW) | Amp (A) | Net Weight (Kg) |
| Storm50&DP | 230V 1N 50/60Hz | 2800 | 12.2 | 54 |
| Storm50BT&DP | 230V 1N 50/60Hz | 6200 | 27 | 60 |
Voltage Configuration of the machine
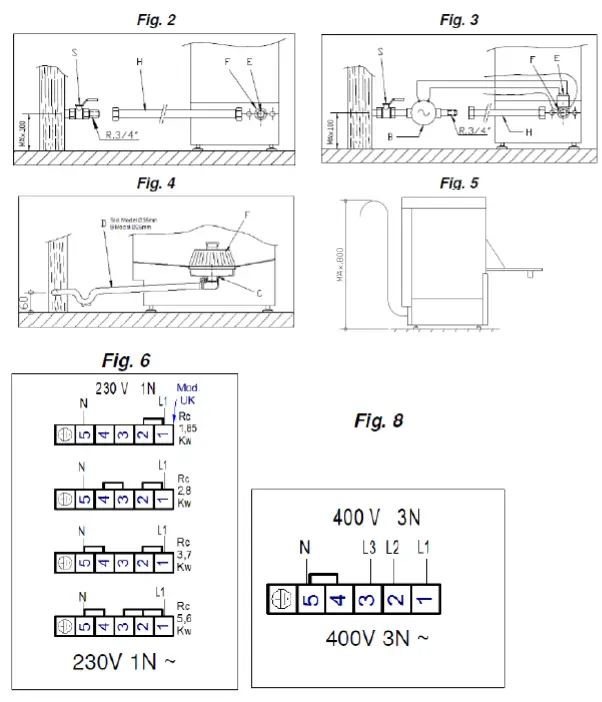
The voltage configuration of the machine is stipulated on the nameplate (230V 1N~50Hz/60Hz). This configuration can be changed to 400V 3N, see fig6 and fig8. Authorised personnel only to change this configuration.
Hydraulic connection
The new hoses supplied with the appliance should be used (do not reuse old hoses). Before connecting the machine to the water supply, the water quality should be tested. Recommended water quality:
| Water Temp (T): | Max. 60°C | Total water hardness: | 5-10°fH (French degrees) |
| pH: | 6.5 – 7.5 | 7 – 14 ⁰eH (English degrees) | |
| Impurities: | Ø < 0.08 mm | 9 – 18 ⁰dH (German degrees) | |
| Chlorides: | max. 150 mg/l | Conductivity: | 400 – 1,000 μS/cm |
| Cl: | 0.2 – 0.5 mg/l |
If the water hardness is more than 10 ⁰fH (French degrees), a water softener must be installed. In addition to water quality, the pressure of the mains water supply must be considered. This is important to ensure the machine operates correctly. Required water pressure:
| Dynamic Pressure | MIN. | MAX. | ||||||
| bar | kPa | Kg/cm2 | psi | bar | kPa | Kg/cm2 | psi | |
| 2 | 200 | 2.03 | 29 | 3.5 | 350 | 3.56 | 50.76 | |
If the water pressure is higher than the recommended pressure, a pressure regulator must be mounted at the output Fig. 2. If the mains water pressure is lower than the recommended pressure, a pressure pump should be mounted at the mains water supply Fig. 3. It is not necessary to install a pressure pump in the BT models.
- S → SHUT-OFF COCK F → FILTER H → WATER HOSE5
- E → ELECTROVALVE B → ELECTRIC PRESSURE PUMP
The following requirements are necessary for the correct hydraulic installation of the machine.
- The hydraulic circuit must be fitted with a valve to shut-off the water supply.
- Check that the mains pressure is within the range indicated above.
- To optimise the working of the machine, the manufacturer recommends that the water temperature at the machine intake is within +5°C and 60°C.
- If using hot water, the water temperature must not exceed 60 ⁰C / 140 ⁰F. All the machines should have a ¾” screw-on connection.
Drainage connection
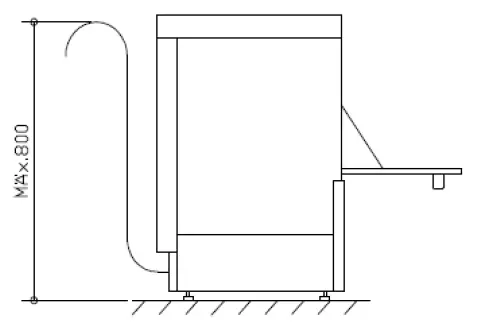
5 For Australia, watermark certified inlet hose and backflow prevention device. Must be installed in accordance with AS/NZS3500.1 (water service supply) including installation of the supplied backflow prevention device. The water draining from the machine must flow freely and therefore the drainage pipe should be lower than the drainage outlet Fig. 4. If the drainage pipe is not lower, a drainage pump will be required. This must not be mounted at a height of more than 800 mm Fig. 5. In this case, the pump may be requested at the time of purchase or subsequently. Drain pipes of 31mm in diameter must be installed in accordance with AS/ NZ3500.2 (drainage) by means of coupled connection to a DN50 or larger pipe
Mechanical / Electric (BTmodels) rinse aid dispenser
Operation: The mechanical dispenser absorbs the rinse aid when it detects a loss in pressure during rinsing. That is, when the filling solenoid valve closes, a vacuum is created that makes the rinse aid dispenser absorb the fluid to which it is connected. The electric pump on BT models rinse-aid into the break-tank. Adjustment: The dispenser should be adjusted when the machine is installed to ensure that the wash is optimised from the start. The setting should be adjusted according to the type of rinse aid and the water hardness.
Detergent dispenser
This ensures that the correct measure of detergent is supplied to the machine. Installation: the detergent dispenser input must be in the tub of the machine, below the maximum water level. Please see the electrical circuit diagram for details of the electrical connection The tub has an opening for the installation of the dispenser. Operation: the detergent dispenser is activated when the machine is taking water, whether it is in rinse cycle or whether it is filling. Settings: the measure of detergent used should be adjusted when the component is installed to ensure that the wash is optimised from the start.
Pressure pump
If the mains water pressure is less than 2 bar (200 kPa), you have the option of installing a pressure pump. If the pressure is less than 2 bar (200kPa), the machine may operate incorrectly. The electrical connections for the pressure pump are shown in the electric circuit diagram. The water connection to the pressure pump is shown in Fig. 3.
If the mains water pressure is less than 2 bar (200 kPa), please contact your supplier or the manufacturer to request the PRESSURE PUMP KIT.
USE AND MAINTENANCE INSTRUCTIONS
BEFORE STARTING THE APPLIANCE, PLEASE READ THE INSTRUCTIONS CONTAINED IN THIS MANUAL CAREFULLY. THE APPLIANCE IS EXCLUSIVELY FOR PROFESSIONAL USE, AND SHOULD ONLY BE USED BY QUALIFIED PERSONNEL.
Operation
The steps required to optimise the operation of your dishwasher are shown below, with all the available options.
- Machine on/off button. (ON/OFF) / Machine on pilot light
- Machine ready pilot temperature satisfied
- Short cycle button (90 s)/ Drainage button / Machine working pilot
- Medium cycle button (120 s) / Machine working pilot
- Long cycle button (180 s) / Cold rinse button / Machine working pilot
Switching on the machine
Before switching on the machine, check the following:
- The mains switch must be on.
- The water stop cock must be open.
- There must be water in the mains network.
- The corresponding filters must be in place.
- The overflow should be mounted in place.
- The chemical tubes are inserted fully into liquid in the correct chemical bottles
Filling and heating
When the machine is switched on, it will start to fill. First the rinse boiler is filled and then the wash tub. The filling process may last a few minutes. Once the wash tub is full, the boiler starts to heat up and when it is hot, the tub is heated. Although it is possible to start the wash process, this is not recommended as the water inside the machine is not yet at the ideal temperature. When the machine has reached the ideal temperature for washing the dishes properly, the machine ready light comes on. The temperature in the boiler should be between 82-90 ºC and in the tank between 57-62 ºC The manufacturer recommends that the water in the glass washer is changed every 40/50 washes or twice a day.
FAULTS, ALARMS AND BREAKDOWNS
The steps to be followed in the event of a fault or operating error are described below. The possible causes and possible solutions are listed in the following table. In the event of doubt, or if you are unable to resolve the problem, please contact the technical service.
NOTE: If a fault occurs and is not listed in the below table, please call the technical service. The manufacturer reserves the right to modify the technical characteristics with prior warning.
| FAULT | POSSIBLE CAUSE | SOLUTION |
| The machine does not come on. | There is no power supply. | Check MCB/switches and isolators are switched on |
| The fuses have blown | Call technician to analyse reason for failure | |
| On/off switch problem | Press and hold for 3 seconds the on/off switch | |
|
The machine does not fill with water. | Water entrance valve closed. | Open the water valve. |
| Rinse nozzles blocked. | Clean nozzles and check branches for build-up of lime. | |
| Solenoid valve filter blocked. | Call the technical service to clean the filter. | |
| Rinse pump faulty | Call the technical service to replace the Rinse pump. | |
| Pressostat is broken. | Call the technical service to replace the pressure switch. | |
| Door is not closed properly | Close the door properly | |
|
Unsatisfactory wash. | Wash distributors obstructed. | Clean distributors thoroughly. |
| Shortage of detergent. | Call the technical service to reset the dispenser. | |
| Dirty filters. | Clean the filters thoroughly | |
| Presence of foam | Unsuitable detergent. Too much detergent, reduce | |
| Too much rinse aid. Reduce rinse-aid intake. | ||
| Wash temperature < 50⁰C | Thermostat incorrectly set / faulty call technician | |
| Dishes heavily soiled | Select a longer cycle. | |
| Water too dirty | Drain the wash tub and fill with clean water. | |
|
Dishes and kitchenware are not dry. | There is no rinse aid | Fill the rinse aid container |
| Rinse aid low | Adjust rinse aid intake | |
| Dishes left inside dishwasher for too long. | When the dishwasher finishes, remove the basket from the machine and allow to dry naturally | |
| Rinse temperature < 80 ⁰C | Thermostat incorrectly set / faulty call technician | |
|
Scratches or stains on dishes | Too much rinse aid | Call technical service to adjust rinse aid dispenser |
| Water too chalky | Install / regenerate water softener | |
| Not rinsing properly | Check rinse pressure and all jets are clear | |
| Detergent setting incorrect | Check detergent quality and adjust to suit | |
| Machine stops during operation | Electrical sockets overloaded | Contact electrician to check power supply |
| Machine protection tripped | Reset safety device and if it trips again, call technician | |
| Machine stops and fills with water when it is washing. | Overflow incorrectly mounted | Mount overflow correctly |
| Pressure switch pipe blocked | Empty the tub and clean thoroughly. | |
| Pressure switch is faulty | Call the technical service to replace it | |
| Machine does not start a wash cycle | Door is not closed properly | Close door properly, if reopens adjust tensioners |
| Door micro switch faulty | Call technical service to replace switch | |
| Machine does not drain completely | Machine not levelled correctly | Level the machine correctly |
| Drain blocked or restricted | Check drain pipe is not blocked and is correct |
Errors shown in display
| Error code | Indication | Reason |
| E1 | ON/OFF LED lights up for 0.5 s and turns off for 2 seconds, repeatedly. | Door or hood is open |
| E2 | ON/OFF LED lights up twice for 0.5 s each time and turns off for 2 seconds, repeatedly | Incorrect water level. Stipulated fill time exceeded. |
| E3 | ON/OFF LED lights up three times for 0.5 s each time and turns off for 2 seconds, repeatedly. | Incorrect drainage of the machine Stipulated drainage time exceeded. |
| E4 | ON/OFF LED lights up four times for 0.5 s each time and turns off for 2 seconds, repeatedly. | Incorrect boiler temperature. Stipulated boiler heating time exceeded. |
| E5 | ON/OFF LED lights up five times for 0.5 s each time and turns off for 2 seconds, repeatedly. | Incorrect tank temperature. Stipulated tank heating time exceeded |
Disposal
EU regulations require products to be disposed of by specialist companies who remove or recycle products, including electronic, metal and plastic components Consult your local waste collection authority regarding disposal of your appliance. Local authorities are not obliged to dispose of commercial equipment but may be able to offer advice on how to dispose of the equipment locally. All packaging materials should be disposed of in an environmentally friendly way. The cardboard may be used as scrap paper. The protective foil and the foam cushions are CFC-free. Do not allow children to play with the packaging and destroy plastic bags safely.
Environmental protection
Discarded electric appliances are recyclable and should not be discarded in the domestic waste! Please actively support us in conserving resources and protecting the environment by returning this appliance to the collection centres (if available).
Compliance
Parts have undergone strict product testing in order to comply with regulatory standards and specification set by international, independent, and federal authorities. Products have been approved to carry the following symbol:
Pentland Wholesale Ltd. Unit17 Walker Park Industrial Estate Walker Rd., Blackburn, BB1 2QE. TEL: 01254614444 www.pentlandwholesale.co.uk


