![]() AquaPUMP™
AquaPUMP™
3-speed Circulation Pumps
INSTALLATION INSTRUCTIONS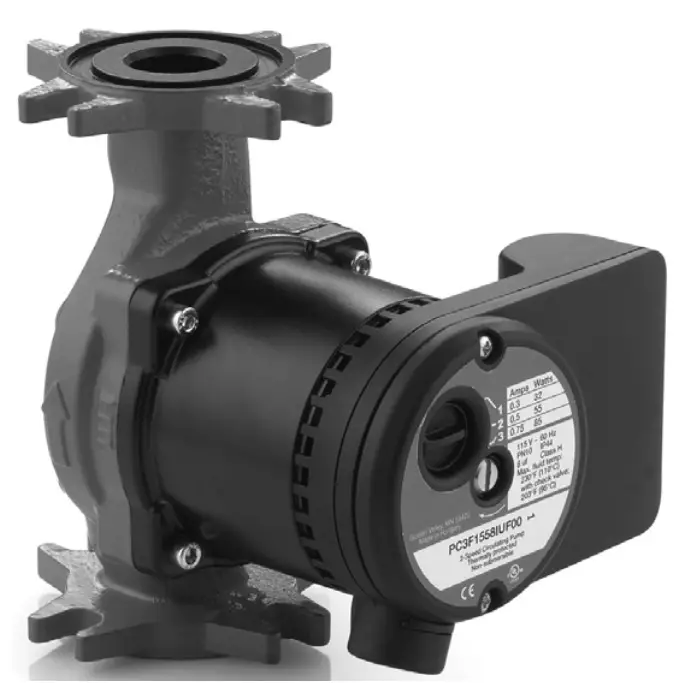
AquaPUMP 3-speed Circulation Pumps
APPLICATION
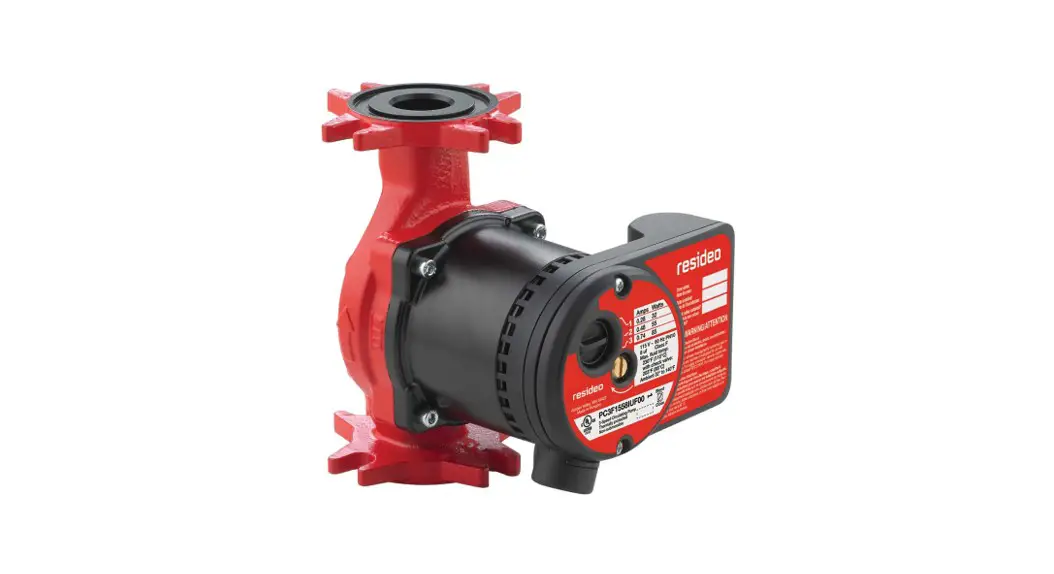
The PC3F in-line, wet rotor circulator with universal flange is designed for applications in closed-loop hydronic heating and cooling systems, as well as in solar-powered systems. The pump is non-submersible and for use in dry, frost-free, well-ventilated installations.
SPECIFICATIONS
Construction:
Casting: Cast Iron
Bearings and Shaft: Ceramic
Electrical:
115VAC +/-10% 60hz
Internal thermal overload protection
Amperage: See Table on page 2.
Max. Pressure: 145 psi (at room temperature);
50 psi at 200°F (93°C)
Min. Inlet Pressure:
167°F (75°C): 0.73 psi
194°F (90°C): 4.1 psi
Temperature Range:
Ambient: 32°F to 104°F (0° to 40°C)
Storage: -40°F to 100°F (-40° to 38°C)
Water: 14°F to 230°F (-10° to 110°C)
[to 200°F (95°C) with optional check valve installed]
Media:
Clean water or water with up to 20% glycol.
Up to 50% glycol may be used, but flow characteristics will differ from these specifications as the fluid may be more viscous.
Sound: Less than 43 dB(A) at 3.3 feet (1 meter)
Standards:
Insulation Class F
Temperature Class TF 95
Approvals: UL/cUL 778, File number 4MX8
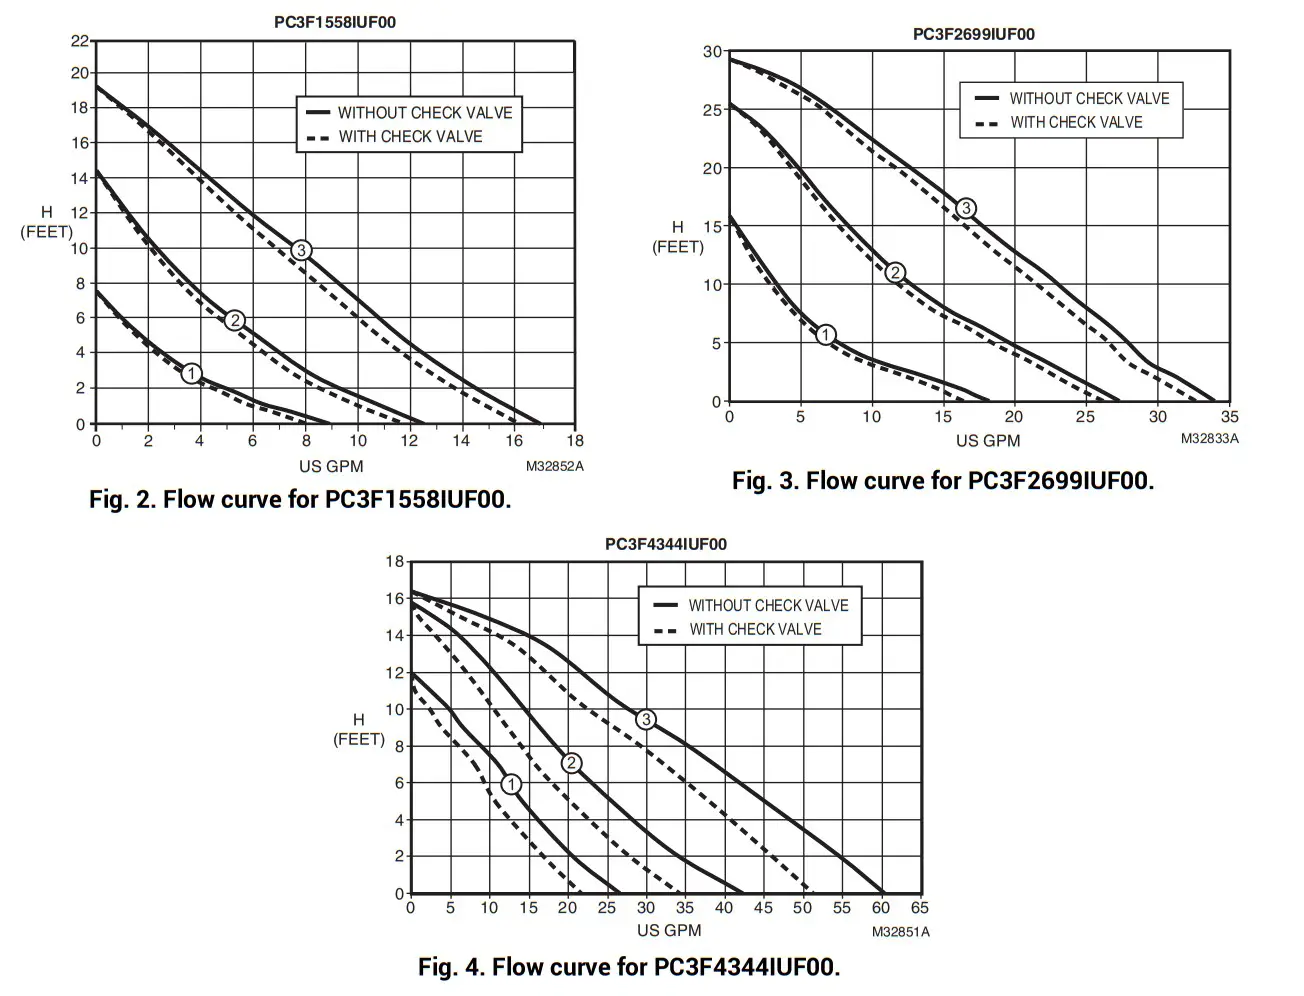
Flow Curves: See Figs. 2, 3 and 4 on page 2.
Flange Connection:
Universal flange. See Fig. 1.
Bolt holes: 1/2 in. (12.7 mm)
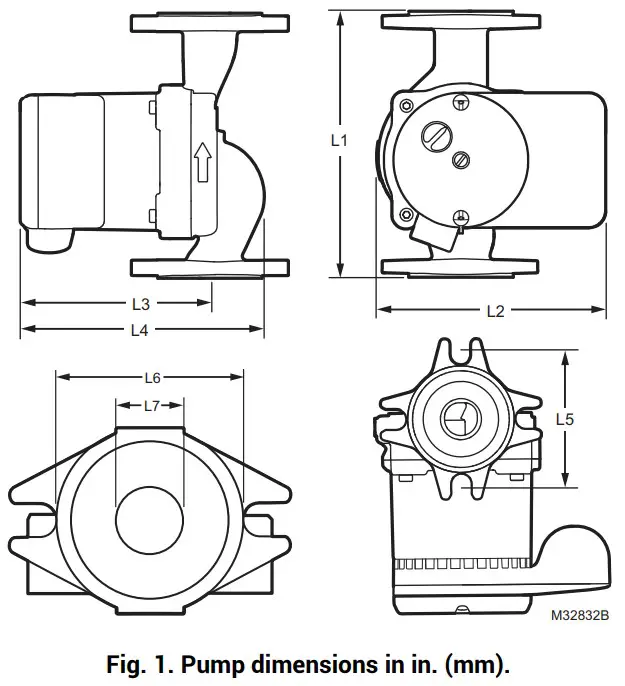
| Pump Model | L1 | L2 | L3 | L4 | L5 | L6 | L7 |
| PC3F1558IUF00 | 6.5 165.5) | 5.5 (140) | 4.7 (118) | 6.6 (167) | 3.2a (80.2) | 2.6 (67) | .953 (24) |
| PC3F2699IUF00 | 6.5 (165.5) | 6.1 (155) | 6.5 (165) | 7.8 (197) | 3.2a (80.2) | 2.6 (67) | .953 (24) |
| PC3F4344IUF00 | 8.5 (216) | 6.1 (155) | 6.9 (174) | 8.9 (227) | 3.4b (87.3) | 2.6 (67) | .953 (24) |
a 3-5/32 in.
b 3-7/16 in.
DESCRIPTION
Table 1. Pump data by model.
| Pump Model | Max. Flow | Max. Pressure Head | ||
| GPM | LPM | Feet | Meters | |
| P03F15581UF00 | 15 | 55.6 | 19.4 | 6 |
| PC3F2699IUF00 | 34 | 92.7 | 31 | 9 |
| PC3F4344IUF00 | 59 | 170 | 17 | 5.2 |
Table 2. Optional and Replacement Parts.
| Pump Model | Check Valve | Gasket |
| PC3F1558IUF00 | PCV100 | PCG100 |
| PC3F2699IUF00 | PCV125 | PCG100 |
| PC3F4344IUF00 | PCV150 | PCG150 |
Table 3. Electrical data.
| Pump Model | Speed 1 | Speed 2 | Speed 3 | |||
| Power | Current | Power | Current | Power | Current | |
| PC3F1558IUF00 | 32W | 0.28A | 55W | 0.48A | 85W | 0.74A |
| PC3F2699IUF00 | 125W | 1.09A | 175W | 1.52A | 205W | 1.78A |
| PC3F43441UF00 | 145W | 1.26A | 185W | 1.61A | 210W | 1.83A |
FLOW CURVES
INSTALLATION
CAUTION
Voltage Hazard.
Can cause electrical shock or equipment damage.
Disconnect power before beginning installation.
- Read and understand the operating instructions before working on the pump.
- Only operate the pump if it is in perfect operating condition.
Only use it as intended; staying aware of safety and risks, and adhering to the instructions in this manual. - Install the pump in a frost-free, dry, well ventilated area.
1. Pump location considerations
- Locate the pump where there is sufficient room for installation and service. It is a good practice to install flanges and service valves (not included) on each side of the pump to allow service without draining the system. It is also good practice to install the circulator inlet as close to the expansion tank outlet as is practical.
- Do not place the pump at the lowest point in the piping system as this is where dirt and sediment collect. Do not place the pump at the highest point in the piping system, either, as this is where air accumulates.
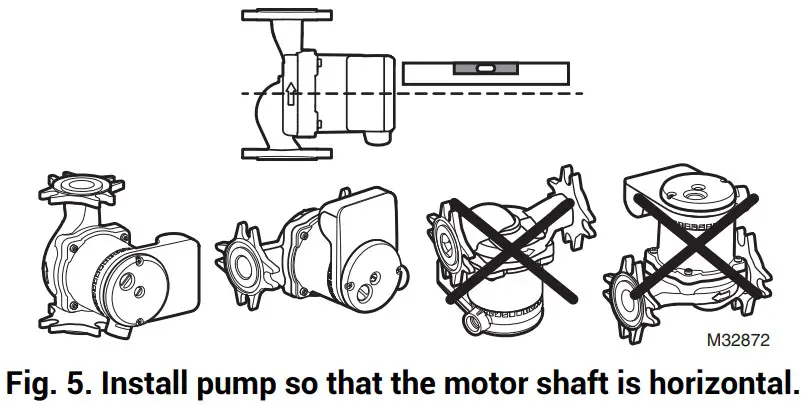
2. Pump orientation and flow direction
- The pump may be installed to discharge up or down, left or right, but the motor shaft must be horizontal.
- An arrow on the motor housing indicates the direction of flow (see Fig. 5).
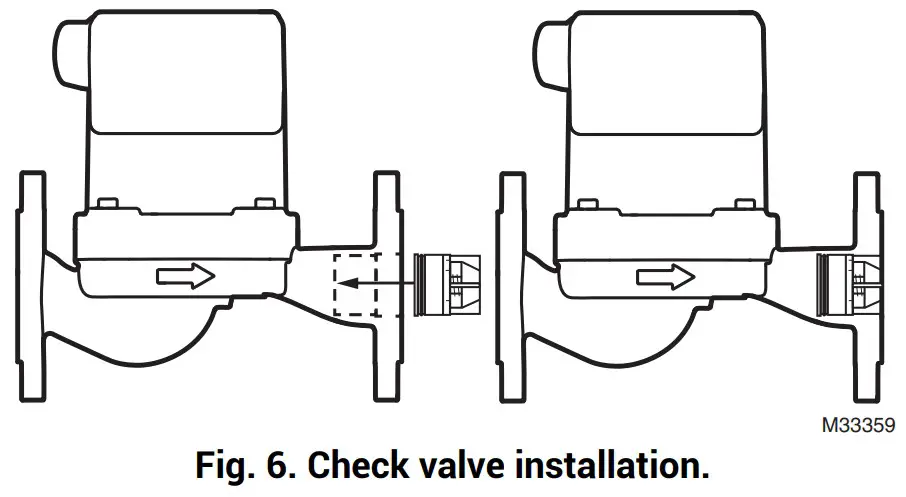
3. Check Valve installation
If an integrated check valve is desired, one may be purchased separately and installed as follows:
- Ensure that the discharge outlet of the circulator is free of debris.
- Hold the check valve so that the end with the O-ring goes into the pump first. Then press the check valve into the compartment on the outlet side of the circulator. Press firmly until it clicks into place (see Fig. 6).
NOTE: Pump must not be installed in upright orientation.
4. Connect the pump
- Connect the pump to the piping system using included flange gaskets.
- If necessary, use pipe hangers on either side of the pump to minimize pipe-strain.
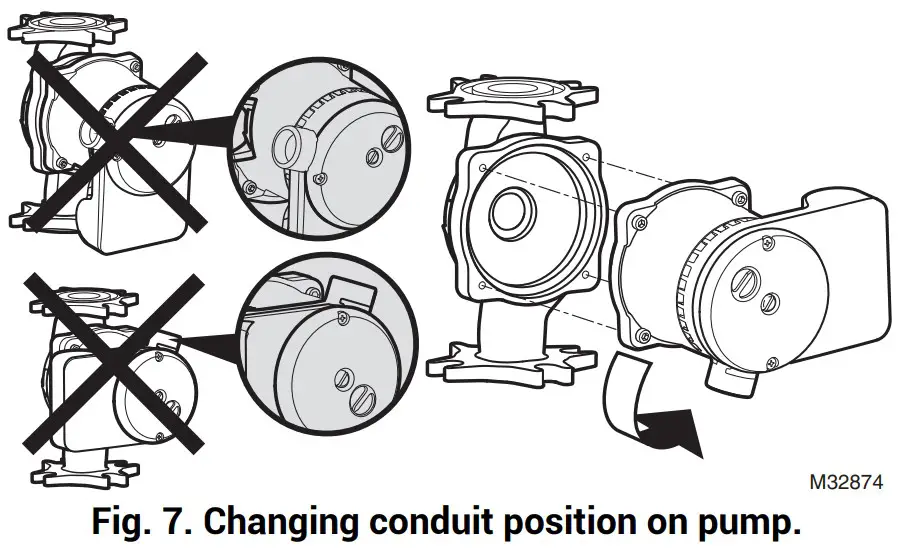
5. Changing conduit position (optional)
- It is good practice to install the pump so the conduit connection is pointing downward (see Fig. 7).
- To change where the wiring comes into the pump, support the motor assembly while removing the four (4) screws on the motor assembly using a 5/32 in. (4mm) L-shaped hex head wrench.
- Rotate the motor assembly to the desired position and replace the screws.
- Tighten evenly, moving diagonally from one screw to the next until you reach 44 in.-lbs.
- Check that the rotor shaft turns freely. If it does not turn easily, disassemble and reassemble the unit again.
WIRING
![]() CAUTION
CAUTION
Voltage Hazard.
Can cause electrical shock or equipment damage.
Disconnect power before beginning installation.
Wiring must comply with applicable codes, ordinances, and regulations and be performed by a qualified electrician.
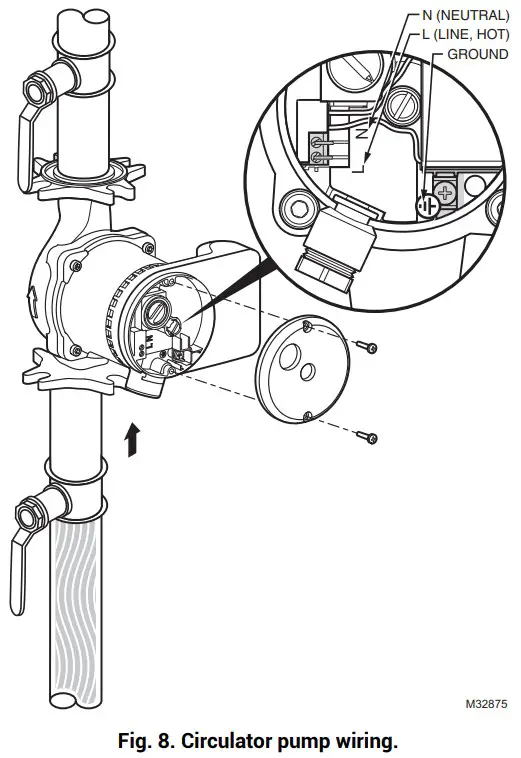
6. Electrical connection
- Loosen the two screws securing the wire box cover.
- Use 12 AWG to 14 AWG copper wires (follow local code for any wiring restrictions),
- Connect the line (hot) wire to the L terminal and the neutral wire to the N terminal (max 4.4 in.-lbs). Wire should be rated to 194°F (90°C) or greater and be in accordance with UL 778/13.10.
- Connect the ground wire to the ground screw inside the box. (See Fig. 8).
- Reattach the box cover and ensure that the conduit or wire cable is secure in the strain relief connector.
 |  |
PUMP OPERATION
WARNING
Pump Damage.
Do not start the pump until it has been filled with water and the system has been purged of air.
7. Starting the pump
- Do not start the pump until it has been filled with water and the system has been purged of air.
- Open the service valves on both sides of the pump to fill the system with water. Check for leaks.
- Turn the air vent screw in the middle of the housing counterclockwise until you hear air escape from the system.
Placing a rag under the vent holes will help collect water. - Run the pump with the air vent open. Water will drip from the air vent holes.
Then, when all air is vented, close the air vent screw by screwing it clockwise back into place.
![]() WARNING
WARNING
Risk of scalding/burning
Depending on water temperature and pressure of the system, hot vapor or liquid can escape if the air vent screw is completely loosened.
Depending on water temperature and how long the pump has been running, the pump can become very hot.
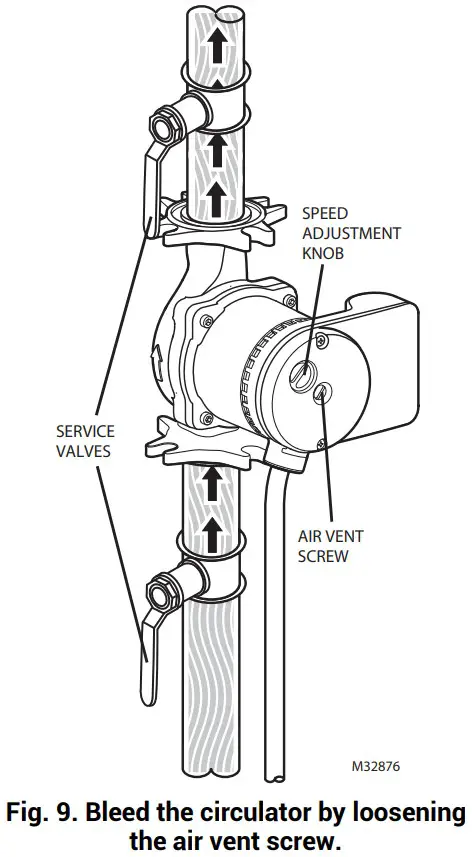
8. Speed selection
- Turn the speed adjustment knob clockwise to increase the speed (see Fig. 9).
- See Figs. 2-4 on page 2 for the flow curves of each pump at the three different speeds.
- Select a speed to obtain proper flow needed for correct system operation.
PUMP REPLACEMENT
Use this cross-reference tool to meet your installation needs.
Table 4. Cross Reference for Pump Replacement
| Resideo | Grundfos | Taco | Bell & Gossett | Armstrong | Wilo | |||||
| Model | Pump Length | Speed | Single Speed | 3-Speed | Single Speed | 3-Speed | Single Speed | 3-Speed | ||
| PC3F1558IUF00 | 6.5″ | High | UP-42F UP-42F-FC | UPS15-58 High UPS15-58-FC High | 005F 007F 008F 008F-IFC | OOR High OOR Med | NRF-22 LR-20WR | Astro 30 Astro 30-3 Astro 50-3 Astro 230C1 | Star 16 | Star S16 High |
| Medium | UP15-42FC | UPS15-58 Low UPS15-58-FC Low | 005F-IFC 006F 006F-IFC 007F-IFC | OOR Low | NRF9F/LW NRF-25 Med | Star S16 Med | ||||
| Low | UP15-18F UP15-18F-FC | Star 5 516 Low | ||||||||
| PC3F26991UF00 | 6.5″ | High | UP26-96F UP26-96F-FC UP26-116F UP26-116F-FC | UPS26-99 High UPS26-99-FC High | 0011F 0011F-IFC 0013F 0013F-IFC | NRF-36 Med NRF-45 Med H-41 | E7 Astro 50 Astro 50-3 | Star 30F Star 32F | S21 High | |
| Medium | UP26-64F UP26-99FC | UPS26-99 Low UPS26-99-FC Low | 0014F 0014F-IFC | Star 17 FX | S21 Med | |||||
| Low | NRF-33 | Star S21 Low | ||||||||
| PC3F4344IUF00 | 8.5″ | High | UP43-44F UP43-44F-FC | UPS43-44 High UPS43-44-FC High | HV H-32 | E16 | ||||
| Medium | UPS43-44 Med UPS43-44-FC Med | 0010F 0012F-IFC | 0010 Med | NRF-33 | H32 | |||||
| Low | UPS43-44 Low UPS43-44-FC Low | 0010E-IFC | 0010 Low | |||||||
The information in this table is based on publicly available information as of the date of this publication. Resideo is not liable if information is found to be incorrect.
If the cross-referenced model uses a flow check valve, then use a flow check with the Resideo model as well.
TROUBLESHOOTING
| Fault | Cause | Action |
| Pump not running | No operating voltage | Check the electrical system. |
| Rotor/shaft stuck | • Isolate the pump from the power supply. • Remove the vent screw (see Fig. 9). • Turn the shaft clockwise using a small screwdriver. • Screw in the vent screw. • Switch on the pump. | |
| Squealing noise | Air in the pump | • Verify that water is in the system and the service valves are open. • Verify that the pump is installed so that the motor shaft is horizontal (Fig. 5). • Bleed the pump |
| Loud noises [> 43 dB(A)] | Pump flow too high | Reduce the pump speed using the knob or button |
| Cavitation due to insufficient supply pressure | • Check the operating pressure of the system. • Verify that the circulator intake is near the expansion tank. Relocate if necessary. | |
| Pump is hot | Normal | It is normal for the pump to feel hot as the cast iron will get about as hot as the water. |
AquaPUMP™ is a trademark of Resideo Technologies, Inc.
![]() www.resideo.com
www.resideo.com
Resideo Technologies, Inc.
1985 Douglas Drive North, Golden Valley, MN 55422
1-800-468-1502
62-0383EFS—11 M.S. Rev. 09-22 | Printed in United States
© 2022 Resideo Technologies, Inc. All rights reserved.
This product is manufactured by Resideo Technologies, Inc. and its affiliates.![]()