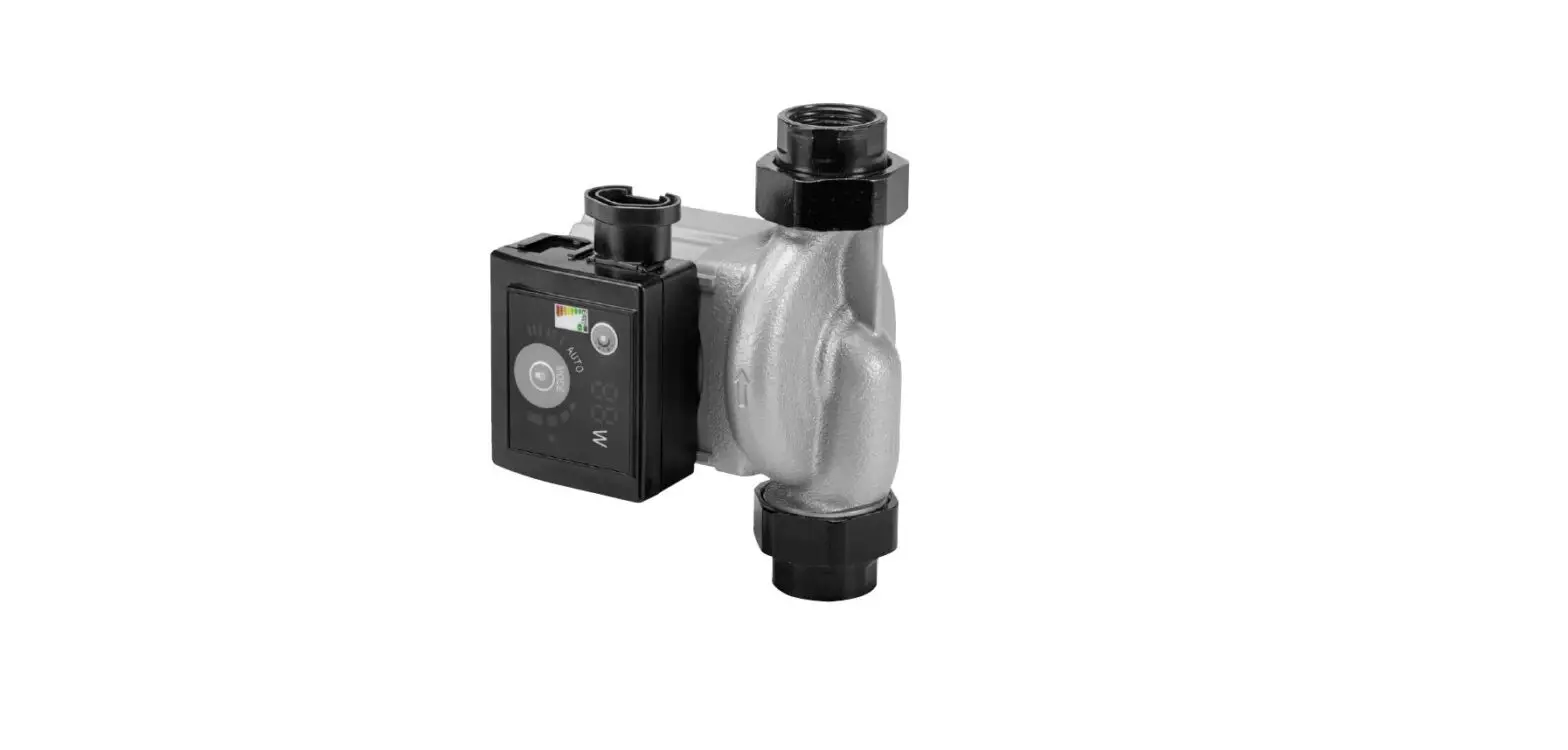
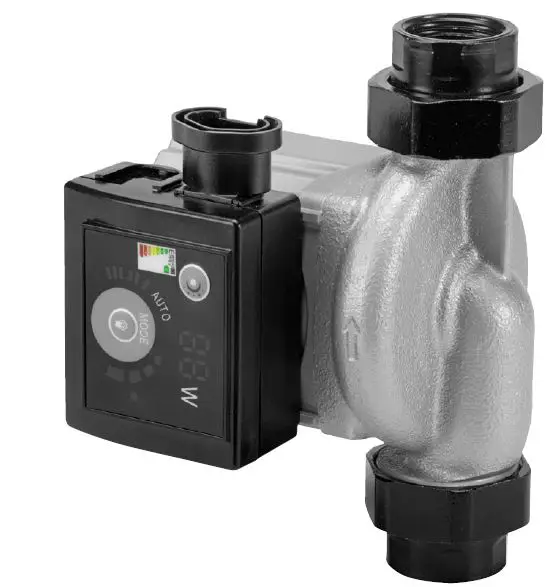
CURAQUA 436044 Circulation Pump 
SAFETY INSTRUCTIONS
- The manufacturer cannot accept liability for personal injury or material damage resulting from failure to follow the instructions.
- Always follow the local safety regulations.
- The pump must be installed and maintained by qualified personnel and in accordance with these instructions.
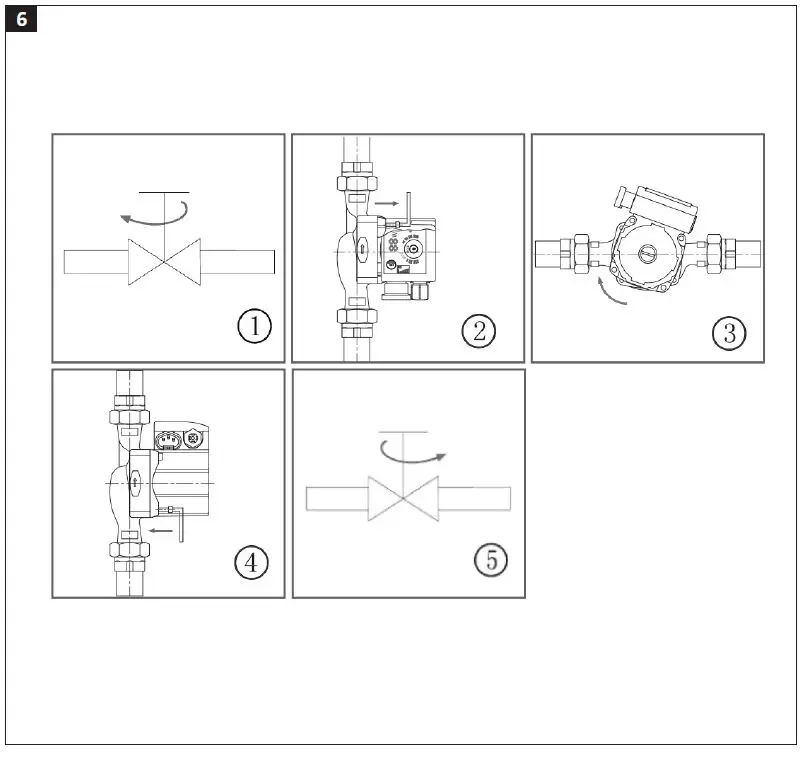
- Install a shut-off valve on each side of the pump to simplify maintenance.
- Disconnect the power supply to the pump before installation and/or maintenance.
- Add a descaling agent to the water in the heating system to counteract scale in the pump.
- Never start the pump without liquid.
- Some operating modes cannot be used for drinking water applications.
- The liquid in the system can be hot and under high pressure. Switch off the pump and empty the system, or close the shut-off valves on each side of the pump, before disconnecting the pipes from the pump. There is a risk of serious scalding if these instructions are not followed.
- Hot liquid will flow out at high pressure if the drain plug is opened. Make sure that outflowing liquid cannot cause personal injury or material damage.
- Ventilation must be arranged in the event of high ambient temperatures to prevent condensation, which can result in electrical faults.
- The system must be emptied if the pump is not used at temperatures below 0°C, to prevent it from freezing and getting damaged.
- If the pump is not going to be used for some time, close the shut-off valves on each side of the pump and disconnect the power supply to the pump.
- A damaged power cord must be replaced by an electrician, or other qualified person, to ensure safe use.
- If the pump gets hot or is not working properly, disconnect the power supply immediately and close the shut-off valves on each side of the pump. Contact the retailer if you cannot solve the problem with the troubleshooting schedule.
- Make sure that children cannot touch the pump.
- The pump should be installed in a dry, cool and well-ventilated area, no warmer than room temperature.
WARNING! Installation and use must be carried out in accordance with local regulations and praxis.
ELECTRICAL SAFETY
New installations and extensions to existing systems should always be carried out by an authorised electrician. If you have the necessary experience and knowledge (otherwise contact an electrician), you can replace power switches and wall sockets, fit plugs, extension cords and light sockets. Incorrect installation can result in fatal injury and the risk of fire.
TECHNICAL DATA
- Rated voltage 230 V ~ 50 Hz
- Output 5 – 45 W
- Protection rating IP42
- Insulation class H
- Ambient humidity Max 95%
- System pressure 10 bar
- Min inlet pressure
- ≤85 °C: 0,05 bar
- ≤90 °C: 0,28 bar
- ≤110 °C: 1,0 bar
- Sound pressure level <42 dB(A)
- Ambient temperature 0~+40°C
- Temperature class TF110
- Surface temperature ≤125°C
- Liquid temperature 2 – 110°C
- EEI <0.23
The temperature of the pumped liquid must always be higher than the ambient temperature to prevent condensation in the control panel and stator.
| Ambient temperature | Min temperature, liquid | Max temperature |
| 0°C | 2 °C | 110°C |
| 10°C | 10°C | 110°C |
| 20 °C | 20 °C | 110°C |
| 30°C | 30°C | 110°C |
| 35°C | 35°C | 90°C |
| 40˚C | 40˚C | 70°C |
The water temperature should be no higher than 65°C to prevent scale in the household hot water.
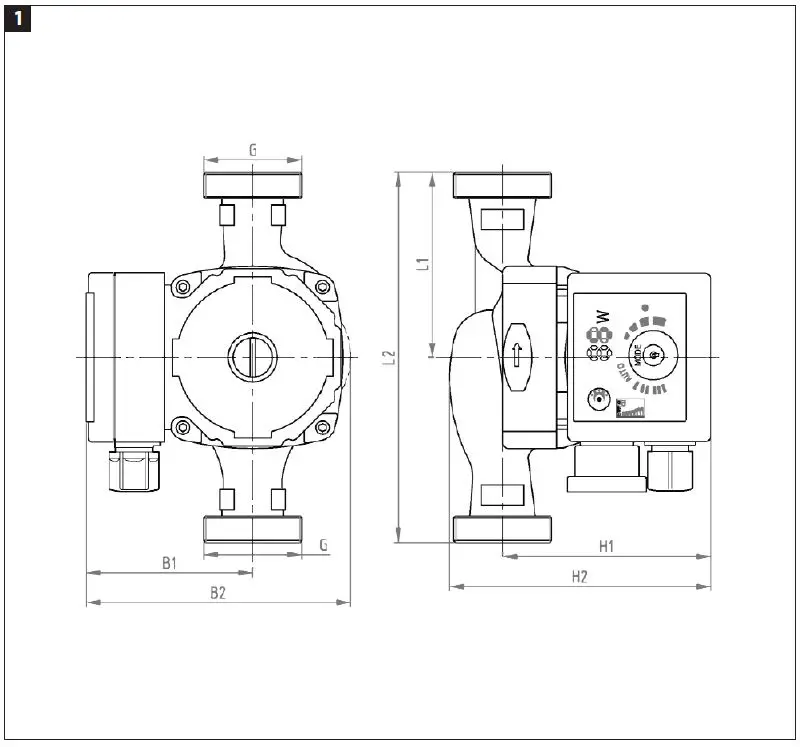
DESCRIPTION
| DESCRIPTION | |||
| DIMENSIONS | |||
| B1 | B2 | G | |
| 436043 | 69 | 138 | 1 1/2″ |
| 436044 | 69 | 138 | 1 1/2″ |
| L1 | L2 | H1 | H2 | |
| 436043 | 65 | 130 | 129 | 156 |
| 436044 | 90 | 180 | 129 | 156 |
USE
HOW TO USE
The circulation pump is mainly intended for circulation in heating systems or tap water systems for households, and can be used in:
- heating systems with constant or variable flow
- heating systems with variable supply temperatures
- systems for recirculation of hot tap water
- air conditioning
- industrial circulation systems
- circulation in heating systems and hot tap water systems for households.
The circulation pump has a permanent magnetic motor and differential pressure regulation, which continuously adjust the pump capacity to the actual needs of the system.
ADVANTAGES OF CIRCULATION PUMPS
- Simple installation and commissioning.
The default setting for circulation pumps is AUTO mode, which means that in most cases they can be run without additional adjustments and automatically adjust to system requirements. - First-rate comfort. Low noise level for pump and system.
- Low power consumption.
FIG. 2
LIQUID THAT CAN BE PUMPED
Pure, thin, non-corrosive, non-explosive liquid without solid particles, fibres or mineral
oil. The pump must not be used to pump flammable liquids such as vegetable oil, petrol or the like. The viscosity of the pumped liquid affects the pump capacity. Take the viscosity of the pumped liquid into consideration when selecting the pump. FIG. 3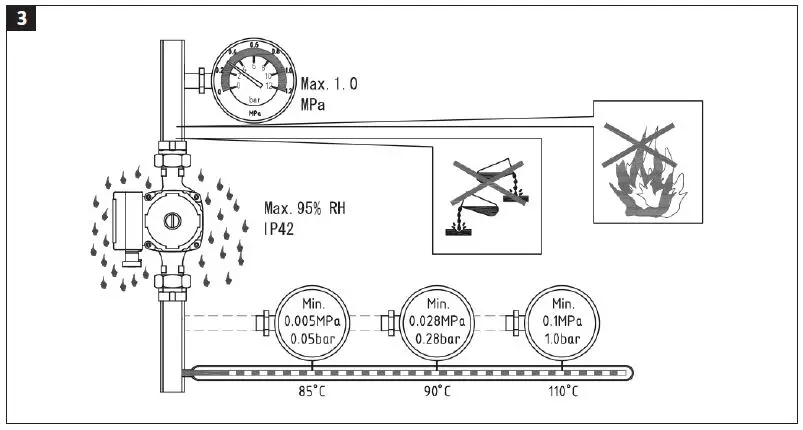
INSTALLATION
Carefully follow the instructions how to install and use the pump to minimise the pump’s environmental impact.
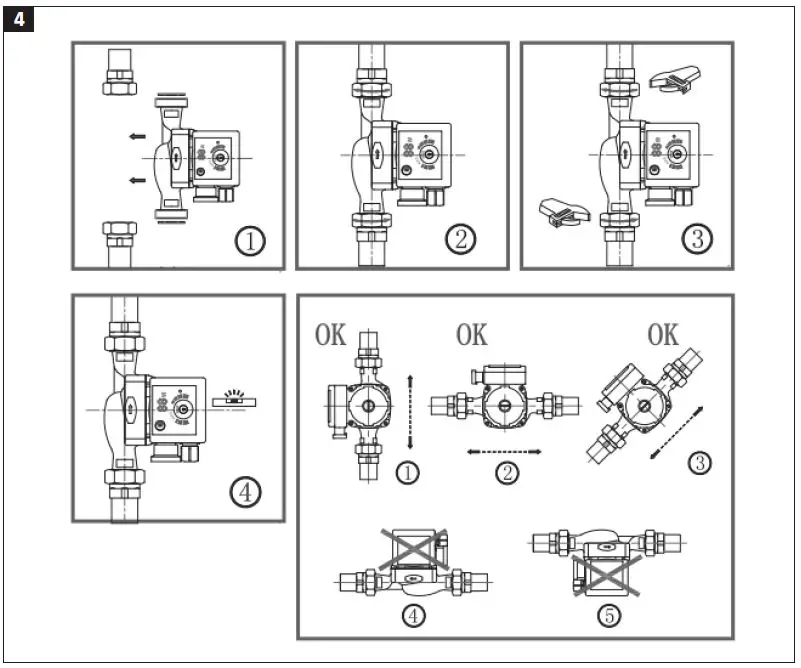
- An arrow on the pump housing indicates the direction of flow through the pump.
- The inlet and outlet pipe connections to the pump must be fitted with seals.
- The pump must be installed with the pump shaft horizontal
FIG. 4
WARNING!
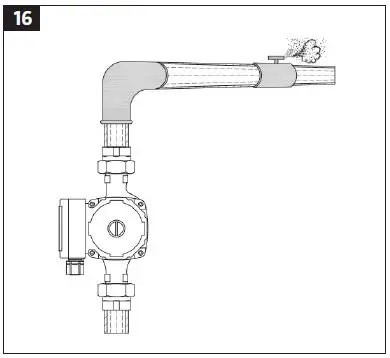
The liquid in the system can be hot and under high pressure. Switch off the pump and empty the system, or close the shut-off valves on each side of the pump, before removing the screws.
IMPORTANT: Place the control panel in the required position. Open the shut-off valves on each side of the pump and fill the system with liquid before starting the pump.
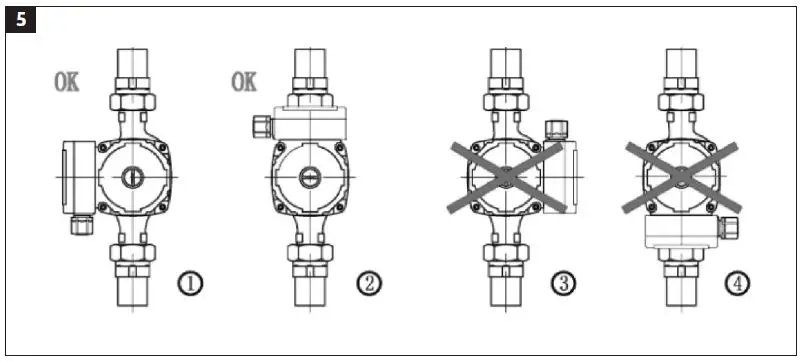
Positioning the control panel
The position of the control panel can be changed as follows:
- Remove the four screws holding the motor.
- Turn the motor to the required position and align the holes to each other.
- Insert and tighten the four screws. FIG. 5, FIG. 6


Thermal insulation of the pump
The piping and pump housing can be insulated to reduce heat losses. FIG. 7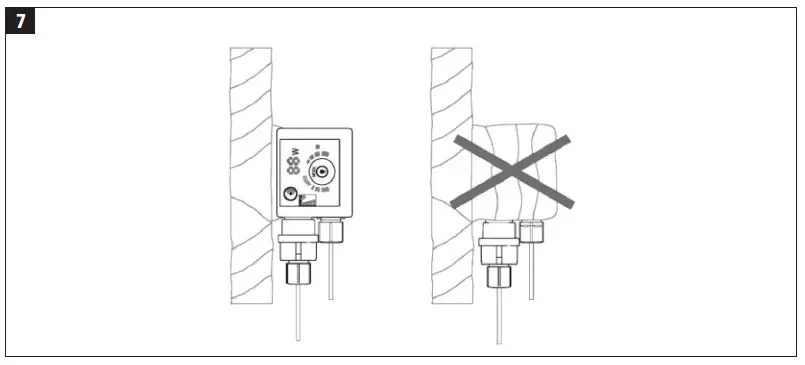
IMPORTANT: The control panel must not be covered by the insulation or anything else.
Electrical connection
The electrical connection and protection must be carried out in accordance with local regulations. FIG. 8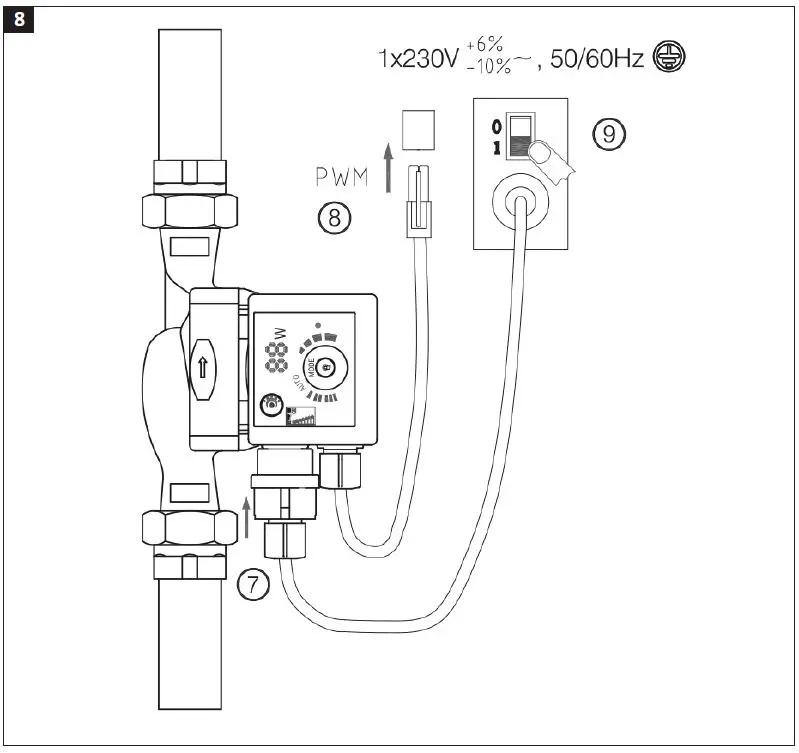
IMPORTANT:
- The pump must be connected to an earthed power supply.
- The pump must be connected via an external circuit breaker with a minimum contact gap of 3 mm on all terminals.
- The circulation pump does not require additional protection.
- Check that the mains voltage and frequency correspond to the rated voltage on the type plate.
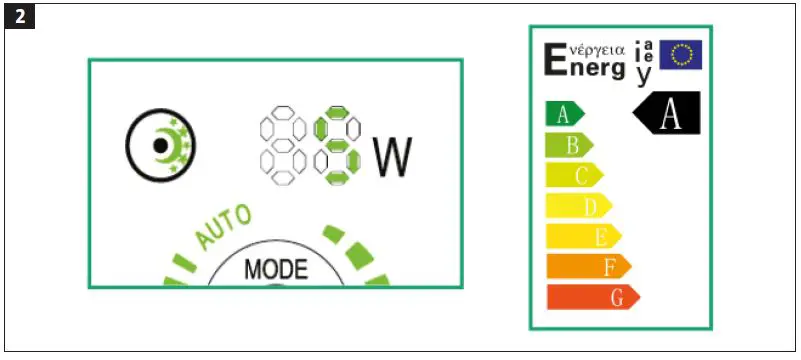
CONTROL PANEL
- Night reduction mode indicator/activating night reduction
- Power consumption
- Pump settings indicator
- Indicator
- Pump settings button
FIG. 9
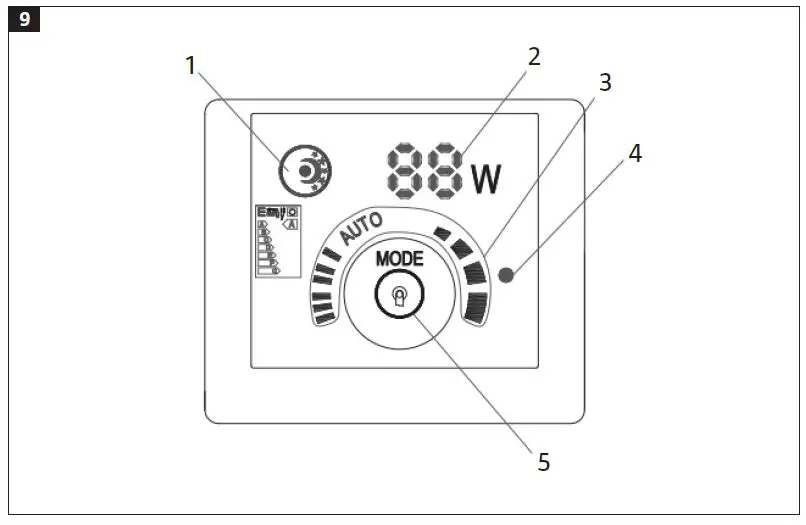
Display of power consumption
Position 1 is activated when the pump is supplied with voltage. The actual power consumption is shown in W during operation. E is shown if the pump is not working properly. If E is shown, disconnect the power supply to the pump and rectify the problem. Reset the power supply and start the pump.
PUMP SETTINGS
The following pump settings are available: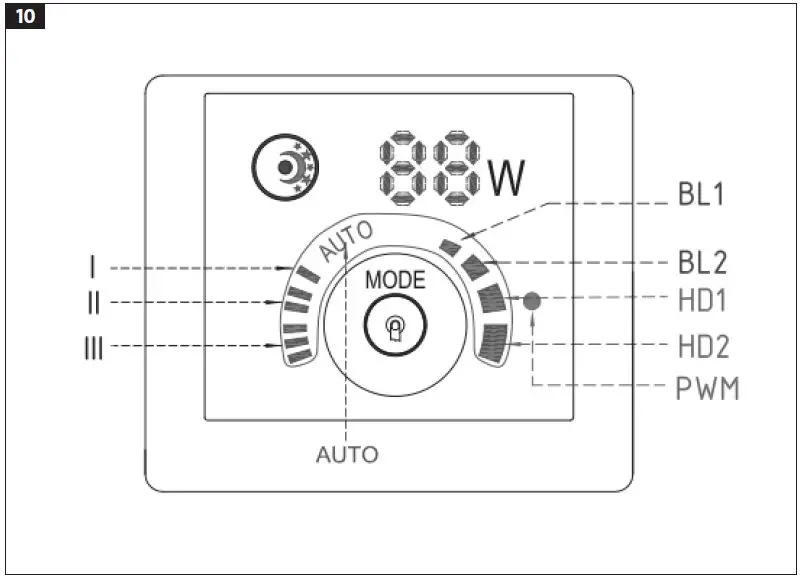
| No. | Indication | Description |
| 0 | AUTO (factory setting) | Automatic adjustment |
| 1 | BL1 | Lower proportional pressure curve |
| 2 | BL2 | Upper proportional pressure curve |
| 3 | HD1 | Lower constant pressure curve |
| 4 | HD2 | Upper constant pressure curve |
| 5 | III | Constant speed III |
| 6 | II | Constant speed II |
| 7 | I | Constant speed I |
Setting
Switch mode by pressing the button (4) (see section Control panel/Parts) at 2 second intervals. The first setting is shown again after pressing 8 times (see section Control panel/Pump settings).
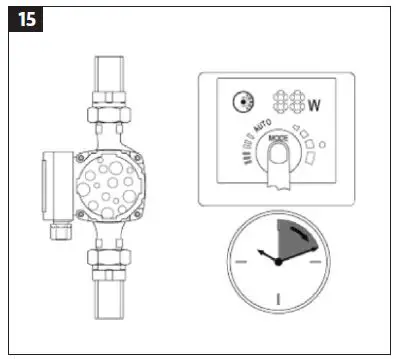
NIGHT REDUCTION
When night reduction is activated the pump switches automatically between normal mode and night mode. The switching between normal mode and night mode is controlled by the supply line temperature of the system. If the temperature in the supply line drops more than 10–15°C in 2 hours, or if the temperature drops 0.1°C/min or faster, night reduction is activated automatically. When the temperature in the supply line has increased by about 10°C the pump returns to normal mode, irrespective of the time.
Activating night reduction
WARNING! Do not activate night reduction if the pump is installed in a system with a gas boiler and small volume of water.
- Press the button
 (3), (see section Control panel/Parts). The lamp goes on when night reduction is activated.
 - Activate/deactivate night reduction with the button.
- Night reduction must only be used in systems for the recirculation of hot tap water.
- Night reduction is not activated in AUTO mode.
NOTE: Night reduction must not be activated if speeds I, II or III are selected.
Prerequisites
The following conditions must be met for best results with the night reduction function.
- The pump must be installed in the system’s supply line, close to the outlet from the boiler.
- Night reduction does not work if the pump is installed in the return line and if the pump is temperature controlled.
- Activate/deactivate night reduction with the button.
PUMP SETTINGS FOR DIFFERENT TYPES OF SYSTEMS
- The pump capacity is automatically adjusted to the system’s heating requirements in AUTO mode. Allow the pump to remain in AUTO mode for at least 1 week after installation, so that the pump has time to adjust. The pump continuously registers the output and adjusts the capacity in AUTO mode. Other settings can be selected if necessary.
- Because of the inherent inertia of the heating system it takes a long time to identify the best operating configuration. Change the pump setting if AUTO mode does not produce the best distribution of heat in all rooms.
- Pump settings and capacity curves are described in the section on settings and capacity.
| Floor heating system | |
| Most suitable | Can be used |
| AUTO | HD1, HD2 |

| Two-pipe heating system | |
| Most suitable | Can be used |
| AUTO | BL2 |
| One-pipe heating system | |
| Most suitable | Can be used |
| BL1 | BL2 |
REGULATION
The pump can be run with proportional pressure regulation (BL) or constant pressure regulation (HD). Both these types of regulation adjust the pump capacity and power consumption to the heating requirements in the system.
Proportional pressure regulation
This type of regulation regulates the differential pressure over the pump according to the flow. The proportional pressure curves are marked with BL1 and BL2 in the Q/H diagram.
Constant pressure regulation
This type of regulation regulates the differential pressure over the pump constantly and is not affected by the flow. The constant pressure curves are horizontal and marked with HD1 and HD2 in the Q/H diagram.
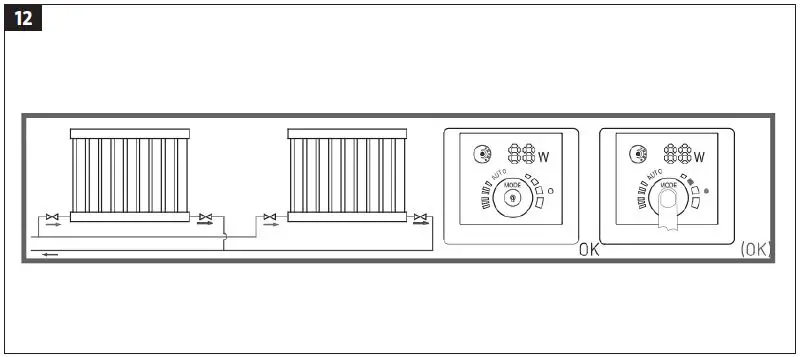
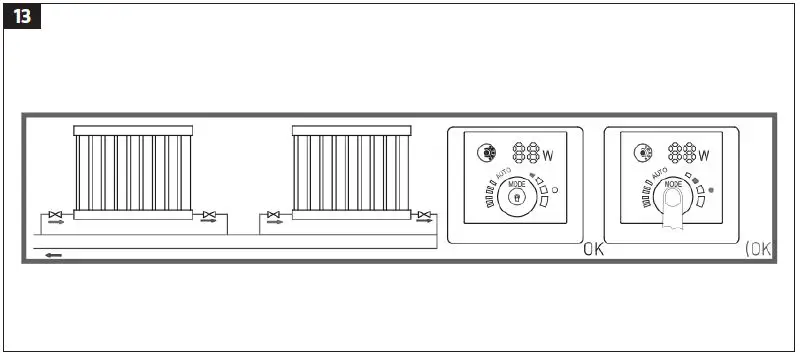
SHUNT VALVE BETWEEN SUPPLY AND RETURN LINE
The shunt valve means that the boiler water can circulate even when all the return line valves from the floor heating system, or all the radiator valves, are closed. The flow should be as small as possible when all the valves are closed. A suitable pump setting depends on which type of shunt valve (manual or temperature controlled) is installed.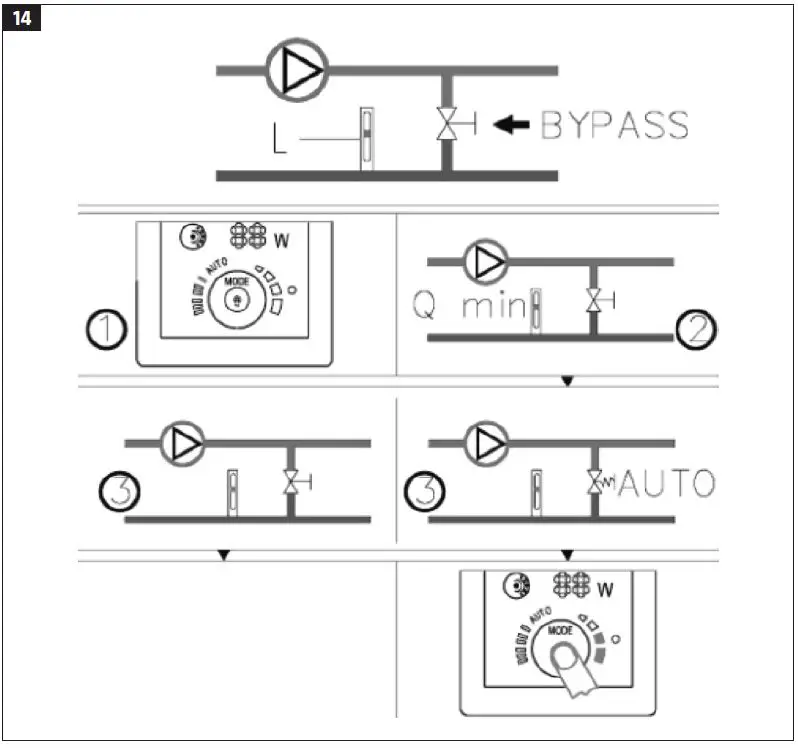
Manual shunt valve
- Set the pump to speed I. The flow should be as small as possible (see instructions for the shunt valve).
- When the shunt valve has been set, set the pump according to the instructions in the section Pump settings.
Temperature-controlled shunt valve
- When the shunt valve has been adjusted, set the pump to speed I so that the system works with the minimum possible flow. See the instructions for the shunt valve.
- When the shunt valve has been adjusted, set the pump to run according to the upper or lower constant pressure curves. The relationship between setting and capacity curve is indicated in the section Settings and capacity.
STARTING THE CIRCULATION PUMP
Preparations
Before starting the pump, check that the system is filled with liquid and bled, and that there is at least the minimum necessary inlet pressure (see section 3).
Bleeding
- Circulation pumps are self-bleeding and do not need to be bled before starting. Any air in the pump may result in noise when starting, but this will stop after a few minutes.
- For fast bleeding the pump can temporarily be set to speed III, depending on the system mode and structure.
- When the pump has been bled and the noise has stopped, set the required pump mode.


WARNING! Never start the system unless it is filled with liquid.
SETTINGS AND CAPACITY
Relationship between settings and capacity.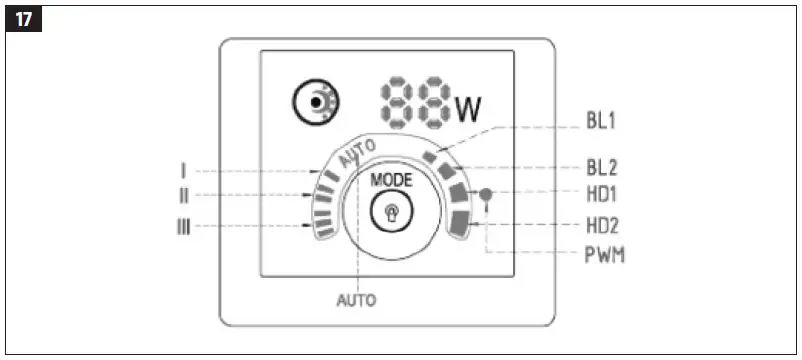
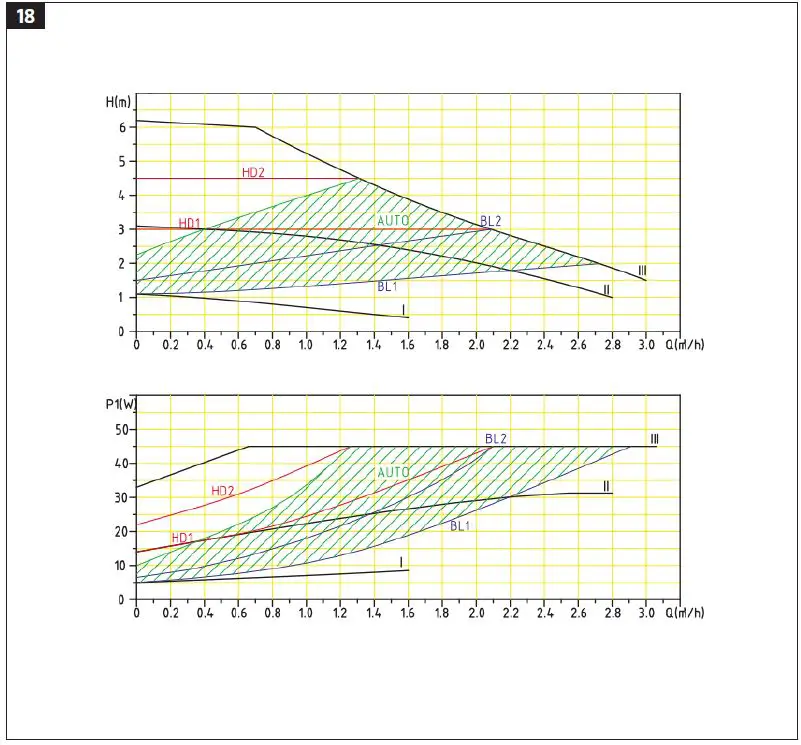
Capacity curves
- The pump can be set to run according to the the required capacity curve (Q/H curve), but in AUTO mode the pump will select the most suitable capacity curve.
- For every Q/H curve there is a corresponding curve for input power, P1. Input power is given in W. The value for P1 is shown on the display.
Prerequisites
- Test liquid: gas-free water.
- The curve’s adaptive density is 983.2 kg/m3 at a liquid temperature of 60°C.
- The curves indicate average values and cannot be used as guaranteed curves. The installation should be capacity tested when necessary.
- The adaptive kinetic viscosity is 0.474 mm²/s.
Setting/capacity/function
| Setting/capacity/function | ||
| Setting | Capacity curve | Function |
| AUTO | Operation between maximum and minimum curve. | This function automatically adjusts the pump capacity to the output in the system. The pump capacity is scaled to the system. The pump capacity is continuously adjusted to system requirements. The pump works with proportional pressure regulation. |
| BL1 | Operation on lower proportional pressure curve. | The operating point follows the lower proportional pressure curve, depending on the flow requirements in the system. With a small output the pressure is reduced, and the reverse. |
| BL2 | Operation on upper proportional pressure curve. | The operating point follows the upper proportional pressure curve, depending on the flow requirements in the system. With a small output the pressure is reduced, and the reverse. |
| HD1 | Operation on lower constant pressure curve. | The operating point follows the lower constant pressure curve, depending on the flow requirements in the system. The pressure is held constant irrespective of the flow. |
| HD2 | Operation on upper constant pressure curve. | The operating point follows the upper constant pressure curve, depending on the flow requirements in the system. The pressure is held constant irrespective of the flow. |
| III | Speed III. | The pump works with constant speed III irrespective of the operating conditions. The pump can be run temporarily at speed III to be bled. |
| II | Speed II | The pump works with constant speed II irrespective of the operating conditions. |
| I | Speed I | The pump works with constant speed I irrespective of the operating conditions. |
| The pump works at minimum capacity in some conditions (automatic night reduction). | ||
TROUBLESHOOTING
| Problem | Control panel | Cause | Action |
| The pump will not start. | The status lights are off. | Fuse has tripped. | Replace the fuse. |
| Overcurrent or overvoltage protection has tripped | Reset the switch. | ||
| Malfunction. | Replace the pump | ||
| E is shown. | Voltage too low. | Check that the voltage comes within the permitted range. | |
| The pump has jammed or is blocked. | Clean the pump. | ||
| Noise in the system. | The numerical value shown. | Air in the system. | Bleed the system. |
| Excess flow. | Reduce the inlet pressure. | ||
| Noise in the pump. | Numerical value shown. | Air in the pump. | Bleed the pump. |
| Inlet pressure too low. | Increase inlet pressure. | ||
| Not enough heat. | Numerical value shown. | Pump capacity too low. | Increase inlet pressure. |


