
axial AX-3 2CH 2.4Ghz AX-3/AR-3 Radio System

INSTRUCTION MANUAL FDR AX-3 2.4GHZ SYSTEM
SETUP BEFORE STARTING
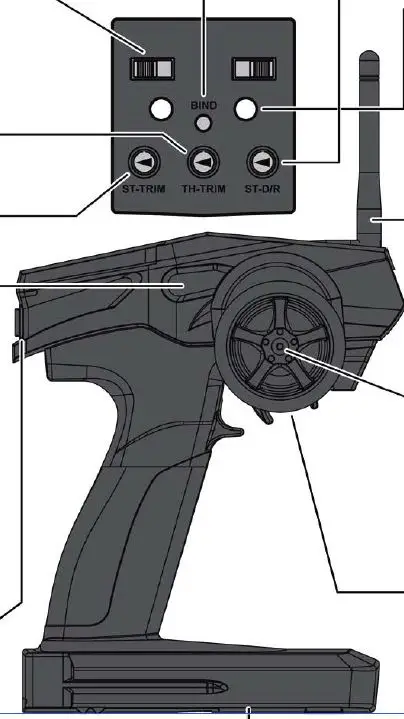
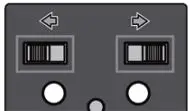
- Steering and Throttle Reverse Switch Servo Factory Settings

- Throttle Trim Gastrtmmung to be used for the throttle operation

- Steering Trim To be used for trimming the steering operation.

- Charger plug in Rechargeable AA batteries required. Charger not included.

- Power Switch

- Binding Button Binding Taster The other aide

- ST.D/R Steering dual rate To be used to adjust steering servo rate and range.

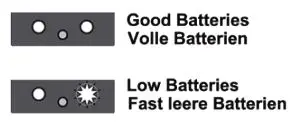
- Battery Level Indicator When the batteries are low the green indicator light will flash.

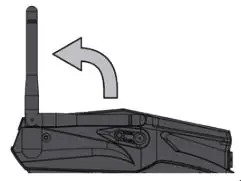
- Antenna Flip the antenna up before use

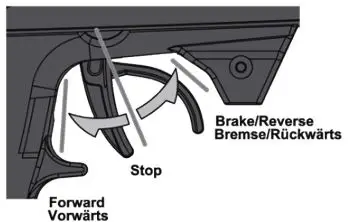
- Steering wheel To be used for steering operation. Wird verwendet um das Fahrzeug zu steuern.

- Throttle Trigger To be used for throttle operation


RADIO BINDING INSTRUCTIONS
The radio system Is bound from the factory so no binding should be necessary. However, If you are matching a new receiver to the transmitter, please follow these steps:
- Install AA batteries into the transmitter.
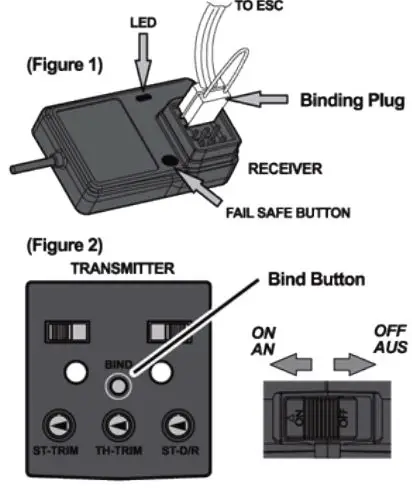
- Insert the binding plug Into CH 3 port on the receiver. (Figure 1)
- Tum on the receiver. You will notice the two LED’s are now flashing meaning the receiver is in •-k’ mode and ready to find the transmitter.
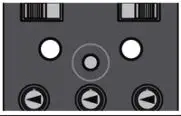
- Press and hold the binding button on the transmitter while turning on the power switch. (Figure 2)
- The LED’s on the receiver should stop flashing indicating it’s now bound to the transmitter.
- Release the binding button on the transmitter and remove the binding plug from the receiver.
- Tum off the receiver, then tum off the transmitter. Once powered on again, radio binding has been completed. If the system did not bind please repeat step’s 1-7 again or call Axial (Figure 11 Customer Service: (949) 600.a&42. NOTE: the AX-3 transmitter will only bind with theAR-3 receiver

Fall Safe Programming
1. With the radio system bound and powered up, position the throttle trigger to the stop position. For electric applications with drag brake, put the trigger in the stop position. For Nitro applications, position the throttle to apply some amount of brake.
2. With the throttle trigger positioned to desired fail safe position press and hold the button on the receiver until the red LED starts flashing. As soon as it starts flashing release the button; it will then flash for 3 more seconds. Fail safe is now programmed.
3. To test, elevate your vehicle so the tires are off the ground. Apply some throttle and tum the transmitter off. If the throttle returns to neutral within a few seconds, fail safe is programmed conectly. If your vehicle keeps running, fail safe was not programmed conectly; repeat steps 1 and 2.
Transmitter Battery Installation
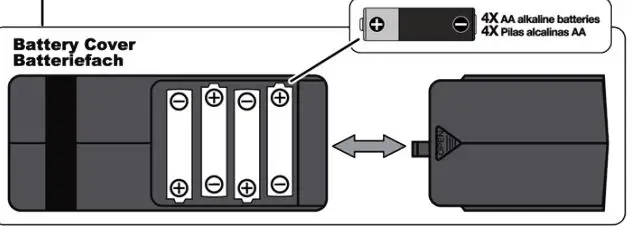
open battery cover at bottom of transmitter. install batteries follow the direction of batteries designated in the inside of battery box.
ATTENTION
Do not mix batteries of different ages or types.
WARNING
- NEVER RUN RIC MODS IN CROWDED AREA OR NEAR SMALL CHILDREN|
- PROTECT YOUR SYSI EM FROM MOISTURE REMOVE BATTERY FROM RIC MODEL WHEN STORING


