SPYKER R28-1824 Lawn Rollers

IMPORTANT
This manual contains information for the safety of persons and property. Read it carefully before assembly and operation of the equipment!
Tools Required for Assembly:
Wrenches or Deep Sockets:
- (x1) 1/4″
- (x1) 5/16″
- (x1) 7/16″
- (x2) 1/2″
- (x2) 9/16″
SAFETY
PREPARATION:
- Know controls and how to stop safely.
- READ THE OWNER’S MANUAL before operating.
- Do not fill the roller to a weight greater than you can handle and control comfortably.
- Keep the vehicle & attachment in good operating condition & keep safety devices in place.
- Keep all nuts, bolts, and screws tight to be sure the equipment is in safe working condition.
- See the tractor equipment owner’s manual for the safe operation of the equipment and be sure that the tractor you are using is capable of towing the roller.
WHILE IN USE:
- Never use a roller up and down hills; always work across hills and slopes.
- Use caution while turning, slowing, or stopping.
- Avoid crossing rocky areas, gravel driveways, or paved areas to prevent denting or puncturing the roller.
- Stay alert for holes in the terrain and other hidden hazards.
- Do not drive close to creeks, ditches, and public highways.
- Watch out for traffic when crossing or near roadways.
- After striking a foreign object: The vehicle and attachment should be stopped and inspected for damage. NOTE: The damage should be repaired before restarting and operating the equipment.
PROTECT YOURSELF AND OTHERS:
- Do not allow children to operate the vehicle.
- Do not allow adults to operate without proper instruction or without having read the owner’s manual.
- Do not carry passengers.
- Be sure the area is clear of pets and people, especially young children. Never assume they will remain where you last saw them. Stop using the roller if any enter the area.
- Always wear substantial footwear.
- Do not wear loose-fitting clothing that can get caught in moving parts.
- Keep your eyes and mind on your tractor/attachment and the area being covered. Do not let other interests distract you.
- To avoid accidents and/or injuries, please make sure there is no person around or behind the roller when used.
TO PREVENT INJURY, USE IT WITH CAUTION!
LIFTING HAZARD:
When the roller is fully loaded with water, it weighs:
- R28-1824 = 270 lbs
- R76-2436 = 680 lbs
WARNING: PINCH POINTS
Use caution between the scraper bar and roller, as well as the handle.
Part List
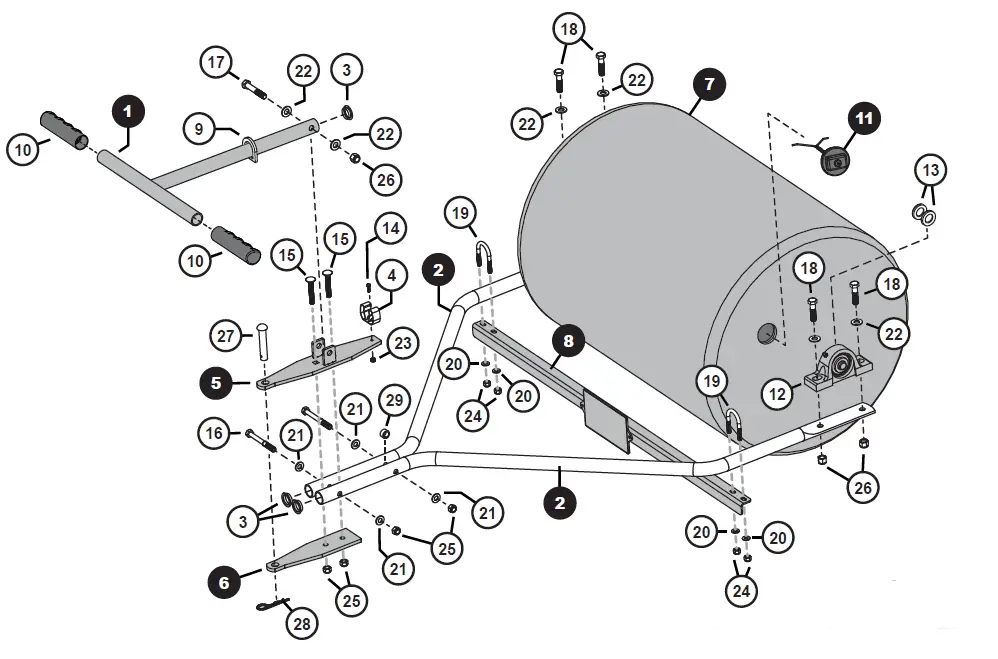
| Ref. | Description | Qty. | Part No. | |
| models > | R28-1824 | R76-2436 | ||
| 1 | Handle Weldment | 1 | 1019542-10 | |
| 2 | Frame Tubes | 2 | 1019540-10 | 1019541-10 |
| 3 | Plug, Tube End | 3 | 1019551 | |
| 5 | Hitch Plate, Top | 1 | 1019539-10 | |
| 6 | Hitch Plate, Bottom | 1 | 1019536-10 | |
| 7 | Roller Drum | 1 | 1019545 | 1019546 |
| 8 | Scraper Bar | 1 | 1019599 | 1019600 |
| 9 | D-Ring | 1 | 1019547-10 | |
| 10 | Handle Grip | 2 | 1019525 | |
| 11 | Tethered Plug | 1 | 1019524 | |
| 12 | Pillow Block Bearing | 2 | 1019534 | |
| 13 | Washer; Flat, 5/8″ | 4 | 45M2121P | |
| Ref. | Description 24 | Qty. | Part No. |
| Bag, Hardware | 1 | 1019535 | |
| 4 | Spring Clip | 1 | 1019526 |
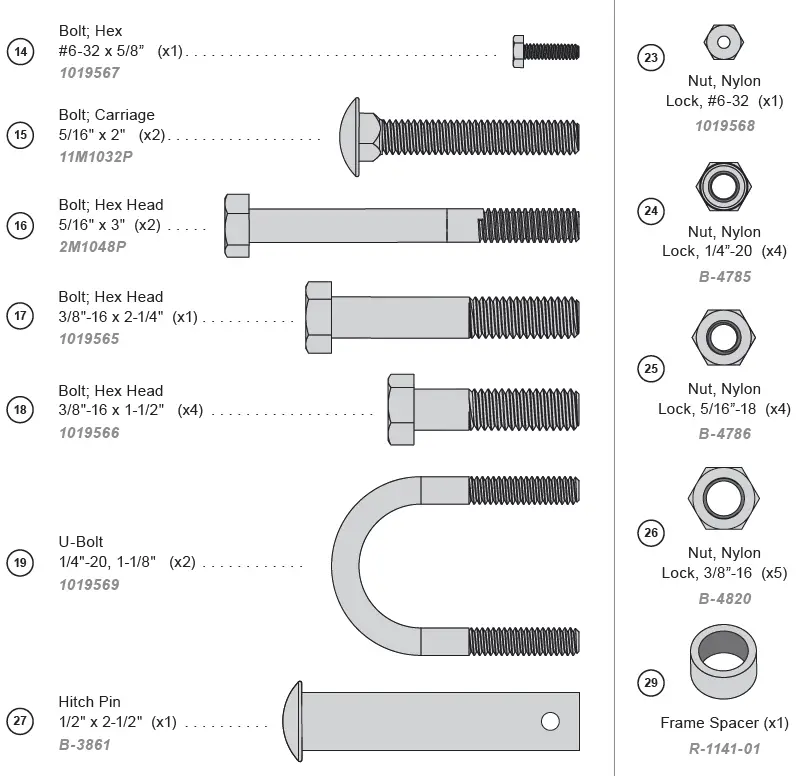
| 14 | Bolt; Hex, #6-32 x 5/8″ | 1 | 1019567 |
| 15 | Bolt; Carriage, 5/16″ x 2 | 2 | 11M1032P |
| 16 | Bolt; Hex Head, 5/16″ x 3 | 2 | 2M1048P |
| 17 | Bolt; Hex, 3/8-16 x 2-1/4″ | 1 | 1019565 |
| 18 | Bolt; Hex, 3/8-16 x 1-1/2″ | 4 | 1019566 |
| 19 | U-Bolt; 1/4″-20, 1-1/8″ | 2 | 1019569 |
| 20 | Washer; Flat, 1/4″ | 4 | 45M0909P |
| 21 | Washer; Flat, 5/16″ | 4 | 45M1111P |
| 22 | Washer; Flat, 3/8″ | 6 | 45M1313P |
| 23 | Nut; Nylon Lock, #6-32 | 1 | 1019568 |
| 24 | Nut; Nylon Lock, 1/4″-20 | 4 | B-4785 |
| 25 | Nut; Nylon Lock, 5/16″-18 | 4 | B-4786 |
| 26 | Nut; Nylon Lock, 3/8″-16 | 5 | B-4820 |
| 27 | Pin; Hitch, 1/2″ x 2-1/2″ | 1 | B-3861 |
| 28 | Cotter; Hairpin, 1/8″, #211 | 1 | D-146P |
| 29 | Spacer; Frame | 1 | R-1141-01 |
Hardware Identifier
Assembly
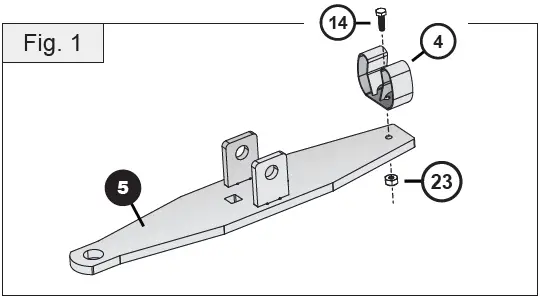
- On the end of the top hitch plate (5), align the spring clip (4) as illustrated below. Run the #6 Hex Bolt (14) through the spring clip and secure beneath the hitch plate with the #6 Nylon Lock Nut (23).

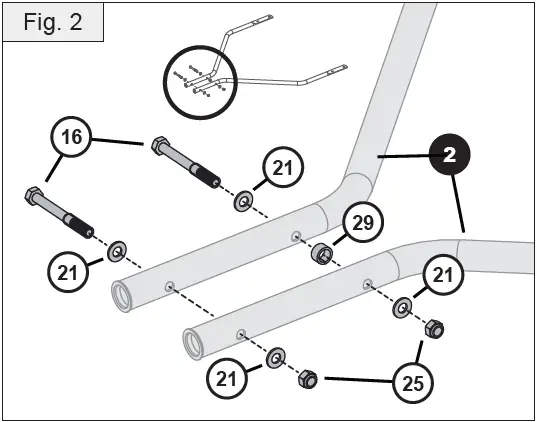
NOTE: After this point, do NOT tighten bolts fully until Step 7. You will need the ability to shift parts a little during the assembly. - Align the frame tubes (2) together and place the frame spacer (29) between them at the second set of bolt holes. See illustration. Add a flat washer (21) to each of the 5/16″ x 3″ bolts (16). Run these bolts through the frame tubes (2) and add an additional flat washer (21) to each bolt. Add a 5/16″ Nylon Lock Nut (25) on each bolt and loosely tighten until both frame tubes contact the spacer, leaving a gap for Step 3.

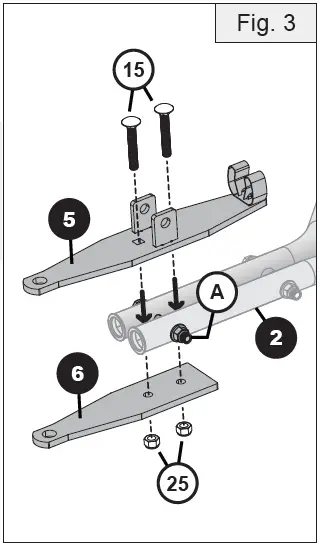
- Align the hitch plates (5 and 6) at the end of the frame tubes.
NOTE: Bolts to be added will straddle the first bolt at the end of the tubes. (Noted here as Bolt “A”)
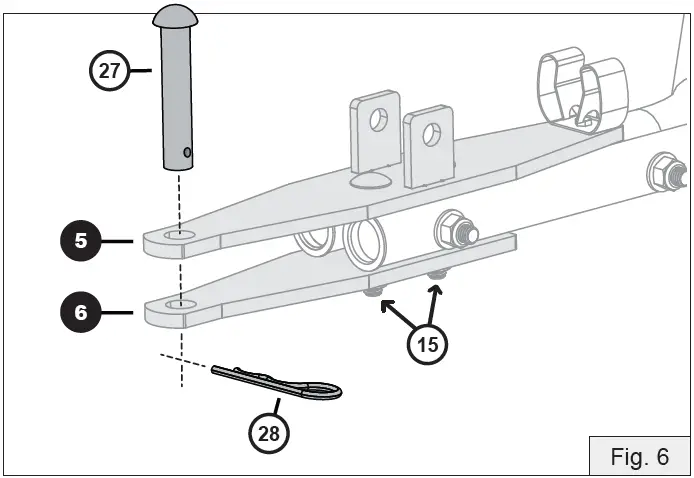
Run two 5/16 x 2″ carriage bolts (15) through the hitch plates as illustrated, straddling Bolt A. Loosely add two 5/16″ Nylon Lock Nuts (25) on each bolt.
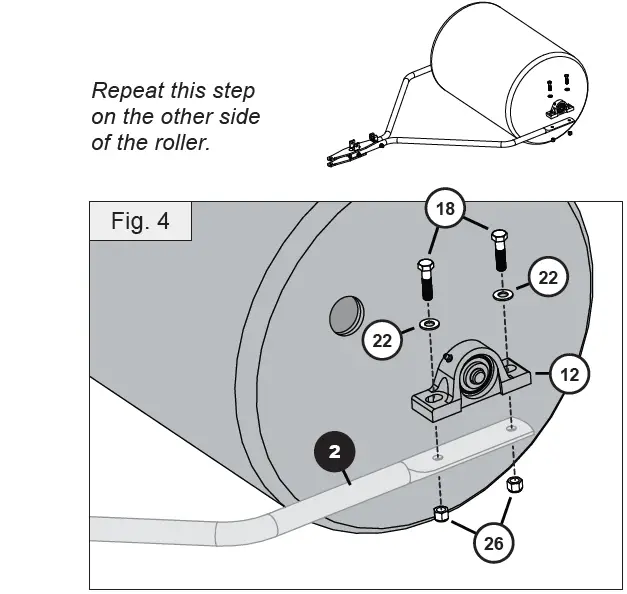
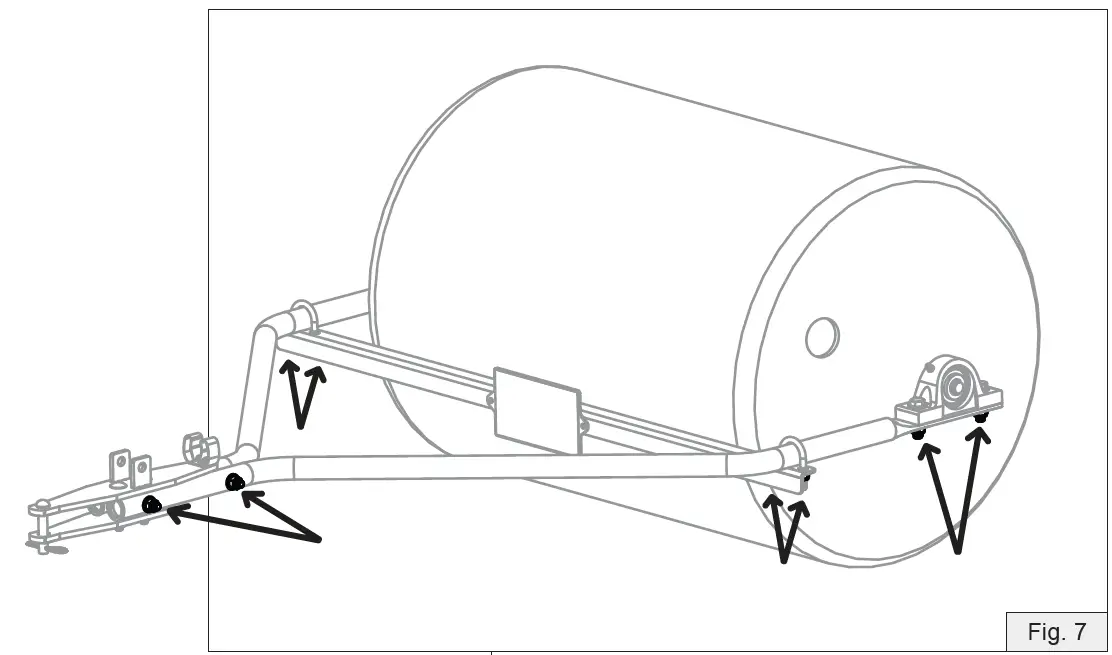
- Align the tow tube (2) against the flat base of the roller bearing (12) as illustrated here. Add a 3/8″ Flat Washer (22) to each of the 3/8″-16 x 1- 1/2″ Hex Head Bolts (18) and run them through these two parts. Beneath the two tubes, loosely add a 3/8″ Nylon Lock Nut (26) to each.

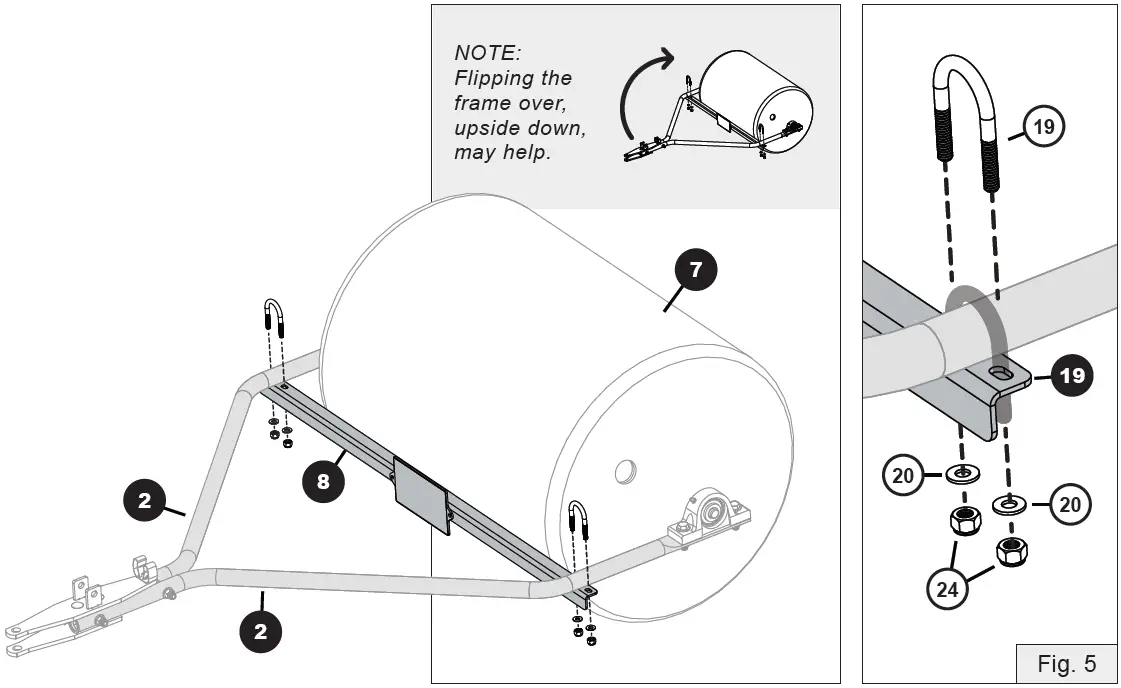
- Align the scraper bar (8) parallel with the roller drum (but not touching), and across the frame tubes (2) as illustrated. The logo panel faces away from the roller drum.
Slide the two U-Bolts (19) in place, straddling the frame tubes (2), and running through the scraper bar (8). Add a 1/4″ flat washer (20) and add a 1/4″ nylon lock nut (24) to each end of the U-Bolt, but don’t tighten fully yet.
NOTE: Alternate tightening the nuts to ensure the u-bolts are straight.
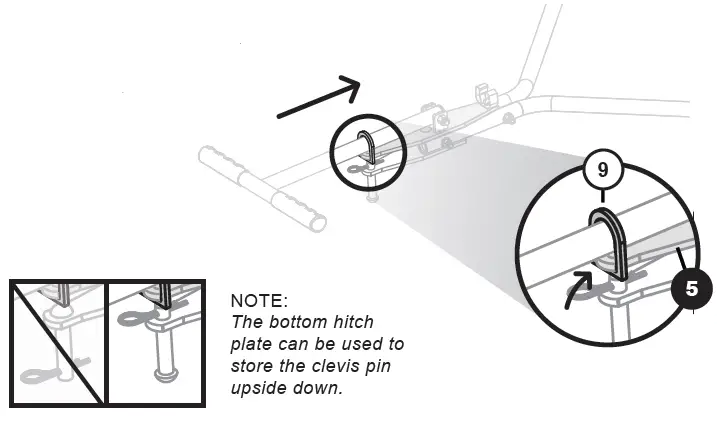
NOTE: Leave a small gap between the bar (8) and roller (7) ensuring the scraper bar does not touch the roller at any point in one full revolution. - Insert the clevis pin (27) through the end of both hitch plates (5 and 6). Secure with a hairpin cotter (28). Secure the two carriage bolts (15) beneath the lower hitch plate (6).
NOTE: The hitch pin can be stored upside down in the bottom hitch plate when using the push handle.
- Securing the Hardware
Fully secure all of the nuts and bolts that were added in Steps 3, 5, and 6.
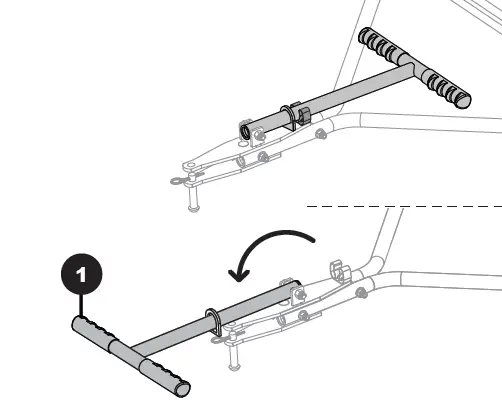
- Insert the handle (1) through D-ring (9) and then slide the handle through the upper hitch plate (5) tabs.
Slide a 3/8″ washer (22) between the handle and hitch tabs. Run the 3/8″ x 2-1/4″ hex head bolt (17) through and secure in place with a 3/8″ nylon lock nut (26).
NOTE: Tighten firmly to reduce play but do not overtighten as the handle needs to rotate.
NOTE: Resting the handle in the spring clip may help.
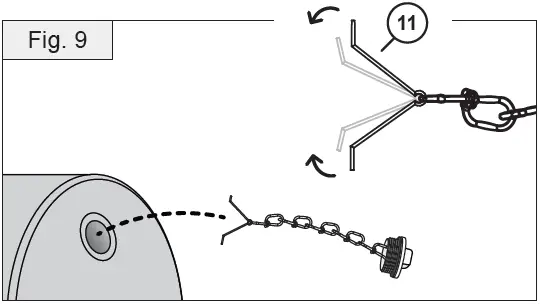
- Attach the roller plug (11) by squeezing the tether spring and insert into the roller, rotating the plug in place.


Assembly is complete.
Use and Care
TO PREVENT INJURY, USE WITH CAUTION: LIFTING HAZARD
When the roller is fully loaded with water, it weighs:
- R28-1824 = 270 lbs
- R76-2436 = 680 lbs
OPERATION
- Refer to the tractor manual to determine the proper towing capacity of your Tractor / Rider.
- GROUND CONDITION IS VITAL TO GOOD LEVELING. Soil should be moist, but not muddy.
- Refer to your Tractor or Riding Mower owner’s manual for proper towing capacity and safe operation of your towing equipment. Towing/Stopping distances will be greatly affected by the added weight of the roller.
- Fill the roller with the amount of water recommended for your tractor/rider. Screw in the plug and tighten it securely.
- The plug has an o-ring to create a seal and prevents the drum contents from leaking out.
- Please note that sand may be used in place of water with no risk of freezing.
Using the Handle:
- Rotate the handle (1) position.

- Slide the D-ring (9) over the top hitch plate (5).

CAUTION! Avoid Damage.
Do not overload your tractor/rider. Roller fully loaded with water weighs:
- R28-1824 = 270 lbs
- R76-2436 = 680 lbs
WARNING: Pinch Points
Use caution between the scraper bar and roller, as well as the handle.
MAINTENANCE
- The key to years of trouble-free service is to keep your Lawn Roller clean and dry.
- Should any rust develop, sand lightly and then paint the area with enamel.
- Periodically check all fasteners for tightness.
- Lubricate bearings monthly with general-purpose lithium grease. Using the grease fittings on the bearings, ensure the grease fitting is clean prior to lubricating. If used in a very dirty/wet environment, lubricate bearings weekly.
NOTE: It’s best to rotate the axle while lubricating. Bearings are fully greased when grease comes out of the bearing seals on the sides.
TRACTOR / RIDING MOWER SPEED
Rollers yield the best results when ground conditions are correct, and equipment is operating at less than 3 mph.
CALIBRATING YOUR TRACTOR TO 3 MPH:
Measure a distance of 20 feet on a flat, level surface. Adjust the tractor throttle and select a gear to cover this distance in 4.5 seconds.
STORAGE
For the longest life:
- Drain the roller
- Leave the plug out
- Grease bearings prior to long-term storage.
- Refer to the maintenance section.
- If possible, hang the roller when not in use to prevent the possibility of developing a flat spot.
If a flat spot develops on the roller during storage, ensure that the roller is empty then leave it out in the sun to warm and roll it around to reduce flat area.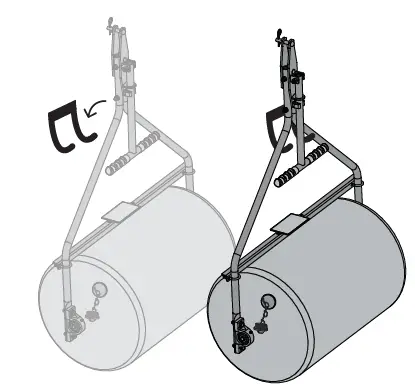
QUALITY CONTINUES WITH QUALITY SERVICE
If you have installation questions, are missing parts, or need replacement parts, don’t go back to the store!
Please find your product serial number and model number, then contact our Customer Service department:
- In North America and Canada call Toll-Free: 800-972-6130
- Chat online: www.spyker.com.
WARRANTY
1-YEAR LIMITED WARRANTY
This is warranted to the original purchaser only. Spyker will replace parts with defects in materials and workmanship, for a period of one year from the date of purchase.
Spyker Spreaders will not be liable for any loss, damage or expense including, but not limited to, consequential or incidental damages, arising from the operation, condition or use of the item. The sole and exclusive remedy against Spyker Spreaders is the replacement of defective parts. This warranty gives you specific legal rights, and you may also have other rights which vary from state to state.
This express warranty, which is applicable only to the original purchase, is in lieu of and excludes all other warranties, whether expressed or implied by operation of law or otherwise, including any warranty of merchantability or fitness for a particular purpose.
SPYKER SPREADERS
Jeffersonville, IN 47130 USA Phone: 800.972.6130 www.spyker.com.
©2021 Spyker Spreaders/A Brinly-Hardy Co.


