
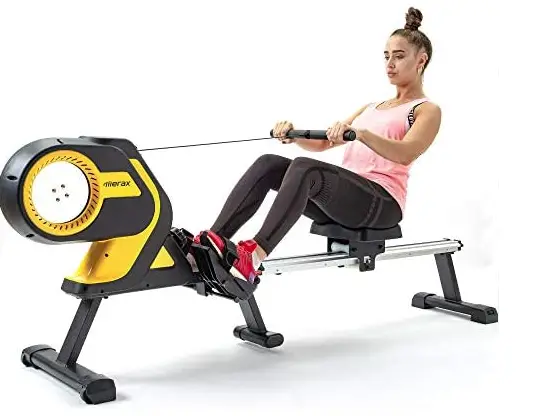
Amucolo MRS-CYMS-0AAL Magnetic Rowing Machine Folding Rower
PLEASE DO NOT RETURN TO STORE
Please do not return this product to the retailer!!We are able to assist you in ANY way.
- If you find that you have any trouble with assembly or missing or damaged parts, please contact us the seller.
EXPLOSION DIAGRAM
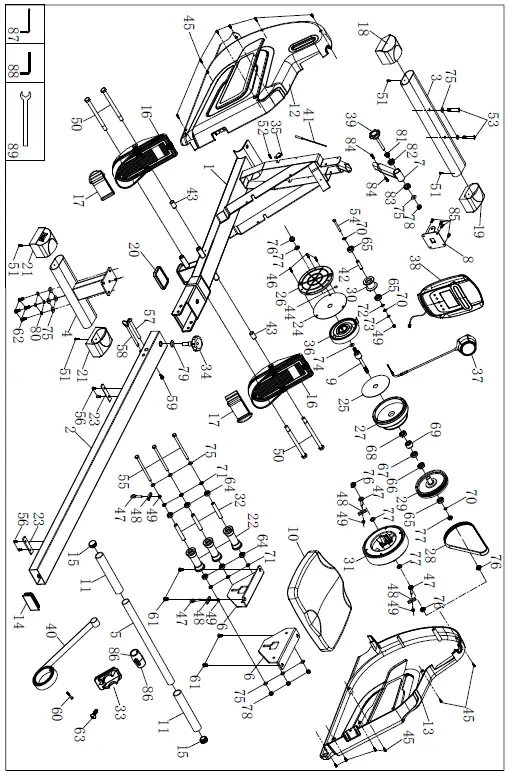
PARTS LIST
| No. | Description | QTY | No. | Description | QTY | |
| 1 | Main frame | 1 | 43 | Bushing | 2 | |
| 2 | Rail | 1 | 44 | Sensor magnet | 1 | |
| 3 | Front stabilizer | 1 | 45 | Self-tapping screw | 12 | |
| 4 | Rear stabilizer | 1 | 46 | Self-tapping screw | 3 | |
| 5 | Handlebar | 1 | 47 | Adjusting bolt | 4 | |
| 6 | Fixed plate for Seat | 2 | 48 | U-type base | 2 | |
| 7 | Console support tube | 1 | 49 | Domed nut | 5 | |
| 8 | Fixed plate for Console | 1 | 50 | Hex bolt | 4 | |
| 9 | Axle set for Meshbelt | 1 | 51 | Self-tapping screw | 4 | |
| 10 | Seat | 1 | 52 | Self-tapping screw | 1 | |
| 11 | Foam grip for handlebar | 2 | 53 | Round hex head bolt | 2 | |
| 12 | Chain cover L | 1 | 54 | Hex Head Screw | 1 | |
| 13 | Chain cover R | 1 | 55 | Allen bolt | 3 | |
| 14 | Square end cap | 1 | 56 | Socket Philips screw | 4 | |
| 15 | End cap for Handlebar | 2 | 57 | Hex bolt | 1 | |
| 16 | Pedal L&R | 2 | 58 | Safety Pin | 1 | |
| 17 | Pedal strap | 2 | 59 | Round hex head bolt, M6*16 | 1 | |
| 18 | End cap for Front stabilizer L | 1 | 60 | Cross head screw | 1 | |
| 19 | End cap for Front stabilizer R | 1 | 61 | Allen screw, M8*15 | 4 | |
| 20 | Plastic pad | 1 | 62 | Round hex head screw, M8*20 | 4 | |
| 21 | End cap for Rear stabilizer | 2 | 63 | Allen screw, M5*10 | 1 | |
| 22 | Roller | 3 | 64 | Bearing | 6 | |
| 23 | Rubber pad | 2 | 65 | Bearing | 3 | |
| 24 | Big Dumboard | 1 | 66 | Bearing | 1 | |
| 25 | Small Dumboard | 1 | 67 | Bearing | 1 | |
| 26 | Disc Spring Cover | 1 | 68 | Bearing | 1 | |
| 27 | Meshbelt | 1 | 69 | One way bearing set | 1 | |
| 28 | Belt | 1 | 70 | C-clip | 3 | |
| 29 | Belt pulley | 1 | 71 | Sleeve | 6 | |
| 30 | Roller for belt | 1 | 72 | Wave washer | 1 | |
| 31 | Magnetic assembly | 1 | 73 | Flat washer | 1 | |
| 32 | Sleeve for seat roller | 3 | 74 | Flat washer | 1 | |
| 33 | Rubber base for Handlebar | 1 | 75 | Flat washer | 13 | |
| 34 | Round knob | 1 | 76 | Flange nut | 4 | |
| 35 | Sensor holder | 1 | 77 | Nut | 4 | |
| 36 | Scroll Coil Spring | 1 | 78 | Domed nut | 4 | |
| 37 | 14 level tension control | 1 | 79 | Flat washer | 1 | |
| 38 | Console | 1 | 80 | Spring washer | 4 | |
| 39 | Knob | 1 | 81 | Inner spacer | 1 | |
| 40 | Webbing strap | 1 | 82 | Outer spacer | 1 | |
| 41 | Sensor | 1 | 83 | Spacer | 1 | |
| 42 | Sleeve for Webbing strap | 1 | 84 | Cross round head screw | 2 |
| 85 | Cross-head screw | 4 | 89 | Open wrench | 1 | |
| 86 | Plastic cover for handlebar | 2 | ||||
| 87 | Allen wrench | 1 | ||||
| 88 | Allen wrench | 1 |
COMPONENTS FOR ASSEMBLY
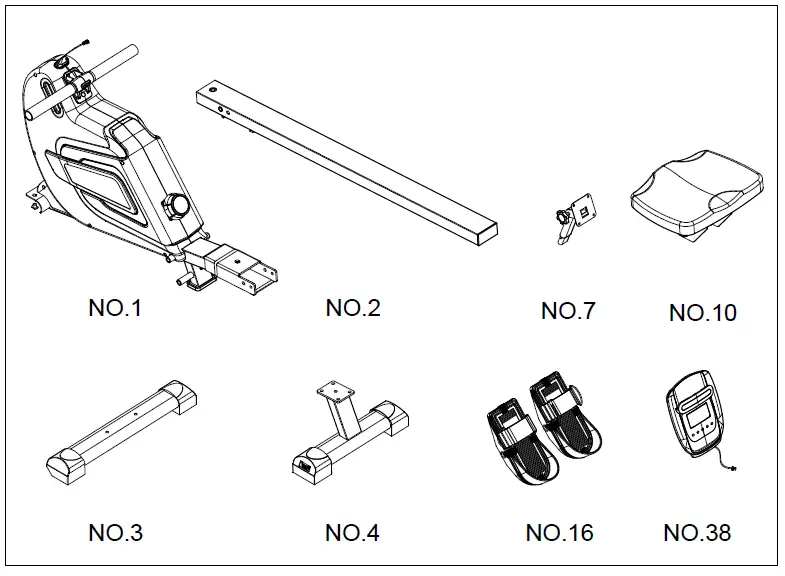
| Part No. | Description | Qty |
| 1 | Main frame | 1 |
| 2 | Rail | 1 |
| 3 | Front stabilizer | 1 |
| 4 | Rear stabilizer | 1 |
| 7 | Console support tube | 1 |
| 10 | Seat | 1 |
| 16 | Pedal L&R | 2 |
| 38 | Console | 1 |
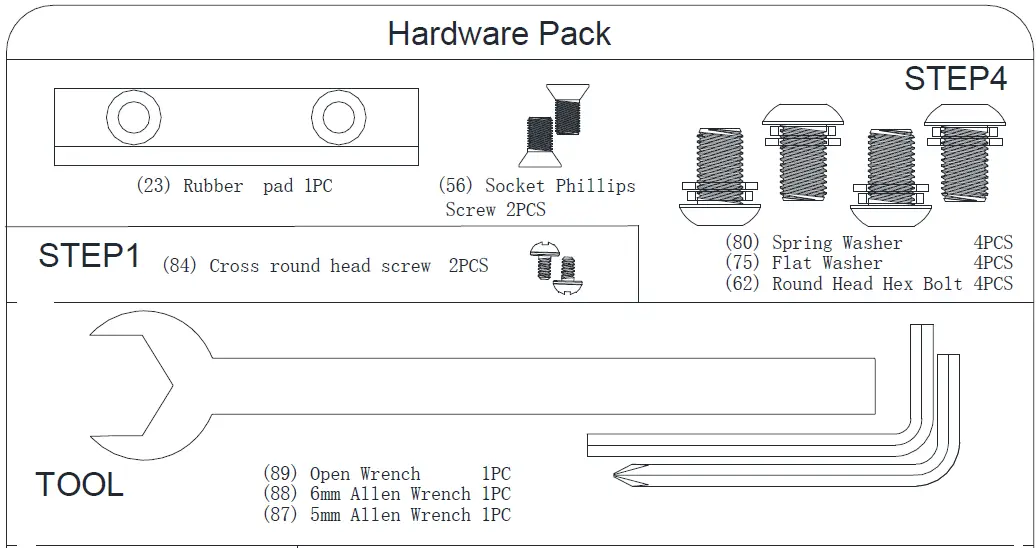
HARDWARE PACKAGE
ASSEMBLY INSTRUCTIONS
NOTE: 2 people are recommended to assemble the product.
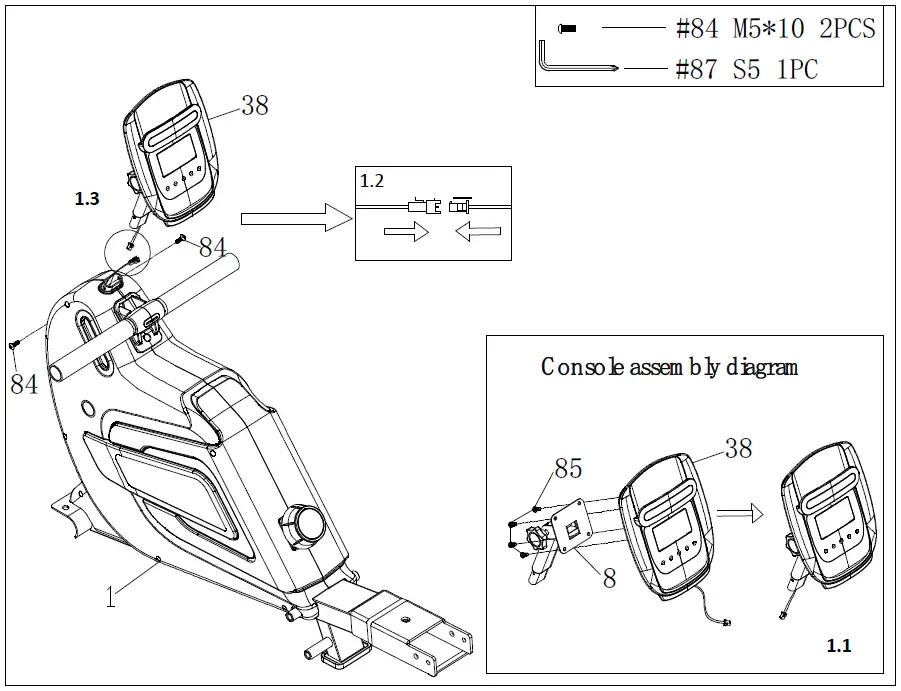
Step 1:
- Thread the sensor wire from Console (38) into console support tube set, securing with 4 pcs Cross-head screw (85) and Console fixing plate (8).
- Attach the Support for Console (38) to Main frame (1), tighten with 2 pcs Cross-head screws (84).

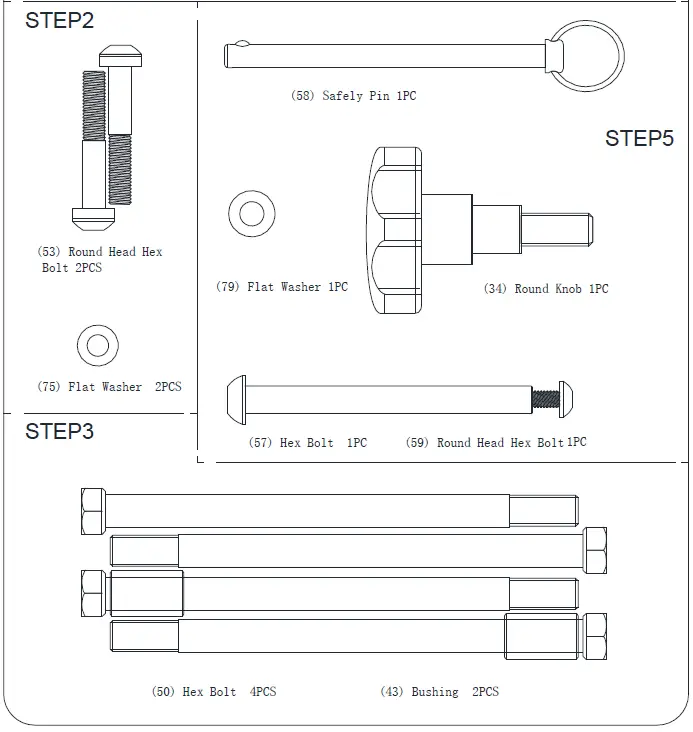
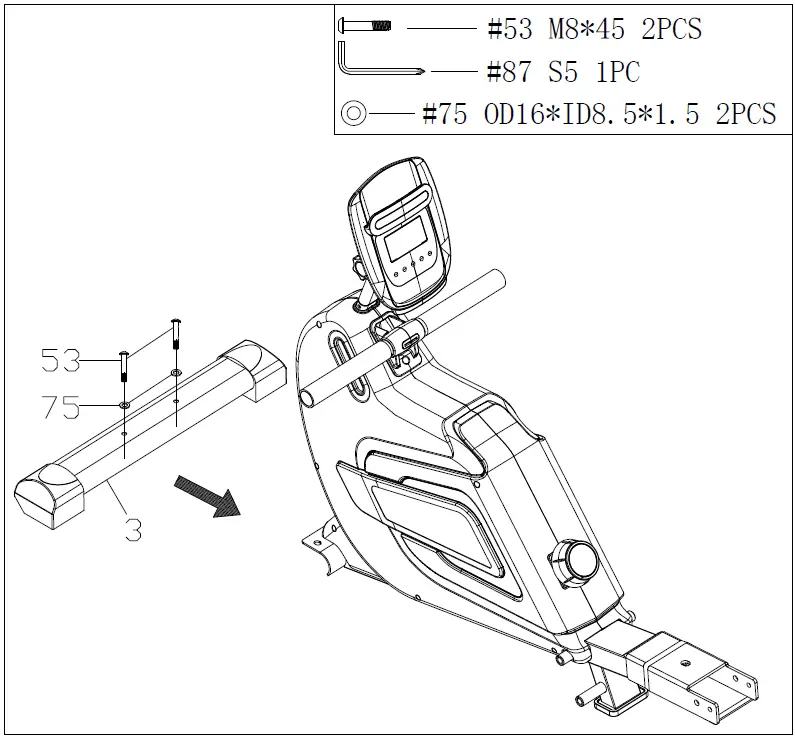
Step 2:
- Attach the Front stabilizer (3) to Main frame (1), securing with 2pcs Flat washers (75), 2 pcs Round hex head bolts (53).

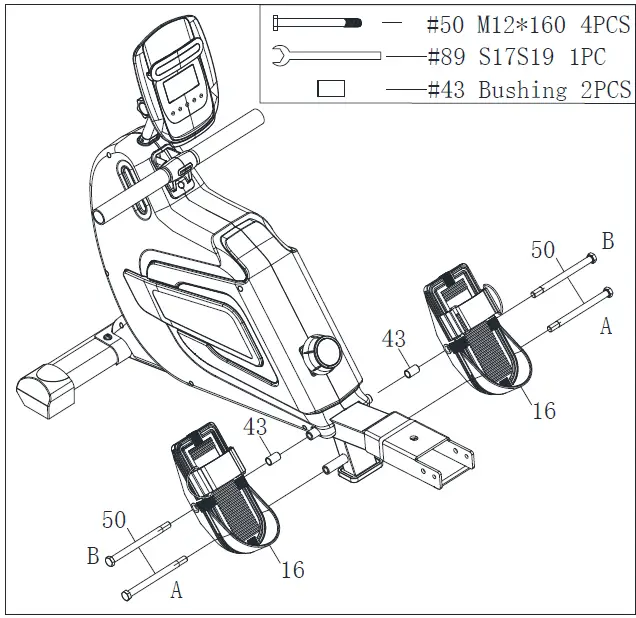
Step 3:
- Attach the hex bolt (#50) into the lower hole of the Main frame (#1) directly according to (see instruction A).
- Then attach the other hex head screw (#50) into the upper hole of the Main frame (#1) through the pedal (#16) and a bushing (#43) (see instruction B).
- Repeat the same to assemble the other pedal.
Note: Identify left and right pedal first before assembly.
Step 4:
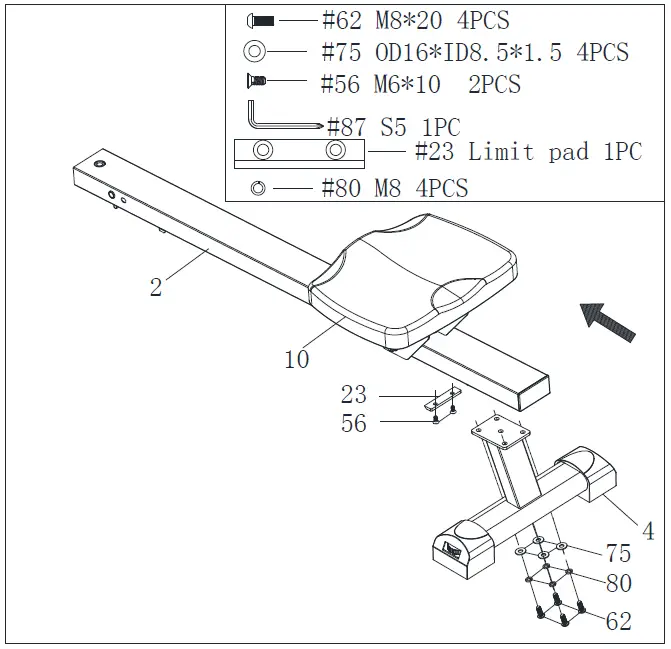
- Slide the seat (#10) onto the Rail (#2). Attach Rubber Pad (#23) to the Aluminum rail (#23) and secure with two Socket Philips Screws (#56).
- Attach the Rear stabilizer (#4) to the Rail (#2), tighten with 4pcs Flat washers (#75), 4pcs Spring washers (#80), 4pcs Round hex head screws (#62).

Step 5:
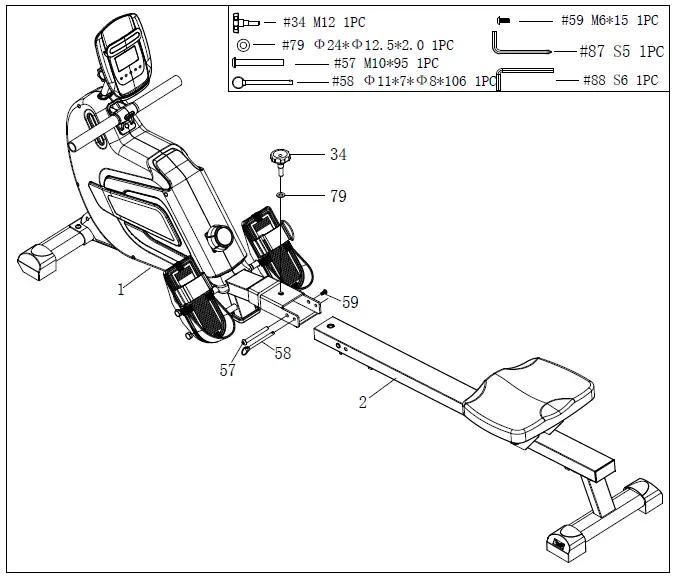
- Attach the Rail (#2) to the Main frame (#1), tighten with the Hex bolt (#57) and Round hex head bolt (#59).
- Insert the Safety pin (#58) to the Main frame (#1) and Rail (#2).
- Tighten the Round knob (#34) with flat washer (#79).

ADJUSTMENT GUIDE
PEDAL ADJUSTMENT
To adjust the pedal strap, remove the Velcro end of the strap from the mesh side by pulling it upward then to the left. Once removed, you may increase the opening of the pedal strap by pulling the mesh end up and to the right. To tighten, pull the Velcro end of the pedal strap upward then to the right and down to secure it to the mesh side of the strap.
MOVING THE MACHINE
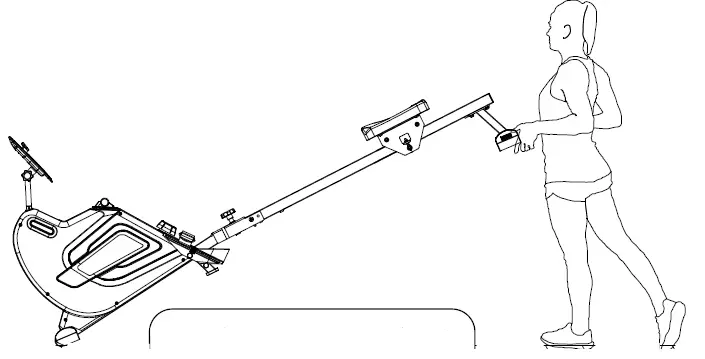
- To move the machine, lift up the rear stabilizer until the transportation wheels on the front stand touch the ground. With the wheels on the ground, you can transport the rower to desired location with ease.
ADJUSTING THE BALANCE
Adjust the Rear Stabilizer of the machine if the machine is unbalanced during use.
FOLDING INSTRUCTION
When not in use, the rower can be folded to save space. Remove the knob (#34) and Flat washer (#79), pull out the Pin (#58). Then, take the rail (#2) and move it into a vertical position.
Safety Instruction:
The seat (#10) will slide down when folding the rail (#2).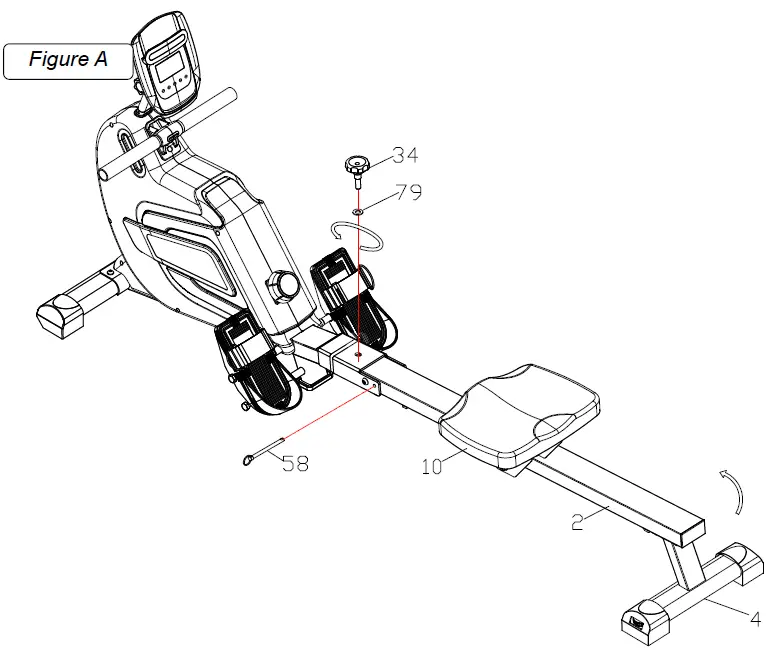

CONSOLE INSTRUCTIONS
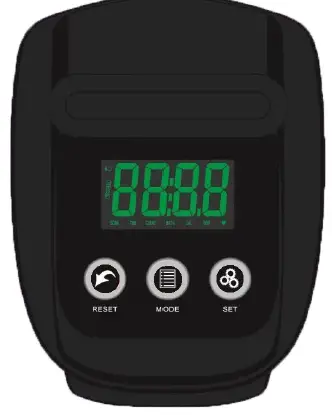
FUNCTIONAL BUTTON
- MODE – Press to select mode. Long press for 2 seconds to reset time, count, distance and calories.
- SET – Set target value of time, count, distance or calories when not in scan mode.
- RESET – Press to reset time, count, distance and calories.
FUNCTIONS AND OPERATIONS
- SCAN:To enter the scan mode, press “MODE” button and select the function to “TIME”, then the word “SCAN” appears on the left of the display. The console displays 6 functions (time, count, distance, calorie, SPM and pulse) in a repeating cycle, each for 6 seconds. To turn off the scan mode, press “MODE” once and the word SCAN disappears. To turn on the scan mode again, press “MDOE” and select the function to “TIME”. In scan mode, the word SCAN flashes continuously on the left of the display.
- TIME: Display the time from exercise start to end.
- COUNT: Display the number of strokes you have completed during your workout.
- DISTANCE: Display the distances you have rowed.
- CALORIES: Display the calories burned.
- Strokes Per Minute (SPM): Display the number of strokes completed per minute.
- PULSE: Display the current heart rate value of the user (Wear a wireless heartbeat chest belt (not included) before measuring the heart rate, the measurement value can not be regarded as the basis of medical treatment).
TARGET TRAINING SETTINGS
This computer has four target training modes: time, count, distance and calories. Before setting the target value, if the word “SCAN” flashes on the display, press the “MODE” button again to turn off the scan mode first. TIME target training mode: Press “MODE” button to switch to the “TIME” function, and then press the “SET” button to adjust the target time (Press and hold the set button to speed up the setting). When it reaches desired value, release the button. Start exercising and the display will start to count down. When the count down reaches zero, the time function flashes to indicate the completion of the training target. At this time, if you continue to train, the computer will automatically start to count up from zero. COUNT target training mode: Press “MODE” button to switch to the “COUNT” function, and then press the “SET” button to adjust the target count (Press and hold the set button to speed up the setting). When it reaches desired value, release the button. Start exercising and the display will start to count down. When the count down reaches zero, the count function flashes to indicate the completion of the training target, if you continue to train, the computer will automatically start to count up from zero.
DISTANCE target training mode: Press “MODE” button to switch to the “DIST” function, and then press the “SET” button to adjust the target distance (Press and hold the set button to speed up the setting). When it reaches desired value, release the button. Start exercising and the display will start to count down. When the count down reaches zero, the distance function flashes to indicate the completion of the training target. At this time, if you continue to train, the computer will automatically start to count up from zero.
CALORIE target training mode: Press “MODE” button to switch to the “CAL” function, and then press the “SET” button to set the target calorie (Press and hold the set button to speed up the setting). When it reaches desired value, release the button. Start exercising and the display will start to count down. When the countdown reaches zero, the calorie function flashes to indicate the completion of the training target. At this time, if you continue to train, the computer will automatically start to count up from zero.
If you want to modify the target data after the setting process or completion, press “RESET” button directly to clear all settings, and then reset according to previous description.
NOTE:
- If the battery symbol on the display lights up, please replace the battery.
- The monitor will automatically shut off if there is no signal received after 2 minutes.
- The monitor will be auto powered on when starting to exercise or pressing any button on the console.
- When you stop exercising for 4 seconds, the display will stop calculating and the word ”STOP” displays on the screen. When you resume exercising, the display automatically starts calculating again and the word “STOP” disappears.
SPECIFICATIONS
|
FUNCTION | SCAN | Every 6 seconds |
| TIME | 0:00~99:59 | |
| COUNT | 0~9999 TIMES | |
| DISTANCE | 0.00~99.99 MILES | |
| CALORIES | 0~9999 CAL | |
| SPM | 0~999 TIMES/MIN | |
| PULSE | 60~240 BPM | |
| BATTERY TYPE | 2pcs of SIZE –AA or UM –3 | |
| OPERATING TEMPERATURE | 32℉ ~ 104℉ | |
| STORAGE TEMPERATURE | 14℉ ~ 140℉ | |


