
KINCROME K12162 Hydraulic Garage Jacks

Specifications

- Part No.: K12162
- Working Load Limit: 2000 kg
- Height Lowered:115mm
- Height Raised: 460mm
- Head Cap Diameter: 110mm
- Handle Length: 1360mm
- Total Weight: 31.5kg

- Part No.: K12163
- Working Load Limit: 1450 kg
- Height Lowered: 85mm
- Height Raised: 466mm
- Head Cap Diameter: 100mm3
- Handle Length: 1360mm
- Total Weight: 26.8kg

- Part No.: K12164
- Working Load Limit: 1100 kg
- Height Lowered: 68mm
- Height Raised: 615mm
- Head Cap Diameter:100mm
- Handle Length: 1360mm
- Total Weight: 44.2kg
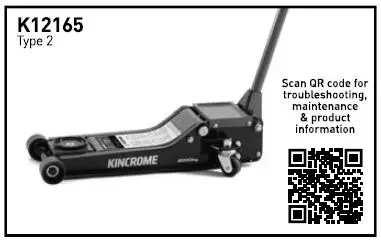
- Part No.: K12165 Type 2
- Working Load Limit: 2000 kg
- Height Lowered: 90mm
- Height Raised 520mm
- Head Cap Diameter: 110mm
- Handle Length: 1420mm
- Total Weight: 40kg

- Part No.: K12167
- Working Load Limit: 2800 kg
- Height Lowered: 107mm
- Height Raised: 520mm
- Head Cap Diameter: 110mm
- Handle Length: 1420mm
- Total Weight: 44.5kg
Know Your Product
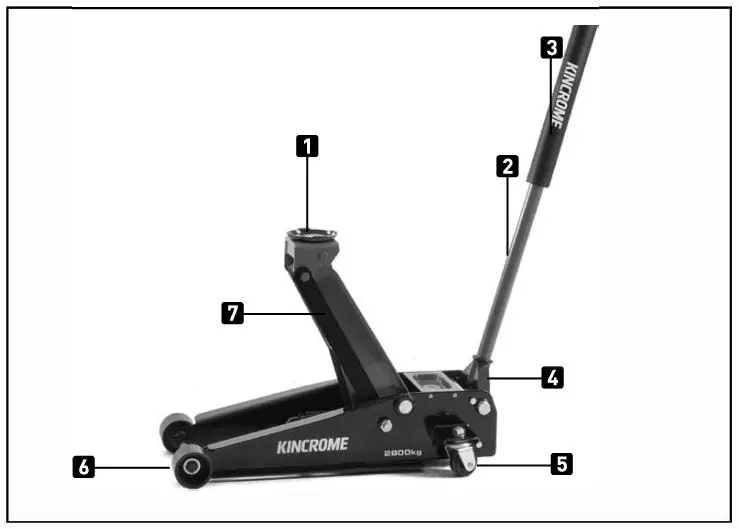
- HeadCap
- Handle Lower
- Handle Upper
- Handle Base
- Rear Castors
- Front Rollers
- Lifting Arm
Important Safety Instructions
The use of a vehicle jack has inherent dangers to avoid risk of personal injury or property damage make sure you are fully aware of the operating instructions for this product, the recommendations in the vehicle owners manual for jacking of your vehicle prior to lifting the vehicle. Do not exceed maximum lifting capacity of this jack. This jack is intended for automotive use only. Be aware that large or heavy vehicles may exceed jack’s stated capacity check vehicle owners manual or contact the vehicle manufacturer. Do not use for any other purpose except the raising and lowering of vehicles, never use to raise any structure or building, Do not lift any human and never ride on jack.
Personal Safety
- Stay alert. Watch what you are doing and use common sense when operating the jack. Do not use the jack while tired or under the influence of drugs, alcohol, or medication. A moment of inattention while operating the jack increases the risk of injury to persons.
- Dress properly. Do not wear loose clothing or jewellery. Contain long hair. Keep hair, clothing, and gloves away from moving parts. Loose clothes, jewellery, or long hair increases the risk of injury to persons as a result of being caught in moving parts.
- Do not overreach. Keep proper footing and balance at all times. Proper footing and balance enables better control of the jack in unexpected situations.
- Use safety equipment. A dust mask, non-skid safety shoes and a hard hat must be used for the applicable conditions.
Preparing Work Area
Before using jack to lift vehicle, it is important to prepare work area properly. Follow this procedure each time the jack is used to help prevent property damage and or serious injury.
- Plan location of jack beneath vehicle, making sure jack will be contacting only a jack support area of vehicle.
- Clear obstructions from work area. Working in tight or cluttered work areas is dangerous.
- Clear children and others from work area before moving or lifting vehicle. Another adult should be nearby for extra safety and assistance but must be clear of vehicle as it is moved or lifted.
- Conduct a pre-operational check of the equipment. Thoroughly inspect jack for damage or wear before each use.
- Briefly test operation of vehicle jack before using to lift any vehicle. If jack is damaged or is malfunctions DO NOT LIFT ANY VEHICLE until the problem is corrected.
- The Vehicle manufacturer’s owner’s manual should be consulted prior to the lifting of the vehicle. It will advise safety precautions, jacking procedure, vehicle weight, recommended jack type, and location of jack support areas on vehicle. NEVER EXCEED THE WORKING VEHICLE LIMIT OF JACK.
- The hydraulic vehicle jack should be used for lifting and lowering only; the raised vehicle should be supported on suitably rated vehicle support stands, and the hydraulic trolley jack removed, prior to commencement of work on e vehicle. Read and understand jack stands manufacturer’s instructions and safety information before use and before lifting the vehicle with this jack.
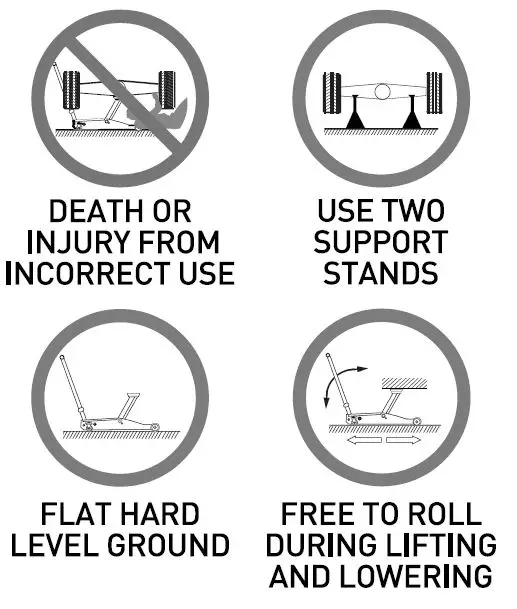
- Be sure jack and vehicle are on solid, level ground such as paved or concrete driveway or garage floor. The jack should be used on level firm ground wherever possible. Uneven or sloped surfaces create hazardous working conditions and dangerously impede the function of the jack. Ensure the jack is free to roll during lifting and lowering.
- No person should remain in a vehicle that is being lifted. No person should enter a vehicle which is supported by a jack or by vehicle support stands. No person should lean into a vehicle which is supported by a jack or by vehicle support stands.
- No person should place any part of their body under a vehicle that it supported only by a trolley jack.
- With vehicle in proper position, set vehicle’s parking brake or emergency brake and put the gear-shift in park (manual transmissions should be placed in 1st gear). Twist VEHICLE IGNITION OFF AND TO THE “LOCK” POSITION making sure steering wheel locks.
- It is recommended that the unlifted wheels of the vehicle be chocked. Do not rely on vehicle transmission orbrakes to hold vehicle in position. Chock all wheels of vehicle not being lifted off the ground to prevent vehicle rolling. Using wedge-shaped blocks that tyre cannot roll over, position one chock tight against the tyre in both forward and reverse rolling paths.
- The vehicle should be centrally located on the head cap. Off centre vehicles can be unstable.
Instruction Manual Images
 WARNING
Unpacking and Assembling Jack
Unpacking
Unpack all the components from the box. When unpacking the garage jack carefully inspect for any damage that may have occurred during transit. Check for loose parts, missing parts or damaged parts.
- Ensure all packaging materials are disposed of as per your local council guide lines.
- Modifications must not be carried out or accessories added.
Assembling the Handle Assembly
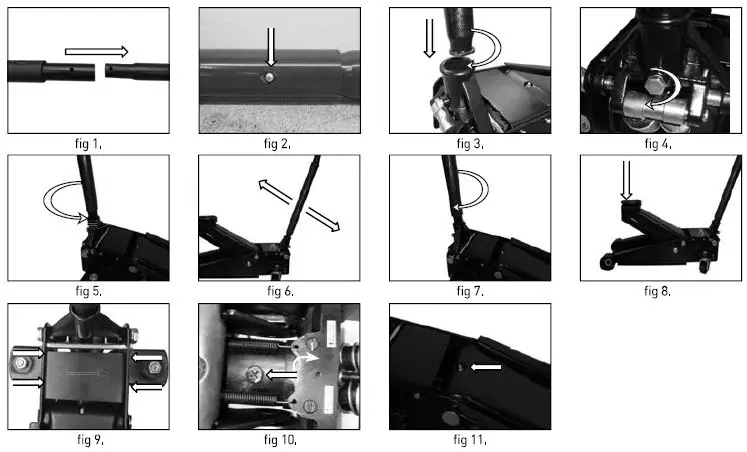
- Ensuring the locking holes are aligned, insert the Upper Handle [3) into the Lower Handle [2) [fig.1).
- Insert the bolt and tighten in a clockwise direction [where fitted) (fig .2).
- Slide the handle assembly into the handle base [41. The handle assembly will be required to be slowly twisted for the hex shaped drive of the release valve to engaged into the handle assembly slot [fig.31.
- Fasten the locking screw in the handle base (4) to ensure the handle assembly is safely secured [fig.4).
- Remove the safety clip that secures the handle base [4) in transit.
Bleeding/ Venting Trapped Air
- Use the handle assembly to twist the release valve 1-1/2 turns counter-clockwise (fig.51.
- Rapidly pump the handle assembly 10 to 20 times to purge air from the hydraulic system [fig.61.
- Use the handle assembly to twist the release valve clockwise until tight [fig.71. Do not over-tighten.
Operation
Your Kincrome Garage Jack is designed to be used with a specific handle length and head cap size. See below for details.
| K12162 | 1360m m | |
| K12163 | 1360mm | 1 00mm |
| K12164 | 1360 m m | 1 00mm |
| K12165 Type 2 | 1420m m | 1 10mm |
| K12167 | 1420 m m | 1 10mm |
Before first using jack carry out the following preparation:
- Check oil level – Open release valve with the handle assembly [fig.5) not more than two twists and press down on head cap (11 [fig.BJ to ensure lifting arm [71 is fully down.
- Remove the 4 screws fixing the pump cover to the jack and remove the pump cover [fig.91.
- Remove fluid filler plug [fig.1 DI. Hydraulic fluid level should be visible at the oil filler hole approx 12 mm below fluid filler, top as required (refer to the “”Maintenance and Storage·· pg 71.
- Bleed system – refer to the above “”BleedingNenting Trapped Air””.
- Lubricate – The Hydraulic Trolley Jack does not require lubricating before first use. It is recommended to periodically grease the wheels and lifting arm pivot via the fitted grease nipple.
vehicle movement.
- Close release valve by twisting the handle assembly clockwise until firm resistance is felt [fig.5).
- Inspect position of head cap [11 beneath support area, making sure it is centred and properly engaging support area.
- Slowly pump the handle assembly until the head cap (1 I contact the vehicle”s lift point.
- To lift, continue pumping until vehicle reaches desired height. Pay attention to head cap (1 I position as vehicle is being raised to be sure there is no danger of support area slipping off or lifting from the head cap [11.
- Place jack stands [always use in pairs) under vehicle support areas.
- SLOWLY twist jack handle assembly counter-clockwise (fig 5.) to ease vehicle down onto jack stands.
Working on Vehicle
Any vehicle being supported by a jack or jack stands creates a potentially hazardous working environment.
Do not move or roll a jack that is supporting a vehicle. Never place any part of your body beneath a vehicle supported by a jack. Be careful of forces applied to vehicle such as torque on a nut or bolt. These forces could cause vehicle to become unstable on jack stands if they are not properly placed. Do not turn on the vehicle”s ignition or attempt to start any vehicle supported by a jack or jack stands.
Lowering the Lifting Arm
Caution!: Make certain that all personnel are clear of the vehicle before lowering. Control the rate of descent of the vehicle at all times. The more you open the release valve, the faster the vechile descends.
- Raise vehicle high enough to clear the jack stands, then carefully remove jack stands.
- Slowly twist the handle assembly counter-clockwise (fig.5) until the jack just begins to lower.
- Carefully control speed of descending vehicle. Lowering a vehicle too fast can cause property damage or serious injury.
- After removing the jack from under the vehicle, push down on the lifting arm (7) (fig.Bl to reduce the pump ram exposure to rust and contamination.
- If the vehicle fails to lower:
- Use another jack to raise the vehicle high enough to reinstall jack stands.
- Remove the affected jack. Repeat steps 1-4.
Maintenance and Storage.
Lubricating
Moving parts on a jack should be lubricated occasionally with a light machine oil to maintain efficient operation. Apply oil to joints on Lift Arm (7) hinges, push rods, Handle Base (4), Rear Castors (5), Front Rollers (6) (and adding grease via the grease nipple on the Lifting Arm (fig. 11). Wipe away excess oil and grease with soft cloth.
Maintaining Oil Level
Important Note: When adding or replacing oil, always use a good grade hydraulic jack fluid. Avoid mixing types of oil. DD NOT use brake fluid, alcohol, glycerine, detergent, motor oil or dirty oil, Improper fluid can cause serious internal damage to a jack.
Adding Oil:
With Head Cap (1) fully lowered & the Jack on level ground, remove the 4 screws and lift the pump cover (fig 9.) Remove air vent valve (fig 10). Hydraulic fluid level should be visible at the air vent valve hole approx 12mm below air vent valve hole, do not overfill. If low, add fluid as needed then close air vent valve.
Replacing Oil:
For better performance & longevity, replace oil supply once a year. To drain oil, open air vent valve and loosen the release valve by twisting handle assembly counter-clockwise. BE VERY CAREFUL not to permit dirt or foreign matter to get into the system. Invert the jack over suitable container and allow oil to drain. Close release valve by twisting handle assembly clockwise, fill with good grade hydraulic jack oil close air vent valve wipe away any spilt fluid. Test the jack before lifting a vehicle. Cleaning The jack should be wiped clean with soft cloth only. Do not use gasoline, kerosene, or other such solvents or any abrasive cleanser as cleaning agents and solvents will cause deterioration of the hydraulic seals.
Storage
Before storage, twist handle assembly 1-1/2 twists counter-clockwise to release pressure in hydraulic cylinder.Leave handle in this position. Store the jack level, in a clean environment preferably indoors, in a dry area to protect
the jack from moisture.
Repairing the Jack
There are no user serviceable parts except as outlined in the exploded views. Only trained, licensed and certified repair personnel should attempt any repairs or replacing of parts. Any modifications to this jack, except those performed by the manufacturer, or their design, will void all warranties both written and implied.
Caring for the environment
When a jack is no longer usable it should not be disposed of with household waste, but in an environmentally-friendly way. Please recycle where facilities exist. Check with your local council authority for recycling advice.
Recycling packaging reduces the need for landfill and raw materials. Reuse of recycled material decreases pollution in the environment. Please recycle packaging where facilities exist. Check with your local council authority for recycling advice. .
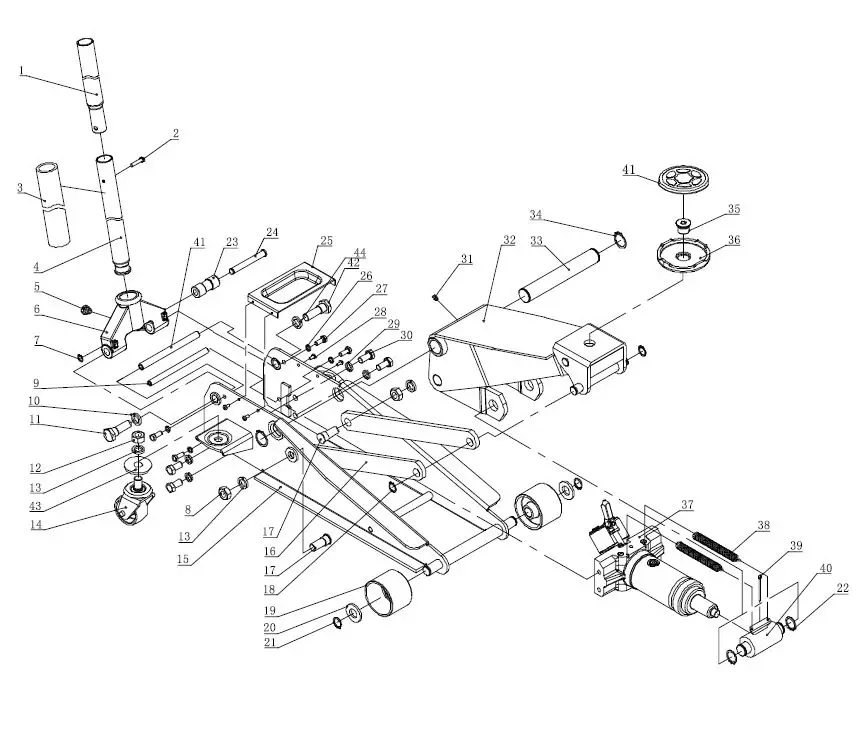
Exploded Diagrams
K12162
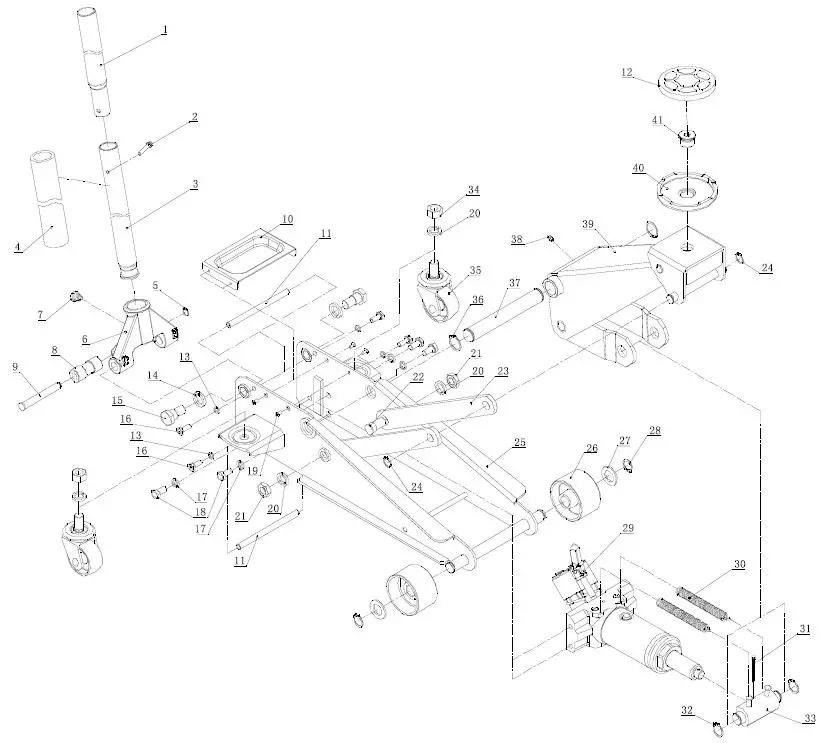
| 1 | HandleTubel | 1 | 22 Screw | |
| 2 | Bott | 1 | 23 Adjustable Plate | 2 |
| 3 | HandleTube2 | 1 | 24 Retainin g Rin g | |
| HandleSleeve | 25 Frame | |||
| RetainingRing | 26 FrontWheel | |||
| 6 | HandleSocket | 1 | 27 FlatWasher | |
| Screw | 28 Retaining Ring | |||
| Roller | 29 Pump | |||
| 9 | Spindle | 1 | JO Spring | |
| 10 | Tools Tray | 31 Cotter Pin | ||
| 11 | LimitingBar | 32 Retaining Ring | ||
| 12 | RubberPad | 1 | 33 AdaptorRcxl | |
| 13 | Lock Washer | 4 | 34 Nut | |
| 14 | Lock Washer | 2 | 35 Caster | |
| 15 | Bott | 2 | 36 Retaining Ring | |
| 16 | Bott | 4 | 37 LiltingArmShalt | 1 |
| 17 | LockWasher | 4 | 38 Zerk | |
| ,e | Boa | 4 | 39 l.iftn;JArmfesrtt./ | 1 |
| 19 | Screw | 40 Adaptor | ||
| 20 | Lcx:k Washer | 41 Screw | ||
| 21 | Nut |
K12163
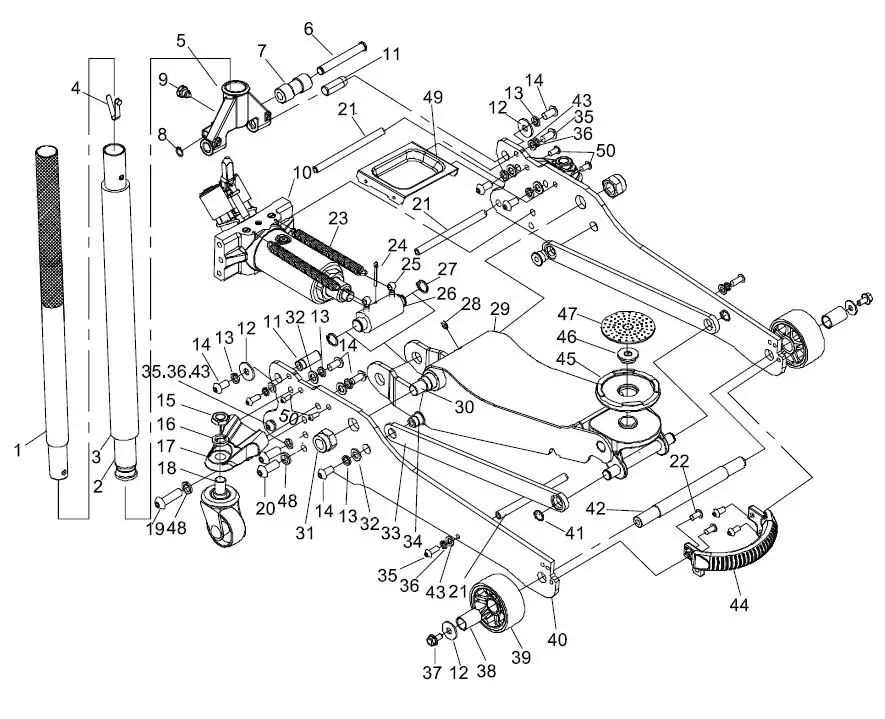
| 10 Pump | I 35 Sc w | |||
| 11 MountingShaft | 2 | 36 Lock Washer | ||
| 12 FlatWasher | 37 Bolt | |||
| 13 Lcx:kWasher | 38 Front Wheel Bushing | |||
| 14 Screw | 8 | 39 Front Wheel | ||
| 15 Nut | 2 | 40 Frame | ||
| 16 Lcx:k Washer | 2 | 41 Retaining Ring | ||
| 17 WheelScx:ket | 2 | 42 Front Wheel Axle I | ||
| 18 Caster | 2 | 43 Flat Washer | ||
| 19 Screw | 2 | 44 Handle | ||
| 20 Screw | 45 Adaptor | |||
| 21 LimitingBar | 46 Sc w | |||
| 22 Screw | 41 Rubbe r Pad | |||
| 23 Spring | 48 Lock Washer | |||
| 24 Cotter Pin | I | 49 Tools Tray | ||
| 25 EyeBo lt | 2 | 5D Sc w | ||
K12164
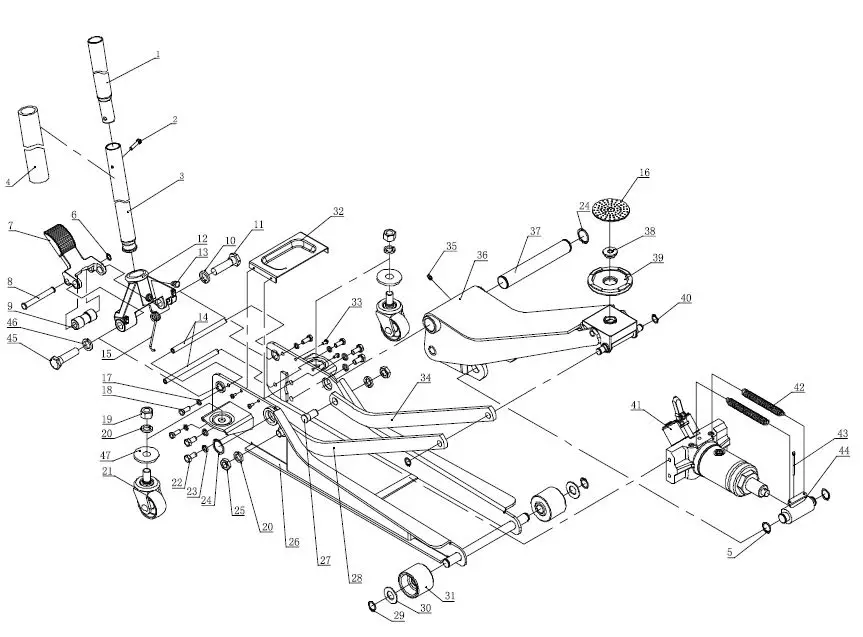
| 1 | HandleTubel | 1 | 22 Screw | |
| 2 | Bott | 1 | 23 Adjustable Plate | 2 |
| 3 | HandleTube2 | 1 | 24 Retainin g Rin g | |
| HandleSleeve | 25 Frame | |||
| RetainingRing | 26 FrontWheel | |||
| 6 | HandleSocket | 1 | 27 FlatWasher | |
| Screw | 28 Retaining Ring | |||
| Roller | 29 Pump | |||
| 9 | Spindle | 1 | JO Spring | |
| 10 | Tools Tray | 31 Cotter Pin | ||
| 11 | LimitingBar | 32 Retaining Ring | ||
| 12 | RubberPad | 1 | 33 AdaptorRcxl | |
| 13 | Lock Washer | 4 | 34 Nut | |
| 14 | Lock Washer | 2 | 35 Caster | |
| 15 | Bott | 2 | 36 Retaining Ring | |
| 16 | Bott | 4 | 37 LiltingArmShalt | 1 |
| 17 | LockWasher | 4 | 38 Zerk | |
| ,e | Boa | 4 | 39 l.iftn;JArmfesrtt./ | 1 |
| 19 | Screw | 40 Adaptor | ||
| 20 | Lcx:k Washer | 41 Screw | ||
| 21 | Nut |
K12165 Type 2
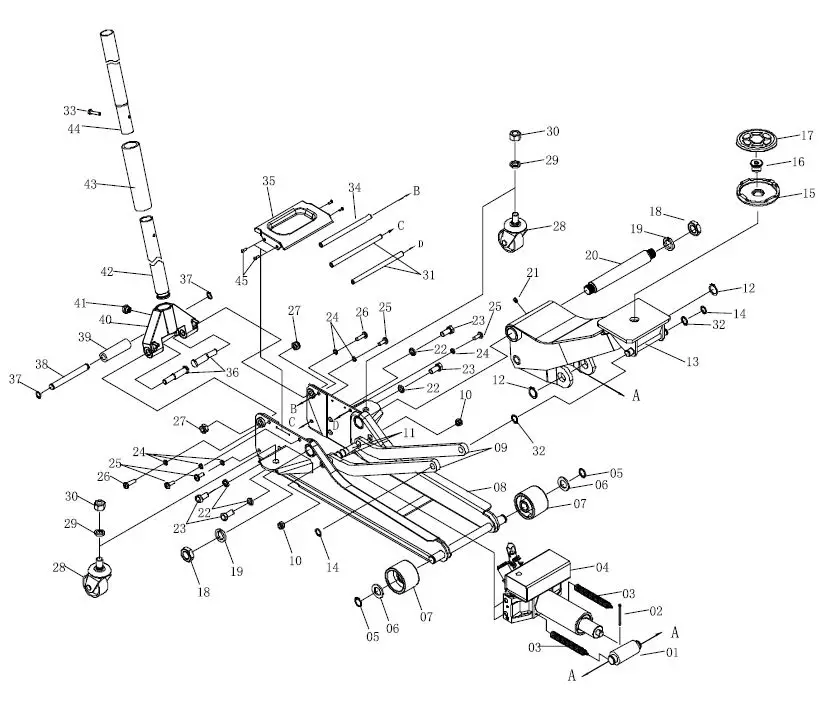
| 1 | AdaptorRod | 1 | 25 Screw |
| 2 | CotterPin | 1 | 26 Screw |
| 3 | Spring | 2 | 27 Nut |
| Pump | 28 CE8″ | ||
| RetainingRing | 29 LockWasher | ||
| 6 | FlatWasher | 2 | 30 Nut |
| 7 | FrontWheel | 2 | 31 Handle limit – |
| ingBar | |||
| 8 | Frame | 1 | 32 Retainin g Rin g |
| 9 | Adjustable Plate | 2 | 33 Bolt |
| 10 | Nut | 2 | 34 Handlelimi ting 1 Bar(short) |
| 11 | Screw | 2 | 35 ToolsTray |
| 12 | RetainingRing | 2 | 36 Bolt |
| 13 | Lifting Arm | 1 | 37 Retaining Ring |
| 14 | Retainin g Rin g | 2 | 38 Spindle |
| 15 | Saddle | 1 | 39 Roller |
| 16 | SaddleScrew | 1 | 40 Handle Socket |
| 17 | Rub ber Pad | 41 LimitingScrew | |
| 18 | Nut | 42 HandleTube2 | |
| 19 | Lcx:kWasher | 2 | 43 HandleSeelve |
| 20 | Lift Arm Shaft | 1 | 44 Handle Tube 1 |
| 21 | Zerk | 1 | 45 Screw |
| 22 | Lcx:kWasher | ||
| 23 | Bott | ||
| 24 | Lcx:kWasher |
K12167
| 1 | HandleTubel | 1 | 23 Roller |
| 2 | Bott | 1 | 24 Spindle |
| 3 | Handle Sleeve | 1 | 25 ToolsTray |
| Handle Tube 2 | 26 l.cJj(Wcs’u | ||
| Screw | 27 Bolt | ||
| 6 | HandleSocket | 1 | 28 Screw |
| Retainin g Rin g | 29 LockWasher | ||
| Nut | 30 Bolt | ||
| 9 | LimitingBar | 2 | 31 Zerk |
| 10 | LockWasher | 1 | 32 Lifting Arm As- sembly |
| 11 | Bott | 33 Lilting Arm Shafl | |
| 12 | Nut | 34 Retaining Ring | |
| 13 | LockWasher | 4 | 35 Screw |
| 14 | Caster | 2 | 36 Adaptor |
| 15 | Frame | 37 Pump | |
| 16 | Adjustable Plate | 38 Spring | |
| 17 | Screw | 2 | 39 CotterPin |
| 18 Retaining Rin g 2 40 Adaptor Rod | |||
| 19 FrontWheel | 2 | 41 RubberPad | |
| 20 FlatWasher | 2 | 42 Bolt | |
| 21 Retainin g Rin g | 2 | 43 Flat Washer | |
| 22 Retaining Rin g | 2 | 44 Lock Washer | |
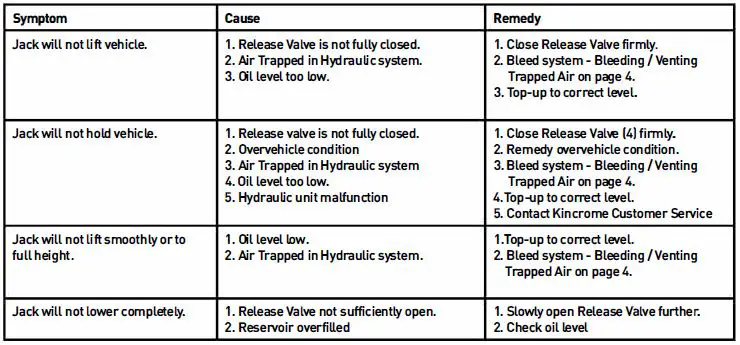
TROUBLESHOOTING
Office Contact Details:
- Phone: +61 3 9730 7100
- Fax: 1300 556 005
- Email: [email protected]
- Website: www.kincrome.com.au
warranty period (24 months] commences on the date that the product is purchased. If this product has materials or workmanship defects [other than defects caused by abnormal or non warranted use) you can, at your cost, send the product to place of purchase, an authorised Kincrome service agent or one of Kincromes addresses for repair or replacement. Your rights under this warranty are in addition to any other rights you have under the Australian Consumer Law or other applicable laws. Our goods come with guarantees that cannot be excluded under the Australian damage. You are also entitled to have the goods repaired or replaced if the goods fail to be of acceptable quality and the failure does not amount · to a major failure. For further details please visit www.kincrome.com.au or call us. Due to minor changes in design or manufacture, the product


 User Manual")


