![]()
Alpha Smartech Plus
Intelligent Wi-Fi Enabled Thermostat
GENERAL DESCRIPTION
The Smartech Plus controller is an intelligent Wireless Wi-Fi heating control unit used to adjust the system settings, time programs, and temperature control and functions.
When used with Alpha boiler models with the BUS connection the unit has full weather and load compensation control.
Varying the system flow temperature by adjusting the heat generator set point and output power according to the conditions.
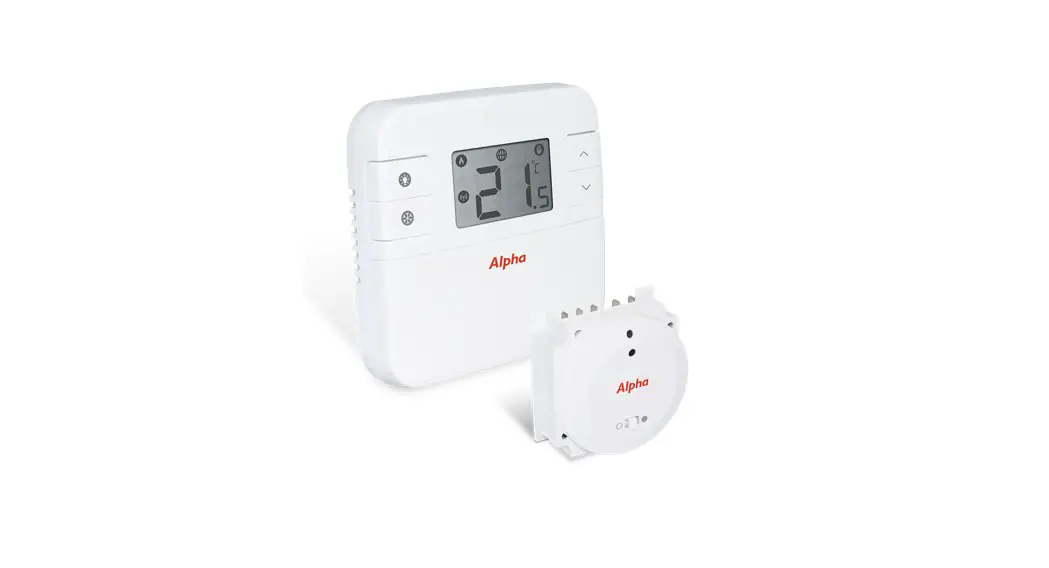
The Smartech Plus consists of a wireless Thermostat and a Gateway receiver mounted in the internal boiler control panel.
The Gateway receiver is connected via Bluetooth to the Thermostat and via Wi-Fi to the Internet.
The Gateway receiver is powered by the 230 Volt AC power mains, connected to the internal boiler via Bus or ON/OFF connection.
The Thermostat has an independent power supply with battery and features a display with e-ink technology.
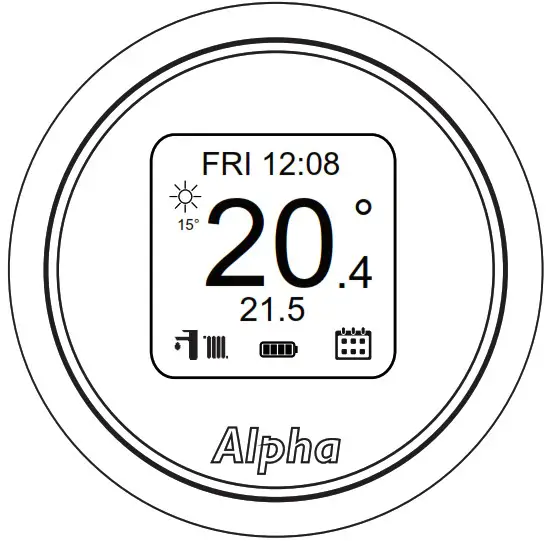
MAIN SCREEN
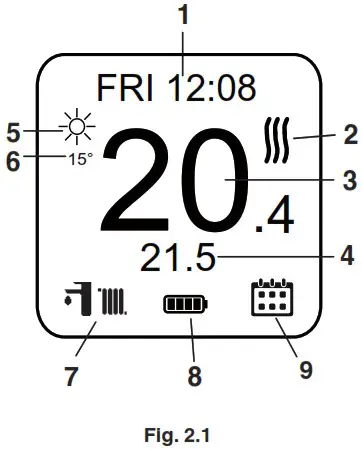
MAIN SCREEN SYMBOLS
| Item | Main screen display |
| 1 | Text message (for example: date, connection status, error) |
| 2 | |
| 3 | Detected room temperature |
| 4 | Set room temperature |
| 5 | Weather (if connected to internet) |
| 6 | Outdoor temperature (if connected to internet) |
| 7 | |
| 8 | |
| 9 | |
Navigation through the various windows and settings may be carried out by rotating and pressing the outer body of the thermostat as shown in Fig. 2.2.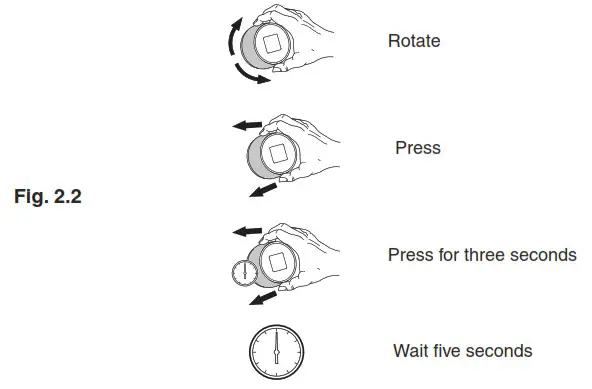
GATEWAY RECEIVER
GATEWAY RECEIVER POSITION
The boiler mounted Gateway is fitted in the receiver component of the boiler control panel (visible after opening the control panel, see Fig. 3.1). Refer to the specific boiler model instructions for further details on the fitment and wiring,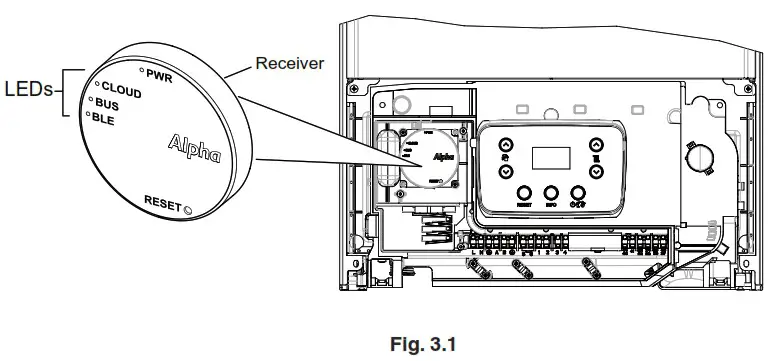
DESCRIPTION OF RECEIVER LEDs
| LED | Description |
| PWR | Solid green: 230V present, the receiver is on. |
| BLE | Bluetooth connection of the receiver with the Smartech: • 1 flash every 4 seconds: the receiver is connected to the Smartech and is communicating normally. • 5 flashes per second: the receiver is trying to connect to the Smartech, if this happens frequently, move the Smartech closer to the boiler/receiver. |
| BUS | It is a service LED managed separately from the receiver, its operation is independent from any receiver status. |
| CLOUD | Shows Smartech connection to home WiFi network: • Off: the receiver is not connected to any Wi-Fi network or no account has been connected to this receiver. The Smartech works regularly even without a Wi-Fi connection, through the Bluetooth connection. • 1 flash per second: the receiver is connecting to the Wi-Fi network or associated account, if the flashing persists check that the Wi-Fi network is active and verify that you have entered the correct password in the receiver. • Steady on: the receiver is connected to the Wi-Fi network and Internet and is working normally. |
START UP
SETTING UP WITHOUT WI-FI (TEMPORARY MODE)
This temporary mode is only used to set up the thermostat according to the type of system on first start-up, if there is no Internet connection available.
The following temporary mode will remain active until the batteries are removed from the Smartech, bringing the system back into the default mode.
Note: For the system to be optimised the User registration procedure must be completed via the Smartech App (Section 4.2).
Follow the procedure below:
- Connect the Gateway receiver to the system and power it on;
- Insert the batteries in the Smartech unit;
- Once the Alpha logo is displayed, keep the Smartech pressed until the list of systems is displayed;
- Rotate the Smartech to the desired type of system;
- Press the Smartech to confirm.
SET-UP AND USER REGISTRATION WITH WI-FI NETWORK
- Application download and installation on mobile devices (Smartphone)
Using the mobile device on which to install the application, connect to the App store of reference: App Store (Apple) or Play Store (Android) and type in ‘Smartech’ in the search field.
The app works with IOS 12 operating system or higher (Apple) and Android 10 or higher.
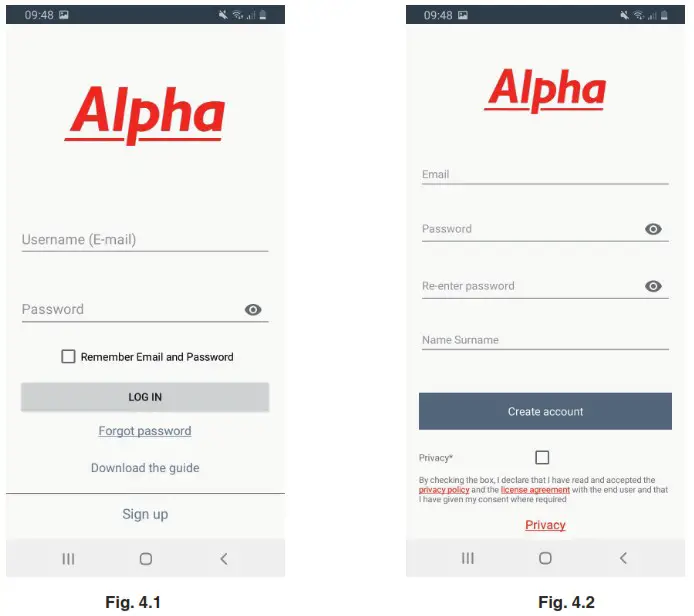
Note: The Wi-Fi network which the Smartech is connected to must have WPA2 PSK encryption, otherwise there might be some incompatibility. - Creating the account Start the ‘Smartech’ app.
The following screen appears on the display of the mobile device when the app starts up, allowing you to login (Fig.4.1), or create a new account (Fig.4.2). • Enter a valid email address.
• Enter a password which will then be used to access the registered account.
• Enter the password again to confirm the one previously entered.
• Enter name and surname.
After entering the requested data, press ‘Create account’.
Within a few minutes, you will receive an email at the address entered during creation of the account containing a code.
Check for the email in the spam box.
Enter this code in the appropriate field in the app and confirm by pressing ‘Create account’.
Note: It is recommended to keep a record of the password for future reference and service support. - Associating APP to Smartech Plus
Note: Before performing this operation, make sure you have the name and password of the Wi-Fi network you want to connect to and ensure this network has an Internet connection. Do not use a hotspot when associating the app.
Make sure that your Smartphone is connected to this network.
Open the ‘Smartech’ App, log in, the message ‘No device has been added yet’ will appear, press ‘+’ at the bottom right.
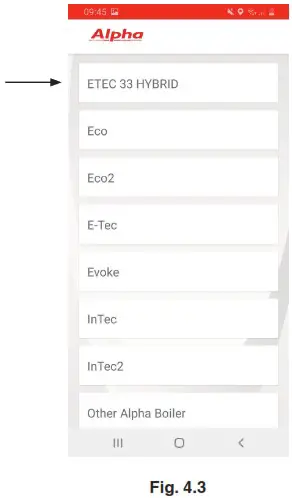
Follow the wizard (Fig.4.3 and Fig.4.4).
- Select the correct boiler model from the provided list (Fig.4.3).
The boiler name is found on the data badge and front panel name plate (Ref.1, Fig. 4.8). Choose the Wi-Fi* network you want to connect the Gateway receiver to and enter the correct password. After connection to the Cloud, a message will indicate the presence of a new Smartech, press ‘Next’ and enter the name you want to give to your Smartech (Fig.4.4). Complete the installation by following the screen guides.
*Smartech Plus is compatible with the frequency 2.4GHz 802.11b/g/n.
If you have a dual-band router, 2.4GHz and 5GHz, Smartech can only be connected to 2.4GHz networks. In the event of frequently losing connection, it is recommended to create a 2.4GHz host network that Smartech can be connected to and any zone expansions. The host network must not require any web login. If no device is found, perform the manual configuration procedure (Fig. 4.5 and Fig. 4.6), using the password 12345678.
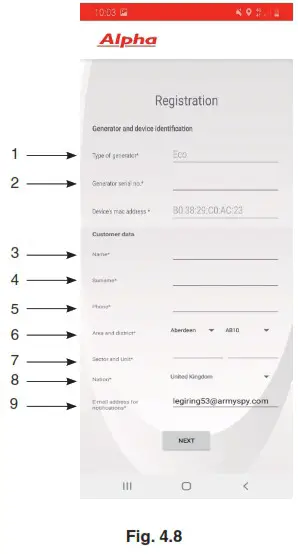
 If a warning appears on the telephone of no Internet connection, press ‘maintain WI-FI connection’ (Fig. 4.7).
- Registration
To complete the pairing procedure of Smartech with the heating appliance model, the registration screen will appear (Fig. 4.8) where you must complete the form to identify the system and customer.
• Then enter the data required by the registration form.
• At the end press ‘Continue’.
 • Enter a valid email address.
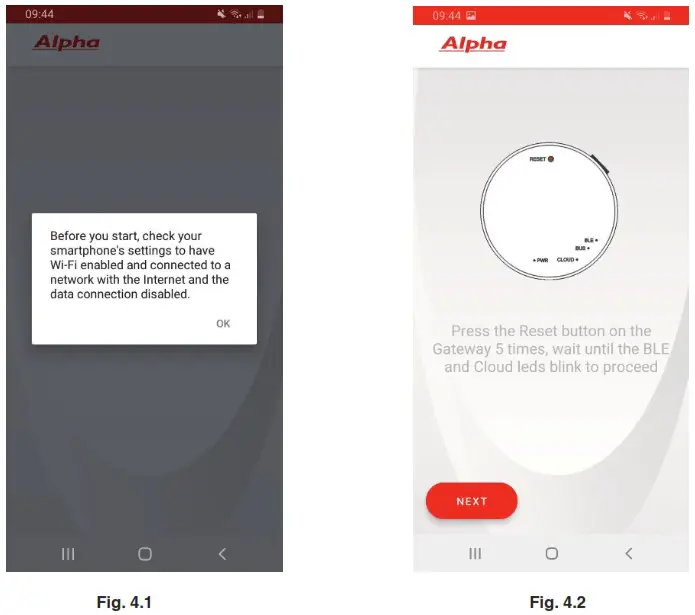
 Choose the Wi-Fi* network you want to connect the Gateway receiver to and enter the correct password. After connection to the Cloud, a message will indicate the presence of a new Smartech, press ‘Next’ and enter the name you want to give to your Smartech (Fig.4.4). Complete the installation by following the screen guides.
 If no device is found, perform the manual configuration procedure (Fig. 4.5 and Fig. 4.6), using the password 12345678.
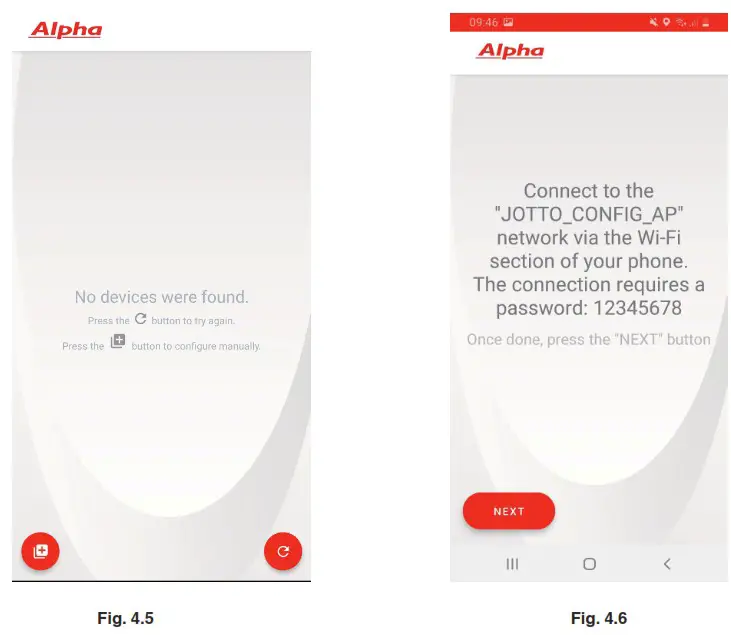 If a warning appears on the telephone of no Internet connection, press ‘maintain WI-FI connection’ (Fig. 4.7).
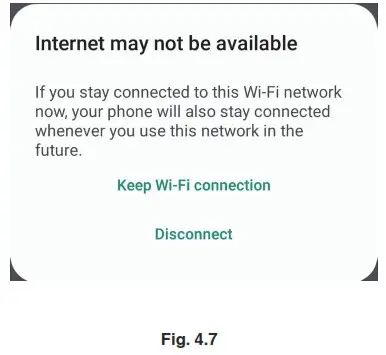
| Ref | Description |
| 1 | Generator model (item 1, Fig. 4.9) |
| 2 | Enter the serial number of the appliance item 2, Fig. 4.9) |
| 03-4 | Enter name and surname |
| 5 | Enter your phone number |
| 6 | Select the area and district where the system is installed (first digits of Postcode before the space) |
| 7 | Select the sector and unit where the system is installed (digits of the Postcode after the space) |
| 8 | Select country where the system is installed |
| 9 | Enter a valid email address |
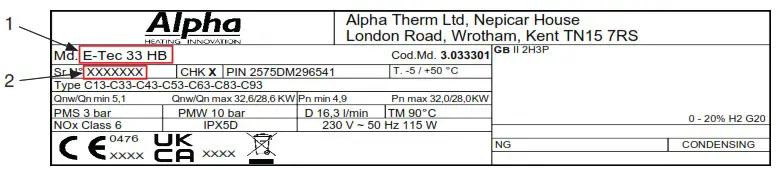 Fig. 4.9
LANGUAGE SETTING
SELECT THE ‘LANGUAGE’ WINDOW TO SET UP THE LANGUAGE OF THE SMARTECH

ROOM TEMPERATURE SETTING
The room temperature detected by the sensor within the Smartech Plus thermostat is indicated at the centre of the display.
The set temperature, which can be changed by rotating the head of the device, is displayed under the detected temperature.
The desired room temperature can be changed quickly by rotating the thermostat body.
The desired value is enlarged when changing the value for clarity.
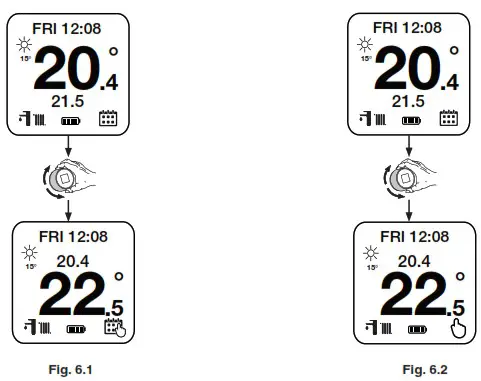
TEMPORARY MANUAL OPERATION
If the ‘PROGRAM ON’ mode is activated (automatic operation mode, see Section15), by manually changing the desired room temperature, the device is forced into temporary manual operation, i.e. the set temperature remains active until the next activation time band. See Fig. 6.1.
MANUAL MODE
If the ‘PROGRAM OFF’ mode is activated (manual operation mode, see Section 16) the new room temperature selected remains active until the a new value is set or the program mode is changed. See Fig. 6.2.
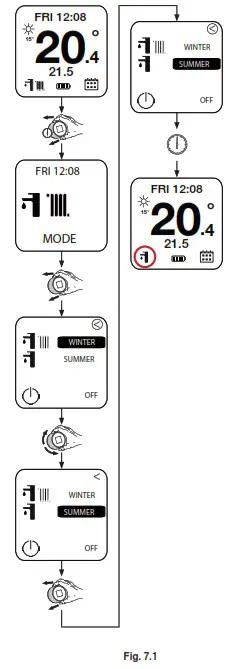
OPERATING MODE
Select the ‘MODE’ window to set up the operating mode (Stand-by, Summer, Winter). See Fig. 7.1.
DATE and TIME SETTING
Select the ‘DATE’ window to select the system’s date and time. See Fig. 8.1.
If the symbol ‘A’ is displayed at the bottom right, the date and time are updated automatically via the Internet connection.
Note: Check that the date and time are entered correctly to guarantee proper operation of the calendars.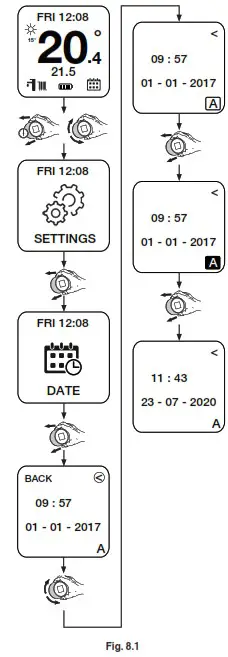 If the Smartech is not connected to the Internet, you must enter the M mode, to manually set the current time and date. See Fig. 8.2.
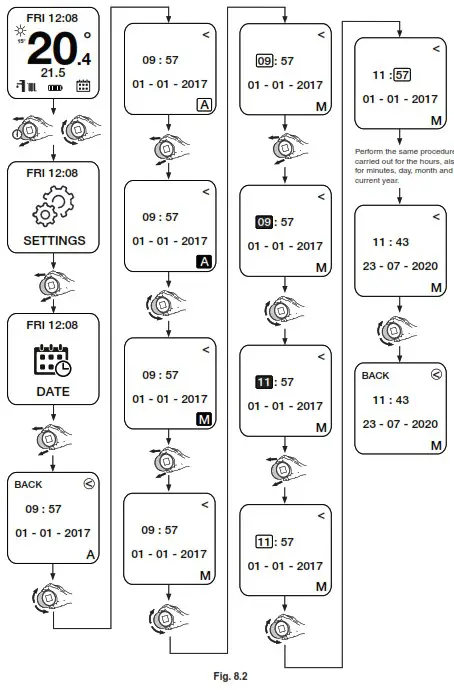
SYSTEM FLOW and DHW TEMPERATURE SETTING
Select the ‘THERMOSTAT’ window to set up ‘Maximum system flow temperature’ and ‘DHW temperature’.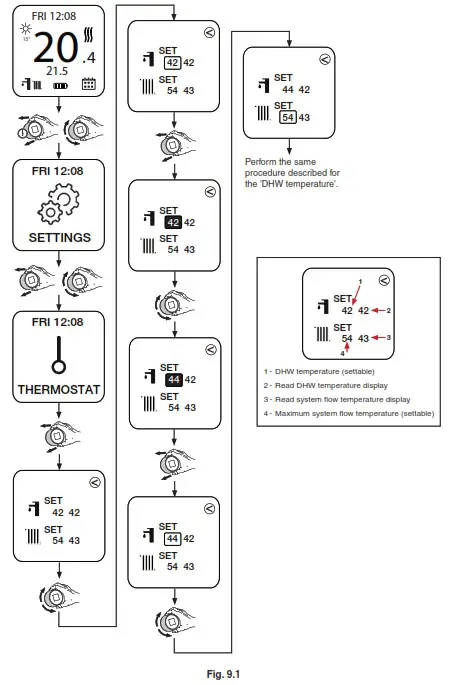
CLIMATIC CURVE SETTING
Select the ‘CURVE’ screen to enable/disable (disabled by default) climatic offsetting with external temperature and to set up the relevant operation parameters. See Fig. 10.1.
The offset curve establishes how the system flow temperature TM is corrected according to the external temperature TE.
Note: The external temperature value TE is detected by the external units probe.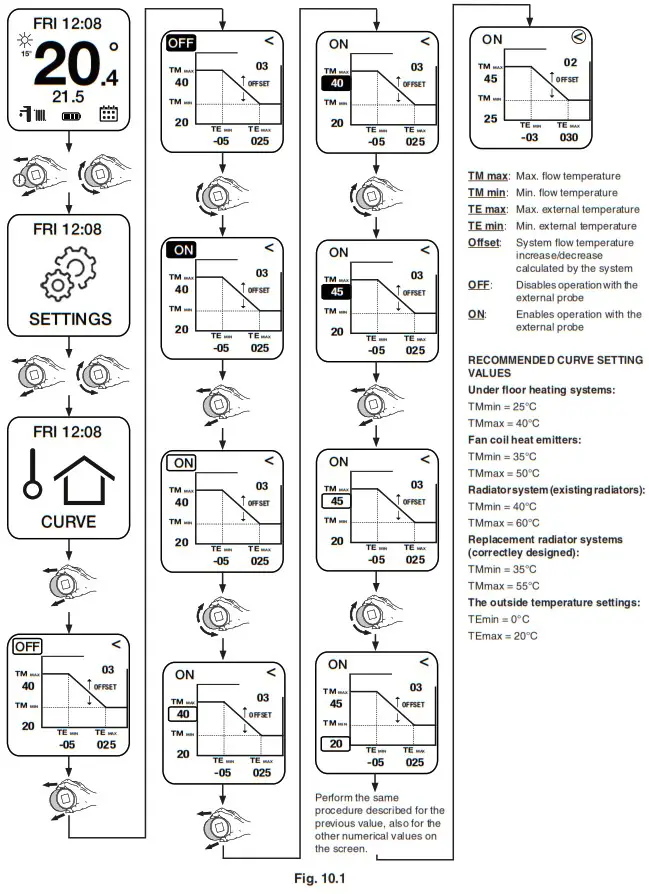
WEEKLY PROGRAM SETTING
Select the ‘SET’ window to associate each day of the week with one of the 4 stored daily calendars (C1, C2, C3 and C4). See Fig. 11.1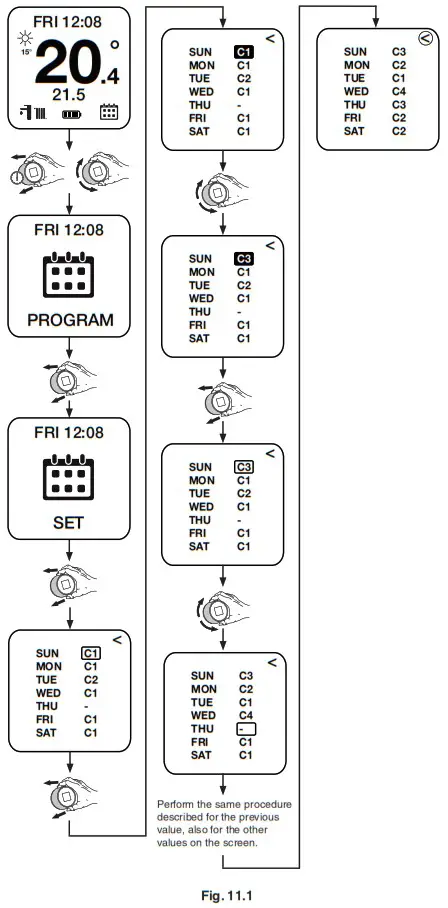
DAILY CALENDAR SETTING
Select the windows ‘CAL1’, ‘CAL2’, ‘CAL3’, ‘CAL4’ to set up to 4 time bands for daily activation for each calendar with the relevant desired room temperatures. See Fig. 12.1
Note: The procedure described is valid for all calendars (CAL1, CAL2, CAL3 and CAL4).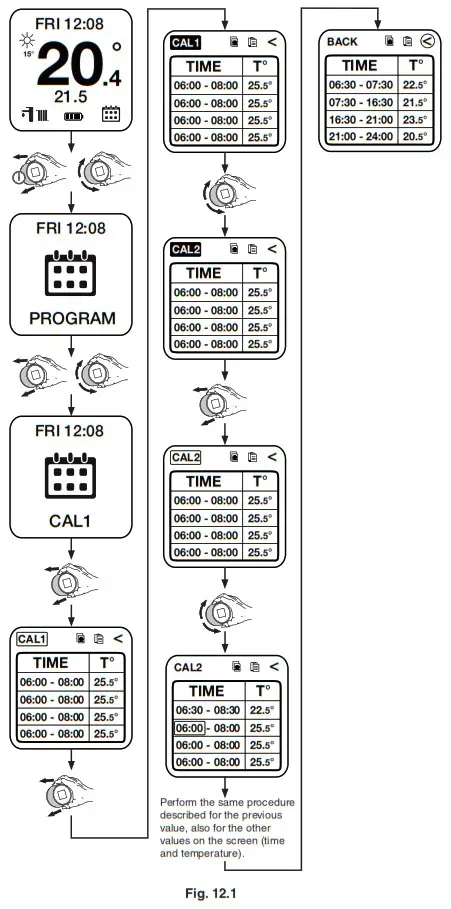
CALENDAR COPY and PASTE FUNCTION
To make calendar programming operations easier, it is possible to use the ‘COPY’ and ‘PASTE’ commands to copy the settings of one calendar (e.g. CAL2) and paste them onto another calendar (e.g. CAL3). See Fig. 13.1.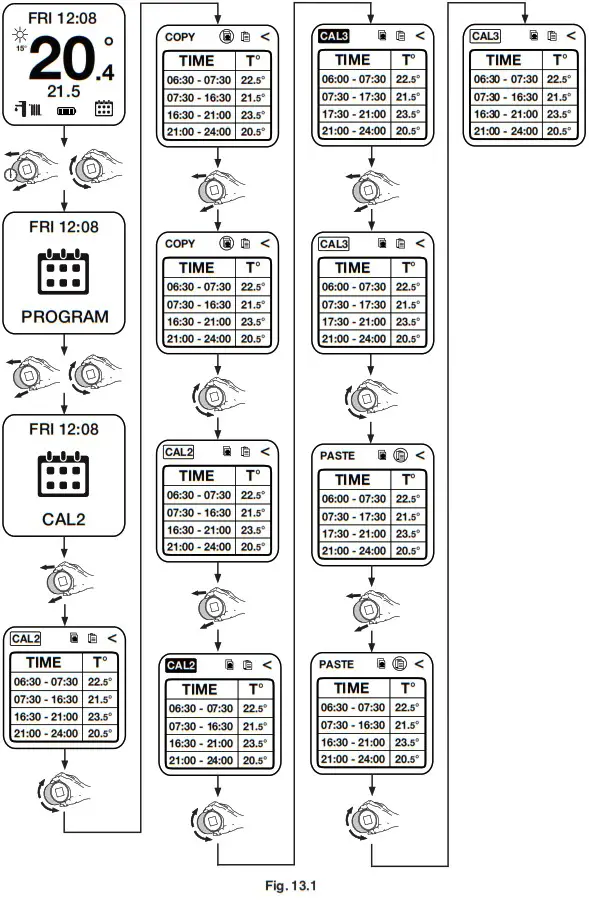
SET ECO
Select the ‘SET ECO’ window to set up the desired room temperature outside the programmed time bands in the various calendars. (Temperature setting value outside the time periods set). See Fig. 14.1.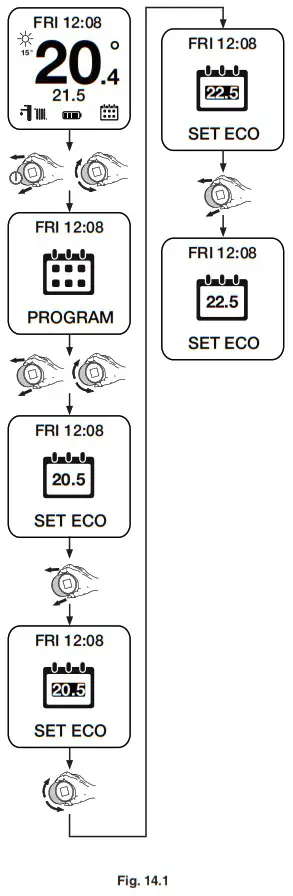
AUTOMATIC OPERATION MODE
Select the ‘PROGRAM ON’ control to activate the automatic operation mode according to the set weekly programming. See Fig. 15.1.
MANUAL OPERATION MODE
Select the ‘PROGRAM OFF’ control to activate the manual operation mode (maintaining the desired room temperature regardless of the set weekly programming). The set value remains active until it is adjusted or another program mode is activated. See Fig. 16.1.

DIAGNOSTICS
Select the ‘DIAGNOSTIC’ window to view some system information including MAC address of the radio module, quality of the Bluetooth signal, current status of the connection between Gateway receiver and the Smartech unit, battery level and HW and SW versions.
This window is also used if you need to make a new pairing between receiver and Smartech. See Fig. 17.1.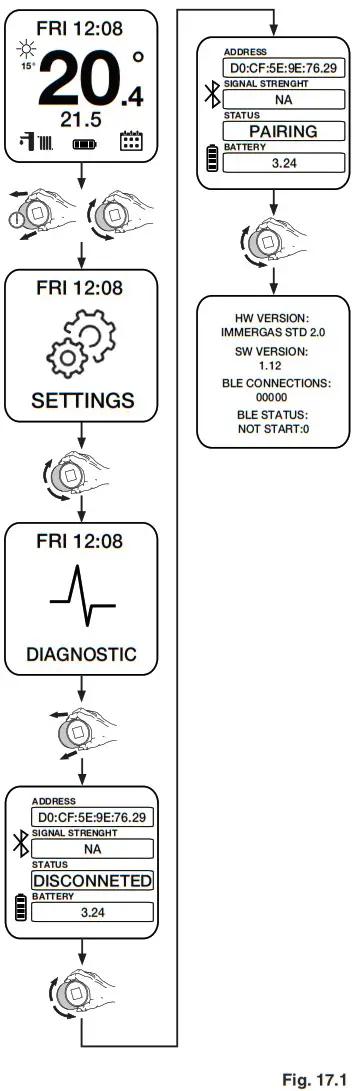
Note: The ‘Signal strength’ field indicates the quality of the Bluetooth transmission between the boiler and the Smartech. It is recommended to use this indication when looking for the proper position of the Smartech. The indications provided are as follows:
Excellent: Stable and strong signal
Good: Stable signal
Poor: Weak signal, the Smartech should be moved closer to the boiler
Disconnected: Signal quality is insufficient, move the Smartech closer to the boiler.
Note: The maximum communication distance between the boiler and the Smartech is 10 metres in open field.
The maximum actual distance might be shorter if there are walls, ceilings or obstacles between the two items.
RESTORE DEFAULT SETTINGS
In the event of incorrect programming of the Smartech settings, default values can be reset as follows:
Enter the Diagnostic menu (Section 17) and press 5 times until the word ‘DEFAULT’ appears in the ‘SIGNAL STRENGTH box’.
![]() Instructions on how to correctly dispose of the product.
Instructions on how to correctly dispose of the product.
At the end of its life, this appliance must not be disposed of as mixed municipal waste.
It is mandatory to separate this type of waste so that the materials making up the appliance can be recycled and reused.
Contact authorised operators for disposal of this type of appliance. Incorrect management of waste and its disposal has potential negative effects on the environment and on human health. The symbol on the appliance represents the prohibition of disposing of the product as mixed municipal waste.
For Technical help or for Service call …
ALPHA HELPLINE Tel: 0344 871 8764
website: www.alpha-innovation.co.uk![]() Nepicar House, London Road,
Nepicar House, London Road,
Wrotham Heath, Sevenoaks,
Kent TN15 7RS
Leave these instructions with the User
These instructions have been carefully prepared but we reserve the right to alter the specification at any time in the interest of product improvement.
© Alpha Therm Limited 2022.
Part No. 1.046669 rev. ST.005903/000
1122/D444


