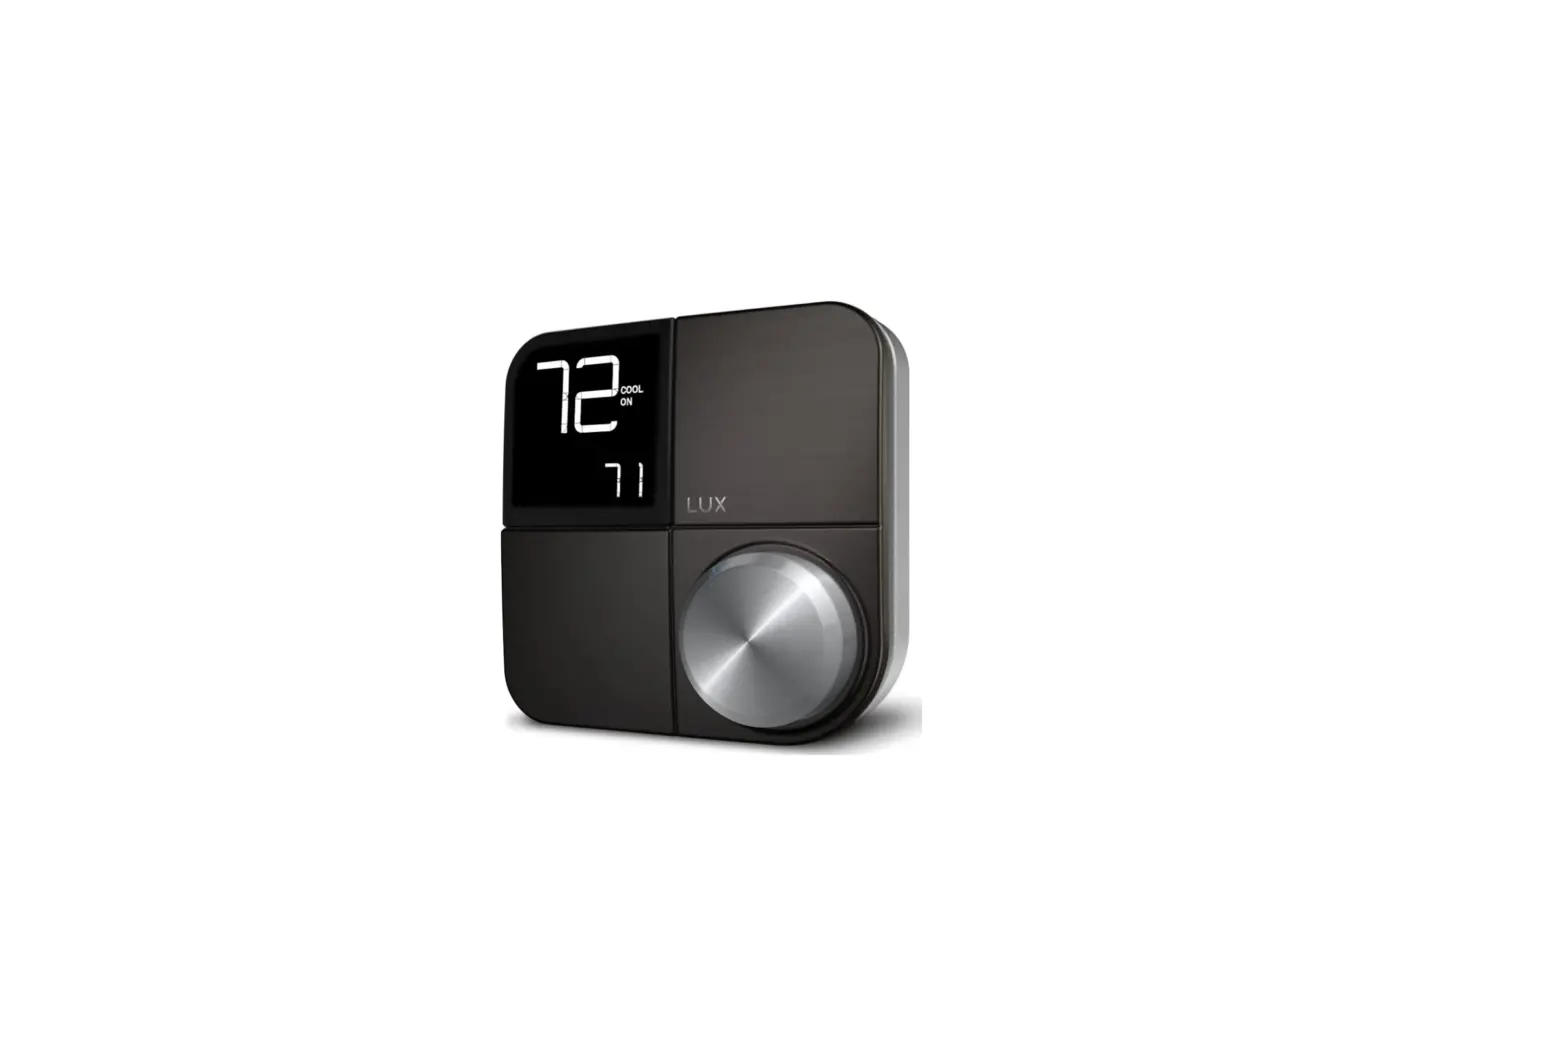
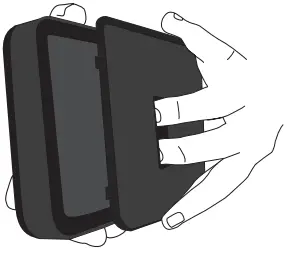
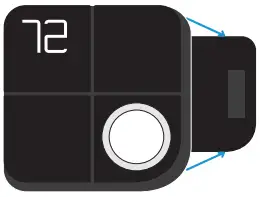
 Kono KN-S-AMZ-004 Wifi Enabled Smart Thermostat
 Kono KN-S-AMZ-004 Wifi Enabled Smart Thermostat
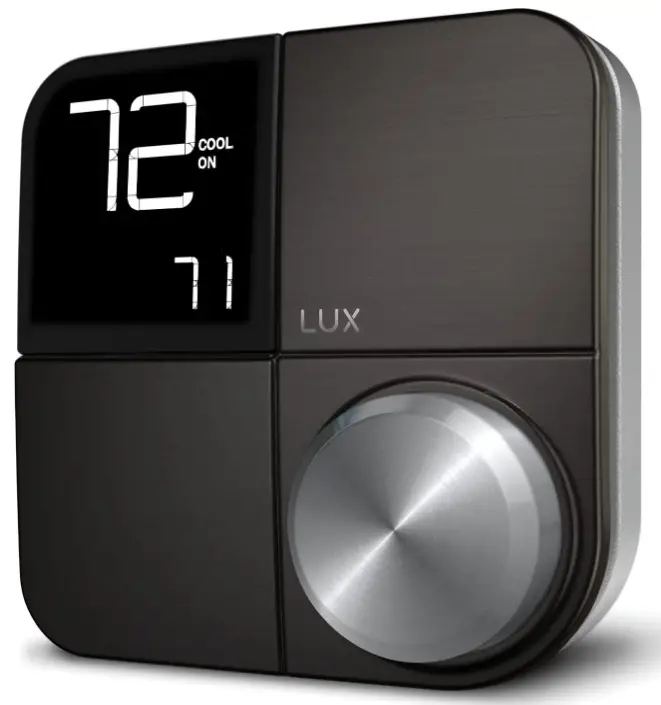
SPECIFICATION
- BRAND: Kono
- MODEL NAME: KN-S-AMZ-004
- ITEM DIMENSIONS LXWXH: 6.5 x 2.8 x 6 inches
- CONTROLLER TYPE: Google Assistant, Amazon Alexa, IOS, Homekit, Android
- COLOR: Black
- USAGE: Cooling, Heating
- POWER SOURCE: Electric
- VOLTAGE: 24 Volts
- MATERIAL: Stainless Steel
- FINISH TYPE: Stainless Steel
- SCREEN SIZE: 5.5 Inches
- CONTROL METHOD: Voice
- CONNECTIVITY PROTOCOL: Wi-Fi
- MOUNTING TYPE: Wall Mount
- STYLE: Kono Thermostat
INTRODUCTION
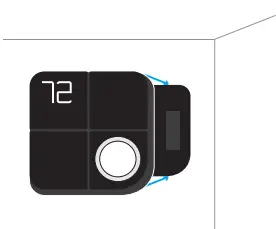
Whether you’re considering temperature or decor, environment is everything when it comes to a home. The Kono Smart Thermostat has décor-snap covers that let you to add your own style and make your thermostat stand out or fit in with fashionable designer colors or a paintable finish. Adding a Kono Smart Thermostat entails more than just installing decor. With integrated indoor air quality monitoring, you easily add energy savings, comfort management, and peace of mind. As a result, home always feels like home.
WHAT’S IN THE BOX?
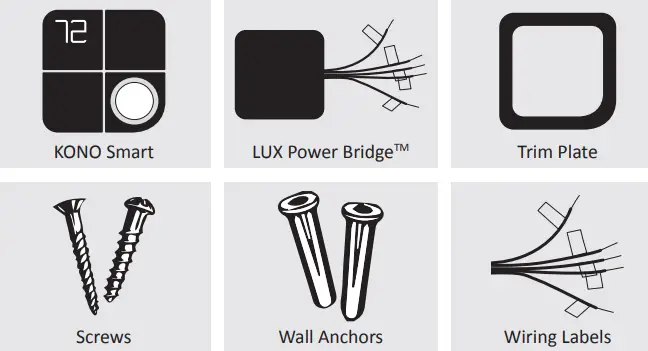
TOOLS NEEDED

Press the knob when the thermostat is idle to view the menu. Rotate the knob to select an option and press again to confirm.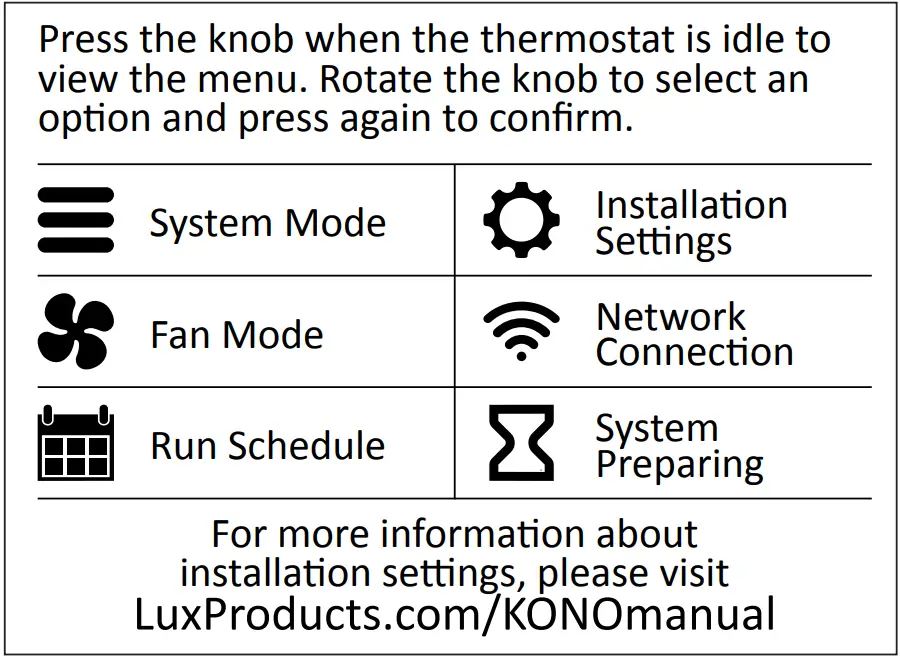
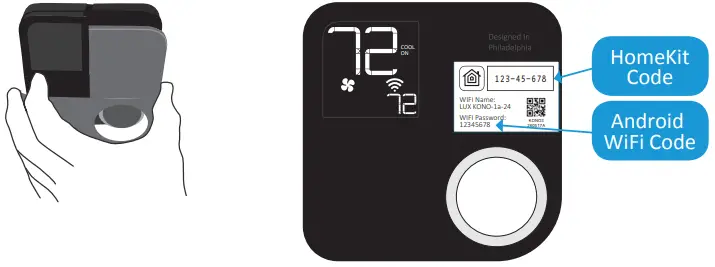
Behind KONO’s Décor-snapTM cover you will see a small, removable “quick guide” to installation and an icon-key label. The icons represent the display icons of your KONO Smart. You will also find important information for HomeKitTM and WiFi setup.
Installation
This manual is a comprehensive guide to installation and wiring.
START HERE
- Download the LUX Products App to your mobile device and create an account.

- Now set your phone aside and turn off the power at the circuit breaker to both your heating and cooling systems before performing any wiring.

- Confirm that your heating and cooling system is powered down by changing the temperature on your thermostat.
HINT: Your system should not make any noise and you should not feel any air exiting your vents.Remove the front of your old thermostat from its base. If you see thick black wires, wire nuts, or any labels that say 120-240VAC or High Voltage, your system is not compatible with KONO Smart. Please call LUX Technical Support at 856.234.8803 before proceeding with your installation. If you do not see any high-voltage labels or wires, you can continue with your installation. - Confirm if you have a C-Wire. If you do, please turn to the next page. If you do not, please skip ahead to page 11.


C-WIRE
INSTALLING WITH A C-WIRE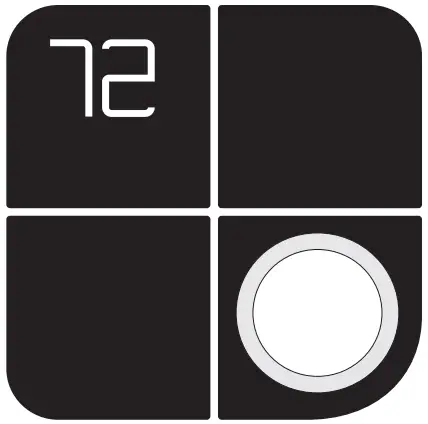
BEFORE STARTING
Turn off the power at the circuit breaker to both your heating and cooling systems before performing any wiring. You will not need the included LUX Power Bridge.
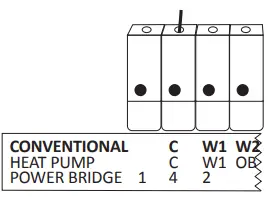
- Identify your system configuration (see wiring diagrams in the appendix). Potential configurations include:
- Conventional 1H/1C (Y, G, W, R, C)
- Conventional 2H/1C (Y, G, W, W2, R, C)
- Heat Pump Single-Stage (Y, G, R, O/B, C)
- Heat Pump with auxiliary heat or dual fuel (Y, G, R, O/B, W, C)
If you have only one R wire, please use the RH terminal. If you have a different configuration other than what is listed above, please call LUX Technical Support for help with your installation.
- Remove each wire from its terminal – make sure that they don’t fall down back into the wall.
- Remove the mounting screws from the base of the old thermostat. Remove the base from the wall.
- If you would like to use the trim plate or wall anchors, you can install them now

- Separate KONO Smart from its base. Pull the wires from your wall through the center hole of the KONO Smart base. Secure the base to the wall using the included mounting hardware.
OPTION 1 – CONVENTIONAL (FURNACE) SYSTEMS:
- Following the terminal labels marked “Conventional” on the thermostat base, press the lever and insert each labeled wire into the top hole of the corresponding terminal.
- If you have both an RC and RH wire present, then remove the red cap next to the reset button. You can now skip ahead to step 2.8.
OPTION 2 – HEAT PUMP SYSTEMS:
- Following the terminal labels marked “Heat Pump” on the thermostat base and referencing your wiring photo, press the lever and insert each labeled wire into the top hole of the corresponding terminal.
If your old thermostat did not have a W1 wire but did have a W2 wire, please insert the W2 wire into the W1 terminal. - If you have both an O wire and a B wire (i.e. in a Trane system), please install the B wire to the “C” terminal. For more detailed directions, please see the wiring diagrams in the appendix or call LUX Technical Support.
- Securely fasten KONO Smart onto its base. Once it has clicked into place, return power to your heating and cooling system.

- After your thermostat powers up, you are ready to configure KONO Smart for your heating and cooling system and connect to a wireless network.|
Please skip ahead to the “Connecting to the Network” section of this manual on page 15.
INSTALLING WITHOUT A C-WIRE USING THE INCLUDED LUX POWER BRIDGE
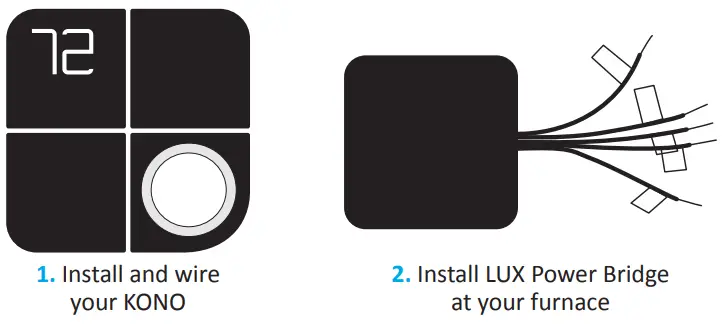
For installation without C-wire, you will need to access your furnace.
Before starting
Turn off the power at the circuit breaker to both your heating and cooling systems before performing any wiring.
INSTALLATION WITHOUT C-WIRE
HINT: helpful videos showing how to wire a thermostat with the LUX Power Bridge are available at LuxProducts.com/videos
- Starting at your thermostat, confirm that you have one of the system configurations listed below:
- Conventional 1H/1C (Y, G, W, R)\
- Conventional 2H/1C (Y, G, W1, W2, R)
If you have a different configuration other than what is listed above, please call LUX Technical Support for help with your installation.
- Remove each wire from its terminal – make sure that they do not fall down back into the wall.
- Remove the mounting screws from the base of the old thermostat. Remove the base from the wall.
- If you would like to use the trim plate or wall anchors, you can install them now.
- Separate KONO Smart from its base. Pull the wires from your wall through the center hole of the KONO Smart base. Secure the base to the wall using the included mounting hardware.
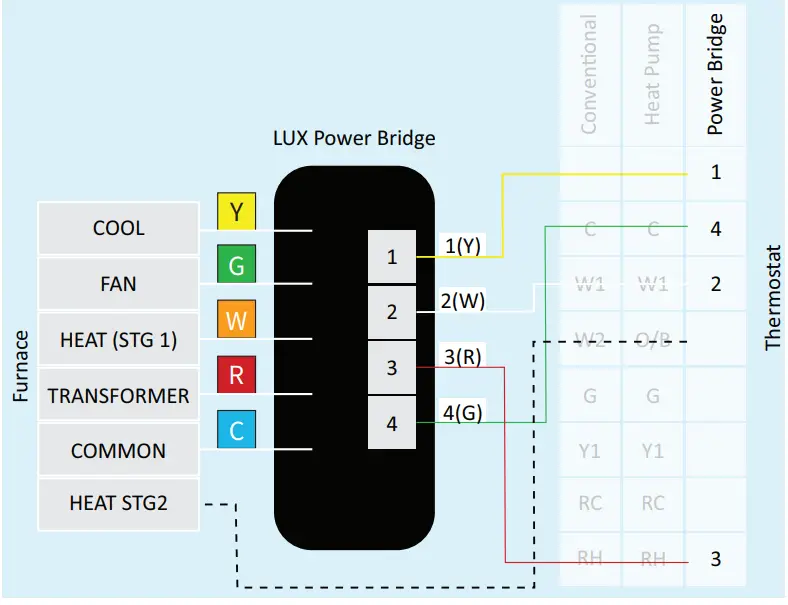
- Following the terminal labels marked “Power Bridge” on the thermostat base, press the lever and insert each labeled wire into the top hole of the corresponding terminal. Connect as follows
- Y WIRE: Terminal 1
- W WIRE: Terminal 2
- R WIRE: Terminal 3
- G WIRE: Terminal 4

- Securely fasten KONO Smart onto its base.
- Go to your furnace – remove the door or panel and locate your control board or transformer. In most cases, there should be four wires running from the furnace to your thermostat
Y, G, W, and R. If you have additional wires, leave them as is.- Matching the letters, label the wires connected to your furnace with the included white Power Bridge wire labels. Take a picture of the wiring at your control board.
- Disconnect these wires from the control board.
- Open the Power Bridge and insert each of your old wires into the corresponding numbered terminals in the Power Bridge.
- Finally, insert the Power Bridge wires (with the colored labels) into the corresponding terminals on your furnace control board.

- Secure the LUX Power Bridge to your furnace. If you had to remove a panel or door to access your control panel, replace it now.
- Return power to your heating and cooling system. If your system, including your thermostat, does not power up please call LUX Technical Support.
After KONO Smart powers up, you are ready to configure it for your heating and cooling system and connect to a wireless network.

CONNECTING TO THE NETWORK
After your thermostat powers up, it will guide you through the initial system configuration. Use the knob to change options and press the knob to confirm your selection.
| First you will need to set your system type | |
| (F) for Furnace or Boiler | (HP) for Heat Pump |
| then | then |
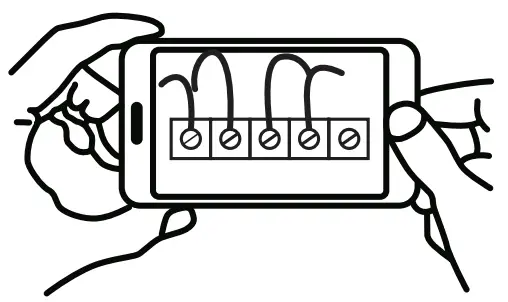
| Set the fan type to Gas (most common), Electric (for systems without gas or oil), or Boiler (no fan) | Set the valve type to O or B – look at the photo of your wiring to see which you have |
NOTE: For advanced settings please visit LuxProducts.com/KONOmanual or call LUX Technical Support.
After confirming your system settings, KONO Smart will ask if you would like to connect to the network. Select “ON” to begin connection or “OFF” to connect later. If you wish to connect, please make sure that you have downloaded the LUX Products App to your smartphone and created an account.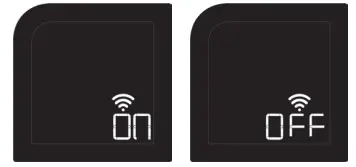
HINT: If you are having trouble, please see our instructional video at LuxProducts.com/videos
After selecting “ON”, KONO Smart will display “01”. You will then need to select “iOS” if you are using an Apple® device or “And” if you are using an Android® device.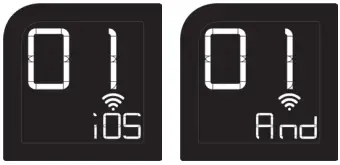
After selecting “iOS” or “And”, your thermostat will display a large “02”, then “03”. Remove your Décor- snapTM cover.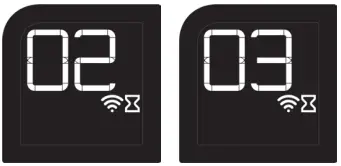
NETWORK
IOS® (IPHONE® OR IPAD®)
Open your LUX App, tap the + icon to add a new accessory, then select the accessory ID that starts with LUX KONO to start the connection process. Follow the instructions in the App. If you need to cancel the joining process at any time, simply press and hold the knob for 5 seconds. Locate your accessory’s HomeKit Code under the Décor-snap cover. When prompted, use your iPhone or iPad’s camera to scan the code. After the App scans the code, your App and thermostat will handle the remaining steps in the connection process.
When you see the thermostat’s idle screen, it means you are connected. You can now replace the Décor-snap cover. To control this HomeKit-enabled accessory, iOS 10.3 or later is recommended.
ANDROID®
Open your LUX App, tap the + icon to add a new thermostat. When prompted by the LUX App, please use your phone’s WiFi settings to join your LUX KONO’s WiFi network. The network name and password can be found under the Décor-snap cover. 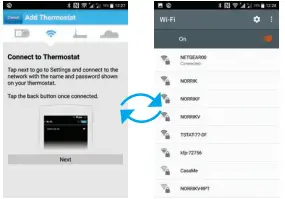 After connecting your thermostat to the network, please return to the App and select your home WiFi network from the list and enter your password.
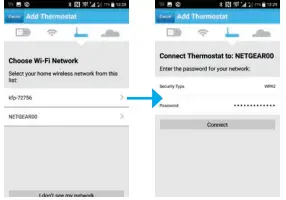 Please make sure your phone reconnects to your home WiFi network and then returns to the LUX App. From this point, your thermostat and App will handle the remaining steps in the connection process. When you see the thermostat’s home screen, it means you are connected. You can now replace the Décor-snap cover.
CONGRATULATIONS!
Installation is complete and your KONO is ready to go. Now let’s save some energy and make your home more comfortable.
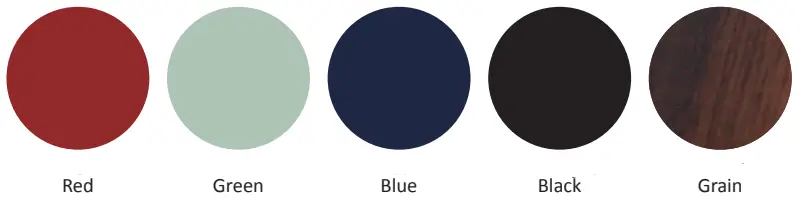
PERSONALIZE YOUR KONO SMART.
It’s more than a thermostat, it’s décor! Match KONO to your style by simply changing the Décor-snap cover. Check out our wide variety of designer colors and finishes at: LUXProducts.com/shopcovers.
| Conventional | Heat Pump | Power Bridge | ||||
| 1 | ||||||
| Transformer | C | C | 4 | |||
| HEAT (STAGE 1) | W1 | W1 | 2 | |||
| HEAT (STAGE 2) | W2 | O/B | ||||
| FAN | G | G | ||||
| COOL | Y1 | Y1 | ||||
| RC | RC | |||||
| RH | RH | 3 | ||||
NOTES:
- The W2 terminal is used for 2 stage heating systems only
- If you have both an RH and RC wire, please remove the red cap from the back of the thermostat
HEAT PUMP SYSTEM WITH C-WIRE WIRING DIAGRAM
| Conventional | Heat Pump | Power Bridge | ||||
| 1 | ||||||
| Transformer | C | C | 4 | |||
| AUX / EMER Heat | W1 | W1 | 2 | |||
| CHANGEOVER VALVE | W2 | O/B | ||||
| FAN | G | G | ||||
| COOL | Y1 | Y1 | ||||
| RC | RC | |||||
| RH | RH | 3 | ||||
NOTES:
- The W1 terminal is used for Auxiliary/Emergency heat or on Dual Fuel systems

NOTES:
- If you have a heat pump or dual transformer system, please call LUX Tech support.
- If you have any wires on your furnace not shown here, please leave them as is.
FAQs
I have a dual-band router 2.4 and 5ghz. The phone connects at 5ghz, but the router provides simultaneous 2.4 ghz. and 5ghz. Will the thermostat work?
It is possible to have connectivity issues on a dual band network, but that isn’t guaranteed.
Do you have to use a cell phone or can you use a computer?
A cell phone or tablet is required to operate the thermostat by the App.
Works with electric baseboard heater?
Yes, as long as this is a 24 to 30 volts to the thermostat and is both Electric Baseboard Heating and an Air Conditioning system. You must a “C” common wire to the thermostat for the unit to operate. Otherwise use our model LUX Geo which is a battery-operated Wifi unit.
Can you connect satellite room thermometers?
NO.
Will it do air conditioning?
Yes, it will operate your heat pump with air or operate in the conventional mode. Works great with Wi-Fi control.
Can I access the thermostat without being in the house?
Yes, via the App used on your cell phone or tablet.
I won’t be using Alexa. but want to control thermostat by iPhone. can I do that?
Yes, your iPhone can control the LUX Kono Smart without having an Alexa.
Can I talk to Google Home to change the settings and schedule the thermostat?
The LUX Kono will operate with the Google Home system for temperature changes but the settings can only be changed by the thermostat. The Kono will operate via the App for the scheduling.
Will this work with a new single wide Mobile home heating and air system?
Yes, it should as long as the wire is the same. We had an older house and didn’t have a problem.
I live in an old 1960 building that has an original gas furnace will Kono work with this furnace?
You MUST have a 4 wire or 5 wire system (C, common wire) in order for the LUX Kono to operate your system. A 2 wire heating system is incompatible; use our model LUX Geo for your 2 wire system operation.
What’s the difference with this one and pro series one?
I don’t know. I bought two of these on the Black Friday event and just installed them this week. I love it. The app works great. I turn on and off the furnace from my phone no matter where I am.
Does it work for Radiant Heat and what is a C wire?
Your radiant heating system may be operating via Line Voltage (120 v – 240 volts) which would make the Kono Smart incompatible. The “C” common wire would be found on 24-30 volt heating systems and would be needed to operate the Kono Smart thermostat. You can contact us at [email protected].
What are the dimensions of the trim plate? I would like to make sure it is large enough to cover the space of my existing thermostat. Thanks.
The wall plate dimensions are 5.5″ W x 5.5″ H or 140 mm W x 140 mm H.
Is delivery fast?
Yes.
Does this come with a sensor that you can put in another room?
At this time, we do not manufacture any thermostats which will have a remote sensor.


