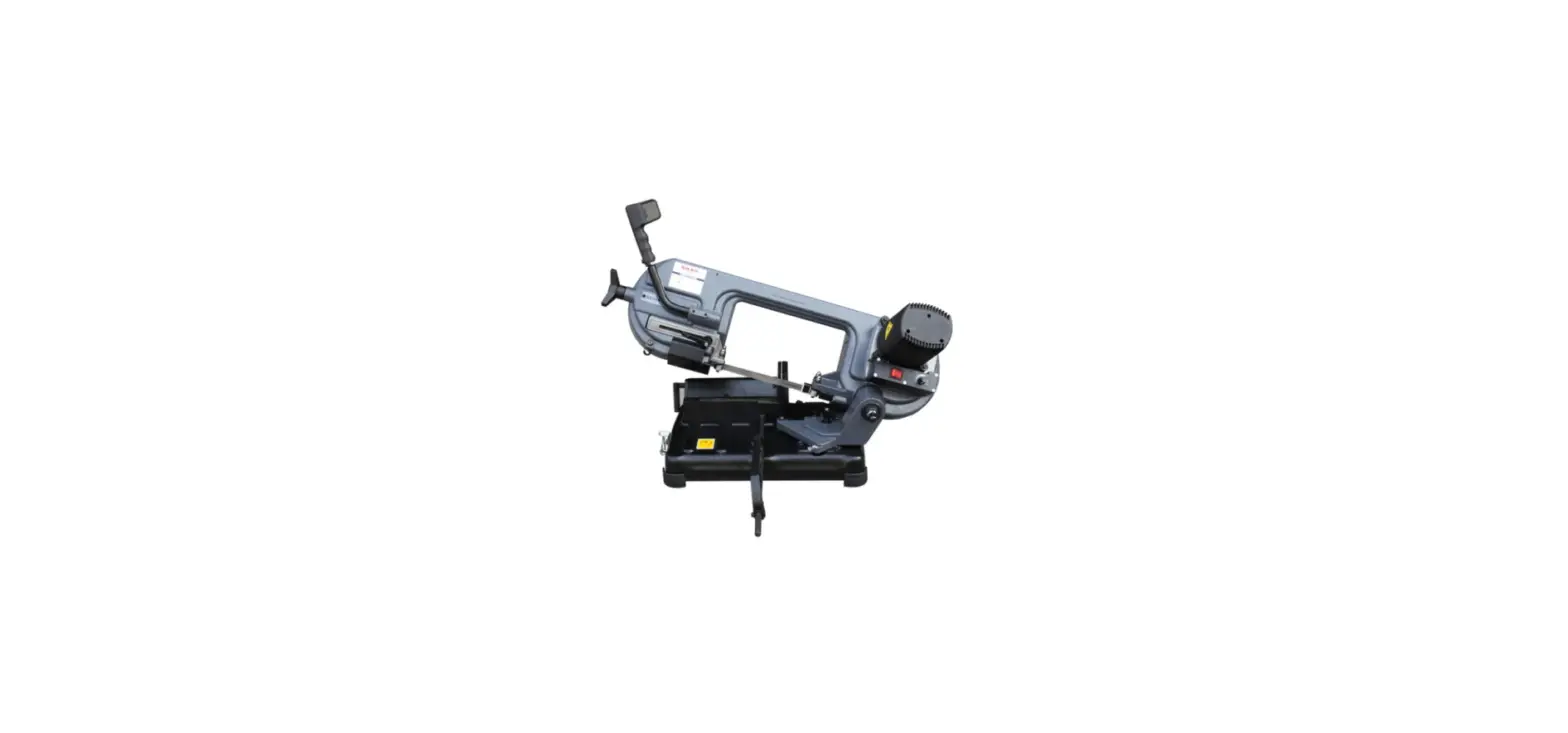
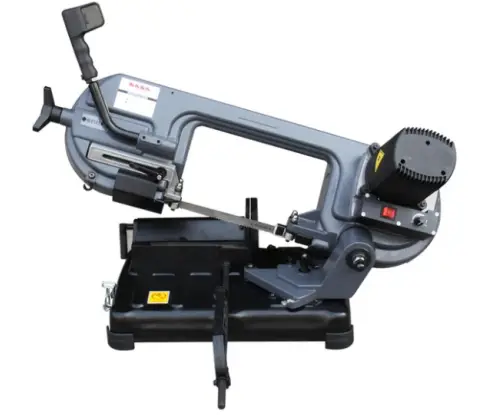
KAKA INDUSTRIAL BS-6 Band Saw

Safety procedures for the operator
Before starting to work with your band saw, read this manual carefully sothat you can use the machine you have just bought better and with maximum safety. ·Keep your work surface clean: cleanliness in the cutting area is essential if you are to work in safety. ·Avoid dangerous exposure: Do not use the machine in very damp places, or near inflammable liquids or explosive gases. ·Do not force the machine unnecessarily: in order to obtain the best performance, follow the instructions given in this booklet. Too high a pressure on the piece to be cut may cause rapid deterioration of the blade and harmful overheating of the motor. For recommended cutting times, see the cutting table. ·Dress suitably: do not wear wide-sleeved clothes or accessories suchas scarves, necklaces or bracelets that could be caught in the moving parts. ·Always use the clamp: the pieces to be cut must always be held still with the clamp. Never hold with your hand piece that are to be cut. ·Avoid accidental starts: do not keep pressing the button on the grip, while inserting the plug in the socket. Make sure the main switch is in the”o” position. ·Check the machine: before starting each cutting operation, ensure that all the parts of the machine are whole and that protection are in a safety position. ·Information on noise (EEC directive 09/392): in normal conditions of use, the cutting machine produce the following sound pressure level equivalent values:
Operating instructions
When delivered, your band saw has already undergone a strict inspection and is able to offer the best performance. However, before starting work, you must
adjust the blade tension and run the blade in. 1. Adjusting the blade tension (Fig.1)
Carefully proceed as follows: a correct blade tension is fundamental if you are to get the best performance from your band saw. Ensure that the switch is in“0” position. Turn the handwheel(B) clockwise as far as it can go, but without
blocking it completely. While holding the handwheel(B)still, turn the knob(C)
anticlockwise until it locks.
Adjusting the blade guide
Your cutting machine is provided with a sliding guide(E) with built-in protection, which guides the part of the blade necessary to make the cut, and at the same time, protects the part of the blade not in use. To do this, simply slacken the handle (D) and slide the blade guide (E) so as to bring it closer to or farther
from the piece that is to be cut (as clearly shown in fig.2).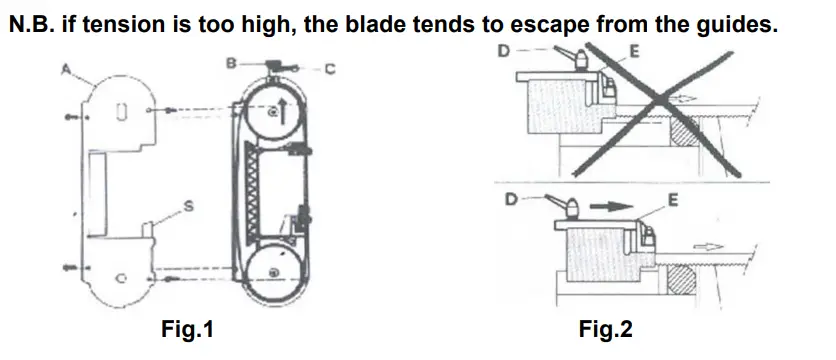
Running in the blade
To safeguard the life and quantity of a new blade, the first two or three cuts must be made exerting slight pressure on the piece so that the cutting time is almost twice the one normally needed (see cutting table).
Adjusting the stop bar (fig.3)
If you have to cut several pieces, all the same length, use the stop bar provided with the band saw, in order to avoid repeating the measurements. Insert the rod (F) in the hole in the base and block it with the towns. Slacken the handwheel (B) and place the stop (H) at the necessary distance from the blade. Then lock the handwheel (G).
Adjusting the cutting angle
The band saw can cut an angle varying from 0°to 45°: It is sufficient to slacken the nut (I) with a 17mm spanner and turn the rotating support (L) towards the corresponding limit stops (M) and (N). For all other intermediate angles, turn the rotating support until the mark (O) on the support matches the corresponding position in the plate. Then lock the rotating support again with the nut (I).
Blade replacement
Whenever the blade is worn, or whenever you need one with a different tooth(see Choosing the blade, point 7), it must be replaced with a more suitable one. Slacken handle D (fig.2) and slide blade guide E as far as it will go, following the direction of the arrow in fig.2. ·Remove protective casing A, by unscrewing the four screws. ·Slacken the blade tension, turn knob C (fig.1) clockwise until it stops, and handwheel B anticlockwise. ·Using a 10mm-spanner, slacken the hexagonal nuts P on the two-blade guide on the outside of the blade (fig.5). ·With the same spanner, gently turn the head of the screws Qon the same blade guide anticlockwise, so as to move the bearings far away enough from the blade and therefore enable you to extract it easily from the guides. ·Pull the blade out of the guides first, and then out of the rubber-coated pulleys. ·Insert the new blade first between the guides and then onto the rubber-coated pulleys, with the teeth facing as shown in fig.6. ·Put the blade under tension again, as described in point 1, and reposition the two outer blade guides in slight contact with the blade, turning the head of the screw Q clockwise. ·Lock the two hexagonal nuts P again. ·Replace protective casing A, being careful to insert the blade between the straps of the protection S (see fig.1). ·Reposition blade guide E in the correct position for the next cut (see point 2).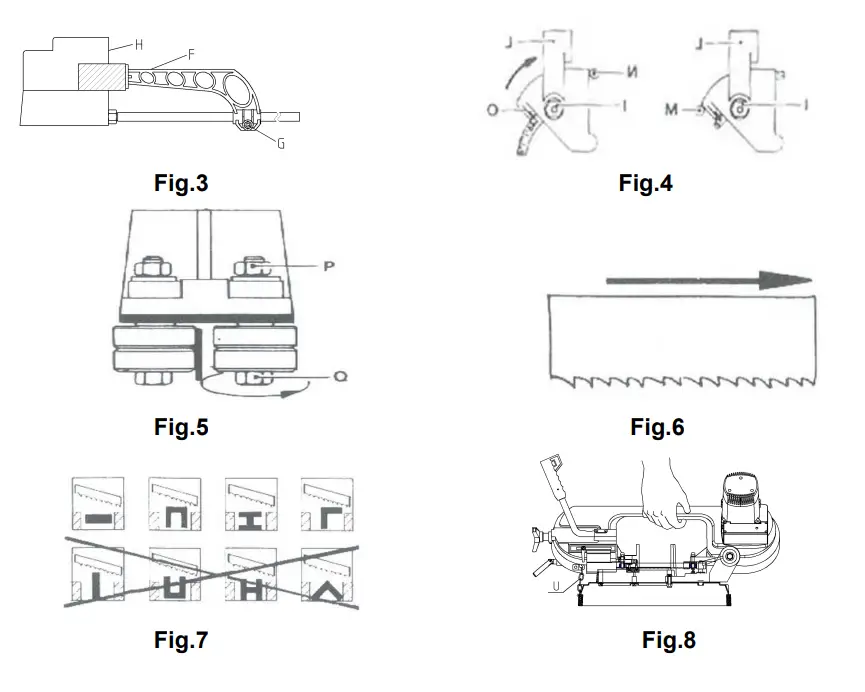
Choosing the cutting speed
This version can perform at two different speeds. In this way, you can always choose the speed most suitable to the material to be cut, regulating it by means of the variator.
Choosing the blade
The choice of the right blade and its toothing depends on the type of material you have to cut and on its section. Your band saw is fitted with a 1735x20mm, 0.9mm thick metal blade, with variable tooth formation of 5-8 teeth per inch, which can perform most of the cuts possible with this machine. However, blades with5 or 8 teeth per inch are also available for special cutting requirements, as indicated in the” cutting table”.
Correct positioning of the piece in the clamp
Pieces to be cut must always be held firmly in the clamp, directly between the two jaws and without inserting other objects. Were profiles, flat barsor particular shapes to be cut, refer to the examples in fig.7.
| Cross-sectional dimension of workpiece (mm) | Blade size-Teeth per inch | m/min | Cutting time |
| 30 | 60 | 0’40” | |
| 50 | 5/8 | 60 | 2’00” |
| 150 max | 60 | 12’00” | |
| 30 | 60 | 1’10” | |
| 50 | 5/8 | 60 | 3’10” |
| 135 max | 60 | 18’00” | |
| 25×35 | 60 | 1’10” | |
| 40×50 | 5/8 | 60 | 2’30” |
| 150X85 max | 60 | 20’00” | |
| 30xs.1 | 80 | 0’05” | |
| 40xs.2 | 80 | 0’15” | |
| 50xs, 5 max | 5/8 | 60 | 0’50” |
| 30xs.1 | 80 | 0’10” | |
| 50xs.2 | 60 | 0’30” |
Locking device for transport
Your cutting machine is provided with a locking device, which allows you to transport it from one place to another. It is sufficient to insert the pin(U) in the hole in the body, and then lift the machine, gripping it as shown in fig.8.
Maintenance
Be careful: before every cleaning or maintenance operation, ensure that the plug is not in the electric supply socket. ·Keep the cutting machine free from the residue by means of a vacuum cleaner or a brush, passing it also over the blade guides and the rubber-coated pulleys. ·Keep the band saw in good condition: if it is not to be used for a long time, put it away in its original packing in a damp-free place. In these cases it is advisable to slacken the blade so as not to keep it under tension unnecessarily.
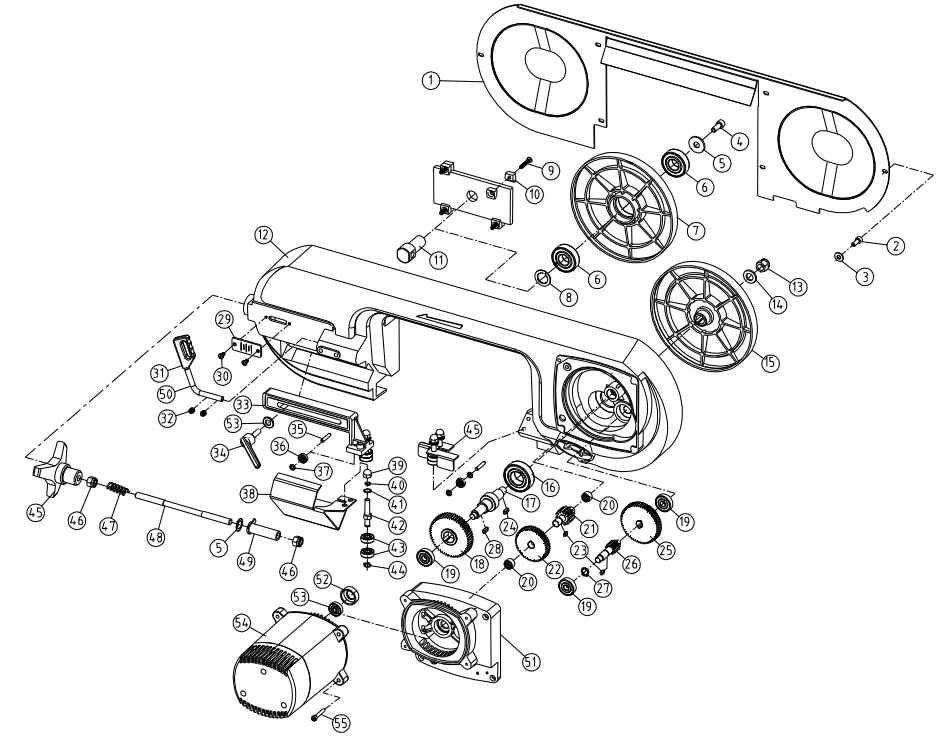
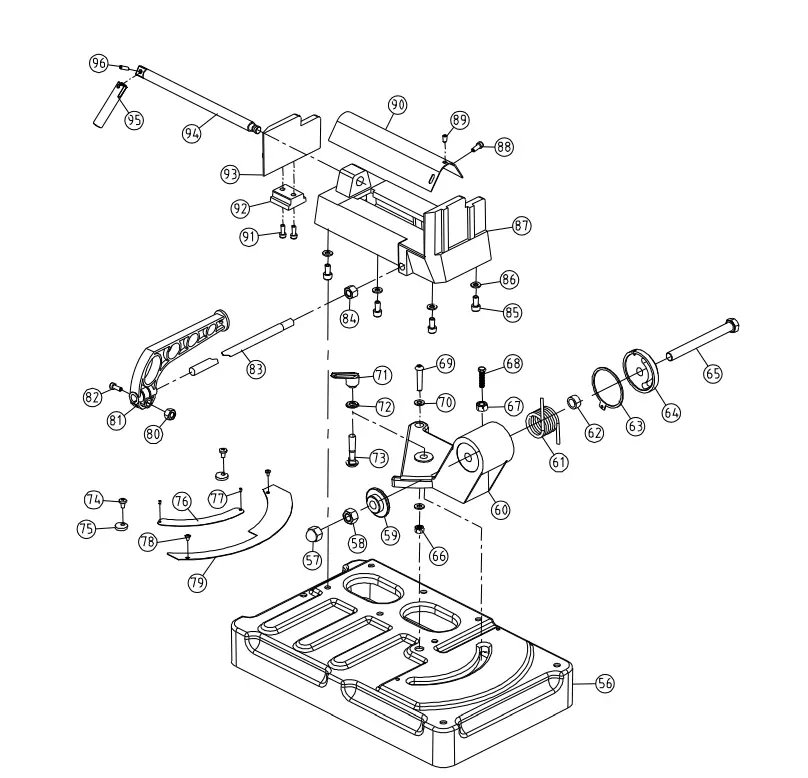
Spare parts
Together with this manual, you can find the exploded views showing all the components of the band saw. Refer to these drawings to identify any spare parts you may need. The data in the present table is approximate.
Electrical data
Take into account that, upstream from the mains to which the cutting machine is connected, there must be a suitable magneto thermal protection to safeguard all the leads against short-circuits and overloads.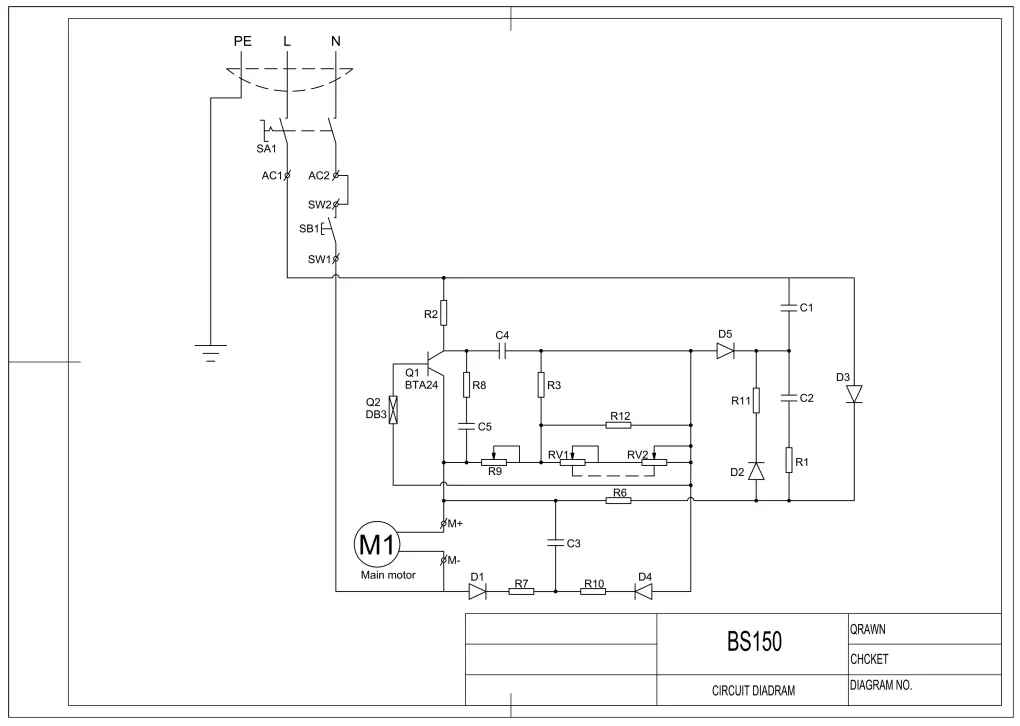
| Item No. | Description | Qty | Item No. | Description | Qty |
| 1 | Cover of saw bow | 1 | 51 | Motor base | 1 |
| 2 | Bolt M5X10 | 6 | 52 | Bearing pad | 1 |
| 3 | Flat washerφ5 | 6 | 53 | Bearing 6000-Z | 1 |
| 4 | Bolt M8X20 | 1 | 54 | Motor | 1 |
| 5 | Flat washerφ10 | 2 | 55 | Bolt M5X30 | 4 |
| 6 | Bearing 6204-2Z | 2 | 56 | Base | 1 |
| 7 | Driven | 1 | 57 | Acorn nut M14 | 1 |
| 8 | Big washer | 1 | 58 | Lock nut M14 | 1 |
| 9 | Bolt M5X30 | 4 | 59 | Sleeve | 1 |
| 10 | Spacer | 8 | 60 | Rotary | 1 |
| 11 | Small shaft | 1 | 61 | Spring | 1 |
| 12 | Saw bow | 1 | 62 | Spacer bush | 1 |
| 13 | Lock nut M12 | 1 | 63 | Rubbing pad | 1 |
| 14 | Flat washerφ12 | 1 | 64 | Rotary disk | 1 |
| 15 | Driving wheel | 1 | 65 | Hexagon bolt M14X140 | 1 |
| 16 | Bearing 6205-2Z | 1 | 66 | Lock nut M8 | 1 |
| 17 | Sleeve | 1 | 67 | Nut M6 | 1 |
| 18 | III Gear | 1 | 68 | Hexagon bolt M6X30 | 1 |
| 19 | Bearing 6200-2Z | 3 | 69 | Hexagon bolt M8X40 | 1 |
| 20 | Bearing HKH1212 2 | 70 | Flat washer 8 | 2 | |
| 21 | I Gear shaft | 1 | 71 | Adjustable handle M10 | 1 |
| 22 | I Gear | 1 | 72 | Big washer 10 | 1 |
| 23 | Flat key 4X10 | 2 | 73 | Square screw M10X50 | 1 |
| 24 | Flat key 6X12 | 2 | 74 | M6X10 | 2 |
| 25 | II Gear shaft | 1 | 75 | Eccentric collar | 2 |
| 26 | II Gear | 1 | 76 | Scale | 1 |
| 27 | Check ringφ12 | 1 | 77 | Rivet 2X5 | 2 |
| 28 | Flat key 5X20 | 1 | 78 | Cross screw M4X6 | 2 |
| 29 | Instructions cover | 1 | 79 | Rubbing pad | 1 |
| 30 | Cross head screw M5X8 | 2 | 80 | Nut M6 | 1 |
| 31 | Handle | 1 | 81 | Stopping handle | 1 |
| 32 | Bolt M8X8 | 2 | 82 | Hexagon screw M6X25 | 1 |
| 33 | Rear adjusting bracket | 1 | 83 | Stopping bar | 1 |
| 34 | Adjustable handle M8X30 | 1 | 84 | Nut M12 | 1 |
| 35 | Round pinφ5X26 | 2 | 85 | Hexagon screw M8X16 | 4 |
| Item No. | Description | Qty | Item No. | Description | Qty |
| 36 | Bearing 625-2Z | 2 | 86 | Flat washer 8 | 4 |
| 37 | Flat washer 5 | 2 | 87 | Vise | 1 |
| 38 | Guard plate | 1 | 88 | Hexagon screw M6X10 | 2 |
| 39 | Acorn nut M8 | 4 | 89 | Hexagon screw M6X8 | 1 |
| 40 | Spring washer 8 | 4 | 90 | Shield of vise | 1 |
| 41 | Flat washer 8 | 4 | 91 | Hexagon screw M6X16 | 2 |
| 42 | Shaft | 1 | 92 | Fixed seat | 1 |
| 43 | Bearing 608-2Z | 8 | 93 | Movable plate of vice | 1 |
| 44 | Checking ringφ8 | 4 | 94 | Lead screw | 1 |
| 45 | Handle | 1 | 95 | Rocker | 1 |
| 46 | Lock nut M10 | 2 | 96 | Spring pin 5X14 | 1 |
| 47 | Pressure spring | 1 | |||
| 48 | Screw | 1 | |||
| 49 | Indication rod | 1 | |||
| 50 | Threading pressure handle | 1 | |||


