aiwa AT-X80R True Wireless Earphones User Guide
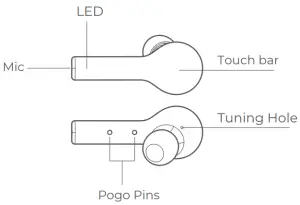
Overview
Choose Your Eartips
- L

- M

- S


How to Pair
Initial Pairing:
- Remove both earbuds from charging case.
- Re-insert them back into the charging case.
- Remove them again to activate the earbuds.
- Turn on BT on your mobile device and connect to “AT-X80R”
Upon successful pairing, earbuds will automatically power up once removed from the charging case, if not please charge and repeat initial pairing process.
Switching between mobile devices:
- Turn off mobile device BT function to disconnect.
- Earbuds automatically enter pairing mode.
- Turn on BT on your second mobile device and connect to “AT-X80R”
*Multi-device connection is not available.*
*Earbuds will auto reconnect to the last connected device upon powering up again*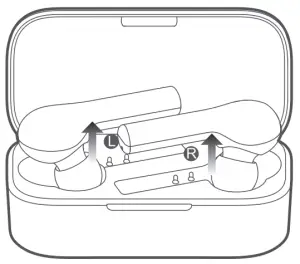
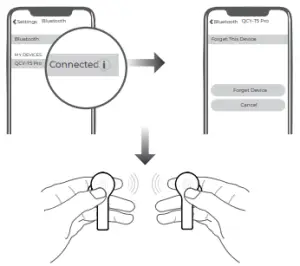
Reset Your Earbuds
- Disconnect and erase any history of your earbuds from your device manually from your device’s BT list.
- Pick up both earbuds and depress both touch sensors (L & R) simultaneously for approx. 8s/ until the LED indicator light glows red to power off.
- Depress both touch sensors (L & R) simultaneously again for approx. 10s/ until the LED indictor light flashes red and green.
- Factory reset is successful. Please refer to the “Initial Pairing:” page of the manual to attempt to pair your earbuds with your device again.
Connecting L and R side earbuds to each other
- Power off both earbuds.
- Depress both touch sensors (L & R) for approx. 5 s/ until the LED indicator light flashes red and green.
- Double tap touch sensors and both earbud’s LED indicator light should flash red and green.
- One side earbud’s indicator light shut down + the other side earbud’s indicator light flashes red and green indicates successful connection.

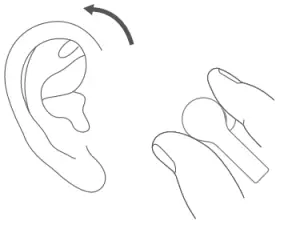
How to Wear
- Select a suitable sized silicone ear tip for your ear size.
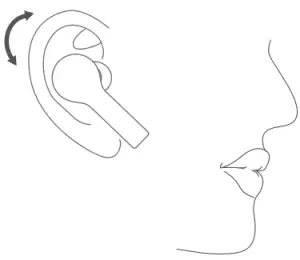
- Adjust the mic towards your voice to enjoy a better calling experience .


Call Control
- Double tap touch sensor to answer an incoming call.
- Long press touch sensor to ignore call.
- Double tap touch sensor to put the first call on hold and answer a second incoming call.
- Long press touch sensor (2s) to ignore a second call.
- Long press touch sensor to switch between an active and held call.
Single Side Earbuds Usage
- Depress touch sensor of preferred earbud side for approx. 5s to enter pairing mode.
- Connect to “AT-X80R” accordingly.
Charging Your Earbuds Simple place earbuds back into charging case to charge then up.
- Red indicator lights indicate charging in progress*
- Green indicator lights indicate charging complete*
Charging Your Charging Case
Battery capacity > 30% (2 flashing green lights)
Battery capacity 30%-90% (Solid green on the left side, Blinking green on the right side)
Battery capacity >90% (Both lights are solid green)
*The charging case supports wireless charging*
Product Parameters
- Pairing name: AT-X80R
- Bluetooth version: V5.0
- Stand-by time: approx. 70hrs
- Charging time: approx. 2hrs
- Playback time: approx. 4-5 hrs
- Operation range: 10m(with no obstacle)
- Battery type: li-ion
- Battery capacity(earbud):3.7V 40mAh
- Battery capacity(charging case):3.7V 600mAh
- Input parameter(charging case):5V 500mA
- Bluetooth profiles: HSP/HFP/A2DP/AVRCP
Function Introduction
Functions | Current status | Operation/result | LED | Prompt |
Connecting L & R side earbuds together | Earbuds are off. (No previous pairing record) | Depress touch sensor for 1s to power up earbuds. Earbuds will automatically enter pairing mode. | LED blinks red and green | TONE |
Earbuds are off. |
| LED blink red and green then right LED turns off | TONE | |
| Power-on | Earbuds are OFF and out of the charging case | Long press touch sensor for approx. 1s | LED glows green for 1s | TONE |
| Earbuds inside the charging case | Remove earbuds from the case | LED glows green for 1s | ||
| Power-off | Power-on | Long press touch sensor for approx. 8s | LED glows red for 2s | TONE |
Pop earbud into the case to power off | LED glows red | |||
| Answer/end call | Incoming call/calling | Double tap touch sensor | \ | TONE |
| Ignore call | Incoming call | Long press touch sensor for approx. 2s | \ | TONE |
| Voice assistant | Connected | Triple tap touch sensor | \ | TONE |
| Gaming mode | Playing/gaming | Triple tap touch sensor to switch on/off gaming mode. | \ | On: two beeps Off: three beeps |
| Music pause/play | Music playing | Double tap touch sensor to pause /play. | \ | \ |
In-Ear Detection
| \ | Beep | ||
Skip track | Music playing | Long press left earbud for previous track. Long press right earbud for next track. | \ | \ |
Warranty Card
Warranty duration: 12 months after purchase (Please inquire with your local distributor for more specific information.)
| Model Number: |
| Date of Purchasing: |
| User’s Name: |
| User’s Phone: |
| User’s Address: |
| Shop’s Name: |
| Shop’ Address: |
| Comments: |
Warranty does not cover:
- Damages caused by unauthorized disassembly.
- Defects or physical damages caused by user.
FCC Statement
This equipment has been tested and found to comply with the limits for a Class B digital device, pursuant to Part 15 of the FCC Rules. These limits are designed to provide reasonable protection against harmful interference in a residential installation.
This equipment generates uses and can radiate radio frequency energy and, if not installed and used in accordance with the instructions, may cause harmful interference to radio communications.
However, there is no guarantee that interference will not occur in a particular installation. If this equipment does cause harmful interference to radio or television reception, which can be determined by turning the equipment off and on, the user is encouraged to try to correct the interference by one or more of the following measures:
- Reorient or relocate the receiving antenna.
- Increase the separation between the equipment and receiver.
- Connect the equipment into an outlet on a circuit different from that to which the receiver is connected.
- Consult the dealer or an experienced radio/TV technician for help
This device complies with part 15 of the FCC Rules. Operation is subject to the following two conditions:
- This device may not cause harmful interference, and
- this device must accept any interference received, including interference that may cause undesired operation.
Changes or modifications not expressly approved by the party responsible for compliance could void the user’s authority to operate the equipment.


Hazardous substances and their contents in the item

| Part Name | Hazardous Substances | |||||||||
| Pb | Hg | Cd | Cr) NI | PBB | PBDE | DIBP | DEHP | DBP | BBP | |
| Main body | X | 0 | 0 | 0 | 0 | 0 | 0 | 0 | 0 | 0 |
| Battery | 0 | 0 | 0 | 0 | 0 | 0 | 0 | 0 | 0 | 0 |
| Ear tips | 0 | 0 | 0 | 0 | 0 | 0 | 0 | 0 | 0 | 0 |
| Accessories | 0 | 0 | 0 | 0 | 0 | 0 | 0 | 0 | 0 | 0 |
| Charging cable | X | 0 | 0 | 0 | 0 | 0 | 0 | 0 | 0 | 0 |
| This form is made by SJ/T 1364 regulation. 0: means that hazardous substance content in the homogeneous materials of this part is within the limits of (EU) 2015/863 regulation . X : means that hazardous substance content in ,at least, one certain homogeneous material of this part is beyond the limits of (EU) 2015/863 regulation ,but there is no mature alternative in the industry at present, it still conforms to the EU ROHS Directive in the scope of exemption. | ||||||||||
Notes: Please arrange using time properly as your hearing may be damaged by using the device for a long time.
Tips
- Before using the headset, please read the manual carefully and keep it for future references.
- The headset need to be fully charged prior to first-time use.
- If the headset is left unused for over two weeks, please recharge it periodically.
- Please use the chargers made by qualified manufacturer.
- If the headset cannot be found by your phone, please check whether it is in pairing mode; if left unconnected for a long while, the headset will exit pairing mode, please re-enter the mode; if a procedure error of your phone occurs, reboot it; if a procedure error of the head set occurs, reboot or reset it.
Caveats
- Never disassemble or modify your headset for any reasons to avoid any damages and danger.
- Do not store the headset in extreme temperatures (under 0ºC over 45ºC).
- Avoid using the indicator close to the eyes of children or animals.
- Do not use this headset during a thunderstorm to avoid irregular function and increased risk of electric shock.
- Do not use harsh chemicals or strong detergents to clean the headset.
- Keep the headset dry.
Aiwa Electronics Int’l Co., Ltd. Explore more at www.int-aiwa.com