better bathrooms BeBa_17297 Top Fix Soft Close Toilet Seat
Thank you for choosing Better Bathrooms.
Please read this manual before installing your product and keep for future reference
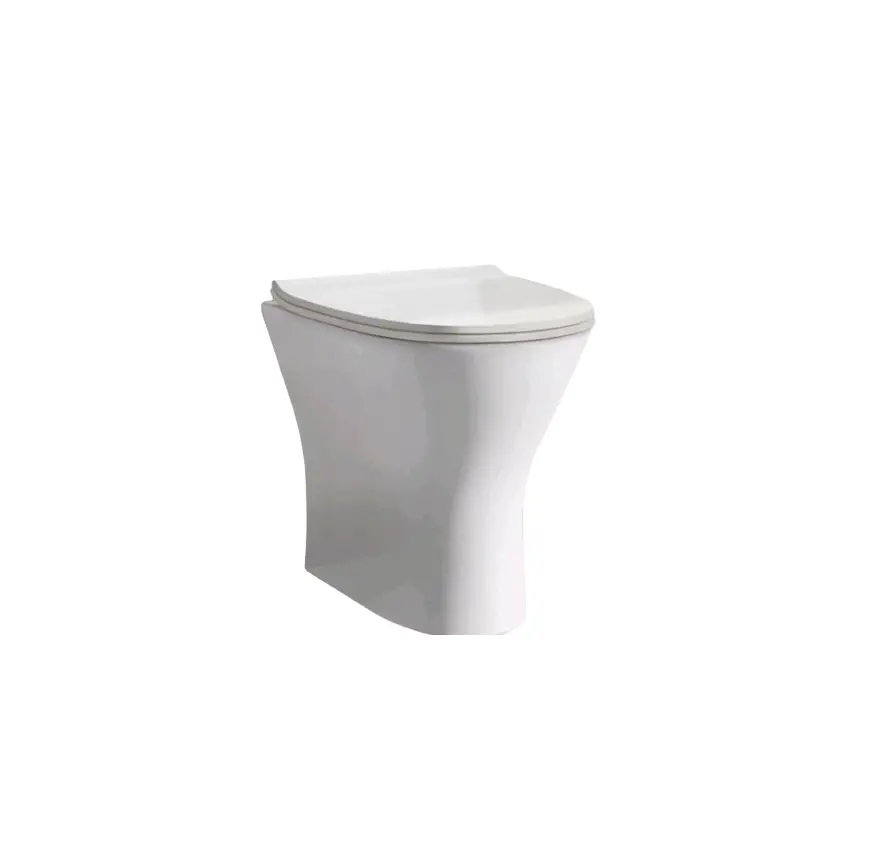
Please note: Image is for illustrative purposes only and may differ slightly to the actual product
- Single-person assembly
- Tools required
- We always recommend using professional tradespeople to install your product
Congratulations on your purchase
And welcome to our growing gang of savvy shoppers We’re on a mission to bring you extraordinary bathroom products, for less. From modern to traditional style ceramics, plus the gorgeous fixtures, fittings and furniture to match. So, you can fall in love with your space every single day. As one of the UK’s largest independent bathroom stores, we’ve received count less awards; including the National Business Awards UK, the Digital Entrepreneur Awards and being placed on The Sunday Times Fast Track 100. We hope your new product exceeds your highest expectations. However, should any problems occur, please:
- log in to your account and contact our customer services team via your self- serve portal – betterbathrooms.com/CustomerAccount/Login
- contact us via betterbathrooms.com/content/contact-us
Important information
- Please read these instructions thoroughly and retain for future reference
- Manufactured to BS EN 1254 – Specification for WC seats(plastics)
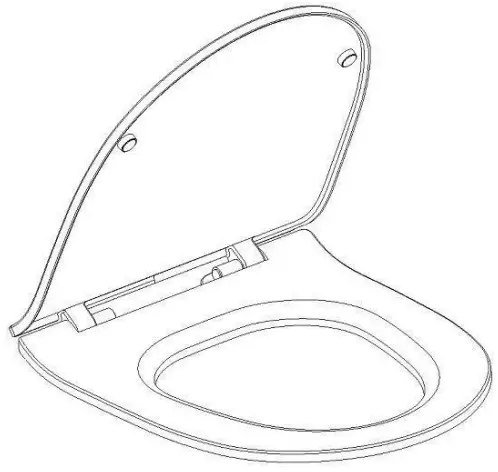
Parts
Please note that Parts are for illustrative purposes only and may differ slightly to the actual product
- Expanding Plug
- Gasket
- Fitting Peg
- Fixing Screw
- Fitting Cover
- Seat/Lid Assembly
Tools required
Screwdriver
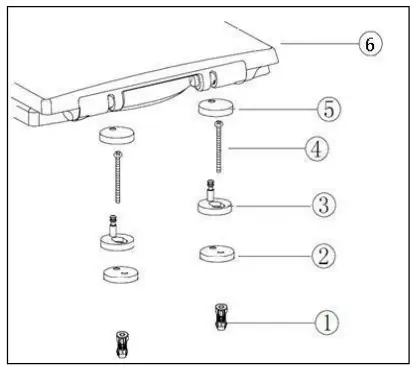
Installation
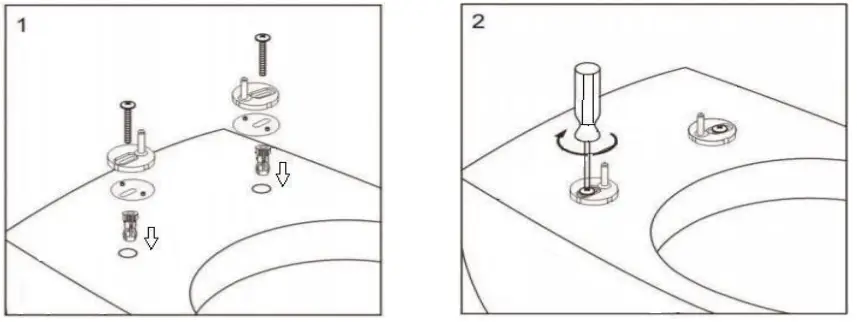
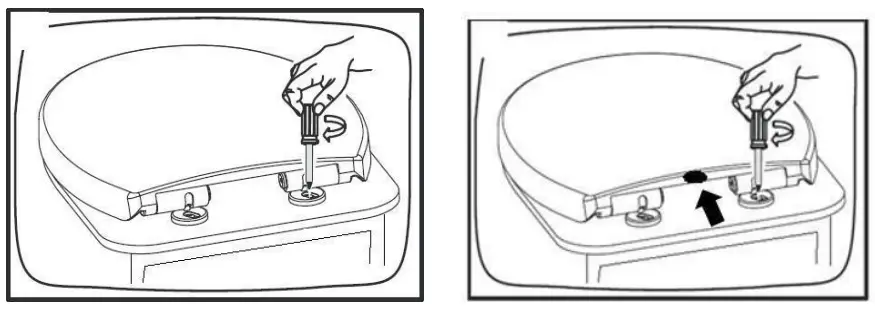
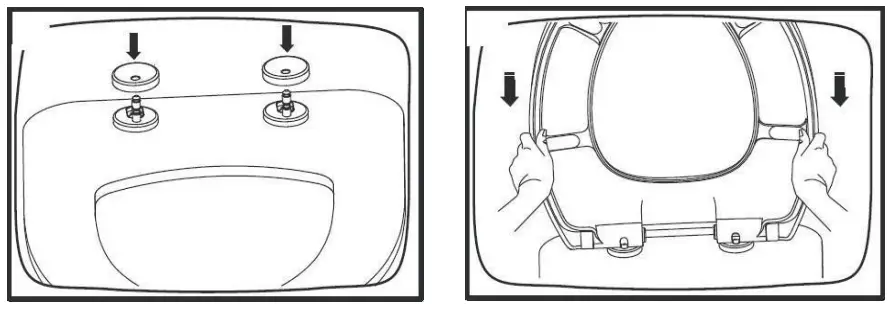
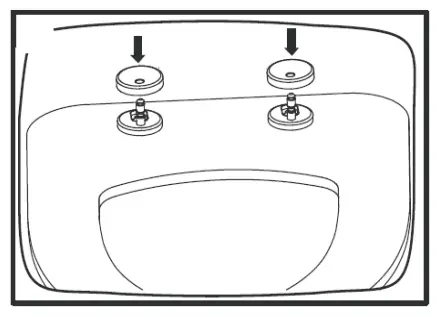
- Push the expanding plugs (part 1) into the holes on the toilet pan then place the gaskets (part 2) between fitting pegs (part 3) and toilet pan. Next, place the long screws (part 4) through the fitting pegs and gaskets and screw into the expanding plug (part 1).

Please note: Fit the screws loosely and do not fully tighten at this stage - Turn the fittings on the toilet so that they align with the holes on the seat, then push the seat onto the pegs until it clicks into place. Gently move the seat so that it aligns on the toilet pan.

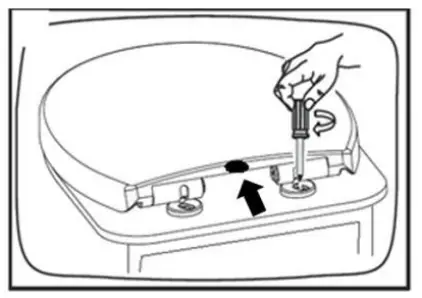
- Once the seat is aligned, tighten the screws into the fittings (as below) then once the seat is secured, remove it by pressing both on the rear and lifting away.

- Place the fitting covers over the fixed fittings then push the seat onto the fitting pegs and click into position


Using
During use do not force the seat closed as this will damage the soft close mechanism. Pull the seat and/or lid towards you slightly until it reaches the point at which it will fall under its own weight, then release.
Do not stand on the toilet seat.
Cleaning
To maintain the surface of your product, wipe with a clean damp cloth and wipe dry, do not use any abrasive cleaning agents or materials.
It is recommended to wipe the seat and fittings on a regular basis.
Troubleshooting
Seat becomes loose after a period of use
Remove the seat and re-tighten the fittings.
Soft close mechanism stops working
The mechanism cannot be replaced, replace the seat and lid, however, the fittings can remain fitted. Removal of seat/lid is advised in Maintenance (below).
Seat is short or overhangs the toilet pan
Align the seat lid with the front edge of the toilet pan, the fittings are adjustable.
Maintenance
- To remove the seat/lid, press the button at the rear of the seat and pull the seat/lid away from the fitting pegs. When replacing ensure it clicks into place.

- To access the fixing screws, remove the lid/seat as above, then pull off the covers.

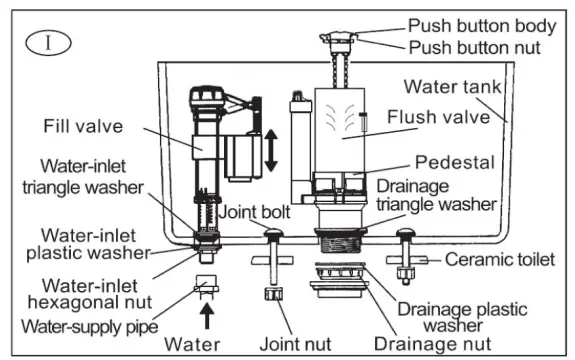
Dual Flush Valve Instruction
Installation Layout
Tip
- Read all manipulation and installation guideline, and please install it step by step according to the installation guideline and prevent any damage from product breakage and improper use.
- All material are written according to the latest information when design. Our company reserve the right to change product characterizes, package and supply at any time without notice.
- Do not use corrosive detergent (such as hypochlorite) in water tank because such strong oxidant makes fittings damaged easily and lead to leakage. The mentioned above situations are beyond the range of our guarantee.
- Our company do not bear the related loses and damages caused by use other company’s parts and material such as glass glue.
- Suitable temperature range: 0-45″C
Functional Instruction
- The flush valve has 2 flushing ways: half-flush and full flush; when you push the full flush, the discharge volume is big and when you push the half flush, the discharge volume is small.
- Water level of half flush is adjustable. (Refer to photo 6)
- Water level of full flush is adjustable. (Refer to photo 3 – 2)
Installation Steps
I. Preparation before Installation
Remove the old fittings and wash tank before installation. And wash clean because many impurities probably existed in conduit.
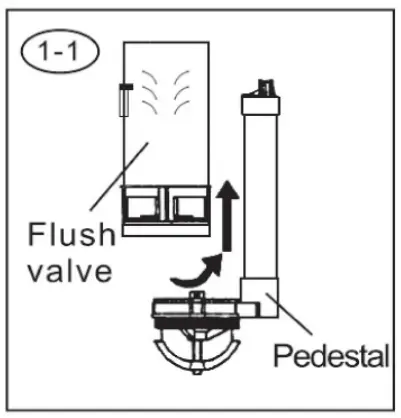
II. Flush Valve Installation (According to the actual need)
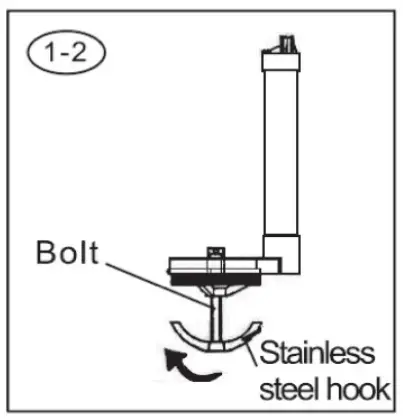
- Stainless steel hook for one-piece flush valve installation
Stainless steel hook for one-piece flush valve installation
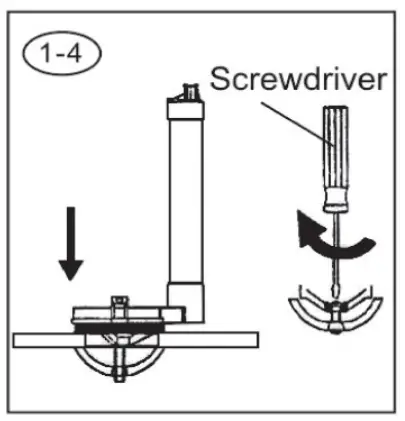
Circumrotate stainless steel hook to the end of bolt clockwise.
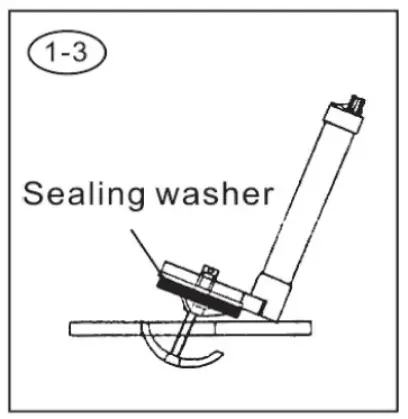
Let pedestal aim at the water tank scupper, deflect property, circumrotate, and, the stainless steel hook can reach the scupper downside, then, revise the pedestal, the sealing washer should put upside. Go through the pedestal by the middle finger of left hand to keep off stainless steel hook and make its both sides put around the outfall symmetrically.
Circumrotate bolt by screwdriver and be sure that seal between sealing washer and the surrounding for outfall.
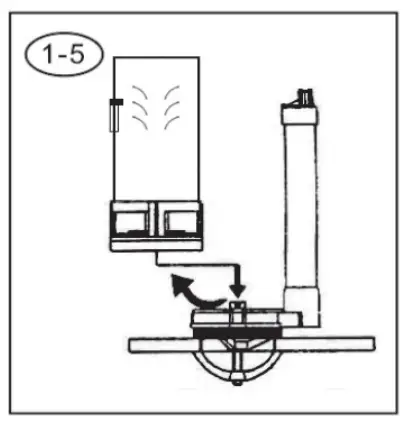
Let flush valve body insert into pedestal and circumrotate it inside the buckle clockwise.
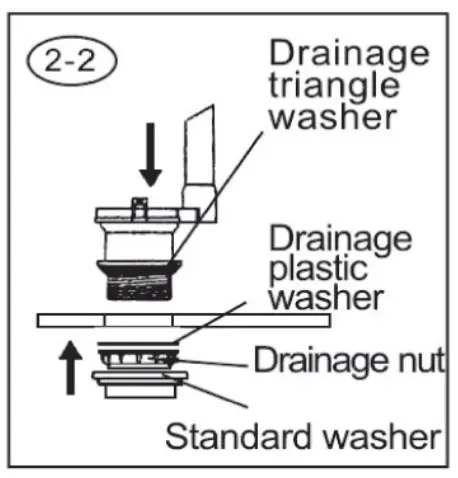
- Two-piece flush valve installation
Contrarotate drainage body and make it removed from pedestal.
Let pedestal insert into outfall from inside of water tank. cover the drainage plastic washer, circumrotate drainage nut and cover the standard washer, and it can adjust the put angle properly according to the actual size of water tank.
Let flush valve body insert into pedestal and circumrotate it inside the buckle clockwise.
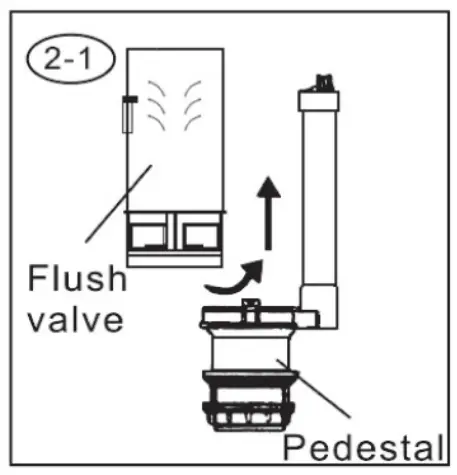
Notice: If the product is different from the photo shown, please refer to the actual product.
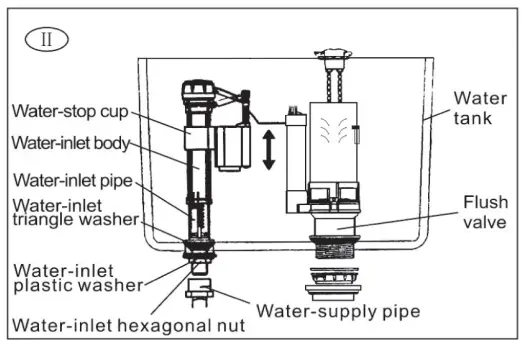
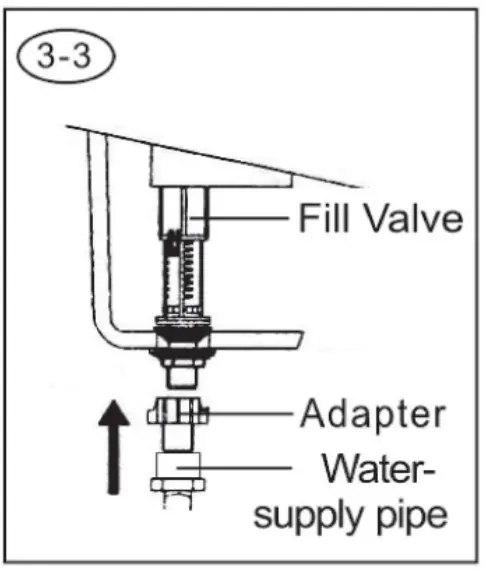
III. Fill Valve Installation
Put fill valve & water-inlet triangle washer insert into water-inlet hole of water tank, then, cover water-inlet plastic washer and hexagonal nut in turn from the bottom of fill valve. Fastening water-inlet hexagonal nut and make a proper adjust according to the size of water tank.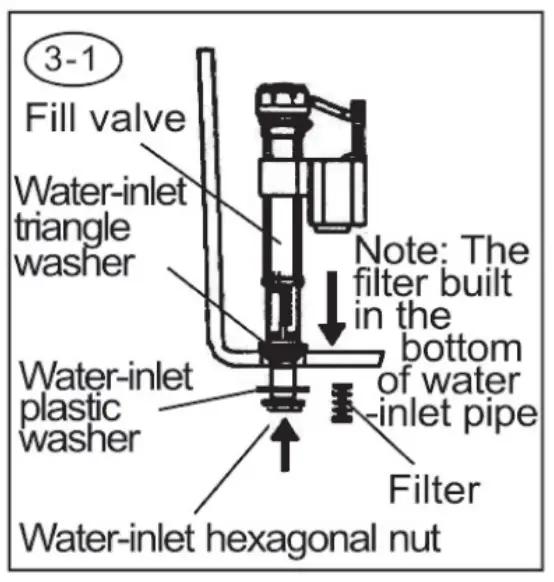
Adjust water level:
Fetch out buckle and screw off water-inlet body anti-clockwise: pull upside or press downside to the proper situation, then, screwing on water-inlet body closely and install the buckle. Little adjustment on water level: revolve adjusted rod to adjust the height of water-stop cup and buoy to reach the suitable water level you need.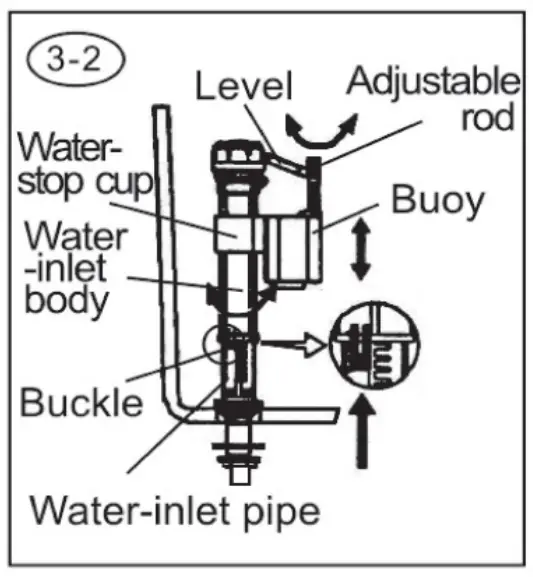
Connect the water-supply pipe and built an adapter or filter according to your actual need.
Notice
- Be sure that buoy is active freely before fill valve installation.
- Wash the impurity in the conduit when you connecting water-supply pipe.
- The height of water level can not beyond overflow mouth of flush valve when adjusting water level.

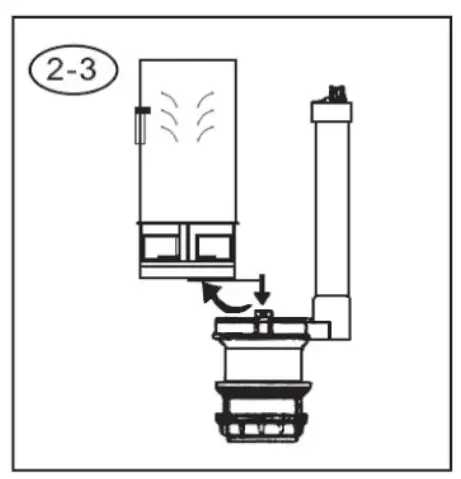
IV. Water tank Installation
Put water tank on ceramic toilet and make standard washer located at the outfall of toilet. Just the photo shows, let jointed bolt insert into installation hole, then, screw the Jointed nut closely.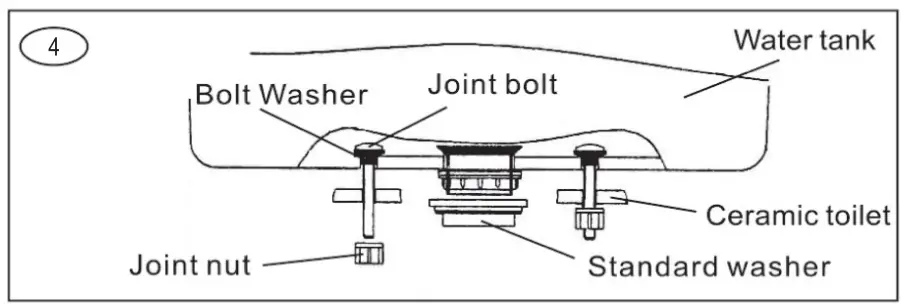
V. Examination
As photo show, connect water-inlet pipe to test and notice the following phenomenon:
- According to the height of half flush to adjust half flush water level: when half flush buoy is higher, the drainage volume is less; when it is lower, the drainage volume is more.
- Adjust the height of water level by the adjusted digit and its corresponding adjusted patch. The placket is big find its water level is high: the placket is small and its water level is low (Note: When adjusting full flush water level, please fetch out flush valve, then, install flush valve again correctly after adjusted.)
- Adjust all parts position to prevent them from interference
- Open & close for water-stop cup is normal and has no leakage.
- It is normal for full flush and half flush .


VI. Push button Installation
Screw off push button nut.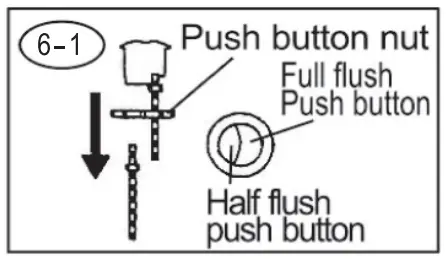
Let push button insert into water tank lid middle hole, screwing on push, button nut from the bottom of water tank lid, then, screwing the adjusted nut closely and be sure that it is firm.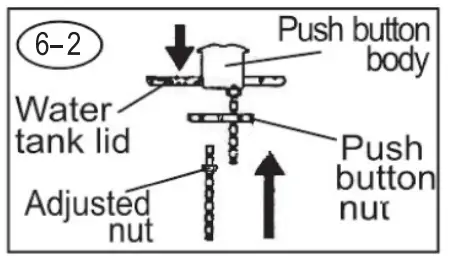
Please confirm pull flush rod press the flush valve key-press whether or not and check it is blocked or not.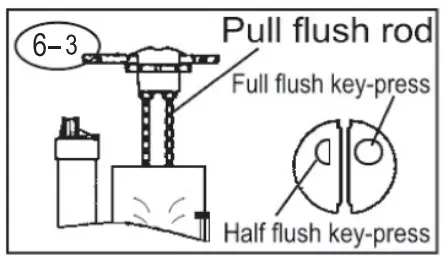
Note: Screw off pull flush red, the cut part is upside.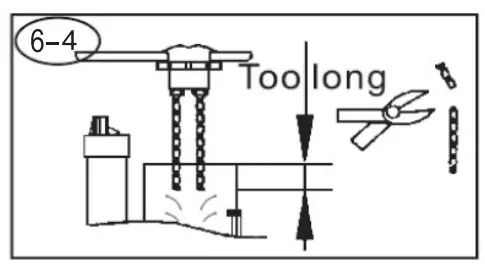
Note: Pull flush Rod should aim the full flush key-press.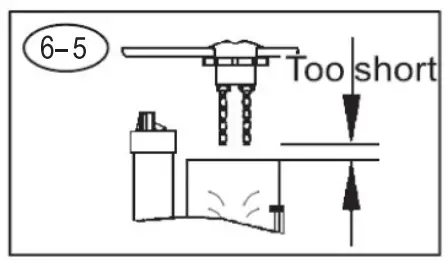
VII. Examination Again
Cover water tank lid and notice the following phenomenon to confirm installation complete or not:
- Open & close for water-stop washer is normal and has no leakage.
- It is normal for full flush and half flush and they flush excellently.
Trouble Shooting
| Symptoms | Probable Reasons | Corr ective actions |
| Water level is too high or too low | Do not adjust the water level of fill valve well | Refer to photo 5 to adjust water level |
| Always water-inlet or do not water-inlet (for fill valve) |
|
|
| Leakage |
|
|
| No drainage or less drainage | Pull flush rod is too short to press drainage pipe | Adjust adjusted nut (refer to 7-2). |
| Water level tor half flush is too high or too low | Water level does not adjusted well | Adjust water level (refer to photo 6). |
Installation Instructions For Floor Fixing Kit
- The WC pan should be installed on a flat surface and placed in its final intended position.
- Using the diagram below as a guide, position each plastic floor fixing bracket inside the walls of the WC pan directly behind the fixing holes.
- Mark off and using the plugs, washer and fixing screws provided, drill and secure the plastic bracket to the floor. You will need to move the pan away from the brackets to make space for fixing.
- With the fixing brackets firmly in position, replace the WC pan back in position. Check that the fixing brackets line up with the holes in the WC pan.
- From the outside wall of the WC pan, place the plastic cover gasket over the side fixing screw and thread into the floor fixing bracket. Take care not to over-tighten.
- Place the cover caps over the head of the side fixing screws, If required use a small amount of silicone sealant to assist with attaching the cover caps permanently.
- Check WC is firmly fixed.
Diagram Key
➀ Flat surface
➁ Plugs
➂ Plastic floor fixing bracket
➃ Washer
➄ Floor fixing screw
➅ Plastic cover gasket
➆ Side fixing screw
➇ Cover cap
➈ WC pan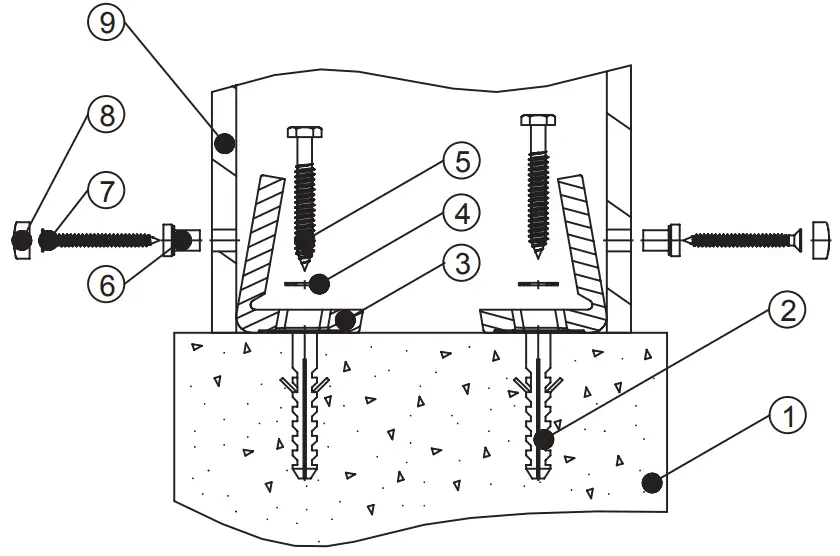
Customer Support
For more information
- visit beterbathrooms.com
- email [email protected]
- call 03303903062
- write to Trident Business Park, Neptune Way, Huddersfield, HD2 1UA
V1_30.08.22