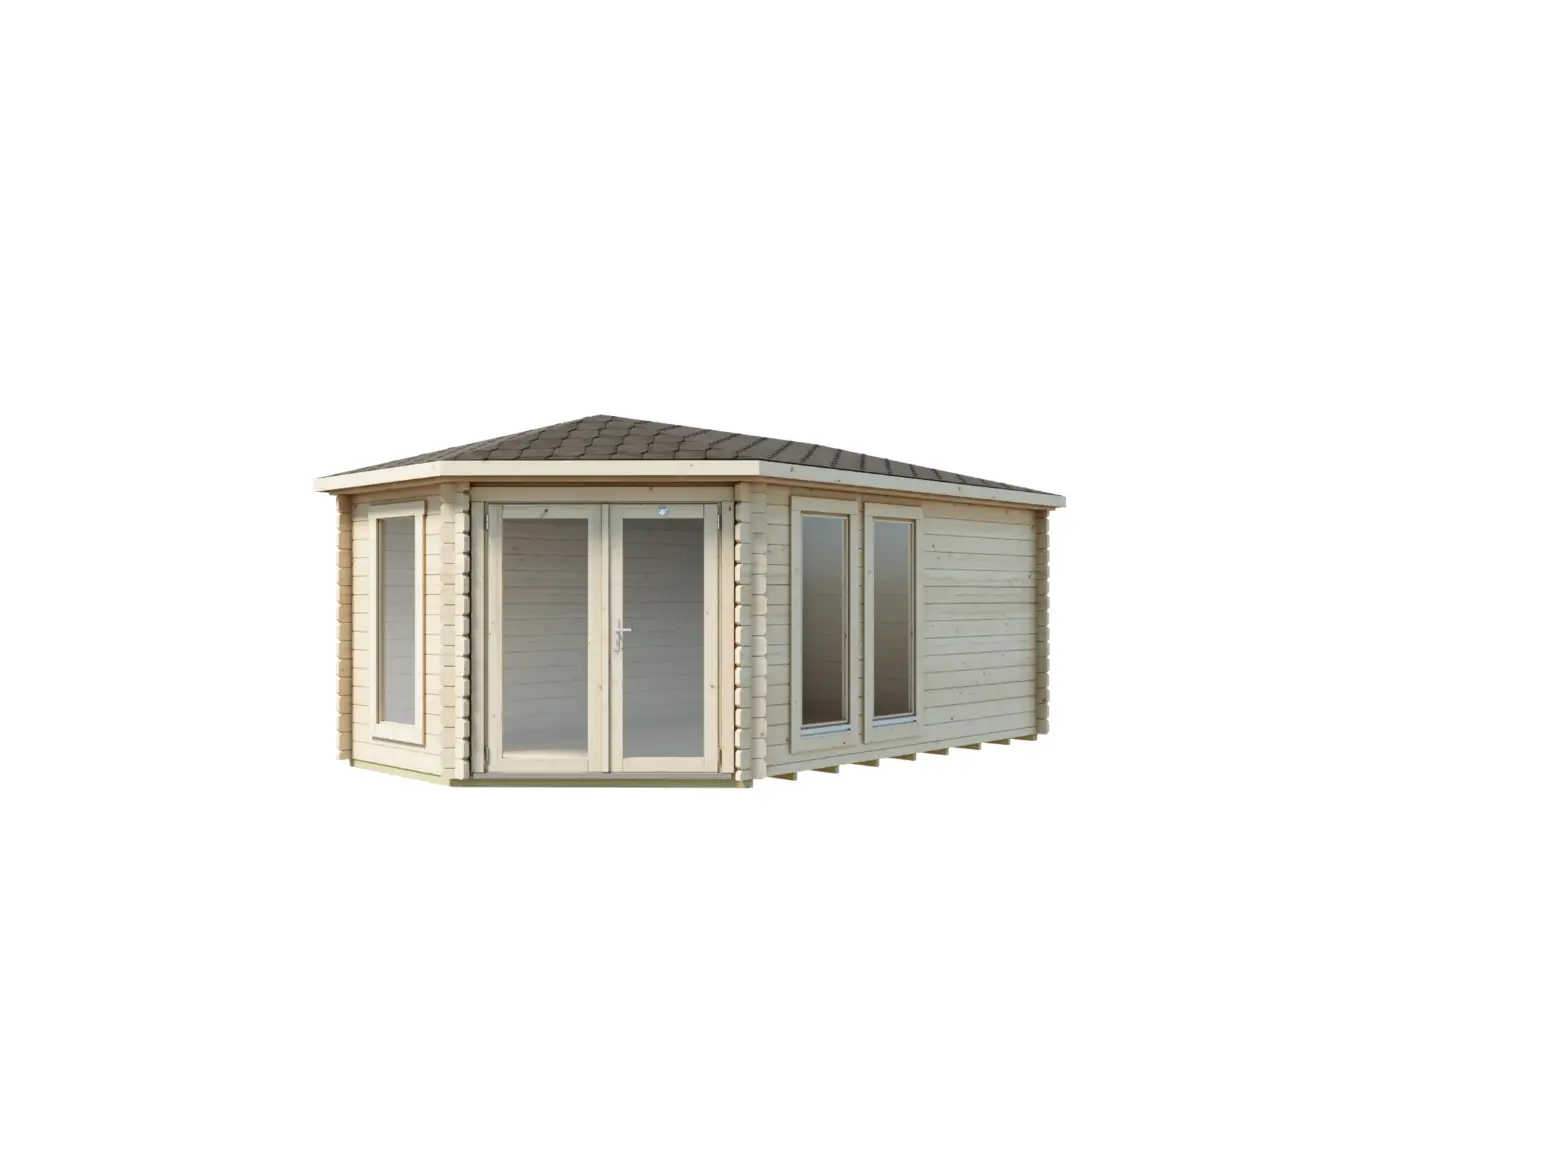
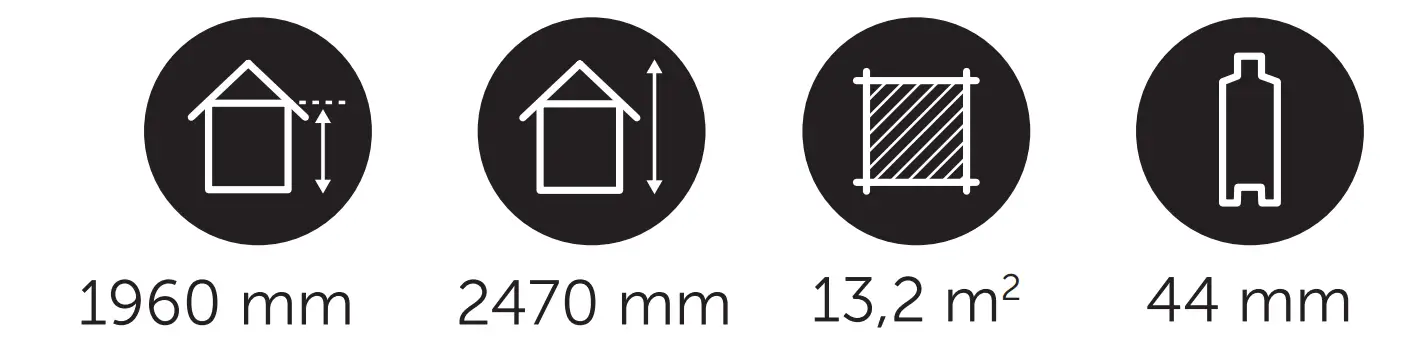
LILLEVILLA Eurajoki Guest house 2780 mm x 5100 mm 44 mm
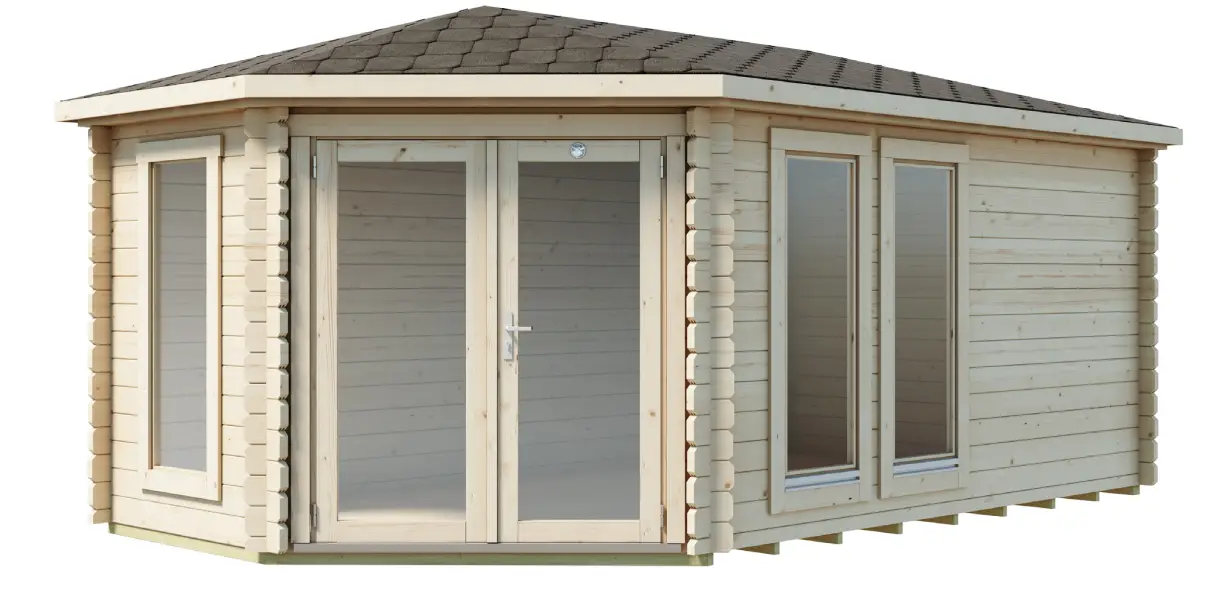
FEATURES
Dimensional drawings
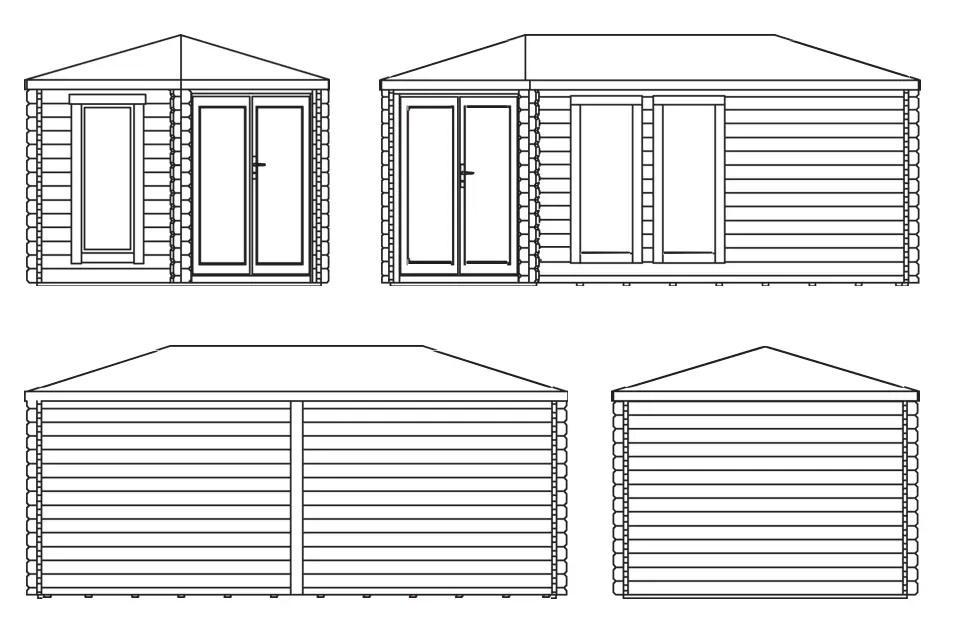

Lillevilla Eurajoki: 2780 x 5100 mm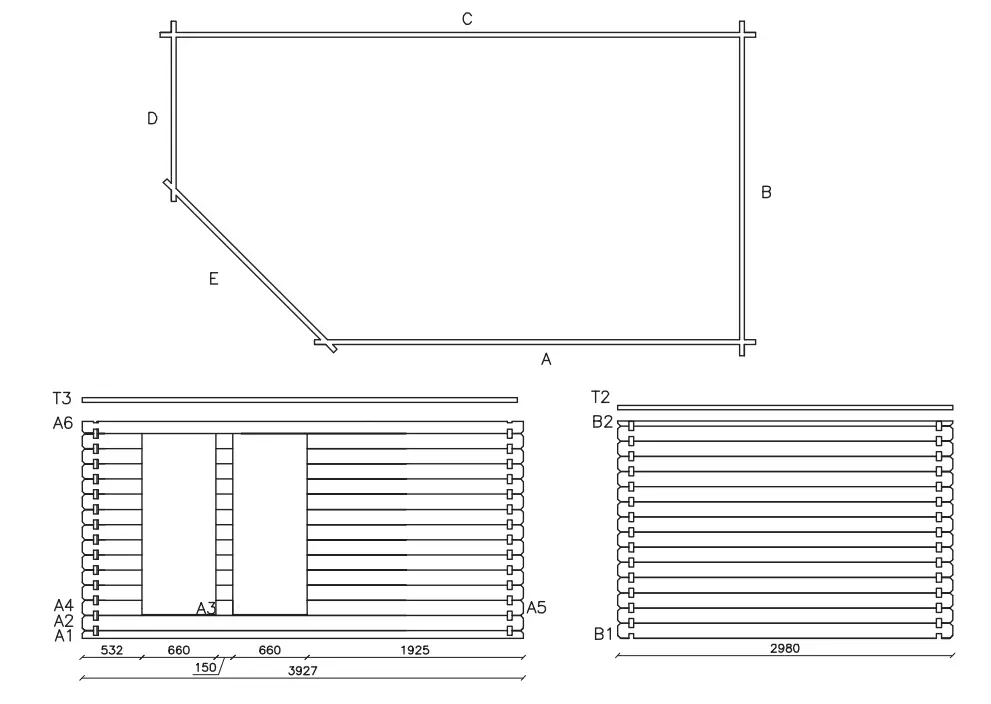
Part list
| Part | Dimensions in mm. | Pieces | Mark | Control |
| Foundation beam, green | 36 x 60 x 2780 | 13 | KI1 | |
| Foundation beam, green | 36 x 60 x 1400 | 2 | KI2 | |
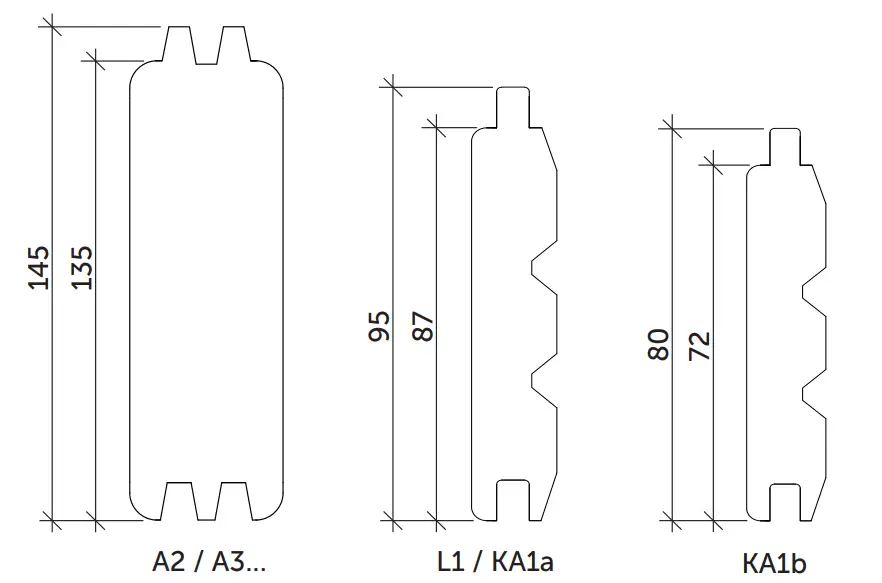
| Floor board | 21 x 87 x 5007 | 31 | L1 | |
| Skirting, to be cut at site | 20 x 30 | 33 m | J1 | |
| Roof board, running meters | 16 x 87 | 230 m | KA1a | |
| or roof board, running meters | 16 x 72 | 280 m | KA1b | |
| Roof beam | 45 x 95 x 1535 | 11 | K1 | |
| Roof beam | 45 x 95 x 1535 | 1 | K2 | |
| Roof beam | 45 x 95 x 1495 | 1 | K3 | |
| Roof beam | 45 x 95 x 1495 | 1 | K4 | |
| Roof beam | 45 x 95 x 2070 | 3 | K5 | |
| Roof beam | 45 x 95 x 2450 | 1 | K6 | |
| Roof beam | 45 x 95 x 1015 | 3 | K7 | |
| Roof beam | 45 x 95 x 515 | 3 | K8 | |
| Roof beam | 45 x 95 x 525 | 2 | K9 | |
| Roof beam | 45 x 95 x 500 | 1 | K10 | |
| Roof beam | 45 x 95 x 1040 | 2 | K11 | |
| Roof beam | 45 x 95 x 985 | 1 | K12 | |
| Roof beam | 45 x 95 x 1130 | 1 | K13 | |
| Roof beam | 45 x 95 x 600 | 1 | K14 | |
| Roof beam | 45 x 95 x 600 | 1 | K15 | |
| Supporting board for roof beam | 26 x 95 x 1700 | 6 | K16 | |
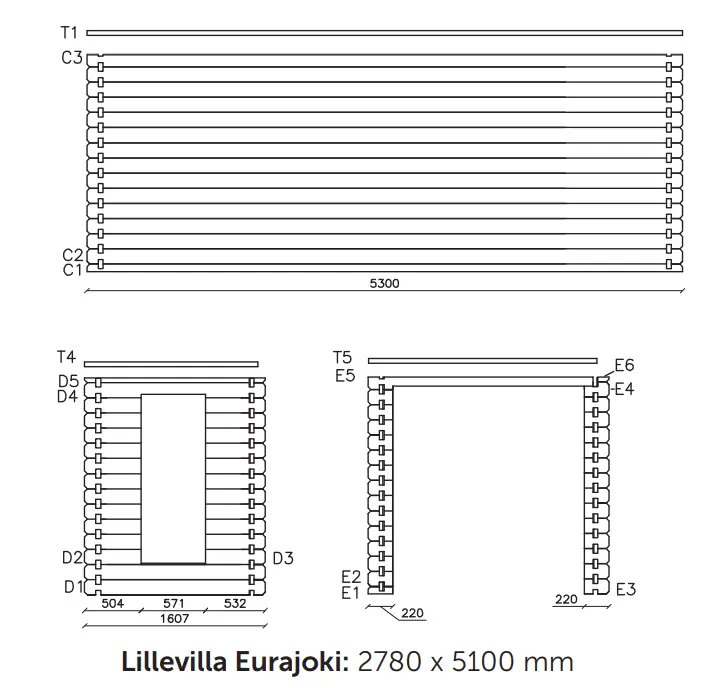
| Horizontal beam upon the walls | 40 x 145 x 5300 | 1 | T1 | |
| Horizontal beam upon the walls | 40 x 145 x 2980 | 1 | T2 | |
| Horizontal beam upon the wall | 40 x 145 x 3872 | 1 | T3 | |
| Horizontal beam upon the walls | 40 x 145 x 1540 | 1 | T4 | |
| Horizontal beam upon the wall | 40 x 145 x 2030 | 1 | T5 | |
| Wall support | 40 x 120 x 1910 | 5 | T6 | |
| Fascia board, to be cut at site | 16 x 95 x 5400 | 1 | T7 | |
| Fascia board, to be cut at site | 16 x 95 x 4000 | 2 | T8 | |
| Fascia board, to be cut at site | 16 x 95 x 2100 | 2 | T9 | |
| Accesories bag | 1 | T10 | ||
| Assembly blocks | 44 x 65 x 250 | 2 | T11 | |
| Door, type D6, right | 84 x 817 x 1740 | 1 | O1 | |
| Door, type D6, left | 84 x 810 x 1740 | 1 | O2 | |
| Door frame, right side | 45 x 56 x 1771 | 1 | O3 | |
| Door frame, left side | 45 x 56 x 1771 | 1 | O4 | |
| Door frame, top | 45 x 56 x 1697 | 1 | O5 | |
| Aluminium profile for door frame | 45 x 45 x 1697 | 1 | O6 | |
| Board to door frame, sides, in | 19 x 95 x 1800 | 2 | O7 | |
| Board to door frame, upp, in | 19 x 95 x 1900 | 1 | O8 | |
| Board to door frame, sides, out | 19 x 80 x 1840 | 2 | O9 | |
| Board to door frame, up, out | 19 x 95 x 1810 | 1 | O10 | |
| Board to door frame, down, out | 16 x 70 x 1655 | 1 | O11 | |
| Window, type E14 | 657 x 1595 | 2 | 11 | |
| Window, type R7 | 558 x 1496 | 1 | I2 | |
| Board to window frame, sides | 19 x 95 x 1560 | 4 | I3 | |
| Board to window frame, up | 19 x 95 x 745 | 2 | I4 | |
| Board to window frame, down | 19 x 95 x 515 | 2 | I5 | |
| Log | 44 x 67 x 3927 | 1 | A1 | |
| Log | 44 x 135 x 3927 | 1 | A2 | |
| Log | 44 x 135 x 150 | 12 | A3 | |
| Log | 44 x 135 x 532 | 12 | A4 | |
| Log | 44 x 135 x 1925 | 12 | A5 | |
| Log | 44 x 110 x 3927 | 1 | A6 | |
| Log | 44 x 135 x 2980 | 14 | B1 | |
| Log | 44 x 43 x 2980 | 1 | B2 | |
| Log | 44 x 67 x 5300 | 1 | C1 | |
| Log | 44 x 135 x 5300 | 13 | C2 | |
| Log | 44 x 110 x 5300 | 1 | C3 | |
| Log | 44 x 135 x 1607 | 2 | D1 | |
| Log | 44 x 135 x 504 | 11 | D2 | |
| Log | 44 x 135 x 532 | 11 | D3 | |
| Log, cut-out for window | 44 x 135 x 1607 | 1 | D4 | |
| Log | 44 x 43 x 1607 | 1 | D5 | |
| Log | 44 x 67 x 220 | 1 | E1 | |
| Log | 44 x 135 x 220 | 1 | E2 | |
| Log | 44 x 135 x 220 | 13 | E3 | |
| Log | 44 x 135 x 220 | 13 | E4 | |
| Log | 44 x 110 x 2030 | 1 | E5 | |
| Log | 44 x 43 x 100 | 1 | E6 |
Profiles of wall logs and roof and floor boards
Forewords
Dear customer,
Thank you for choosing this light log product. Please read the instruction manual carefully in full before beginning the installation, and keep the instructions for further reference. The drawings of the wall structures and the component list in this manual are model-specific and the other drawings are general drawings.
In case of reclamation, please inform your dealer about the specific guarantee number of your cabin. You can find this code on the package and on the first or last page of the instruction manual. Unfortunately, without the guarantee number we cannot handle your reclamation!
Warranty terms for this product
Following terms apply for all our products. The warranty is void if:
– Assembly instructions are not followed by customer.
– Changes have been made to the parts by customer.
– The package has not been stored properly after delivery to customer.
– The assembled product has not immediately been properly taken care of by painting or other preservative product.
– The foundation is not made properly, or according to our instructions.
The warranty is valid if:
– A part has a manufacturing defect.
– A part is not fit for its intended use.
– A part does not meet the information given prior to purchase.
– A part lasts for a shorter time than can be assumed.
Please check with your local building authorities if planning permission is required before beginning construction.
Assembly and maintenance instructions
Before assembly
Machined logs and other parts have been packed into protective wrapping. If the item will not be constructed immediately, it should be kept indoors or otherwise well-protected until assembly. The package should be kept away from the ground in order to avoid absorbing moisture and be stored on a level base.
Building instructions include a part list and drawings of the wall constructions. Please check the contents in full with the help of the part list and contact your retailer immediately if something is missing or defective.
Please sort the parts near the planned building area leaving enough space for working.
- Check contents of the package
- Use the part list at the end to register any missing or damaged parts
- Contact your retailer if necessary.
The timbers are packed in plastic and sealed with plastic rims. Recycle the plastic, rims and protecting beams underneath, according to local regulations.
Foundation
The most important aspect of the construction is a well-prepared foundation. It must be flat, completely level and devoid of any movement even after the assembly work. Take special care of these requirements when building on areas where the ground retains water. In all cases a concrete raft foundation is preferred. This spreads the constructions’ load over a wide area and suits all ground types. Your retailer can advise an alternative foundation method should a raft not be possible. When using a pier and beam foundation, the spacing of the columns (posts) shall not be greater than 60 cm. When using construction blocks, slabs or footings as foundation it should be made sure that the soil will not move during frozen ground conditions. We recommend placing the foundation on, for example, a compacted and evened out bed of gravel. Regardless of type of foundation it should be made sure that the subfloor construction is well ventilated. The foundation for the optional terrace must be level with the base for the cabin and be prepared carefully. If needed, seek advice from an expert or have a professional perform the foundation work.
Fasten the foundation beams to the foundation, for example with angle irons (not included). Foundation beams are protection treated but it is advisable to add a roofing felt strip (not included) or another insulator between the foundation and the beams to stop moisture from the foundation penetrating the timber. The outermost foundation beams should finish nearer each other than the log walls. There are two important reasons for this.
- Rain water won’t wet the point of contact of the foundation beams and the lowest logs.
- The outermost foundation beams offer support for the edge of the floor. In practise it means that the foundation shall be 5-10mm smaller than the log frame of the cabin.
If your cabin excludes a floor and you are building the log frame directly onto brick/blockwork, please add a felt bitumen strip between the undermost log and brick/block. Additionally the brick/ blockwork should be 5-10mm smaller than the log frame so that rainwater falling along the walls won’t wet the point of contact at the lowest log.
Door and window
The distance between sides of the door frame must be exactly the same at the top and the bottom. It is very important that the cabin and the door frame are completely level to allow the door(s) to function properly. If the doors or windows do not seem to fit correctly in the opening, check the level of the foundation and the level of the building. These components will not function properly if they do not sit level. If necessary pack up the low corner to correct this fault. Depending on the model, the accessory bag may contain adjustment plates for the hinges. If necessary, the position and distance of the door from the side frame can be adjusted by mounting one or more adjustment plates under the hinge(s). Some models have hinges that can be adjusted by screwing the hinge inwards or outwards as needed.
Be careful to install windows the right way up. Windows with hinges on the side assembled upside down will fall from the hinges when opened. Some windows are to be assembled with hinges at top. Avoid opening such too much, because it might also loosen from the hinges. Lightly tighten the screws on the door and window fittings and the lock with hand tools.
Roof and floor boards
It is normal that the back side of the roof and floor boards has wane on it. It is not a defect but a characteristic of the product. Roof boards and floor boards have the same profile, therefore make sure you are using right boards for right purpose. The boards will expand and contract depending upon the amount of moisture in the air, so leave a space of 1-1.5mm between each board. Roof boards are assembled the flat side downwards and the side with furrows upwards.
Covering material for roof
Covering material for the roof must be installed immediately. If this is excluded, temporary protection is required. Only light material are suitable roof coverings. We recommend shingles, roofing felt or tin roof for gable roofs. For models with plane roof, we recommend roofing felt or EPDM roofing. Follow the instructions supplied by the provider.
Protection against storm
Fasten the roof to the building and the cabin to the foundation and take special care in open areas where there is the possibility of heavy winds and storms. You will need extra fastening material excluded from the delivery.
Protection treatment
The timber used for the products LILLEVILLA-products has not been treated, with the exception foundation beams and terrace boards, that has been treated against blue stain and moulding. Protection treatment of the building must be performed immediately after erecting the cabin as soon as the weather is suitable for it. The first treatment should be done with a with a colorless wood preservative that prevents the formation of mold and blue stain.
After this, a surface treatment is done either with a transparent stain or with an opaque target paint. The best result is achieved when the building is treated twice. The first treatment should be done when the building has been built and the conditions are favorable. The second treatment is carried out the following year early in the summer, when the humidity is at its lowest and the wood is as dry as possible. In this case, possible drying stripes in the seams of the logs are covered.
As paint can be used transparent glaze or paint. Make sure the glaze/paint you are about to use is suitable for log surfaces, and does not form a so-called plastic, non-breathing surface. Ask for more information from your local paint shop. The wood must be dry when it is treated, and the working conditions as well.
Also the interior of the building must be treated with wood preservative preventing the formation of mold and blue stain, the inner corners especially carefully. Doors and windows must be treated from both sides.
Despite treatment, moisture can get in through corners, knots, splits and joints of the parts. This can be prohibited with silicon, if needed.
Maintenance
Safe long-term use of the building requires regular checking, possible reparation of the fastenings and inspecting the condition of the parts. Pay special attention to the roof construction, its covering material, doors and windows, foundation fastenings, the protection against storm as well as surface treatment of any wooden parts.
Failure to perform regular maintenance can cause damage to the building or a safety risk to its user. Regularly inspect the condition of the protection treatment and re-new it when necessary. Inspect the bottom rails of the doors, windows and their frames, end surface of timbers and parts stressed by hard weather- or usage-related wearing.
Check the functioning of doors and windows, and adjust hinges when necessary. Check the silicon seals of doors and windows, renewing them when necessary.
It is very important to make sure that underneath the building is well-ventilated. Also installing ventilation grills (not included) on top of the walls is recommended to let moisture get out from the building. Remove snow from the roof regularly.
Tools
For assembly you will need a hammer, a drill, a screwdriver with different heads, a spirit level, a tape measure, a spanner, glue and a saw. It is also good to have someone helping you with the installation. Check local authorities if a permission for construction is needed. Please bear in mind, that assembling requires a bit of experience. If needed, ask for professional assistance.
Safety
Take care of safety and always follow the national safety regulations. Keep children away from the building site.
Material definitions
Wood is a natural material and therefore, knots, knot groups, cracks, hair cracks on the knots, resin and twisting are relevant features of the wood. This means that loosened knots or knot holes on edges, resin, knot cracks, dry spots and hair cracks that do not affect the structure, and twisting, if the twisted parts are still usable, are acceptable.
Planing errors and wane on the back of roof and floor boards are acceptable without restriction if the boards can be assembled so that the defects do not appear on the visible side.
The wood is a living material, and despite the technical drying it underwent before production, it shrinks when it dries during the summer and then it swells again during the autumn and winter. This can affect some gaps between the wall boards in the summer. This is completely normal and there is nothing wrong with the product and thus no reason for a complaint. During the autumn and winter, the wood swells again when it absorbs moisture from the air, and then the gaps between the boards disappear. Walls that have been painted with dark paint dry faster and stronger than lighter walls, and this also affects gaps between the wall boards. It is important that the wood is protected from moisture and from direct sunlight during the entire assembly process.
Procedure in case of defects or faults
If you have something to complain, please immediately contact the place of purchase to make a written claim via the re-seller. If the assembling is begun or continued, it means that the customer has accepted the parts.
An imperfect claim will not be handled but returned back for fulfilling. The parts complained must be available for checking made by producer or re-seller. If the claim is entitled, producer takes care of delivery costs to the re-seller during moderate period. Producer and re-seller reserve rights to decide all the arrangements concerning the claim. They may also visit the building site, if they think it is necessary. Producer or re-seller is not responsible for any direct or indirect costs or damages due to a defected or missing part. Producer’s liability limits only to the delivery of new parts to the re-seller. If the claim proves later to be groundless, customer is responsible to compensate all the costs caused.
Foundation
Installation of foundation beams
General drawings
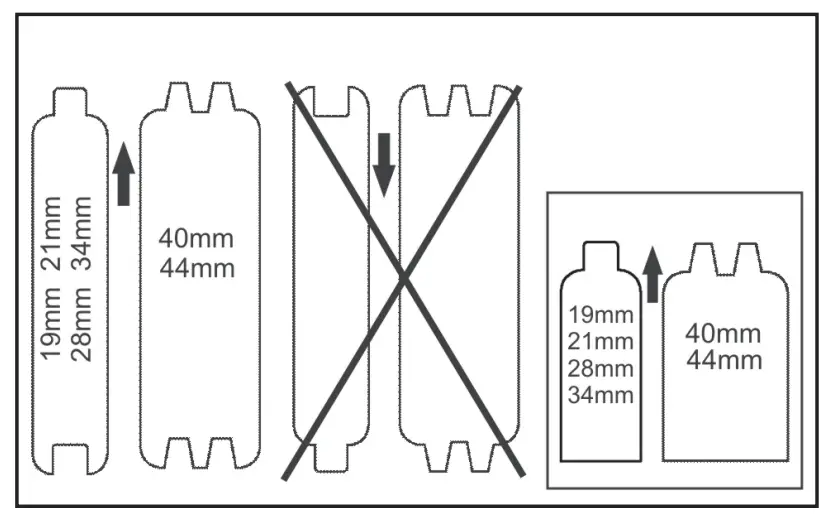
The assembling direction of logs, foundation beams and assembling of the floor.
Read through the whole manual before you start building your cabin
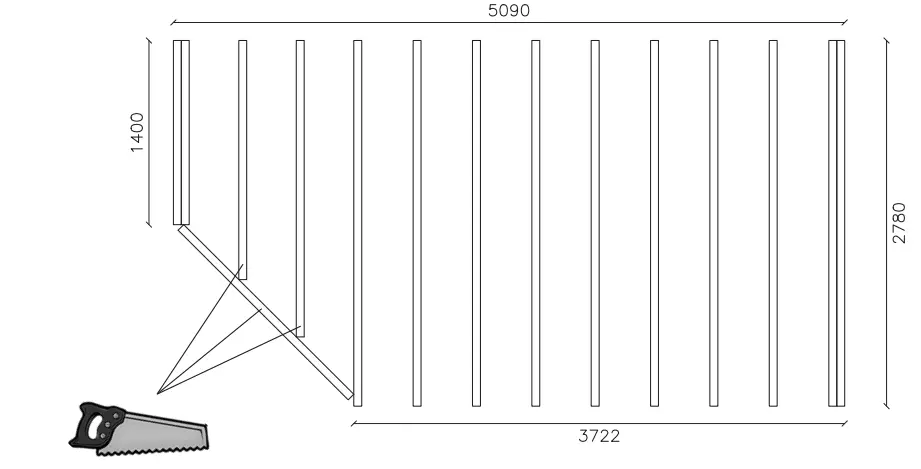
Check the cross-section of the foundation beam frame with two long straight logs, for example, as shown. Then assemble the first couple layers of logs and adjust the foundation beams if needed.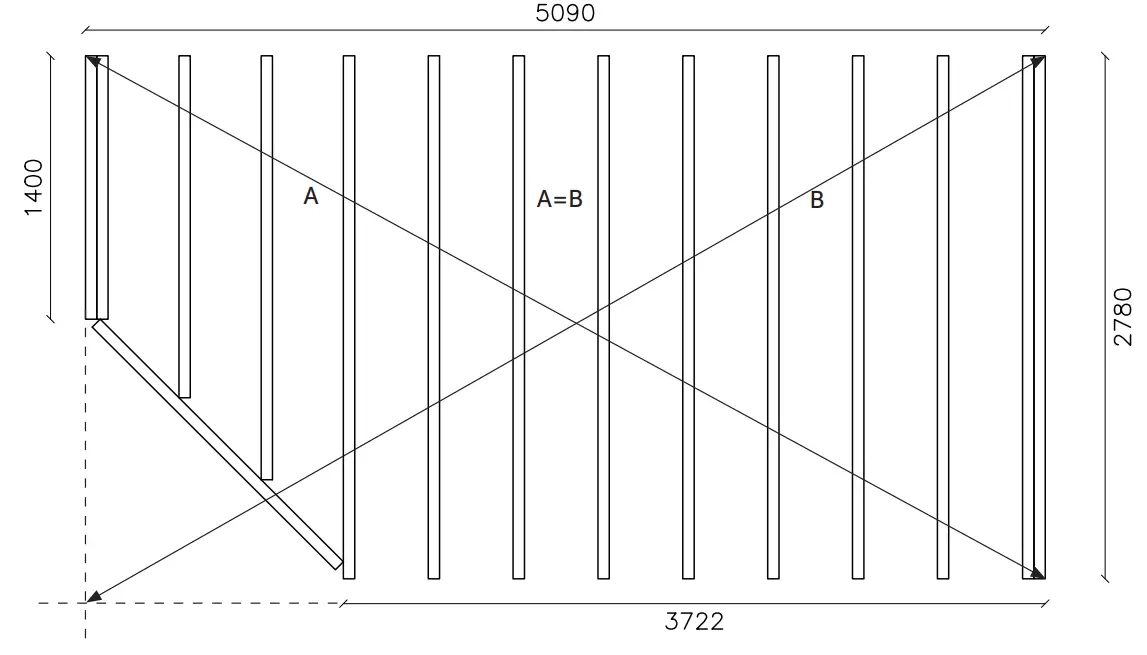
Walls, window and door
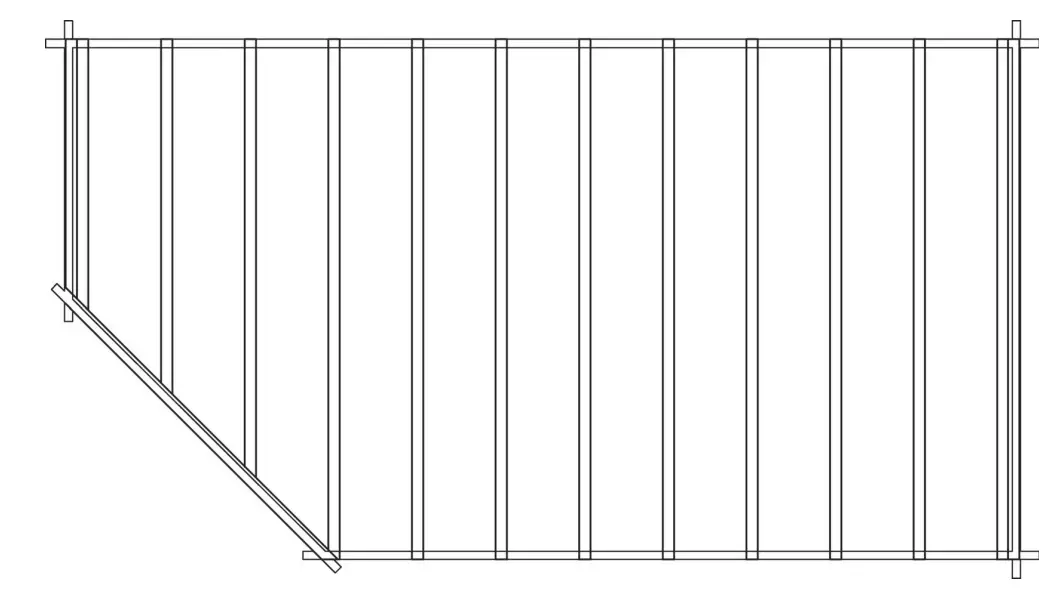
Assembly of log frame half way
Assemble logs to approximately 1 meter height, or about 5–6 rows. If you have logs with minor imperfections, or that has twisted of drying, place them in the lower rows. Due to the nature of the material, sometimes logs can get twisted. In that case you can straighten them for example with a clamp. Try to bend it to its shape gently, while taking a pause from work for example. It should retrieve its original shape. A warped log can be straightened using an arm lever made of a plank (about 1 meter long) having a notch equal to the size of the thickness of the log. A standard clamp with two pieces of wood can also be used. This will be screwed onto the timber. Be careful not to damage the log. Some twisting of the log is natural. Twisted logs are recommended to be assembled in the lower rows.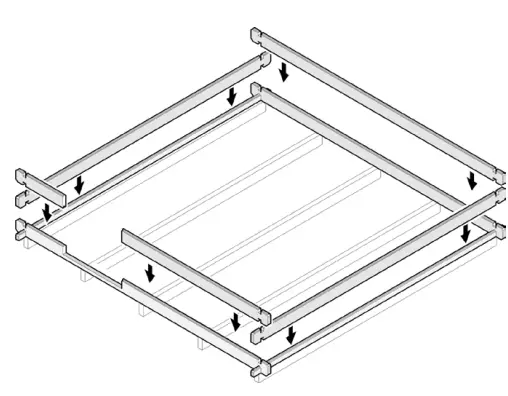
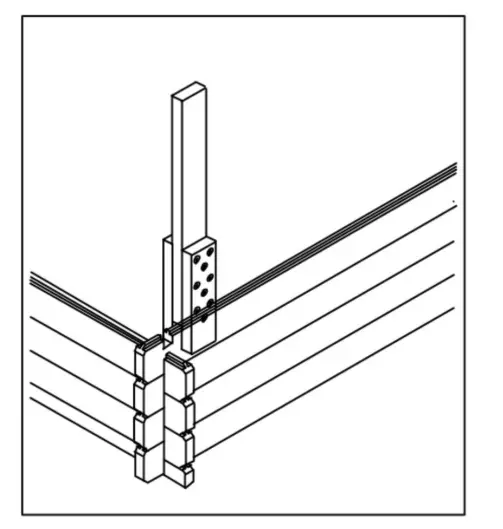
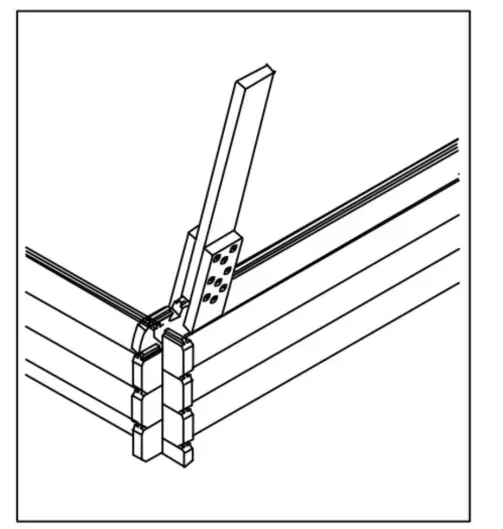
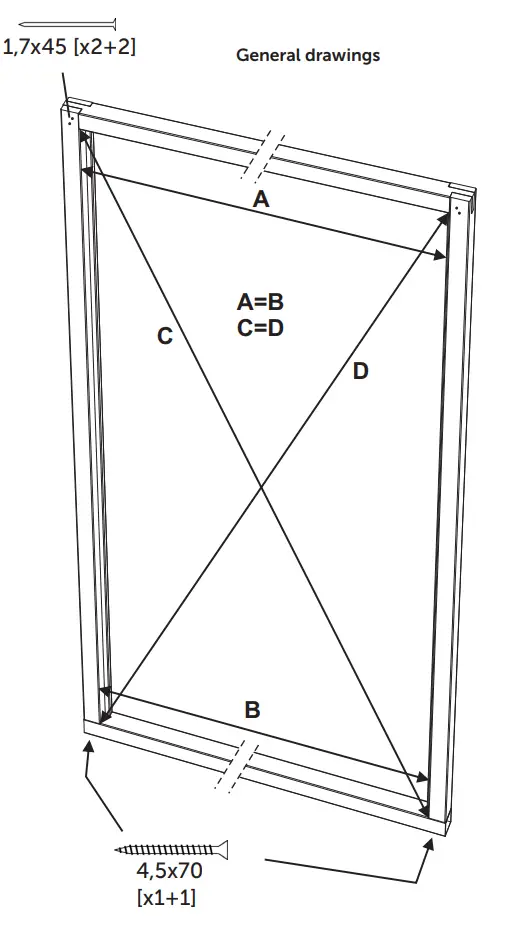
General drawings
Assemble the logs as on the dimensional drawings provided.
Checking the cross measurement of the log frame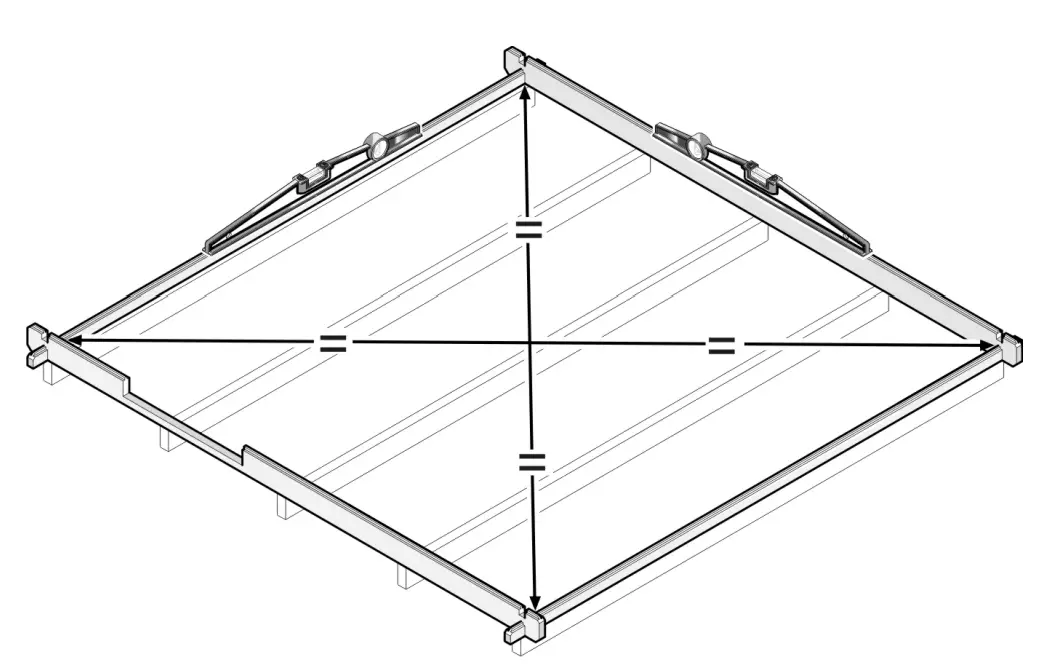
General drawings
Attaching the first timbers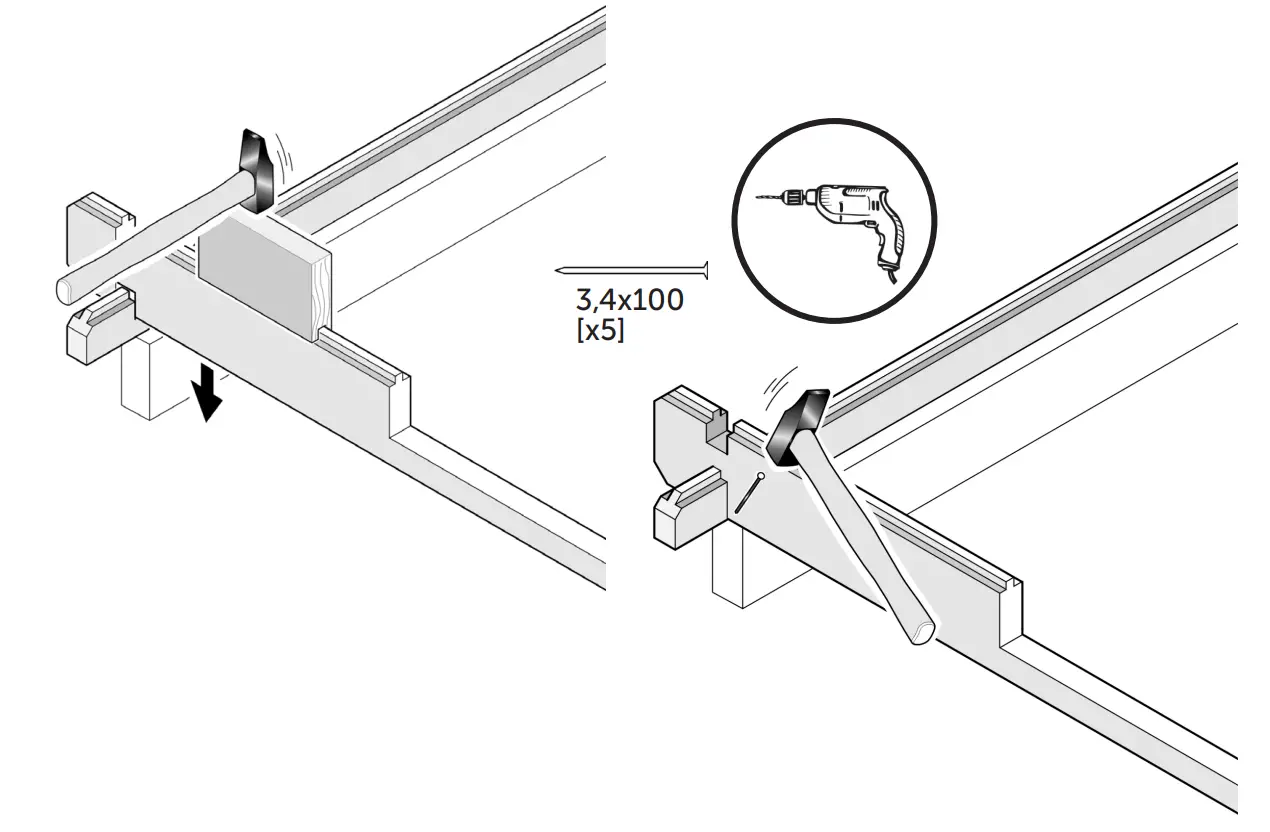
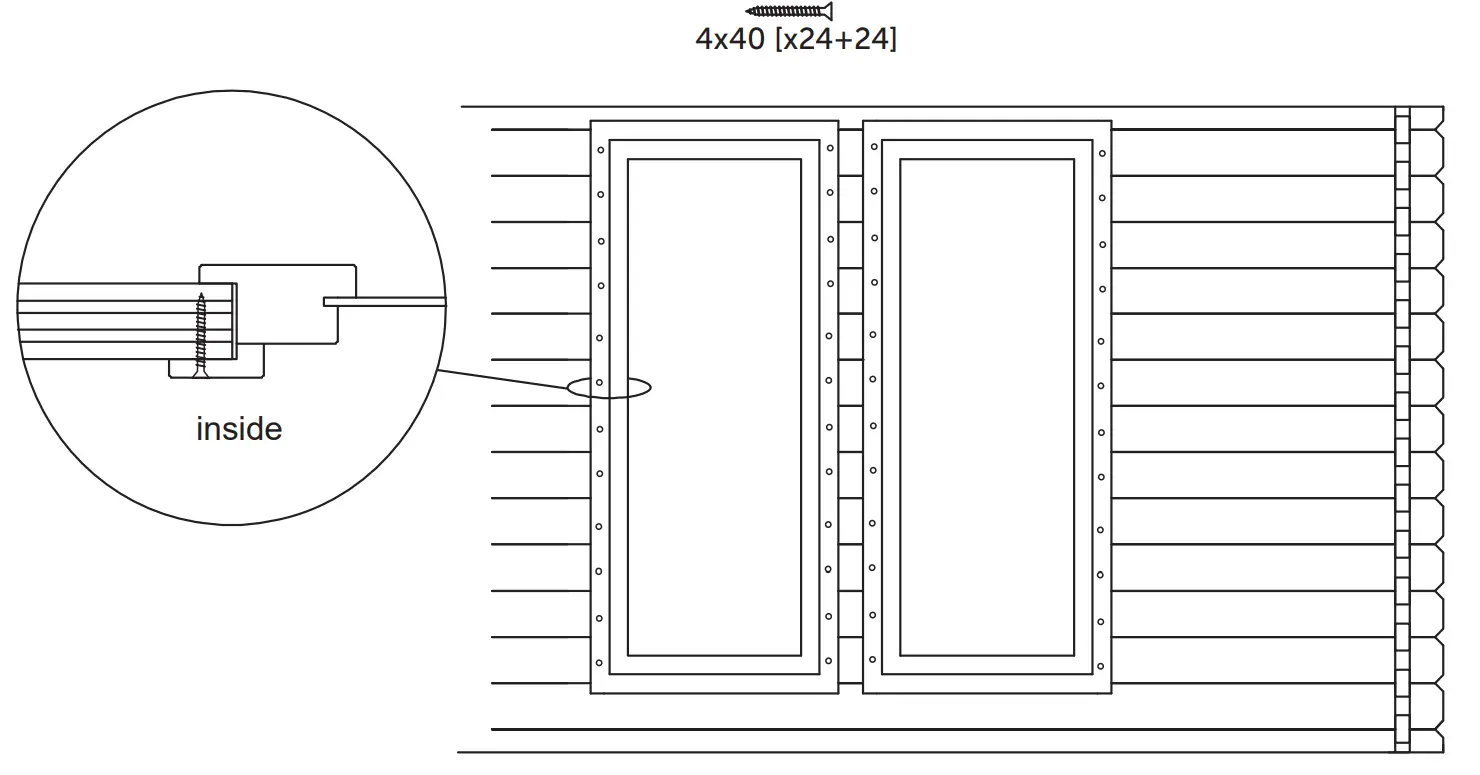
Assembly of windows
Windows type E14 must be installed during the wall assembly phase. It is not possible to install them afterwards. Fix the windows to each wall log with screws.
Type R7
Fix the boards to both sides of the window frame with 4x40mm screws and with glue (glue not included) as shown in the drawing below. Pre-drill before nailing!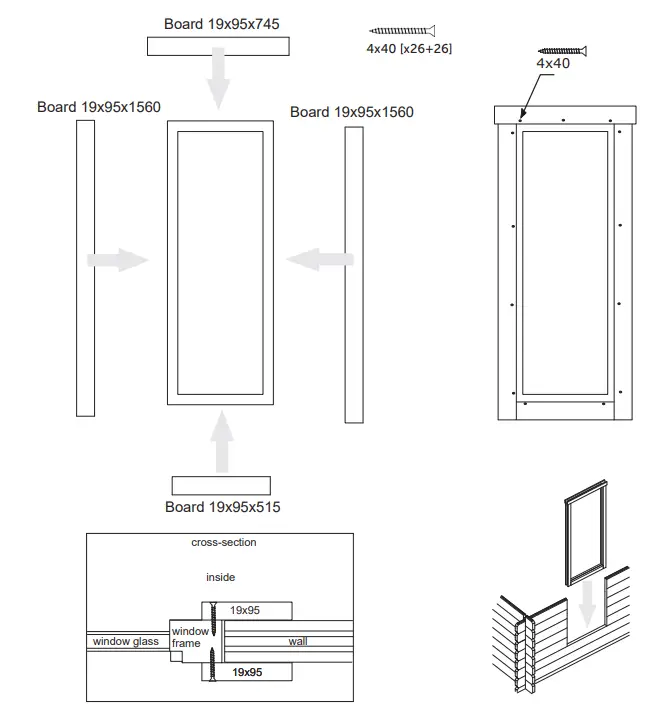
Type R7
Fix the boards to every other log from inside and every other log from outside. Pre-drill!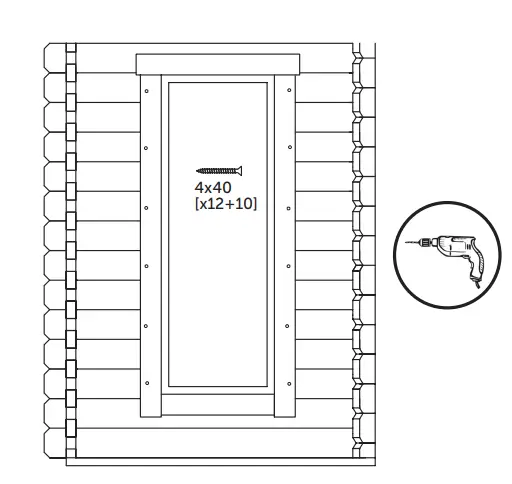
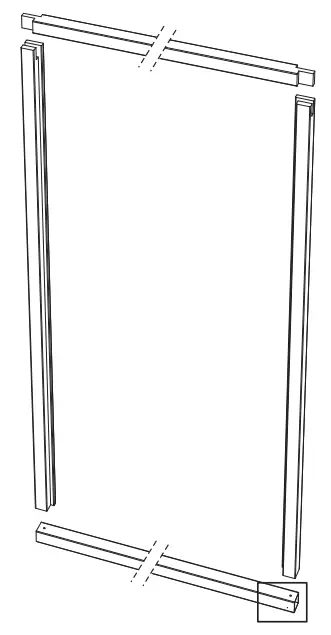
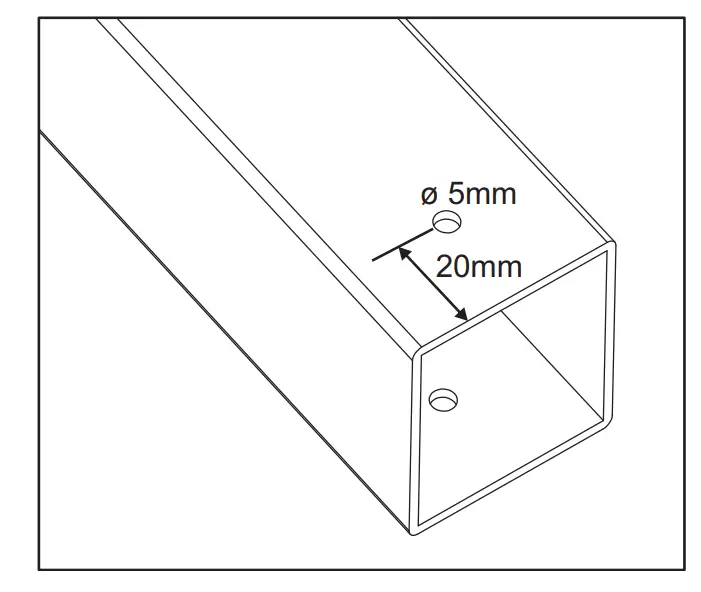
Assembly of door
Drill 5 mm holes to the aluminium profile and put the door frame together by using nails/screws as shown in the drawings. Check that are no gaps in the joints of the frame parts. Check the measurements as shown and adjust if needed.
General drawings
Attach the frame boards to the frame on both sides and install the frame in place during the wall assembling phase. Pre-drill!
Alternative installation method: Mount the walls and then first attach the frame boards to one side of the frame and place it in the door opening. Then attach the boards to the other side.
The above also applies to window type R7 (part no. I2). Windows type E14 (part no. I1) must be installed during the wall assembly phase. It is not possible to install them afterwards.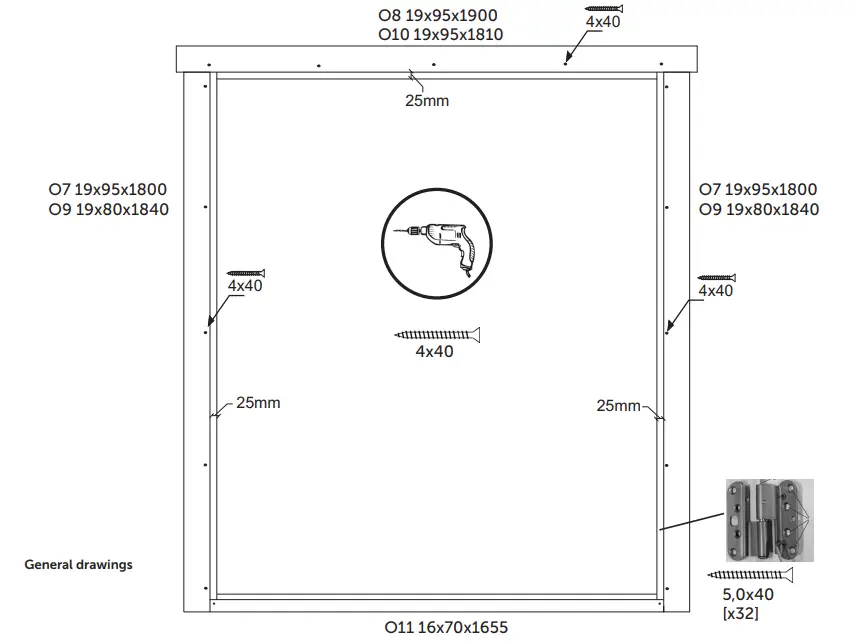
Mount the frame first. Door can be mounted later on.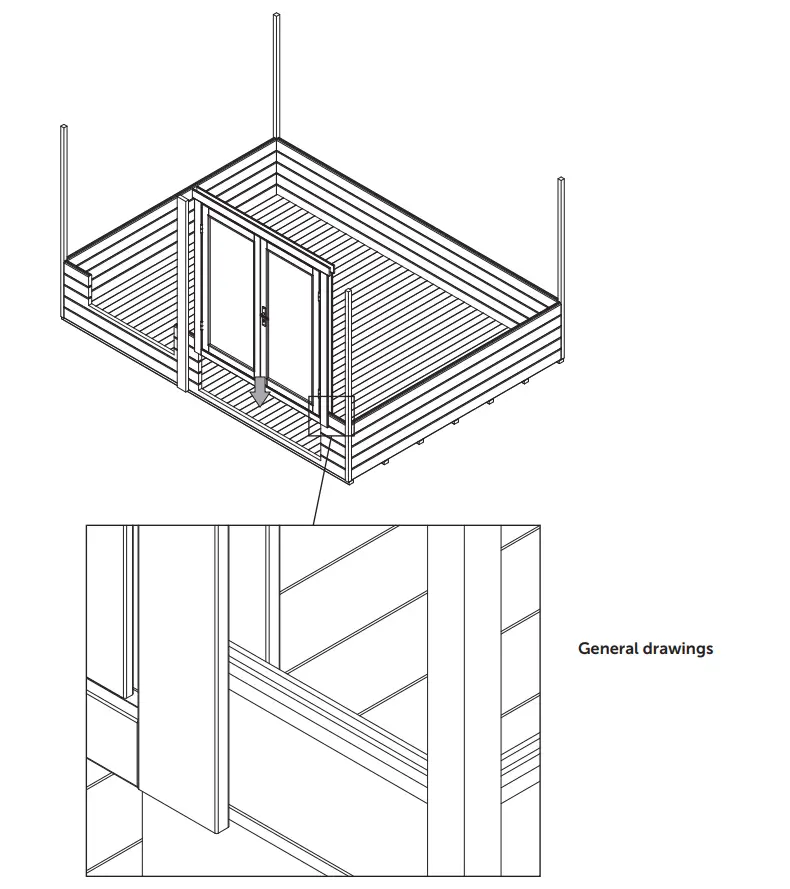
Fix the door frame to the walls with screws. Pre-drill before screwing!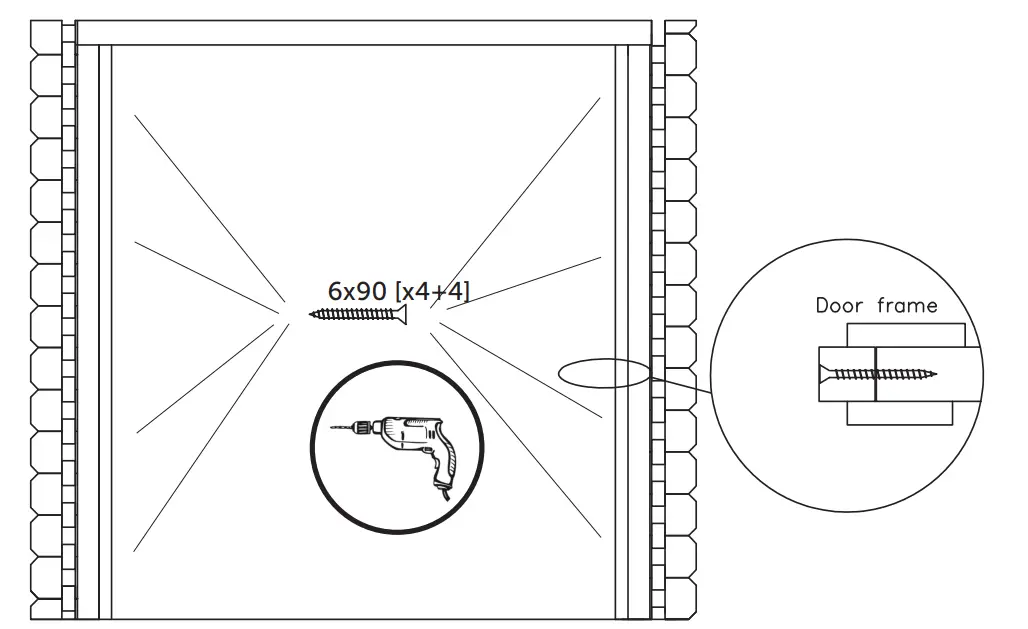
Adjusting the door hinges
Adjusting vertically
First screw off the covering hat of the hinge (1). Loosen the fixing screw if there is one (2). The door is liftedupwards by turning the adjustment screw clockwise with a hexagonal key AV5 (3). Adjust the hinges so that both of them are carrying the weight of the door. Finally, tighten the screw (2) and screw the covering hat in place.
Adjusting sideways
First loosen the fixing screws of the hinge of the door blade with a couple of turns (4). The door moves to the lock side by turning the adjusting screws (5) with a hexagonal key AV4 clockwise. It is important to adjust all the screws so that the hinge will be in correct position. When finished adjusting, tighten the fixing screws (4) again. The accessories bag contains extra adjustment plates for extra sideways adjustment needs.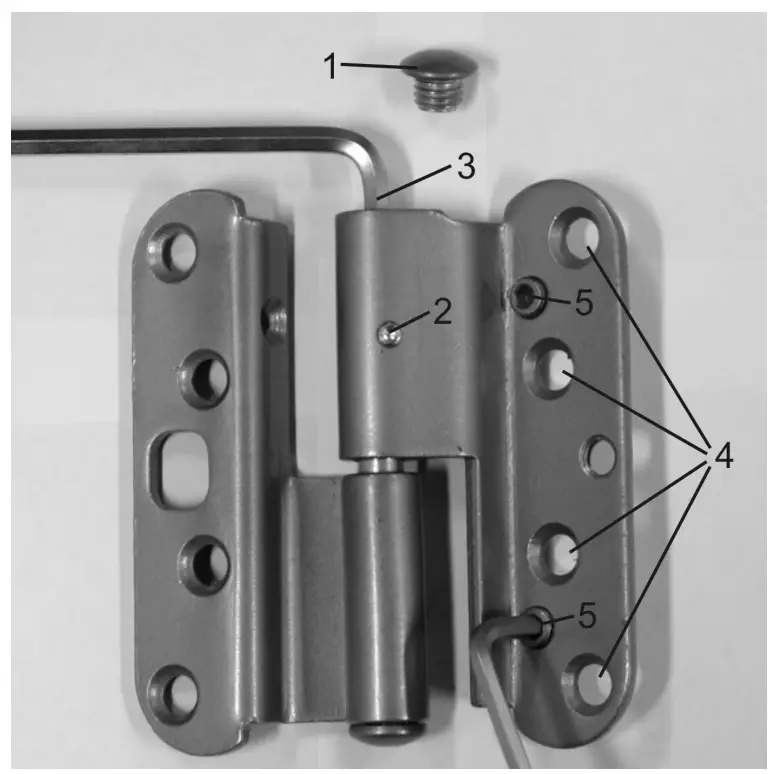
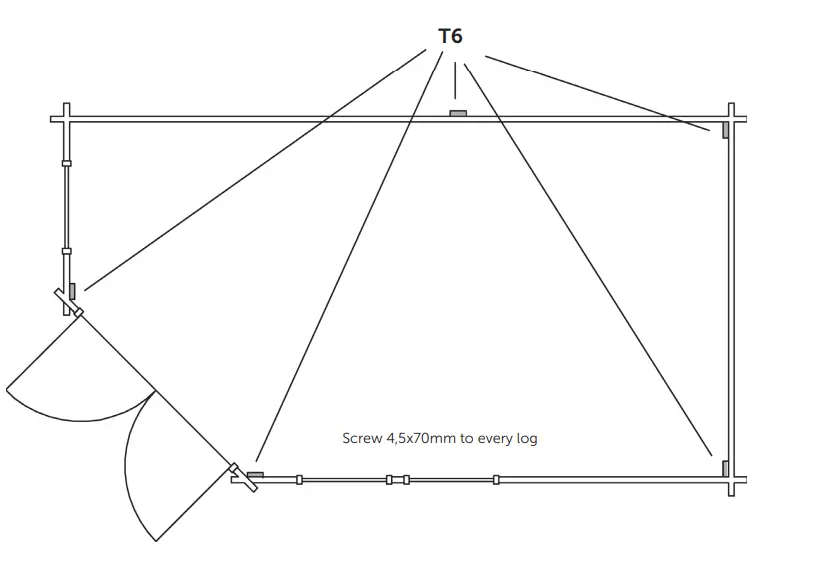
Preparation for installing the roof
Once the walls are assembled, install the beams T1-T5 on the log frame as shown. Screw the beams to the logs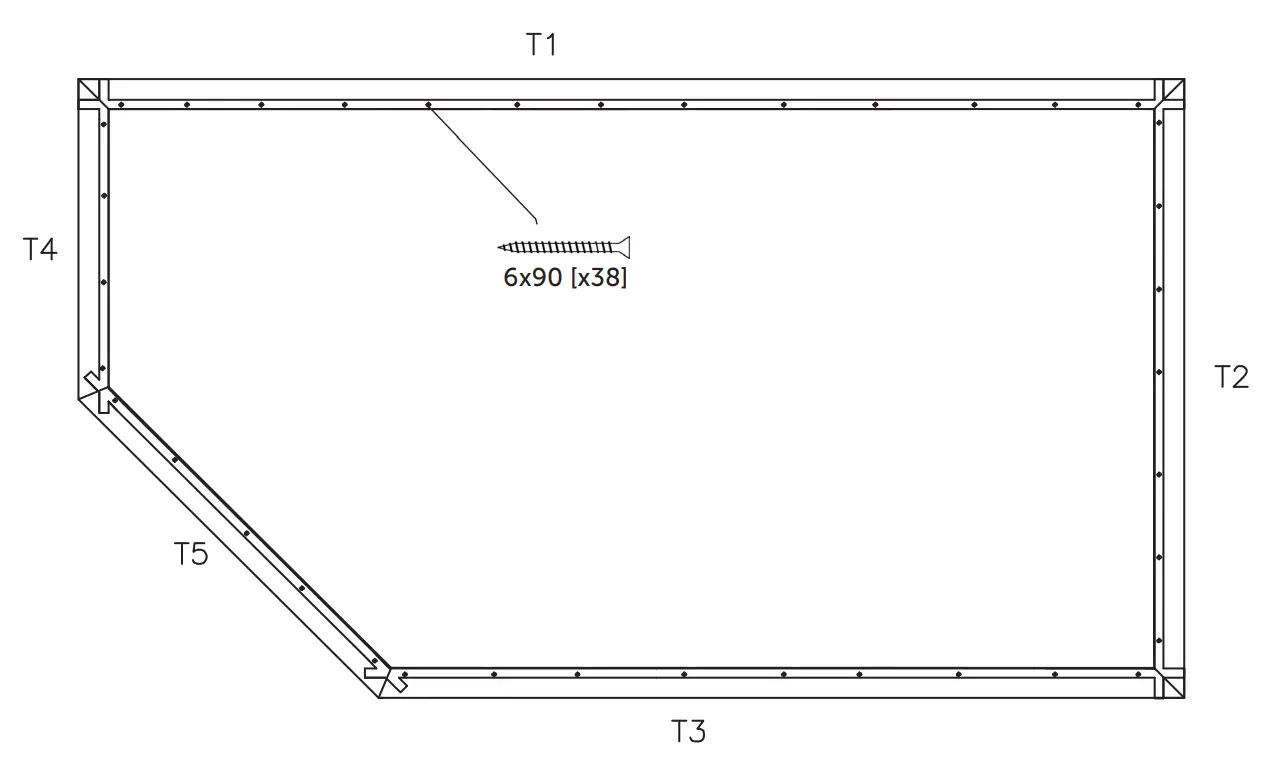
Install the roof beams as shown in drawings and fix with screws.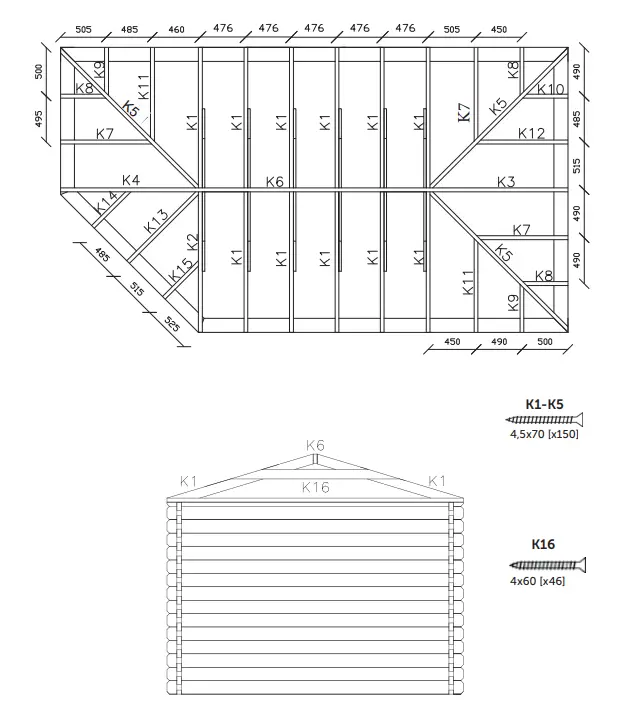
Roof
Installation of roof
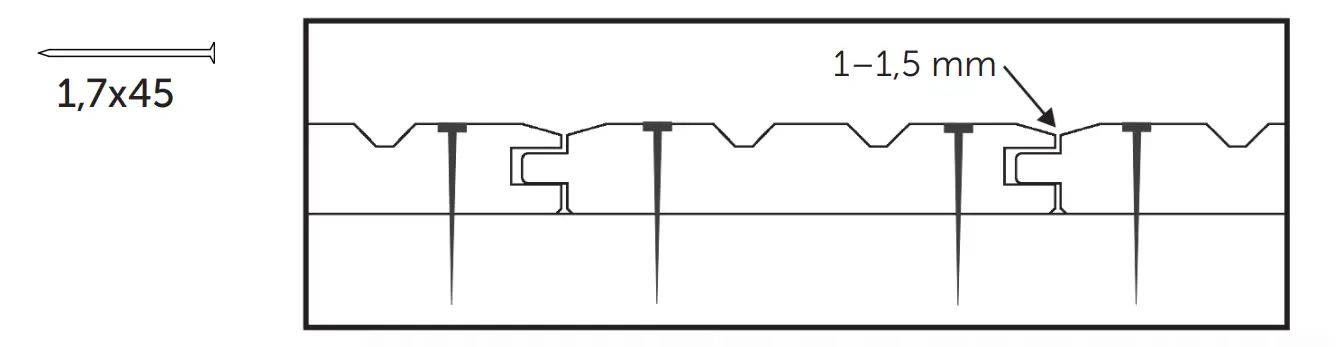
The grooved side of the roof boards is installed on the outside and the flat side on the inside. Nail all the boards to the roof beams. Leave a gap of 1-1.5 mm between each roof board to allow the boards to expand and shrink due to moisture changes.
The roof boards are delivered as running meters, so they are cut to the appropriate length on site and the ends of the boards are sawn to right angle. Start installing the boards from the eaves and finish one roof sheet at a time all the way up. Use the leftover pieces from the boards after cutting to the next pieces to minimize wastage from the boards.
The eaves boards are delivered as running meters. They are cut to the appropriate length on site and nailed to the wall logs.
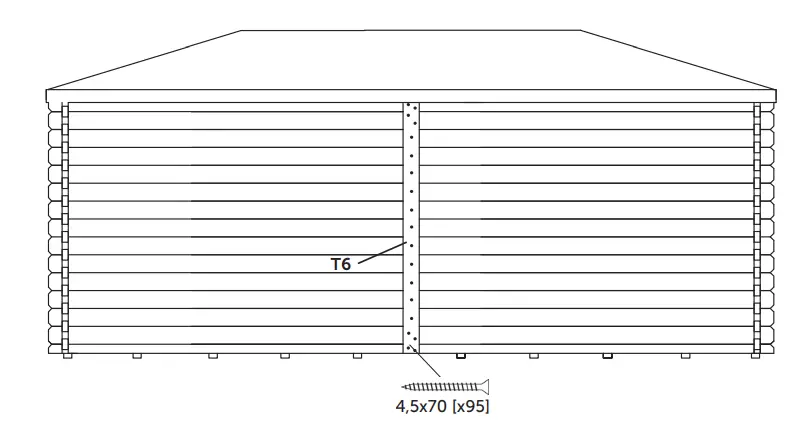
Assembly of wall support
Floor
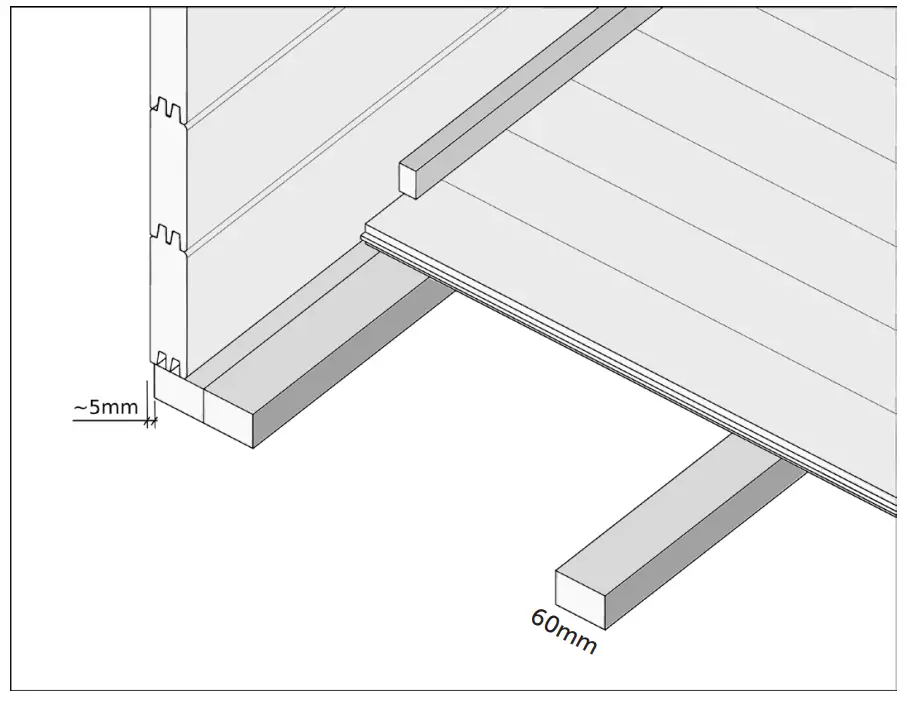
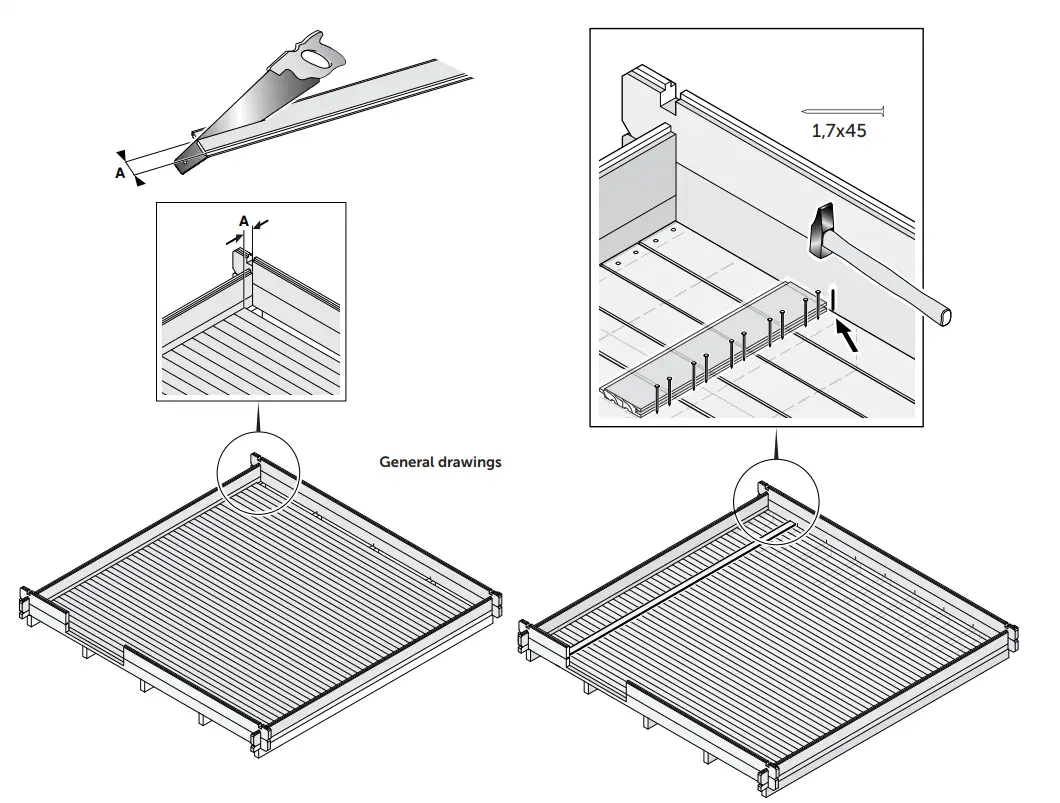
Begin assembling the floor from one wall. Use a board as assist when nailing the floorboards to the foundation beams. Saw the last board to leave a 5 mm space between the board and the wall
CUSTOMER SERVICES
Luoman Puutuote Oy
Lapuantie 626
61450 Kylänpää
Switchboard +358 6 474 5900
[email protected]
www.lillevilla.com