
AMPIRE KCX403 Mini Universal Rear View Camera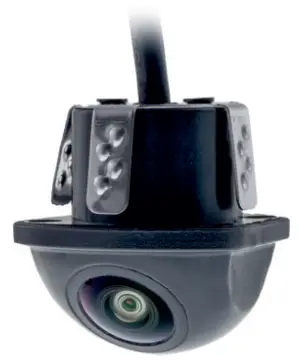
Precautions
- Install the camera properly, paying special attention to these precautions.
- Operate this camera only in designated motor vehicles
- Make sure that the connections are correct.
- Make sure that you do not damage any pipes or cables when drilling holes.
- Lay the cables so that they cannot be kinked, crushed or damaged by sharp edges.
- Install the camera in a safe place where it will not interfere with driving and where it will not be exposed to moisture. Use the installation material supplied with the camera.
- Incorrect installation can damage the vehicles electronics! Observe the instructions of the vehicle manufacturer. This Caution! camera is intended exclusively for use in motor vehicles.
- Do not use any chemical cleaning products or solvents to clean the rear view camera. This may damage the plastic components or the lens of the camera. Clean the rear view camera with a clean, soft and damp cloth.
Environmental Reference

- Old electronic devices do not belong in the garbage can.
- If you later want to dispose of this device, remove all cables and batteries and dispose of them separately at a recycling facility in your area.
- Alternatively, you can return this device to Ampire for disposal.
- The packaging is recyclable. designated collection system.
Environmental instructions and information on the disposal of electrical and electronic equipment including batteries (applicable to countries that have adopted a separate collection system)
If you want to dispose of this product, do not dispose of it with your normal household waste. There is a separate collection system for used electronic equipment in accordance with legal requirements that require appropriate treatment, recovery and recycling. Contact your local authority for details on finding a recycling facility in your area. Proper recycling and disposal helps to conserve resources and prevent harmful effects on our health and the environment.
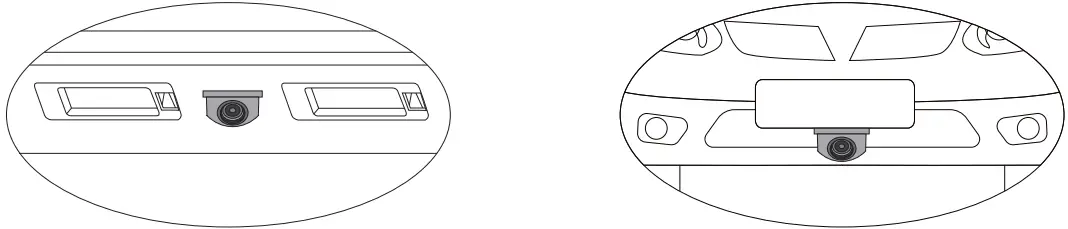
Installation Options
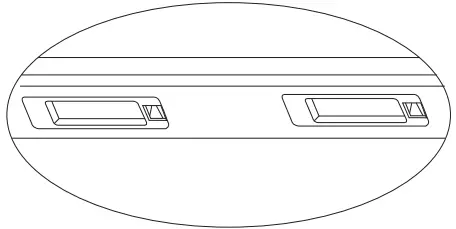
rear installation
- Install the KCX403 into your license plate light mount. To do this, dismantle the bracket and drill an 21 mm hole.

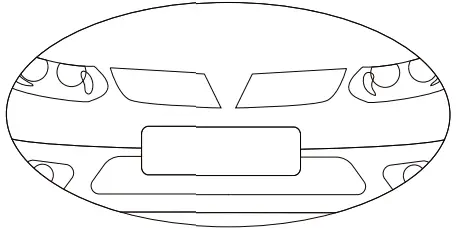
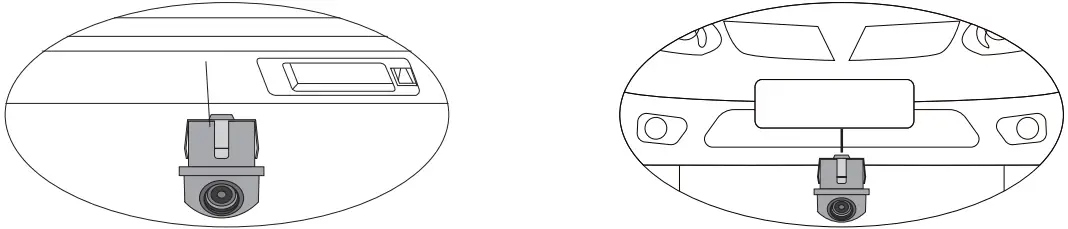
front installation - Install the KCX403 e.g. under the license plate in the front of the vehicle. To do this, drill an 21 mm hole.
Pass the cable through the hole and press the camera and seal into the hole.
Lay the cable and connect it according to the description given on the next page. Then reinstall the bracket. In variant 2, you may have to Depending on the installation location (front or rear), two cable loops are cut. Otherwise the image will be displayed incorrectly. Please check this setting with the help of a monitor before final assembly.
Connection KCX403
| 1 | Black | (-) Ground |
| 2 | Red | (+) 12V Ignition (terminal 15) |
| 3 | Yellow cinch plug | Video output for connection to a monitor |
| 4 | Yellow cinch socket | Video input for connecting a front camera. |
| 5 | Blue | (+) Input for reversing light |
| 6 | Orange | (+) 12V switching output for switching on the monitor / interface (5 sec. Switch-off delay) or a front camera (10 sec. Switch-off delay). Warning! If the cable is not required, the cable must be insulated and must not come to Ground. |
| 7 | Green Loop | Guidelines (on/off). Cut the cable loop if you want to have displayed no guides. |
| 8 | White Loop | Image display (rotated 0/180°). Cut through the cable Loop for installation according to variant 2. |
| 9 | Blue Loop | Image reproduction (mirrored / normal). Cut the cable loop, if you want to mirrored the image reproduction for front mounting. |
| 10 | Purple Loop | Guide line size (wide/narrow). Cut the cable loop if you want to display narrow guidelines. This is advantageous if the camera is installed high on the vehicle. |
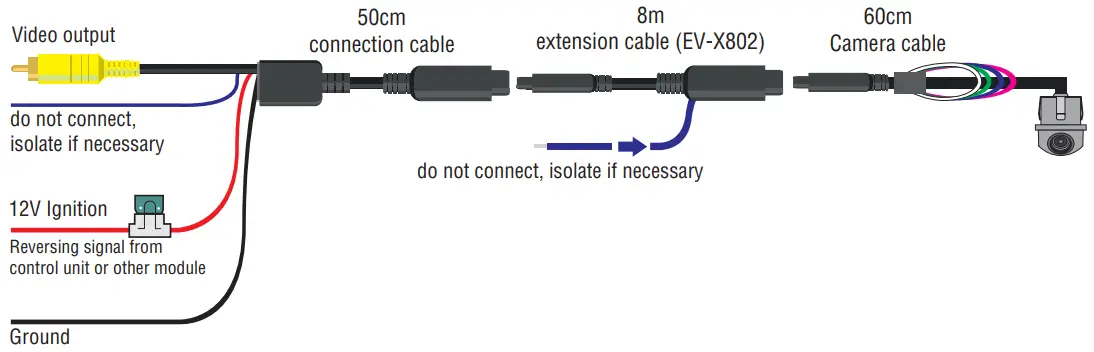
Complete connection
Carry out the following connection if all voltages are available at the installation site in the car (ignition, reversing signal,..)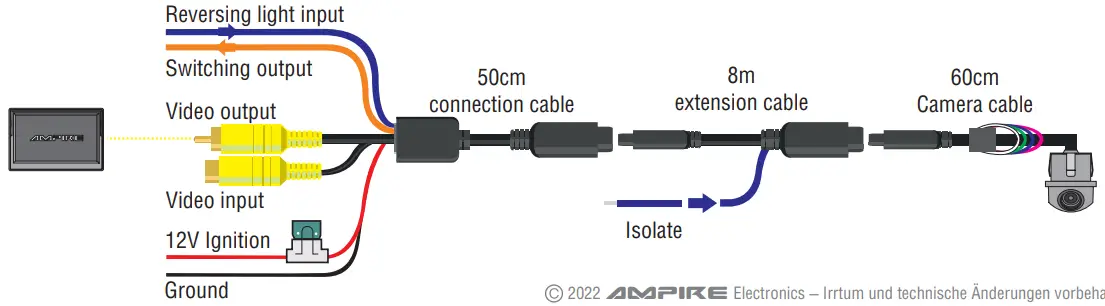
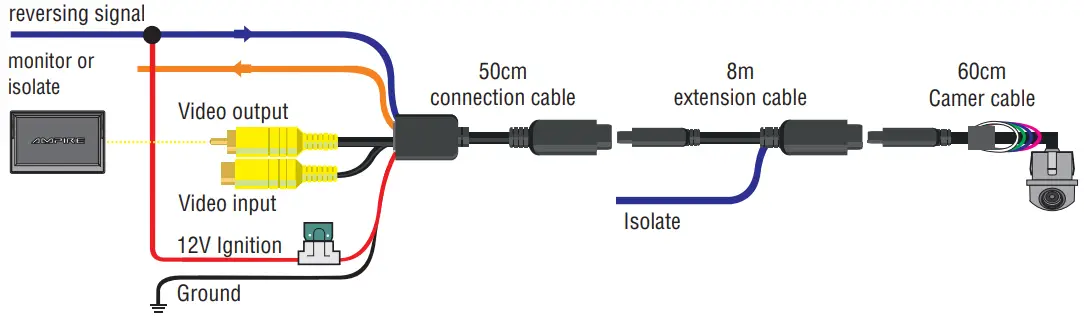
Rear reversing signal pick-up

Pickup reversing signal front
Connection with front camera
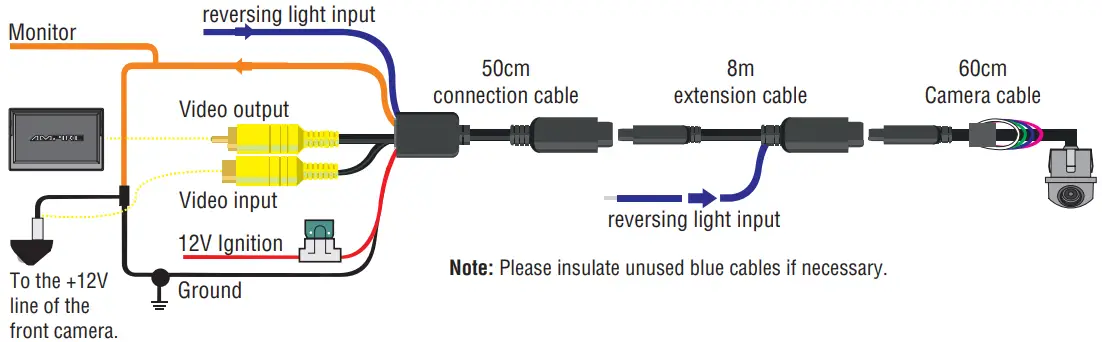
Functionality of the switching electronics
After the 12V reversing signal is no longer present on the blue cable, the video output is switched to the input for a front camera for 10 seconds. During this time, the orange cable has 12V. After these 10 seconds the system switches off. The delay of 10 seconds only works if the circuit at the input of the front camera detects a video signal. If the circuit at the input of the front camera does not detect a video signal, only a delay of 5 seconds will work.
Connection KCX403-ECO
Wiring
| 1 | Black | (-) Ground |
| 2 | Red | (+) 12V Ignition (terminal15) or (+) 12V reversing signal. |
| 3 | Blue | Additional line / switching line (do not connect, isolate if necessary). |
| 4 | Yellow Cinch Plug | Video output for connecting to a monitor. |
Functions of the cable loops
| 1 | Green Loop | Guidelines (on / off). Cut the cable loop if you want to have displayed not guides. |
| 2 | White Loop | Image display (rotated 0/180°). Cut through the cable Loop for installation accordingto variant 2. |
| 3 | Blue Loop | Image reproduction (mirrored / normal). Cut the cable loop, if you want to mirrored the image reproduction for front mounting. |
| 4 | Purple Loop | Guide line size (wide/narrow). Cut the cable loop if you want to display narrow guidelines. This is advantageous if the camera is installed high on the vehicle. |
Wiring
| 1 | Black | (-) Ground |
| 2 | Red and Blue | Connect and insulate at the connector plug. |
| 3 | Blue | Additional line / switching line reversing signal (rear area). |
| 4 | Yellow Cinch Plug | Video output for connection to a monitor. |
Functions of the cable loops
| 1 | Green Loop | Guidelines (on / off). Cut the cable loop if you want to have displayed not guides. |
| 2 | White Loop | Image display (rotated 0/180°). Cut through the cable Loop for installation accordingto variant 2. |
| 3 | Blue Loop | Image reproduction (mirrored / normal). Cut the cable loop, if you want to mirrored the image reproduction for front mounting. |
| 4 | Purple Loop | Guide line size (wide/narrow). Cut the cable loop if you want to display narrow guidelines. This is advantageous if the camera is installed high on the vehicle. |
If no ignition is connected to the red cable, but a reversing signal has been found in the car (rear area), please note:
After the camera has been installed, the reversing signal must be connected to the blue additional cable (on the EV-X802). In the next step, connect the red and blue cables to the connection cable. Please connect the black line on the connection cable to ground (monitor or body).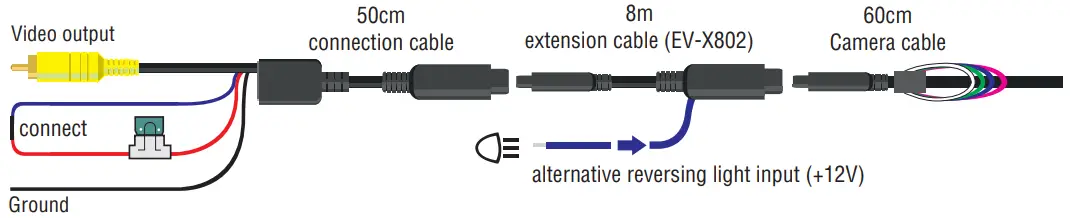
Technical Data

| Image Sensor | 1/4 Color CMOS |
| Effective Pixels | 960 x 480 |
| Resolution | 800 TV Lines |
| S/N Ratio | >46 dB (AOC on) |
| Minimum Illumination | 0,01 Lux |
| Diagonal Angle | 188° |
| Horizontal Angle | 155° |
| Vertical Angle | 113° |
| Protection Category | IP69K |
| Video Output | 1,0 Vp-p, 75 Ohm |
| Dynamic Range | >74,8 dB |
| Power | DC 12V |
| Power Consumption | 25-55 mA |
| Operating Temperature: | -40° to +75°C |
| Storage Temperature: | -60° to +105°C |
| Dimensions (LxWxH) | 27,5 x 28,2 x 28,5 mm |
Hereby Ampire Electronics GmbH & Co.KG declares that the reversing camera KCX403 and KCX403-ECO complies with the directives 2014/30/EU, 2014/35/EU and 2011/65/EU.
The full text of the EU Declaration of Conformity in German language is available at the following Internet address: https://ce.ampire.de
Since its founding in 1987 Ampire Electronics has only one goal, to provide the best possible alarm-, hifi- and Multimedia products, Car Car which are available on the international market.
All manufacturing facilities and suppliers are certified according to ISO 9001 and QS-9000.
Ampire quality products are sold worldwide.
An Ampire customer service is available in many countries.
For more information about distributors in your territory please call: + 49-2181-81955-0.
We are focused on future oriented development of user friendly products.
The outstanding high quality standards, functionalities and designs of our products are unique in the market. ” German Development” is taken literally in AMPIRE.
© 2022 AMPIRE ELECTRONICS.
All rights reserved. Reproduction in whole or in part without written permission.
Customer Service
Langwadener Straße 60
D-41516 Grevenbroich
[email protected]
Support
+49 2181-81955-0
[email protected]
www.ampire.de
![]()


