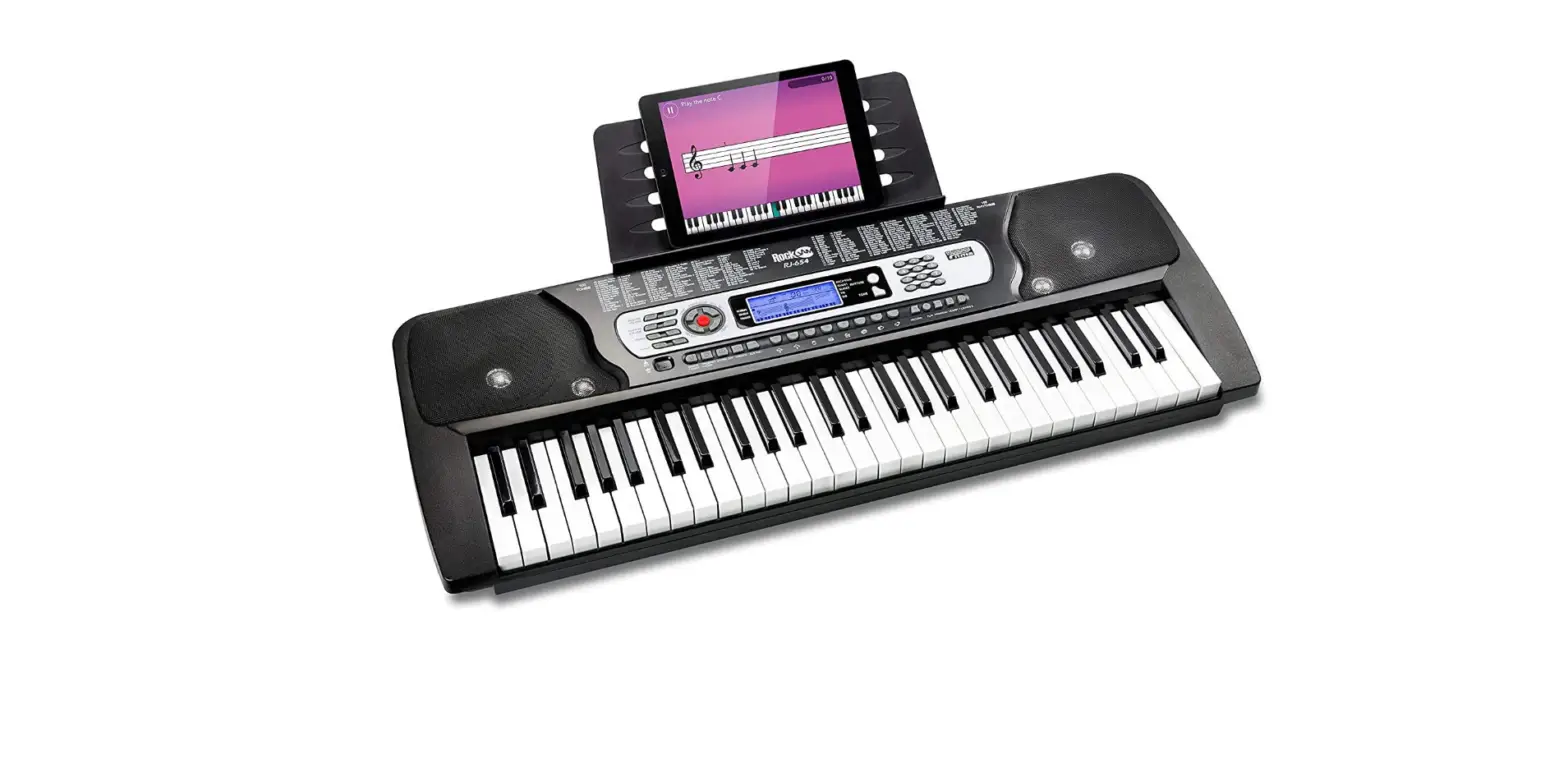
 RockJam RJ654 54 Key Keyboard Piano
 RockJam RJ654 54 Key Keyboard Piano
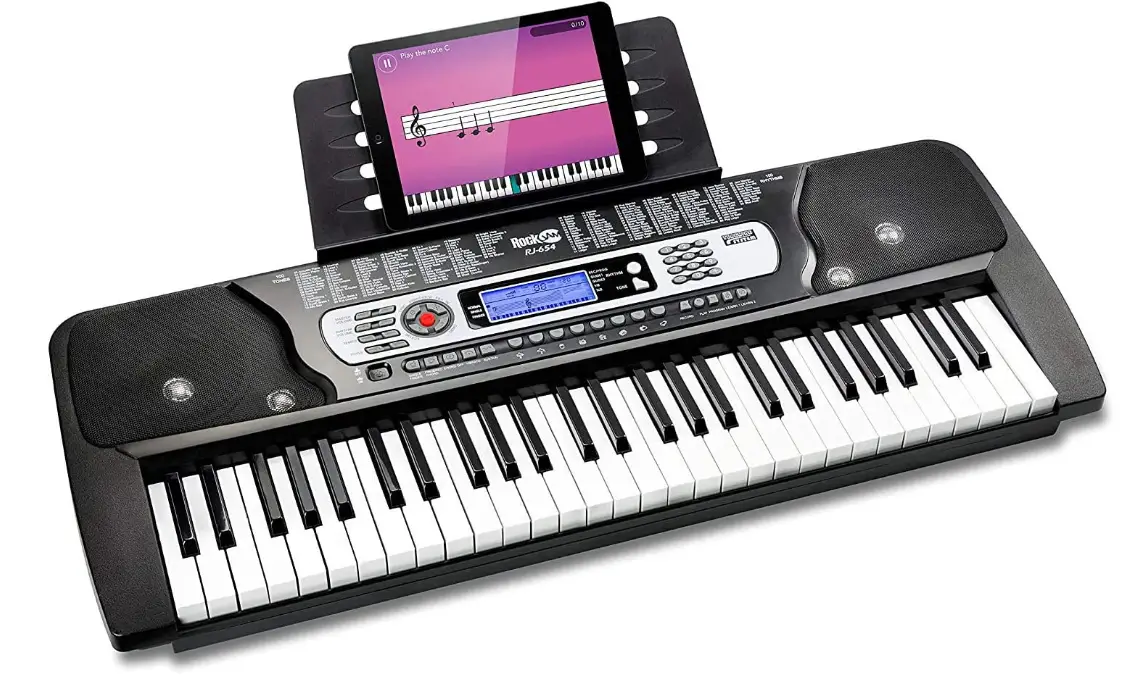 Important Information
Be sure to obey the following information so as not to harm yourself or others or damage this instrument or other external equipment.
Power adapter
- Please use only the specified AC adapter supplied with the product. An incorrect or faulty adapter can cause damage to the electronic keyboard.
- Do not place the AC adapter or power cord near to any source of heat such as radiators or other heaters.
- To avoid damaging the power cord, please ensure that heavy objects are not placed on it and that it is not subject to stress or over bending.
- Check the power plug regularly and ensure it is free from surface dirt. Do not insert or unplug the power cord with wet hands.
Do not open the body of the electronic keyboard
- Do not open the electronic keyboard or try to disassemble any part of it. If the device is not functioning correctly please stop using it and send it to a qualified service agent for repair.
Use of the electronic keyboard
- To avoid damaging the appearance of the electronic keyboard or damaging the internal parts please do not place the electronic keyboard in a dusty environment, in
direct sunlight or in places where there are very high or very low temperatures. - Do not place the electronic keyboard on an uneven surface. To avoid damaging internal parts do not place any vessel holding liquid onto the electronic keyboard as spillage may occur.
Maintenance
To clean the body of the electronic keyboard wipe it with a dry, soft cloth only.
Connection
In order to prevent damage to the speaker of the electronic keyboard please adjust the volume of any peripheral device to the lowest setting and gradually adjust the volume accordingly to an appropriate level once the music is playing.
During operation
- Do not use the keyboard at the loudest volume level for a long period of time.
- Do not place heavy objects onto the keyboard or press the keyboard with undue force.
- The packaging should be opened by a responsible adult only and any plastic packaging should be stored or disposed of appropriately.
Specification
Specifications are subject to change without notice.
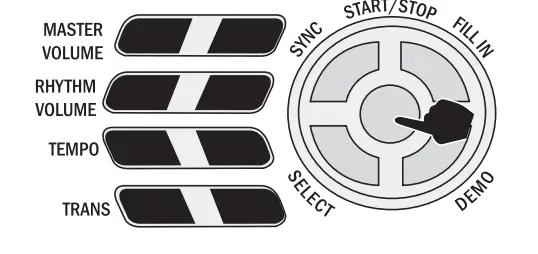
Front Panel and External Connections
Front Pane
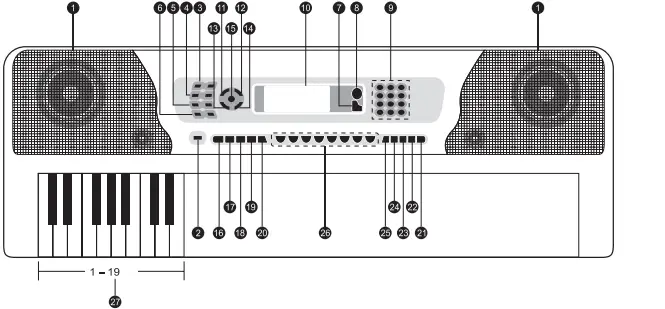
- Speaker
- Power Switch
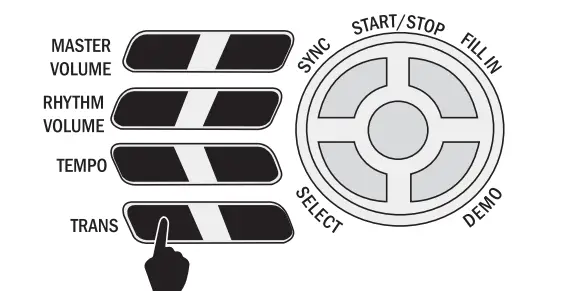
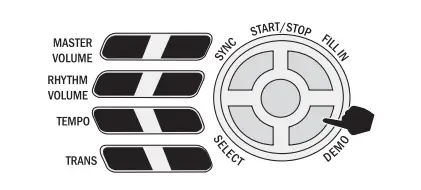
- Master Volume
- Rhythm Volume
- Tempo
- Transpose
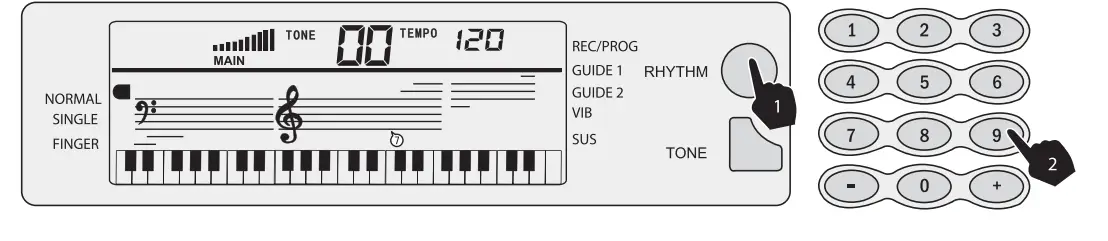
- Tone
- Rhythm
- Number Buttons
- LCD Display
- Sync
- Fill In
- Select
- Demo
- Start/ Stop
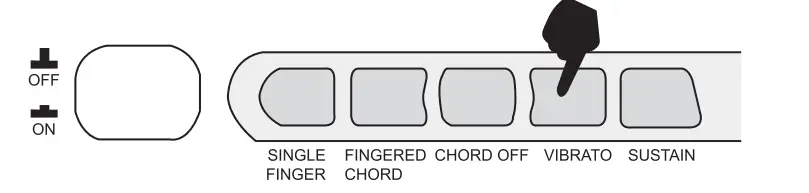
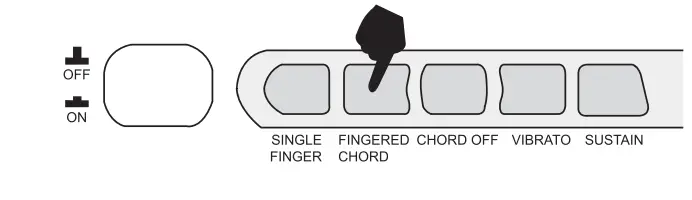
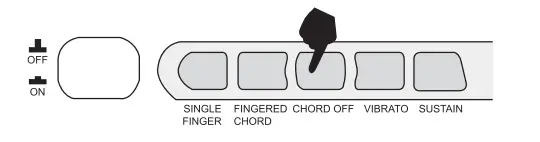
- Single Finger Chord
- Fingered Chord
- Chord Off
- Vibrato
- Sustain
- Learn 2
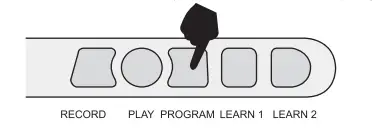
- Learn 1
- Program
- Playback
- Record
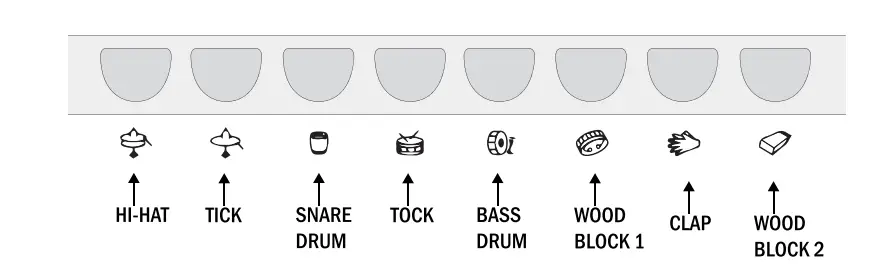
- Percussion
- Chord Keyboard Area
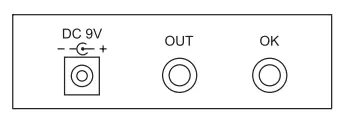
External Connection
LCD Display

- Speed value of rhythm and song (bpm)
- Digital display of song, rhythm and tone number
- TONE, RHYTHM or DEMO song
- Volume level display
- Staff display
Preparation Before First Use
Power
Use of AC/DC power adapter
Please use the special AC/DC power adapter that came with the electronic keyboard or a power adapter with DCgV output voltage and 400mA output current with a centre positive plug. Connect the DC plug of the power adapter to the DC9V power socket on the rear of the keyboard and then connect the other end into the mains wall socket and switch it on.
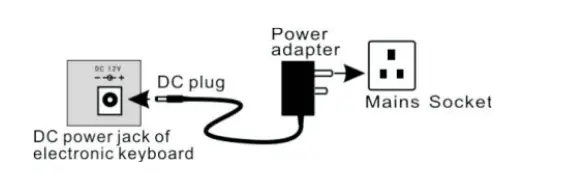
Caution
When the keyboard is not in use you should unplug the power adapter from the mains power socket.
Battery operation
Open the battery lid underneath of the electronic keyboard and insert 6 x 1.5V Size D alkaline batteries. Ensure the batteries are inserted the correct way around and replace the battery lid.
Caution
Do not mix old and new batteries. Do not leave batteries in the keyboard if the keyboard is not going to be used for any length of time. This will avoid possible damage caused by leaking batteries.
Auto Power Off
The amplifier section of the keyboard will go into a low-power standby mode if no key is pressed for 3 minutes. Press any key to come out of the low power mode. Note the keyboard will not enter the low power mode during demo song or rhythm playback.
Jacks and Accessories
Using external speakers:
Connect the 3.5mm external speaker plug into the (OUTI jack on the rear of the keyboard. The keyboard’s internal speakers will not cut off but will be enhanced by the external speaker. Note: External speaker not supplied.
Connecting a microphone
Connect the 3.5mm microphone plug into the [OKI jack on the rear of the keyboard. Sing along in time with the music. Note: Microphone not supplied.
Basic Operation
Power and Volume
Power control:
Press the POWER button to turn the power on and again to turn the power off.
Adjustment of the Master Volume
The keyboard has 10 levels of volume from 1-10. The default volume level when powered on is set to level 7. To change the volume, press the MASTER VOLUME +/-1 buttons. The volume level is indicated by the bars on the LCD display. Pressing both the MASTER VOLUME +/4 buttons at the same time will make the master volume return to the default level.

Tone
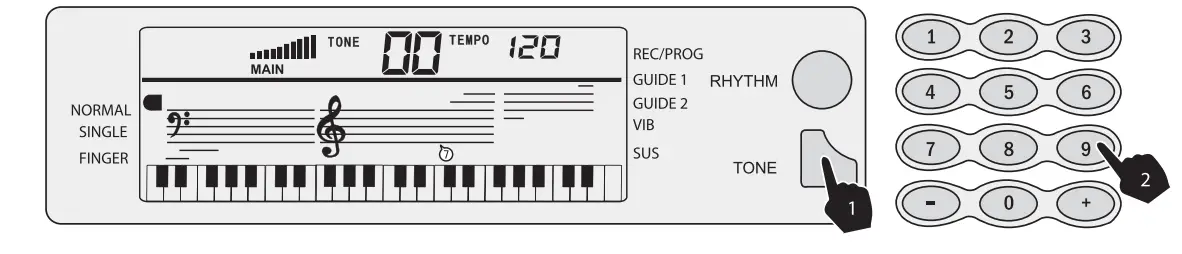
Tone Selection:
When the keyboard is first switched on the default status is TONE. To change the tone you can either press the +or – buttons on the numerical keypad or directly input the number of the tone you require by pressing the corresponding digits 0-9.
Effect&Control
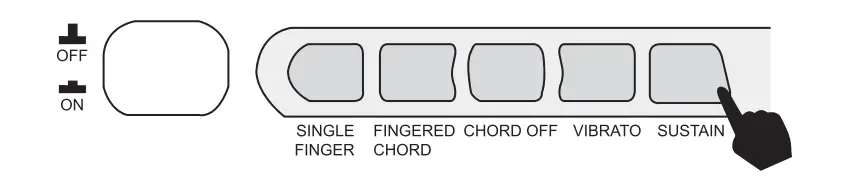
Sustain:
Press the sustain) button to enter Sustain mode. The LED display will show a flag next to ISUSI. Once this mode is selected the sound of each note played is prolonged. Pressing the ISustain] button again will turn the sustaining feature off and exit this mode.
Vibrato
Press the Vibratol button to enter Vibrato mode. The LED display will show a flag next to MIB]1. Once this mode is selected each time a note is played a trembling effect is added to the end of the note. Pressing the Vibratol button again will turn the Vibrato feature off and exit this mode.
Transpose
Pressing the Transpose +/-1 button alters the musical scale of the note being played. You can adjust the scale by 6 levels upwards or downwards. Pressing both the [Transpose +/ buttons at the same time will make the musical scale revert to 0.
Panel Percussion Instruments
There are 8 kinds of percussion instruments to choose from. Press the corresponding button to sound the required instrument. You can use the percussion instruments to filli your music and enhance the performance.
Rhythm
Selecting the rhythm:
You can choose from any of the 100 built-in rhythms. Please refer to the appendix for the detailed rhythm table. Press the RHYTHM button to enter the rhythm selection function. The LED display will show the current rhythm number. You can select the rhythm you require by pressing the corresponding digits on the numerical keypad or by pressing the +/ buttons.
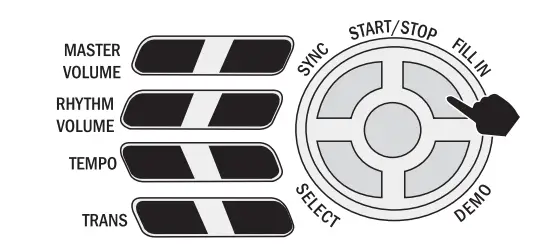
Start / Stop
Press the ISTART/ STOPI button to play the rhythm. Press the ISTART/ STOP] button again to stop the thythm playback.
Sync
Press the sync button to select the sync accompaniment function. Pressing any of the first 19 keys on the left-hand side of the keyboard will start the rhythm playing. Press the ISYNC) button again to stop the rhythm and reset the sync function. Press the ISYNCI button again to exit the sync function.
Fill in
You can fill in the length of the interlude if you press the [F|LL IN) button during the rhythm playback. After the fllin the rhythm ill continues playing as normal.
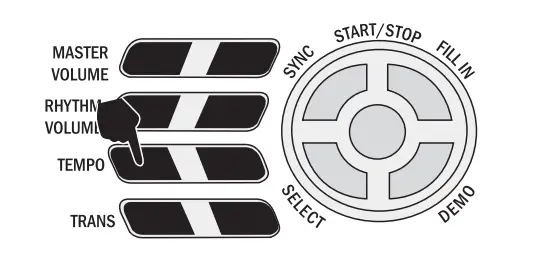
Rhythm Volume Adjustment
The default Rhythm Volume is level 7; this can be adjusted by pressing the RHYTHM VOLUME +/-] buttons. The LED display will show the volume as you are adjusting. The adjustment range is 1-10 indicated by the bars on the LCD display. Pressing both the RHYTHM VOLUME +/-] buttons at the same time will make the Rhythm Volume return fo the default level.
Tempo Adjustment
Press the [TEMPO +/-J buttons to adjust the playing tempo of the rhythm, metronome and demo song. The adjustment range is 40-240 bpm in 15 steps. Pressing both the [TEMPO +/4 butons at the same time will make the tempo revert to 120 bpm.
Chord ACCompaniment
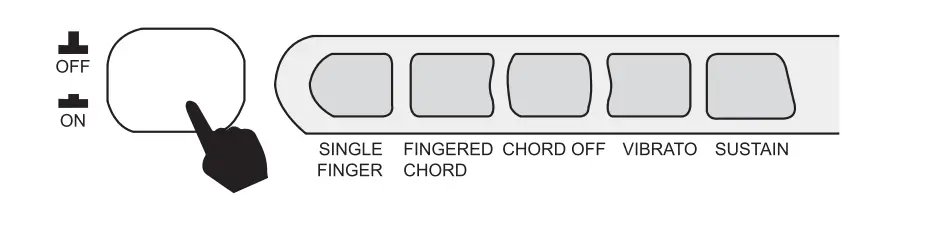
Single Finger Chords:
Press the SINGLE FINGER button to enter the single-finger auto chord mode. A flag is displayed on the LCD next to SINGLE. Chords are played by pressing certain keys in the chord area on the left-hand side of the keyboard |keys 1-191. The finger patterns required are shown in Appendix v. The played chord is displayed in the top left corner of the LCD display. Press the START/STOP] bUtton to start or stop the chord accompaniment.
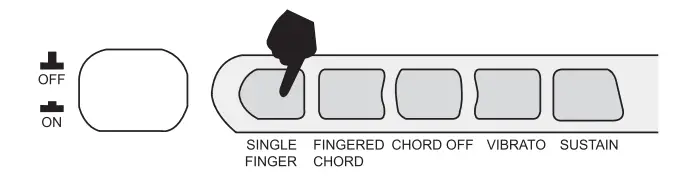
Fingered Chords
Press the (FINGERED CHORDJ button to enter the fingered auto chord mode. A ilag is displayed on the LCD next to FINGER. By pressing certain keys in the chord area on the lett hand side of the keyboard Ikeys 1-19) you can hear ditferent chord accompaniments. The finger patterns required are shown in Appendix V. The played chord is displayed in the top leff corner of the LCD display. Press the [START/STOP] button to start or stop the chord accompaniment.
 Chord Off
During any chord mode press the [CHORD OFFI button to stop the chord accompaniment sound and exit the chord mode. The rhythm will continue fo play.
Recording Function
Press the RECORD button to enter the recording mode. The LED display will show a flag next to REC/PROG. Press any key to start recording. The maximum recording capacity is 4I notes. Each time yoU press the [RECORDI button, the previous memory will be cleared and the keyboard will enter the recording mode again.
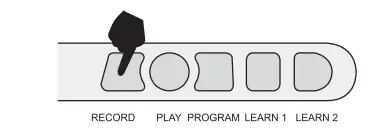
Before the memory becomes full, press the PLAYI button to play back the recorded notes.
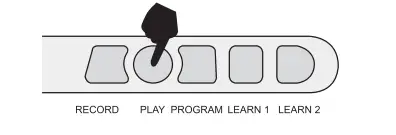
Press the lPROGRAMM butfon fo enfer the rhyihm edifing mode. The LED display will show a flag next to REC/PROG. You can edit a section of rhythm by pressing any of the 8 kinds of panel percussion on the keyboard. The maximum recording length is 16 percussion sounds. Press the PLAYBACK button to hear the programmed sounds in sequence. You can also adjust the tempo for optimal effect. Each time you press the [PROGRAMJ button the previous memory will be cleared and the keyboard will enter the programming mode again.
Demo Song Playback
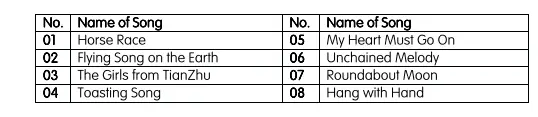
Press the IDEMOJ button to play a demo song. The LED display will show SONG XX where xx is the number of the demo song. By pressing the ISELECT] button repeatedly you can choose the demo song you require. There are 8 songs to choose from in total. The keyboard will finish playing the chosen song and then start to play the next song. Press the DEMOJ button again to exit the demo mode.
Teaching Modes
LEARN 1:
Press the [LEARN 1] button to enter the Single Key teaching mode. A flag next to GUIDE I will be displayed on the LCD. This mode is suitable tor beginners to familiarise themselves with the rhythm and tempo of the song. The LED display will show SONG IX where xx is the number of the demo Song selected. select a different song using a select key. The beat point will lash on the LED display to indicate the tempo. The keyboard will then play the main melody automatically. The LCD will indicate which keys should be pressed.
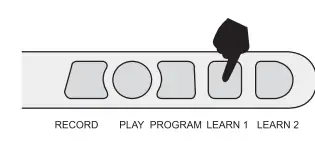 LEARN 2
Press the ILEARN 21 button to enter the Synchronised teaching mode. A line next to GUIDE 2 will be displayed on the LCD. This mode is suitable for more advanced users. The LED display will show SONG XXI where xx is the number of the demo song selected. Select a different song using the [SELECT) key. The beat point will flash on the LED display to indicate the tempo. The correct key fo press is displayed on the LCD display. Play along in time making sure to press the correct keys.
Appendix IL Rhythm Table

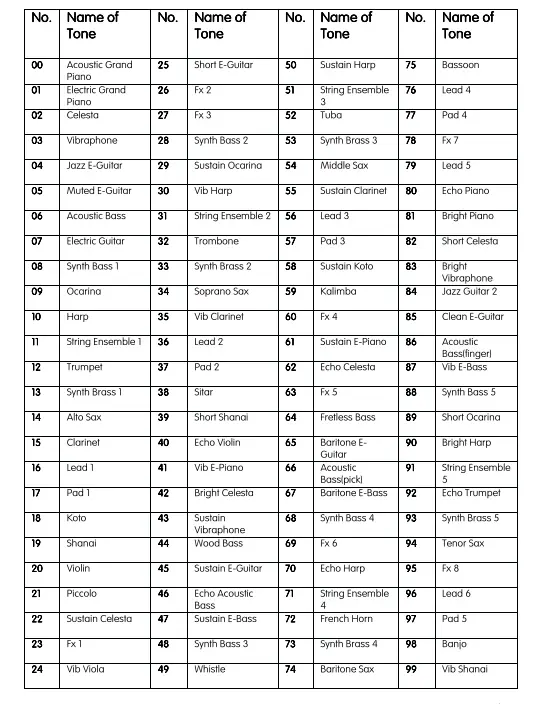
Appendix IL. Tone Table
Appendixl. Demo Song Table
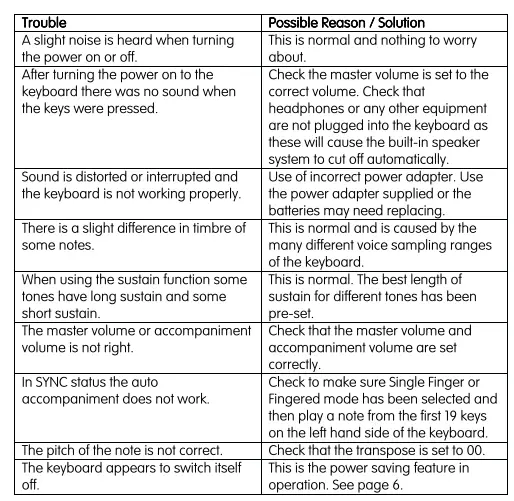
Appendix IV, Troubleshooting
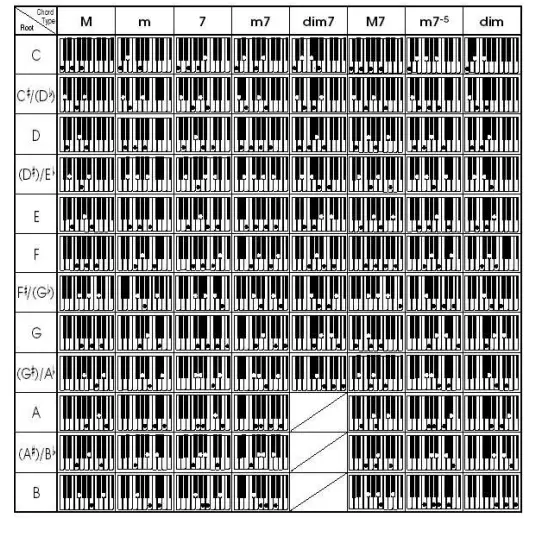
Appendix V. Chord Tables
Single Finger Chords

Fingered Chords
Appendix VI. Technical Specification
- Display
LED Display with Staff and Key Indication - Tone
100 different tones - Rhythm
100 difterent rhythms - Demo
8 different demo songs - Effect Control
Sustain, Vibrato, Transpose - Recording and Programming
41 Note Record Memory, Playback, 16 Beat Rhythm Programming - Percussion
8 Kinds of panel percussion instruments - Accompaniment Control
Start/ Stop, Sync, Fll-in, Temp - Intelligent Teaching
2 Teaching modes - External Jacks
DC 9V Power Input, External Speaker Output, Microphone Input - Diapason IRange of Keyboard
C2- F6 - Intonation
<3cent - Weight
3.9kg - DC Input
DC9V - Power Adapter
DC9V, 400mA - Output Power
3Wx2 - Accessories
Power Adapter, Music Stand, User Guide
Frequently Asked Questions
The only difference between these two models is that the RJ654 has a built in metronome, which allows you to set the tempo of your music.
Your keyboard comes with a power switch located on the back of it. To turn it on, simply flip the switch up. To turn it off, flip it down.
Your keyboard comes with a USB cable for connecting it to your computer. Simply plug one end into your keyboard and then plug the other end into an open USB port on your computer. If you are using Windows, you will need to install drivers for your keyboard before it will work properly. You can download drivers for Windows here. If you are using Mac OS X, no drivers are required for your keyboard to work properly. It should work right out of the box.
Your keyboard comes with a 30 pin connector cable for connecting it to an iPad or iPhone. Simply plug one end into your keyboard and then plug the other end into an open 30 pin connector port on your iPad or iPhone. If you are using iOS 4 or above, no drivers are required for your keyboard to work properly. It should work right out of the box. If you are using iOS 3, however, you will need to download drivers for your keyboard before it will work properly. You can download drivers for iOS 3 here . Please note that if you have an iPad 2 or an iPhone 4S, this cable will not work with those devices as they have a new connector called Lightning which is not compatible with this cable. You can purchase a Lightning-to-30-pin adapter from Apple here . This adapter allows you to use this cable with newer devices like iPad 2 and iPhone 4S as well as older devices like iPad 1 and iPhone 4.
Your keyboard comes with a micro USB cable for connecting it to an Android device (phone or tablet). Simply plug one end into your keyboard and then plug the other end into an open micro USB port on your Android device (phone or tablet). If you are using Android OS 2 or above, no drivers are required for your keyboard to work properly. It should work right out of the box. If you are using Android OS 1 however, you will need to download drivers for your keyboard before it will work properly. You can download drivers for Android OS 1
Six D-size batteries are required for this 54-key RockJam. can additionally use the supplied AC adaptor. The AC adaptor can be used without batteries.
Yes, the microphone has an output.
AA batteries can be used to power a DC device. You might also use the AC adaptor that it also includes.
You can utilize headphones with a 3.5mm jack, of course.
Yes, you can use eight D batteries or plug it in.
The speakers are muted, yes. However, because the keyboard is so loud in them, try wearing headphones with a volume control.


