![]()
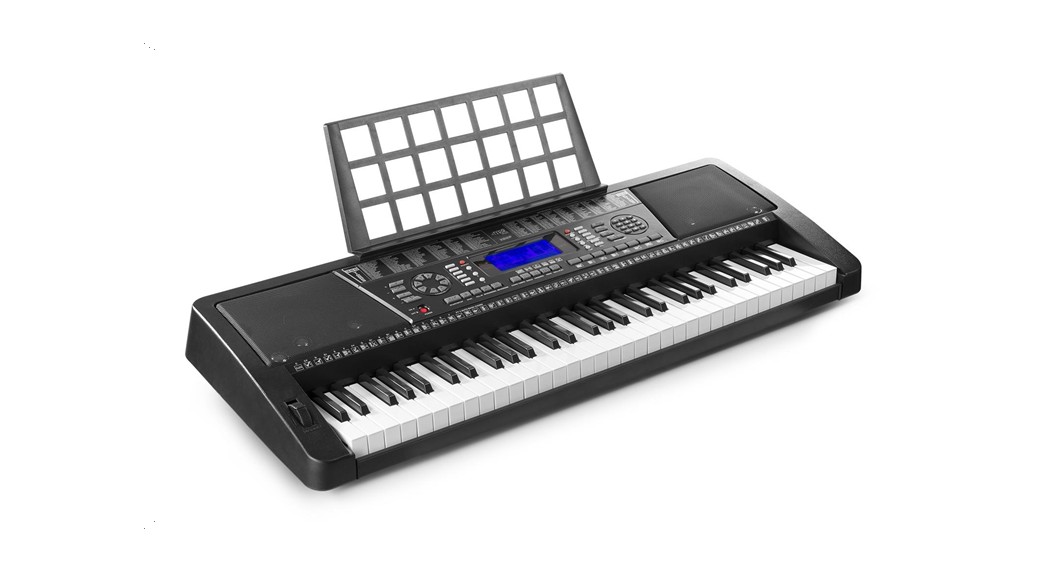
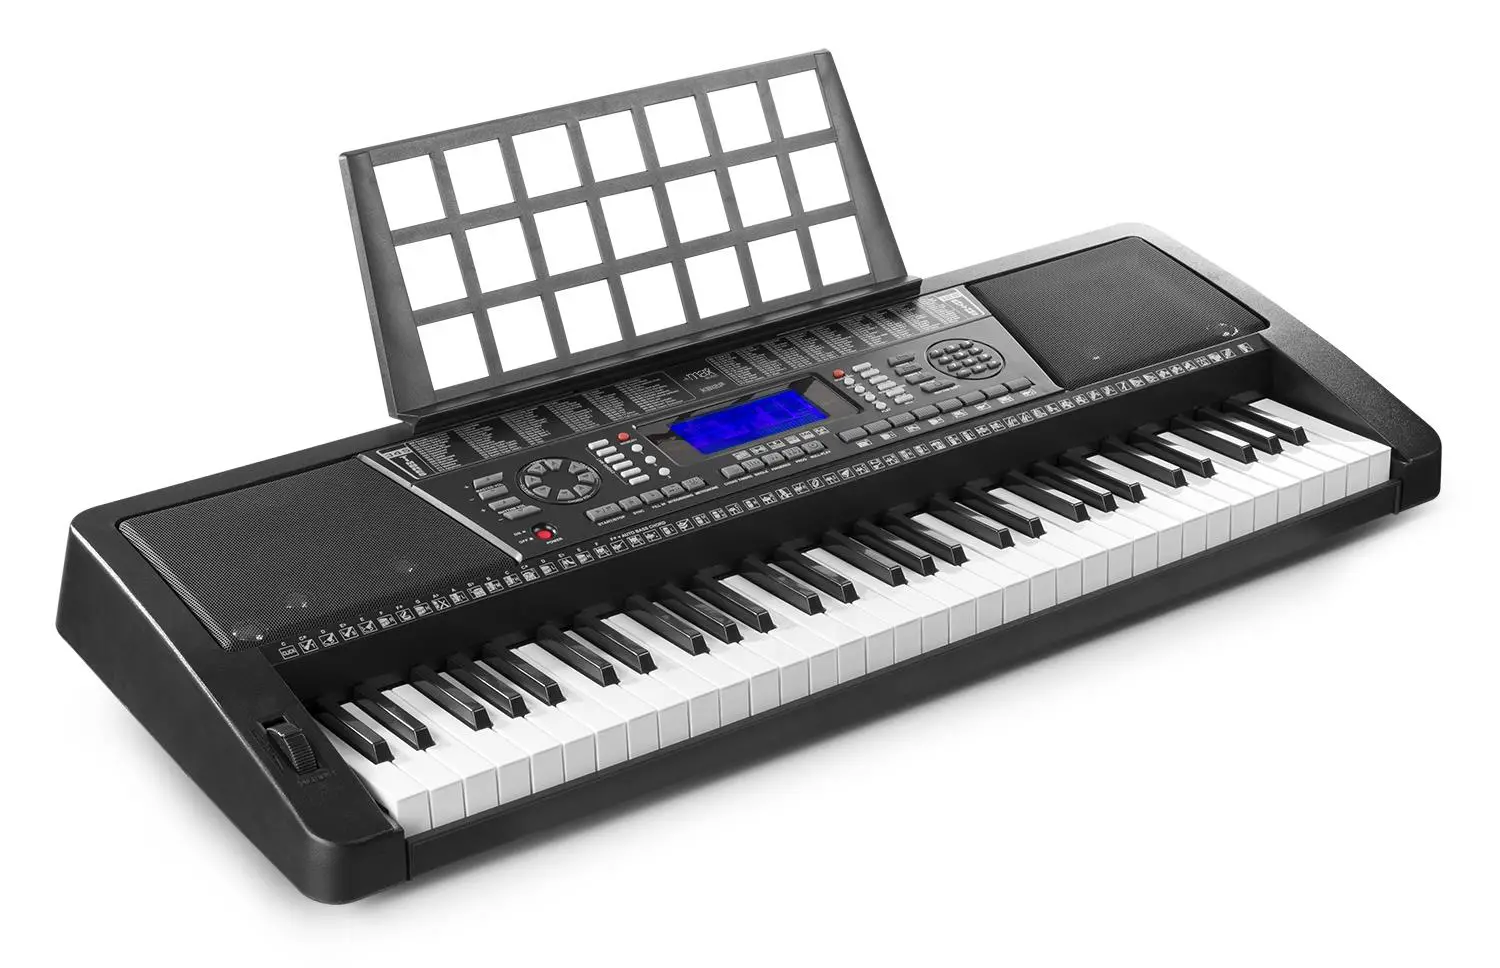
KB12P Elect.Keyboard Pro 61key Midi
Ref. nr.: 130.107
 INSTRUCTION MANUAL
V1.1
Congratulations to the purchase of this Max Music product. Please read this manual thoroughly prior to using the product in order to benefit fully from all features.
Read the manual prior to using the product. Follow the instructions in order not to invalidate the warranty. Take all precautions to avoid fire and/or electrical shock. Repairs must only be carried out by a qualified technician in order to avoid electrical shock. Keep the manual for future reference.
- Prior to using the product, please ask advice from a specialist. When the unit is switched on for the first time, some smell may occur. This is normal and will disappear after a while.
- The unit contains voltage carrying parts. Therefore do NOT open the housing.
- Do not place metal objects or pour liquids into the product. This may cause electrical shock and malfunction.
- Do not place the product near heat sources such as radiators, etc. Do not place the unit on a vibrating surface. Do not cover the ventilation holes.
- The product is not suitable for continuous use.
- Be careful with the mains lead and do not damage it. A faulty or damaged mains lead can cause electrical shock and malfunction.
- When unplugging the product from a mains outlet, always pull the plug, never the lead.
- Do not plug or unplug the unit with wet hands.
- If the plug and/or the mains lead are damaged, they need to be replaced by a qualified technician.
- If the product is damaged to such an extent that internal parts are visible, do NOT plug the unit into a mains outlet and DO NOT switch the product on. Contact your dealer. Do NOT connect the product to a rheostat or dimmer.
- To avoid fire and shock hazard, do not expose the product to rain and moisture.
- All repairs should be carried out by a qualified technician only.
- Connect the product to an earthed mains outlet (220240Vac/50Hz) protected by a 10-16A fuse.
- During a thunderstorm or if the product will not be used for a longer period of time, unplug it from the mains. The rule is: Unplug it from the mains when not in use.
- If the product has not been used for a longer period of time, condensation may occur. Let the unit reach room temperature before you switch it on. Never use the product in humid rooms or outdoors.
- During operation, the housing may become hot.
- To prevent accidents in companies, you must follow the applicable guide lines and follow the instructions.
- Do not repeatedly switch the product on and off. This shortens the life time.
- Keep the unit out of the reach of children. Do not leave the unit unattended.
- Do not use cleaning sprays to clean switches. The residues of these sprays cause deposits of dust and grease. In case of malfunction, always seek advice from a specialist.
- Only operate the product with clean hands.
- Do not force the controls.
- If the product has fallen, always have it checked by a qualified technician before you switch the product on again.
- Do not use chemicals to clean the unit. They damage the varnish. Only clean the product with a dry cloth.
- Keep away from electronic equipment that may cause interference.
- Only use original spares for repairs, otherwise serious damage and/or dangerous radiation may occur.
- Switch the product off prior to unplugging it from the mains and/or other equipment. Unplug all leads and cables prior to moving the product.
- Make sure that the mains lead cannot be damaged when people walk on it. Check the mains lead before every use for damages and faults!
- The mains voltage is 220-240Vac/50Hz. Check if power outlet match. If you travel, make sure that the mains voltage of the country is suitable for this product.
- Keep the original packing material so that you can transport the product in safe conditions
![]() This mark attracts the attention of the user to high voltages that are present inside the housing and that are of sufficient magnitude to cause a shock hazard.
This mark attracts the attention of the user to high voltages that are present inside the housing and that are of sufficient magnitude to cause a shock hazard.
![]() This mark attracts the attention of the user to important instructions that are contained in the manual and that he should read and adhere to.
This mark attracts the attention of the user to important instructions that are contained in the manual and that he should read and adhere to.
The product has been certified CE. It is prohibited to make any changes to the product. They would invalidate the CE certificate and their guarantee!
NOTE: To make sure that the unit will function normally, it must be used in rooms with a temperature between 5°C/41°F and 35°C/95°F.
![]() Electric products must not be put into household waste. Please bring them to a recycling centre. Ask your local authorities or your dealer about the way to proceed. The specifications are typical. The actual values can slightly change from one unit to the other. Specifications can be changed without prior notice.
Electric products must not be put into household waste. Please bring them to a recycling centre. Ask your local authorities or your dealer about the way to proceed. The specifications are typical. The actual values can slightly change from one unit to the other. Specifications can be changed without prior notice.
Do not attempt to make any repairs yourself. This would invalid your warranty. Do not make any changes to the product. This would also invalid your warranty. The warranty is not applicable in case of accidents or damages caused by inappropriate use or disrespect of the warnings contained in this manual. Max cannot be held responsible for personal injuries caused by a disrespect of the safety recommendations and warnings. This is also applicable to all damages in whatever form.
UNPACKING INSTRUCTION
CAUTION! Immediately upon receiving the product, carefully unpack the carton, check the contents to ensure that all parts are present and have been received in good condition. Notify the shipper immediately and retain packing material for inspection if any parts appear damaged from shipping or the package itself shows signs of mishandling. Save the package and all packing materials. If the product must be returned to the factory, it is important that the product is returned in the original factory box and packing.
If the device has been exposed to drastic temperature fluctuation (e.g. after transportation), do not switch it on immediately. The arising condensation water might damage your device. Leave the device switched off until it has reached room temperature.
Supplied contents:
- MAX Music KB12P keyboard
- Power supply
- Music sheet stand
POWERSUPPLY
The label on the bottom of the product indicates to what type of power supply the product must be connected. Check that the mains voltage corresponds to this, all other voltages may cause irreparable damage. The product must also be directly connected to the mains, no dimmer or adjustable power supply.![]() Always connect the device to a protected circuit (circuit breaker or fuse). Make sure the device has an appropriate electrical ground to avoid the risk of electrocution or fire.
Always connect the device to a protected circuit (circuit breaker or fuse). Make sure the device has an appropriate electrical ground to avoid the risk of electrocution or fire.
CONTROLS
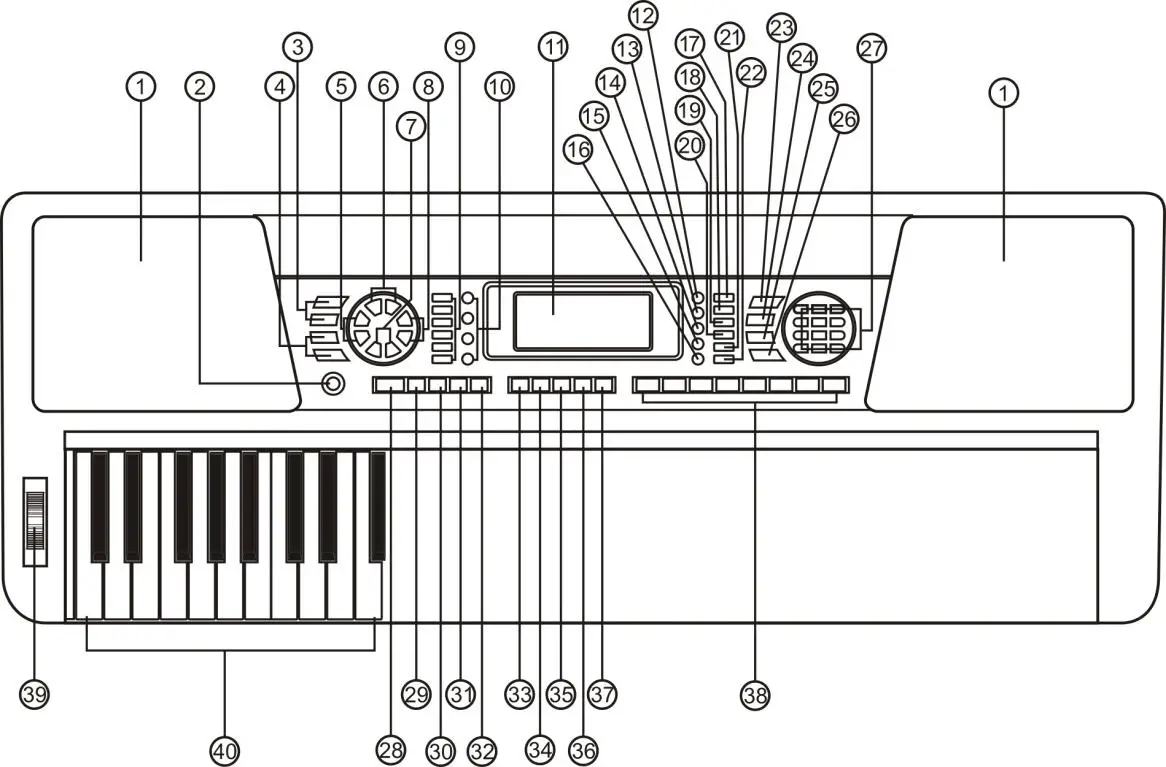
- SPEAKERS
Loudspeakers to reproduce the sound of the music played. Sound level is determined on the basis of the volume setting. - POWER ON/OFF
Switch to turn the keyboard on or off. - MASTER VOLUME
Press [MASTER VOL +] or [MASTER VOL -] to raise or lower the master volume. Press both simultaneously to reset to default value. - RHYTHM VOLUME
Press [RHYTHM +] or [RHYTHM VOL -] to raise or lower the rhythm volume. Press both simultaneously to reset to default value. - VIBRATO
Press the [VIBRATO ] or [VIBRATO
  ] buttons to set vibrato level from “001” to “007”. Press the two buttons simultaneously to reset to the default value.
 - TEMPO
Press the [TEMPO] or [TEMPO ] buttons adjust the tempo. Press the two buttons simultaneously to reset to the default value. - CHORD VOLUME
Press the [CHORD VOL] or [CHORD VOL ] buttons adjust the chord volume. Press the two buttons simultaneously to reset to the default value. - TRANSPOSE
Press [TRANSPOSE] or [TRANSPOSE ] to transpose the tone of the notes. The transpose may be adjusted from “-6” to “+6”. Pressing the two buttons simultaneously resets transpose to the default value. - CHORD MAT
You can add decoration to your performance by pressing any of these buttons to punch in special sounds. - MEMORY
With the status memory function, you can save tone, rhythm, tempo and other parameters for fast shifting during playing. This keyboard is equipped with 3 saving slots, which can be called at any time during playing. Set tone, rhythm, tempo and chord as required and press the [MEMORY] button. Select [MEMORY 1] to [MEMORY 3] to save the current status. - LCD DISPLAY
Displays current mode, notes to play, rhythm, tempo, etc. - DEMO SONG
This keyboard has 40 stored demo songs (“000” to “039”) for your selection. Press [DEMO SONG] and the demo songs will start to play in sequence. During playing process, press [DEMO SONG] to play the next demonstration song. Press [START/STOP] to stop playing. During the playing process, you can also press the num pad buttons or the “+”/”-” buttons to select other demonstration songs. The selected demonstration song will then play repeatedly. - ONE-KEY TRAINING
Press [ONE KEY] to enable the single key training function. Press “+”/”-” button to select the song to be learned. One key training aims at duration learning, and there is no requirement on pitch or creativeness. This mode allows for mistakes when playing the keys, but the keyboard still plays correct notes and the display will show the correct notes. After one song is finished, repeat the current song to be learned. Press the [ONE KEY] button to disenable the training function. - GUIDE
Press [GUIDE] to enable the ensemble function. Press “+”/”-” button to select the song to be learned. The Ensemble training aims at the correct and comprehensive learning of the song duration and notes. The keynote will be shielded for ensemble and you need to play the correct note according to the correct duration of the song. If you fail to play within 3 seconds, the keyboard will automatically play the correct note. After one song is finished, repeat the current song to be learned. Press [ENSEMBLE] to disenable the training function. - RECORD
Press [REC] to enable the recording function. In this mode all played notes will be recorded. When storage is full, “FULL” will appear on the display and recording will stop automatically. Press [PLAY] to playback the recorded notes. You can record a new rhythm, or you can press [PLAY] to playback the recorded rhythm again. - PLAY
Press to start/resume play. - TOUCH
This keyboard has a touch-sensitivity-function, which is activated by default. This functions allows the musician to produce sounds of varying volume by using different intensity when pressing the keys to play notes. Press [TOUCH] to turn off this function, “Touch off” will appear on the LCD screen. Press [TOUCH] again to turn the function back on, “Touch on” will appear on the LCD screen. - DUAL
Press [DUAL] to initiate the double timbre function, with “Double On” appearing on the LCD screen. Default setting is the combination of “000” (piano timbre) and “048” (string ensemble 1). To compose your own timbre: first press [TIMBRE 1], then choose a type of timbre on the numeric penal. Press [TIMBRE 2]first, then choose a type of timbre on the numeric penal to set the next. The timbre of the notes is the combination of the two chosen types. Press [DUAL] button again to turn the double timbre function off, “Double Off” will appear on the LCD screen. - SUSTAIN
Press [SUSTAIN] and the sustain effect will be activated. Press this button again and the sustain effect will be disenabled. - PERCUSSION
This Keyboard provides 61 kinds of keyboard percussions. Press [KEYBOARD PERCUSSION] to turn the keyboard into percussion keyboard, and each key corresponds to one percussion instrument. Press this button again to disenable the keyboard percussion function.
The instrument also features 8 panel percussions. Press the panel percussion buttons according to underlying pictures to add the desired percussions during regular keyboard playing. - SPLIT
Press [SPLIT] to enable the keyboard splitting function. 24 keys on the left of the keyboard will split with the remaining keyboard. While the left keyboard zone will increase by one octave and maintain the original tone, the right keyboard zone will decrease by one octave to maintain the same pitch with the left keyboard zone. The tone of the right keyboard zone can be set as needed so different tones can be played by the left and right keyboard zones at the same time. Press [SPLIT] again to disenable this function. - MIDI
Press to toggle to MIDI (Musical Instrument Digital Interface) functionality. Use the MIDI OUT (41) jack to connect the keyboard to a computer. - TIMBRE 1
Call for a chosen timbre, saved as “Timbre 1”. - TIMBRE 2
Call for a chosen timbre, saved as “Timbre 2”. - RHYTHM
Rhythm selection:
This Keyboard provides 128 rhythms (“000” to “127”) for your selection. The rhythm is defaulted to be “000”. Press [RHYTHM] to initiate the rhythm selection function.
Press the numeric keys or the “+”/”-” buttons to select other rhythms. Rhythm enabling: Press [START/STOP] to start the accompaniment rhythm. While in enable state:
Press [SYNC], “SYNC” will show on the display. Play any key in the chord key zone (1st-19th key from left). The accompaniment rhythm will be activated.
Press [START/STOP] to stop the accompaniment rhythm. Interlude: After the accompaniment, rhythm is activated, press [FILL-IN] to have a temporary rhythm play during the accompaniment rhythm. - RHYTHM SHIFT
During the Rhythm playback, press the [RHYTHM SHIFT] button to add variations to your performance. Press the [RHYTHM SHIFT]button again to return to the main rhythm. - NUM PAD
Numeric keys to enter an exact value. - START/STOP
Press to start or stop playing selected program. - SYNC
When in rhythm mode, press [SYNC]. “SYNC” will show on the display. Play any key in the chord key zone (the 1st-19th key, from left) to activate the accompaniment rhythm. - FILL-IN
Press the [FILL-IN] button to add an interlude to the rhythm. The fill played is determined by accompaniment rhythm selected. After the fill, the selected accompaniment rhythm will continue playing. The Fill In function can be used as often as desired. - INTRO / ENDING
Press to start an intro playback. When the intro section is finished, the playback will be shifted to the main section automatically. Press during the rhythm playback to skip to the ending section. The rhythm will then be automatically stopped after the ending section. - METRONOME
There are 4 kinds of metronomes stored on the keyboard: 1/4 beat, 2/4 beat, 3/4 beat and 4/4 beat. You can adjust the tempo to your desired value by continuously pressing the [METRONOME] button. For example, press the button once to stay at 1/4 beat and cancel the rhythm by pressing it again. By this analogy, the 2/4, 3/4 and 4/4 beats will need 3, 5 and 7 taps respectively. Once the tempo is selected, the pendulum of the metronome on the LCD screen will start swinging and the beats will start blinking. - CHORD TIMBRE
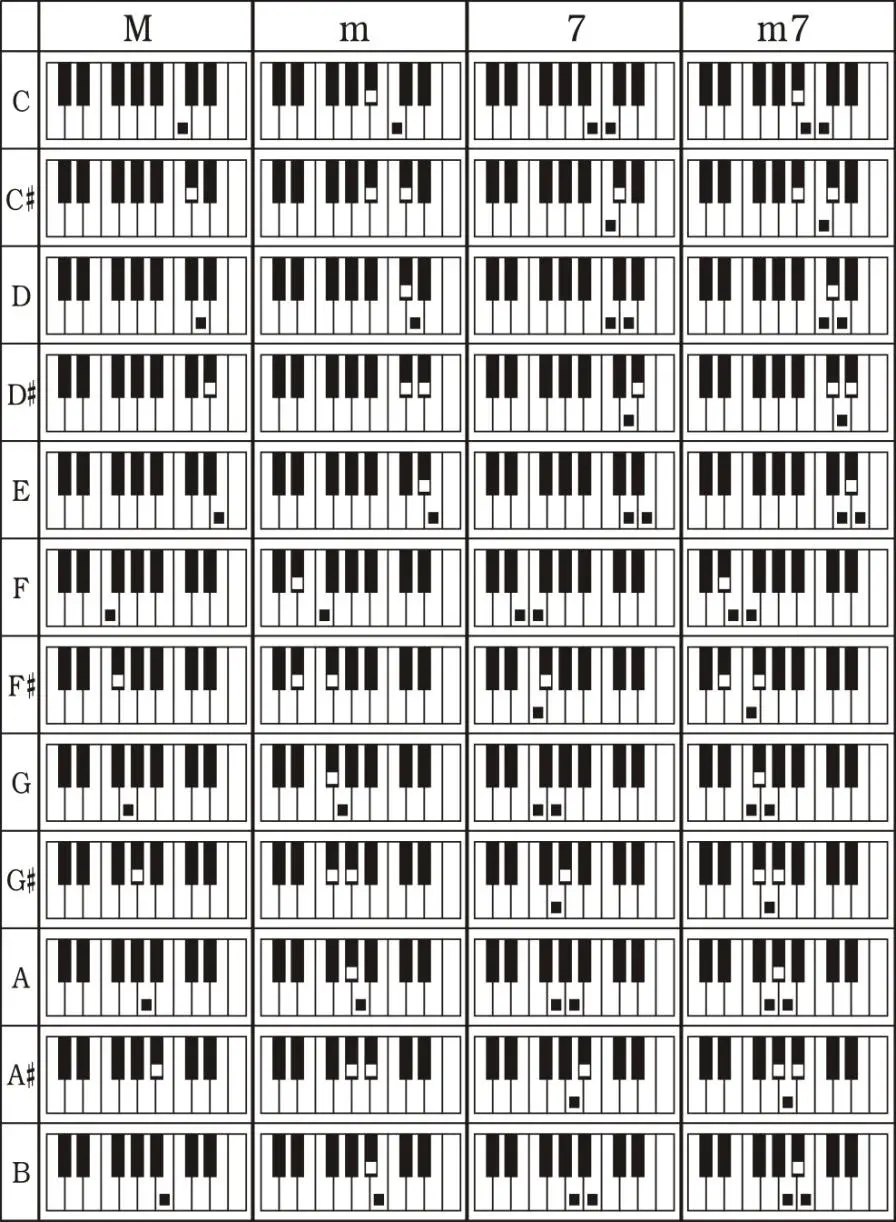
The instrument features 5 different chord timbres. Press the [CHORD TIMBRE] button successively to change the timbres. - SINGLE CHORD
Under the state that the rhythm is activated, press [SINGLE]. You can now play a single chord on the keys in the chord zone of the keyboard.
- FINGERED CHORD
In this mode, you play the individual notes of the chord in your left hand. Under the state that the rhythm is activated, press [FINGERED]. You can now play a fingered chord on the keys in the chord zone of the keyboard.
- PROGRAM
Press [PROG] to enable the rhythm programming function, “PROG” will show on the display and the keyboard percussion function will be activated. 32 Percussions can be programmed at maximum. Press [PLAY] to playback the programming rhythm. Press [START/STOP] or press [PROG] again to disenable the programming function. All recorded rhythms will be removed. - NULL PLAY
Press to play back the programmed rhythm repeatedly. You can then add up an accompaniment chord to the rhythm. Press again to stop playing. - PANEL PERCUSSION
The instrument also features 8 panel percussions. Press the panel percussion buttons according to underlying pictures to add the desired percussions during regular keyboard playing. - PITCH BEND
Wheel to determine the pitch bend. Turn the wheel forwards to increase the depth of the effect, turn the wheel backwards to decrease the depth of the effect. - CHORD SECTION
Chord key zone (1st-19th key from left).
CONNECTIONS
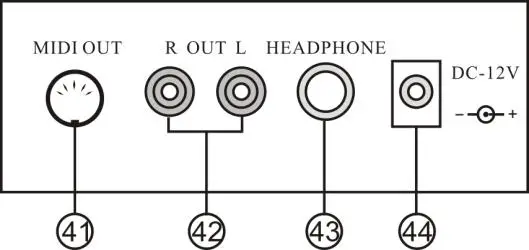
41. MIDI OUT JACK
MIDI (Musical Instrument Digital Interface) is a standardized specification for music synthesizers that respond to MIDI messages. You can connect the instrument to a computer via the [MIDI OUT] jack and upload your performance to the computer to add up further recording, composing or re-editing.
42. AUDIO OUTPUT
You can use the built-in speakers or connect the instrument to the external amplifiers or stereos. When connecting, turn off the switches of both sides and plug the right end of audio cable into either side of [OUT L / R] terminals on rear-panel and the other end to external device.
43. HEADPHONES/OUTPUT
When connecting headphones to the PHONES/OUTPUT port, the loudspeaker will be disenabled automatically. You can perform without disturbing others and others disturbing you.
44. DC 12V INPUT
Socket for plugging in the supplied power adapter.
AUTO RHYTHM
Rhythm selection
This Keyboard provides 128 rhythms (“000” to “127”) for your selection. The rhythm is defaulted to be “000”. Press [RHYTHM] to initiate the rhythm selection function. Press the numeric keys or the “+”/”-” buttons to select other rhythms.
Rhythm control
- Rhythm enabling
Press [START/STOP] to start the accompaniment rhythm. While in enable state: Press [SYNC], “SYNC” will show on the display. Play any key in the chord key zone (1st-19th key from left). The accompaniment rhythm will be activated. - Interlude
After the accompaniment rhythm is activated, press [FILL-IN] to have a temporary rhythm play during the accompaniment rhythm. - Stop rhythm
Press [START/STOP] to stop the accompaniment rhythm.
Tempo adjustment
Press the [TEMPO] or [TEMPO ] buttons adjust the tempo. Press the two buttons simultaneously to reset to the default value.
EFFECT CONTROL
Sustain function
Press [SUSTAIN] and the sustain effect will be activated. Press this button again and the sustain effect will be disenabled.
Vibrato function
Press the [VIBRATO] and the vibrato effect will be activated. Press this button again and the vibrato effect will be disenabled.
RECORDING AND RHYTHM PROGRAMMING
Recording
Press [REC] to enable the recording function. In this mode all played notes will be recorded. When storage is full, “FULL” will appear on the display and recording will stop automatically. Press [PLAY] to playback the recorded notes. You can record a new rhythm, or you can press [PLAY] to playback the recorded rhythm again.
Rhythm programming
Press [PROG] to enable the rhythm programming function, “PROG” will show on the display and the keyboard percussion function will be activated. 32 Percussions can be programmed at maximum. Press [PLAY] to playback the programming rhythm. Press [START/STOP] or press [PROG] again to disenable the programming function. All recorded rhythms will be removed.
TRAINING METHODS
Training I: One key
Press [ONE KEY] to enable the single key training function. Press “+”/”-” button to select the song to be learned. One key training aims at duration learning, and there is no requirement on pitch or creativeness. This mode allows for mistakes when playing the keys, but the keyboard still plays correct notes and the display will show the correct notes. After one song is finished, repeat the current song to be learned. Press [START/STOP] or press the [ONE KEY] button to disenable the training function.
Training II: Follow
Press [FOLLOW] to enable the follow function. Press “+”/”-” button to select the song to be learned. With Follow training, you can learn by following the correct playing notes. The program will wait for you to play the correct note before it moves to the next one. Notes: In this mode, the Keyboard plays only the correct notes and gives no response to the wrong notes. Press [START/STOP] or press [FOLLOW] to disenable the training function.
Training III: Ensemble
Press [ENSEMBLE] to enable the ensemble function. Press “+”/”-” button to select the song to be learned. The Ensemble training aims at the correct and comprehensive learning of the song duration and notes. The keynote will be shielded for ensemble and you need to play the correct note according to the correct duration of the song. If you fail to play within 3 seconds, the keyboard will automatically play the correct note. After one song is finished, repeat the current song to be learned. Press the [START/STOP] button or press [ENSEMBLE] to disenable the training function.
RECOMMENDED TRAINING APPS / GAMES
MAX highly recommends the below apps to support you on your journey of piano exploration. It has never been this easy to dip your toes in the deep and majestic waters of playing the piano. Train yourself from novice to king of the keys with help from PIANO DUST BUSTER, PIANO MAESTRO and SIMPLY PIANO. Please note: downloading the below apps is free of charge. Expanding the apps with more training, songs and other additives might involve costs.
 |  |  |
| PIANO DUST BUSTER PIANO DUST BUSTER is the ultimate introduction to piano for kids. No previous piano experience needed! | PIANO MAESTRO An in depth educational tool to study piano. From a single note to complete pieces, PIANO MAESTRO makes sheet music come to life! | SIMPLY PIANO Explore the piano step-by-step, from scratch. SIMPLY PIANO will help you learn the basics from sight-reading to playing with both hands. |
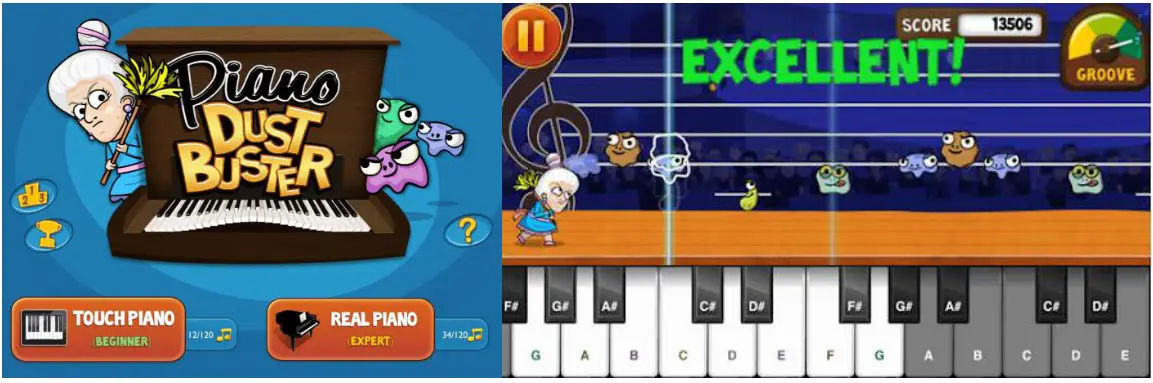
PIANO DUST BUSTER
Help granny dusting off her piano while collecting points and bonuses. Piano Dust Buster is a great tool to get excited about playing your piano and improving your skills. Piano Dust Buster is an ultimate introduction to piano, no previous piano experience needed. You have the option to begin practicing reading notation, compete against other players or challenge yourself to hundreds of songs ranging from Beethoven to Adele. (*IOS compatible only!)
PIANO MAESTRO
#1 ranked Education App. An in depth educational tool for beginning to study piano. PIANO MAESTRO helps practicing and learning sight reading, rhythm, technique, playing with both hands and much more!
In addition you will
Progress up in chapters, unlock new songs and raise the difficulty level along the way. Learn to play songs step by step and have access to practice options. You’re able to personalize your learning experience.
Piano Method Books Included
Learn songs from some of the most well-known and beloved piano method books used today. A digital way to compliment the use of your favorite method book, all books can be found in the Library in the ‘Methods’ section. (*IOS-IPAD compatible only!)

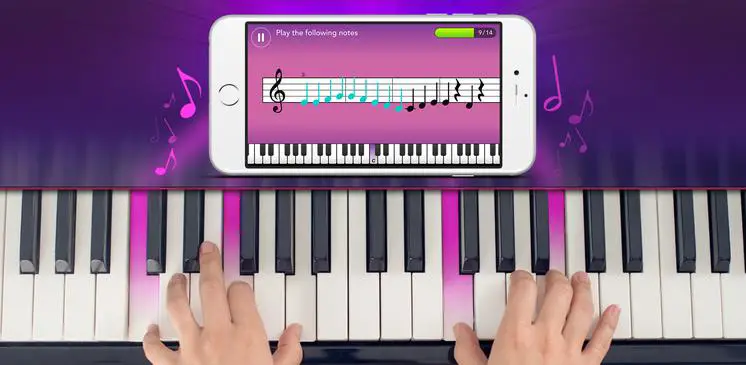
SIMPLY PIANO (IOS and ANDROID COMPATIBLE)
Whether you’re a complete beginner or want to learn piano on your own, SIMPLY PIANO will guide you to become the piano player you always wanted to be. Just place your IOS or Android device on your piano and play. Your device will immediately recognize what you are playing!
- Learn the piano basics from sight-reading to playing with both hands
- Tons of fun songs ranging from classical to top-charting hits
- Listens to how you play, giving you instant feedback to quickly learn and improve your skills
- Courses for different tastes and levels including pop chords, essentials, blues and more
(* Compatible with both IOS and ANDROID devices)
APPENDIX I. TIMBRE TABLE
| 0 | Acoustic Grand Piano | 67 | Baritone Sax | 134 | DaStoNa |
| 1 | Bright Acoustic Piano | 68 | Oboe | 135 | Gaohu |
| 2 | Electric Grand Piano | 69 | English Horn | 136 | Rock Grand Piano |
| 3 | Honky-torit Piano | 70 | Bassoon | 137 | Electronic organ |
| 4 | Rhodes Piano | 71 | Clarinet | 138 | Psychedelc elect/tint |
| 5 | Chorused Piano | 72 | Piccolo | 139 | Water inn |
| 6 | Harpsichord | 73 | Flute | 140 | Bright Guitar |
| 7 | Clavichord | 74 | Recorder | 141 | Orchestra piccolo |
| 8 | Celesta | 75 | Pan Ride | 142 | Heavy metal gutter |
| 9 | Glockengeel | 76 | Bottle Blow | 143 | Crystal guitar |
| 10 | Music box | 77 | Shakuhadti | 144 | Amer electric Piano |
| 11 | Vibraphone | 78 | Whistle | 145 | Bright bass |
| 12 | Marimba | 79 | ()canna | 146 | Rock Electric Bass |
| 13 | Xylophone | 80 | Lead 1 (square) | 147 | Psychedelic Bass |
| 14 | Tubular Bela | 81 | Lead 2 (saWoot) | 148 | Rhythm Electric Bass |
| 15 | Dulcimer | 82 | Lead 3 (alone lead) | 149 | Heavy metal bass |
| 16 | Hammond Organ | 83 | Lead 4 (chat lead) | 150 | Magic etectronc |
| 17 | Peramtave Organ | 84 | Lead 5 (diaconal | 151 | Blight vin |
| 18 | Rock Organ | 85 | Lead 6 (voice) | 152 | Atonic viola |
| 19 | Church Organ | 86 | Lead 7 (Wm) | 153 | Heavy bass orchestra |
| 20 | Reed Organ | 87 | Lead 8 (bass•lead) | 154 | Synth clarinet |
| 21 | Accordian | 88 | Pad 1 (new age) | 155 | Interactive Lead |
| 22 | Harmonica | 89 | Pad 2 (warn’) | 156 | orchestral keyboard |
| 23 | Tango Accordion | 90 | Pad 3 loolvsyrdhl | 157 | Bagpipes |
| 24 | Acoustic Guitar (nylon i | 91 | Pad 4 (dicer) | 158 | Synth Beni) |
| 25 | Acoustic Guitar (steel; | 92 | Pad 5 (bowed) | 159 | Japan Synth |
| 26 | Electric Guitar gazz) | 93 | Pad 6 lmetalt) | 160 | Churdi Piano |
| 27 | Electric Guitar (dean) | 94 | Pad 7 (halo) | 161 | Church electric Piano |
| 28 | Electric Guitar (muted) | 95 | Pad 8 (sweep) | 162 | Synth Piano |
| 29 | Overdriven Guitar | 96 | FX I (rain) | 163 | Baritone Piano |
| 30 | Distortion Guitar | 97 | FX 2 (soundtrack) | 164 | Piano PAD |
| 31 | Guitar Harmonics | 98 | FX 3 (crystal) | 165 | Strong Piano |
| 32 | Acoustic Bass | 99 | FX 4 (atmosphere) FX 5 (brightness) | 166 | Metal Piano |
| 33 | Electric Bass(finger) | 100 | 167 | Light rhythm Piano | |
| 34 | Electric Bass (pick) | 101 | FX 6 (goblins) | 168 | electric Piano Pad |
| 35 | Fretless Bass | 102 | FX 7 (echoes) | 169 | Classical par |
| 36 | Slap Bass 1 | 103 | FX 8 Isa-6) | 170 | Organ Guitar |
| 37 | Slap Bass 2 | 104 | Sdar | 171 | Electric Guitar |
| 38 | Synth Bass 1 | 105 | Banjo | 172 | Synthesis Nylon Guitar |
| 39 | Synth Bass 2 | 106 | Slmmsen | 173 | Synth Electronic Guitar |
| 40 | Violin | 107 | Koto | 174 | Bright Clean Guitar |
| 41 | Viola | 108 | Kaknba | 175 | Orchestra Guitar |
| 42 | Cello | 109 | Bagpipe | 176 | Psychedelic Guitar |
| 43 | Contrabass | 110 | Fiddle | 177 | Bright organ |
| 44 | Tremolo Strings | 111 | Shansi | 178 | Pick organ |
| 45 | Pizzicato Strings | 112 | Tinkle Bell | 179 | Synth accordion |
| 46 | Orchestral Harp | 113 | Am | 180 | Bright Wolin |
| 47 | Timpani | 114 | Steel Dams | 181 | Stringed violin |
| 48 | String Ensemble 1 | 115 | Woodblock | 182 | Trill violin |
| 49 | Serino Ensemble 2 | 116 | Taiko Drum | 183 | Electronic vicar’ |
| 50 | Synth Stomps 1 | 117 | Mekdc Toni | 184 | Large an |
| 51 | Synth Stomps 2 | 118 | Synth Drum | 185 | rhythm Orchestra |
| 52 | Choir Aahs | 119 | Reverse Cymbal | 186 | Pancato Viola) |
| 53 | Vc0ce Oohs | 120 | Guitar Fret Norse | 187 | Pizzicato Ensemble I |
| 54 | Synth Voice | 121 | Breath Noise | 188 | Pizzicato Ensemble 2 |
| 55 | Orchestra Hit | 122 | Seashore | 189 | Percussion band |
| 56 | Impel | 123 | Bird Tweet | 190 | ElantoneSynthContrabass |
| 57 | Trombone | 124 | Telephone Ring | 191 | Bass Flute |
| 58 | Tuba | 125 | Helicopter | 192 | Distortion Contrabass |
| 59 | Muted Trumpet | 126 | Applause | 193 | Contrabass Lead |
| 60 | French Horn | 127 | Gunshot | 194 | Violin Lead |
| 61 | Brass Section | 128 | Suona | 195 | Cab Lead |
| 62 | Synth Brass 1 | 129 | Pin | 196 | Pazicato rhythm |
| 63 | Synth Brass 2 | 130 | Samoan | 197 | high Harp |
| 64 | Soprano Sax | 131 | Bondi | 198 | Harp ensemble |
| 65 | Alto Sax | 132 | Erhu | 199 | Synth Harp |
| 66 | Tenor Sax | 133 | Guzheng | 200 | Baritone Trumpet |
| 201 | Trumpet ensemble | 250 | Synth Shamisen | 299 | Synth Steel Drums |
| 202 | rhythm Trumpet | 251 | Electronic Shamisen | 300 | Rhythm electric Piano |
| 203 | high Trumpet | 252 | Bright Sitar | 301 | Baritone Xylophone |
| 204 | Synth Trumpet | 253 | Whistle Accord | 302 | Clean Piano |
| 205 | Bass Trombone | 254 | rhythm Nation | 303 | Bright Dulcimer |
| 206 | Trombone ensemble | 255 | Bright Koto | 304 | Rhythm Grand Piano |
| 207 | rhythm Trombone | 256 | Koto Lead | 305 | Rhythm Accordian |
| 208 | high Trombone | 257 | Diplophonia Koto | 306 | Marimba Harp |
| 209 | baritone Trombone | 258 | Baritone Koto | 307 | Synth Xylophone |
| 210 | Synth Trombone | 259 | Synth Koto | 308 | Psychedelic Jazz Guitar |
| 211 | Violin French Horn | 260 | Environmental Lead | 309 | Rhythm Electric Guitar |
| 212 | French Horn ensemble | 261 | Metal Lead | 310 | Baritone Piccolo |
| 213 | Electronic French Horn | 262 | Orchestra Lead | 311 | Pan Flute Pad |
| 214 | Synth French Horn | 263 | Glockenspiel Lead | 312 | Soft Pad |
| 215 | PsychedelicSynth Brass | 264 | Bass Lead | 313 | Fierce Organ |
| 216 | Distortion Synth Brass | 265 | Fifths Lead | 314 | Fantasy Clarinet |
| 217 | Vibraphone Synth Brass | 266 | Wind Lead | 315 | Bright Rhythm |
| 218 | Rock Synth Brass | 267 | Atmosphere Lead | 316 | Synth Brass Ensemble |
| 219 | Synth Muted Trumpet | 268 | Sharp Lead | 317 | Electronic Xylophone |
| 220 | Soprano Sax ensemble | 269 | Bright Lead | 318 | Atmosphere Pizzicato |
| 221 | Hit Soprano Sax | 270 | East Nation Pad | 319 | Rhythm Clarinet |
| 222 | Synth Soprano Sax | 271 | Atmosphere Pad | 320 | Bright Dulcimer |
| 223 | National Sax | 272 | Electric bass Pad | 321 | Double British pipe |
| 224 | Metal Sax | 273 | electric Piano Pad | 322 | Bright Bassoon |
| 225 | Baritone Sax ensemble | 274 | Clean Guitar Pad | 323 | Electronic Synth Bassoon |
| 226 | Crystal Sax | 275 | Westem Pad | 324 | Rock Wind |
| 227 | Soft Baritone Sax | 276 | Sci-fi Pad | 325 | Synthetic effect wind1 |
| 228 | Synth Baritone Sax | 277 | Metal Sci-fi Pad | 326 | Synthetic effect wind2 |
| 229 | Heavy metal Sax | 278 | Clarinet Pad | 327 | Synthetic effect wind3 |
| 230 | Church Oboe | 279 | Electronic dance Pad | 328 | Synthetic effect wind4 |
| 231 | Oboe ensemble | 280 | Double Kalimba | 329 | Synthetic Fiddle |
| 232 | Bass Oboe | 281 | Bright Kalimba | 330 | Special Echo FX |
| 233 | Bright Oboe | 282 | Crystal Kalimba | 331 | Electronic Organ Lead |
| 234 | distortio oboe | 283 | Synth Kalimba | 332 | Church Organ Lead |
| 235 | English Horn ensemble | 284 | Electronic Bagpipe | 333 | Science Fiction Classic |
| 236 | Pizzicato English Horn | 285 | Wind Bagpipe | 334 | Electronic Bagpipe |
| 237 | Diplophonia English Horn | 286 | high Bagpipe | 335 | String Ensemble Pad |
| 238 | Bright English Horn | 287 | Bright Bagpipe | 336 | Electronic wind Pad |
| 239 | Synth English Horn | 288 | Orchestra Bagpipe | 337 | Organ Electric Guitar |
| 240 | Psychedelic Synth Lead | 289 | Baritone Bagpipe | 338 | Jazz Electric Piano |
| 241 | Vibraphone Synth Lead | 290 | Environmental Shanai | 339 | Rock Timpani |
| 242 | Marimba Synth Lead | 291 | Baritone Shanai | 340 | Fantasy Atmosphere |
| 243 | Metal FX | 292 | Tenor Shanai | 341 | Heavy metals Pad |
| 244 | Electronic FX | 293 | high Shanai | 342 | Bright clavichord |
| 245 | Electronic String Ensemble | 294 | Synth Shanai | 343 | Noise Lead |
| 246 | Wind FX | 295 | Bright Steel Drums | 344 | Classical Electronic |
| 247 | Clarinet FX | 296 | Steel Drums Lead | ||
| 248 | Organ FX | 297 | Lyric Steel Drums | ||
| 249 | Crystal FX | 298 | Orchestra Steel Drums |
APPENDIX 2. RHYTHM TABLE
| 0 | 16BeatPop | 44 | Twist | 88 | Waltz2 |
| 1 | 8BeatPop | 45 | HardRock3 | 89 | Tango1 |
| 2 | 8BeatShuffle | 46 | 16BeatRock | 90 | Tan o2 |
| 3 | FolkRock | 47 | SoulBeat | 91 | Slow soul2 |
| 4 | Bachatal | 48 | Reggae | 92 | Jazz Waltz3 |
| 5 | PopShuffle | 49 | Big Band1 | 93 | Slow soul3 |
| 6 | PopRock | 50 | Big Band2 | 94 | Cobmo2 |
| 7 | PopClassics | 51 | Swings | 95 | Rhumba 2 |
| 8 | 16BeatBallad | 52 | Waltz1 | 96 | Samba |
| 9 | PopBallad | 53 | Funky soul5 | 97 | 16beat1 |
| 10 | BigBallad | 54 | Jazz Waltz1 | 98 | Pop Dance3 |
| 11 | PianoBallad | 55 | Jazz Waltz2 | 99 | Chinas |
| 12 | EpicBallad | 56 | Cobmol | 100 | 16Beat2 |
| 13 | BalladClassics | 57 | Euro Soul | 101 | Funky soul6 |
| 14 | EuroBeat | 58 | Mambo | 102 | China2 |
| 15 | PopDancel | 59 | Merenguel | 103 | China3 |
| 16 | Step | 60 | Beguine | 104 | Mambo2 |
| 17 | Shuffle | 61 | West Coast | 105 | Pop Samba2 |
| 18 | SwingBeat | 62 | Habanera | 106 | Pop Samba3 |
| 19 | Bachata2 | 63 | PopBossanovall | 107 | Rock |
| 20 | Countryl | 64 | Bossanova | 108 | PopPolka |
| 21 | Country2 | 65 | Jazz Samba | 109 | 16 Beat3 |
| 22 | CountryRock | 66 | Cha-Cha | 110 | Mideast |
| 23 | FunkySoul 1 | 67 | Newsoul | 111 | BeguineDance |
| 24 | FunkySoul2 | 68 | Baiao | 112 | GothDance |
| 25 | PolkaPop | 69 | Calypso | 113 | Swing2 |
| 26 | PopDance2 | 70 | Reggael6bate | 114 | EasyBeat |
| 27 | Blues | 71 | Country Waltzl | 115 | Break_Beat |
| 28 | RockFolk | 72 | Bluegrass | 116 | 8 Ballad |
| 29 | Folk | 73 | Country3 | 117 | House1 |
| 30 | DanceRock | 74 | CountryRock | 118 | HappyPop |
| 31 | SlowSoul 1 | 75 | Country folk | 119 | GlamRock |
| 32 | Soul | 76 | Country Waltz2 | 120 | House2 |
| 33 | Funky_soul3 | 77 | C & W | 121 | thailand |
| 34 | Funky Soul4 | 78 | Pop Samba 1 | 122 | Slow soul4 |
| 35 | HardRock 1 | 79 | Polka2 | 123 | Rock+Roll |
| 36 | Hard Beat | 80 | Traditional Waltz | 124 | TradBeat |
| 37 | RockyPop | 81 | Vallenato | 125 | Lambada |
| 38 | Slow Rock1 | 82 | Bolero | 126 | SoftBeat |
| 39 | Slow Rock2 | 83 | Rhumba 1 | 127 | Plena |
| 40 | Lyric Rock | 84 | Jorpo | ||
| 41 | EasyRock | 85 | Merengue2 | ||
| 42 | HardRocic2 | 86 | March | ||
| 43 | Bachata3 | 87 | Salsa |
TECHNICAL SPECIFICATION
Power Supply: 100-240VAC 50/60Hz (12V Adapter)
Weight: 4,40 kg
Dimensions (L x W x H): 965 x 366 x 142mm
The specifications are typical. The actual values can slightly change from one unit to the other. Specifications can be changed without prior notice.
The products referred to in this manual conform to the European Community Directives to which they are subject:
- Low Voltage (LVD) 2014/35/EU
- Electromagnetic Compatibility (EMC) 2014/30/EU
- Restriction of Hazardous Substances (RoHS) 2011/65/EU
![]()
Specifications and design are subject to change without prior notice.
www.tronios.com
Copyright © 2022 by Tronios The Netherlands


![Midiplus X Pro Mini Series Midi Keyboard User Manual [x4 Pro Mini, X6 Pro Mini]](https://static-data1.manualsee.com/1/img/304/59766/2021/02/Midiplus-X-pro-mini-Series-MIDI-Keyboard-User-Manual-X4-pro-mini-X6-pro-mini.jpg "Midiplus X Pro Mini Series Midi Keyboard User Manual [x4 Pro Mini, X6 Pro Mini]")


