![]()
FENNEL
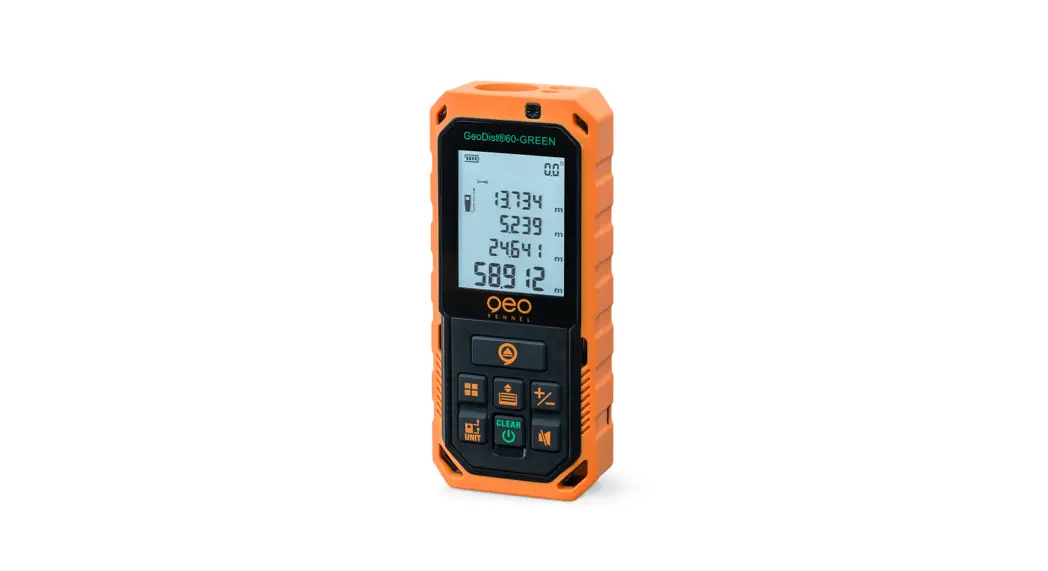
GeoDist ® 60-GREEN
USER MANUAL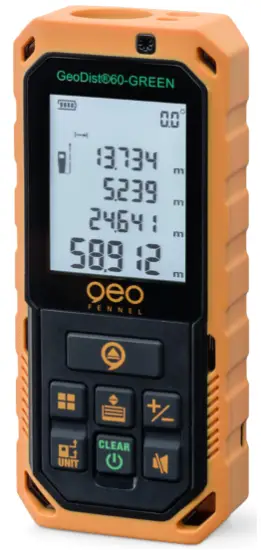
Dear Customer,
Thank you for your confidence in us, having purchased a geo-Fennel instrument.
For the optimum performance of the instrument, please read this manual carefully and keep it in a convenient place for future reference. This manual contains important safety information that should be read and understood before use.
Technical specification and design are subject to chance without notification.
geo-FENNEL
Precision by tradition.
SUPPLIED WITH
- Laser distance meter GeoDist ® 60-GREEN
- NiMH batteries AAA
- USB charging cable
- Holster
- Hand strip
- User manual
Technical data
| Measuring distance | 0,2 – 60 m* |
| Accuracy distance measurement | ±2 mm** |
| Accuracy tilt measurement | ± 0,3° |
| Laser class | 2 / green |
| Power supply | NiMH |
| Temperature range | -10°C – +40°C |
| Measuring units | m / ft / in / ft+in |
| Dust / water protection | IP 65 |
| Dimensions | 115 x 50 x 26 mm |
| Weight (with batteries) | 142 g |
*May be shorter under unfavourable conditions
**Typical accuracy, may increase under unfavourable conditions
POWER SUPPLY
INSERT 3 X AAA NIMH BATTERIES
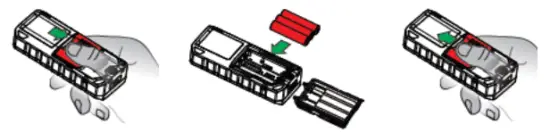
Ensure correct polarity when inserting the batteries.
CHARGE THE BATTERIES
Open the cover of the USB plug (bottom of the instrument) and charge the battery via the USB connection. For this use a standard USB charger, i. e. from a smartphone. When the charging process is completed close the USB plug.
Alternatively, the instrument can be operated with standard AAA Alkaline batteries.
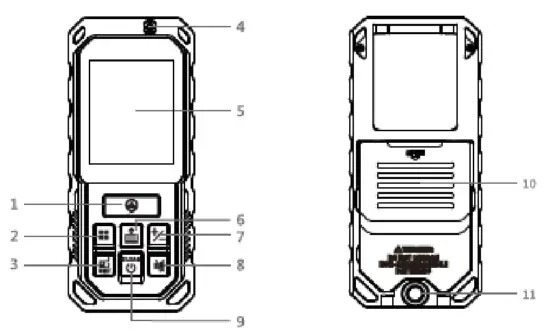
OPERATIONAL ELEMENTS

 Measuring key (press briefly: single measurement/press long: continuous measurement)
 Measuring mode: area, volume, Pythagoras, indirect measurement 1 +
 Press briefly: measuring reference: front, rear, tripod Press long: measuring units: m / ft / in / ft+in
- Laser warning symbol
- Display
 Memory
 In the modes distance, area, volume: Press briefly: addition Press long: subtraction
 Sound on/off
 Press briefly: clear/back Press long: ON / OFF
- Battery cover
- Tripod thread
OPERATION
DISPLAY INDICATION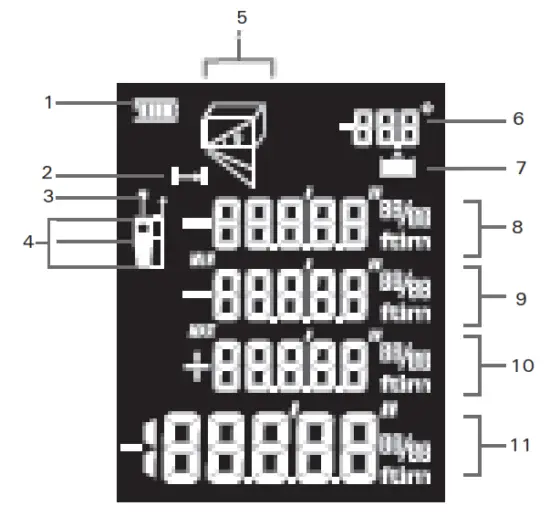
- Battery status indication
- Single/continuous measurement
- Laser on
- Measuring reference: front / tripod / rear
- Measuring mode indication
- Angle indication
- Memory
- Measuring value 1
- Measuring value 2 / minimum
- Measuring value 3 / maximum
- Sum / last value / result
GENERAL NOTES
- After 3 minutes without operation the instruments powers off automatically.
- The instrument automatically saves the last 20 measured values.
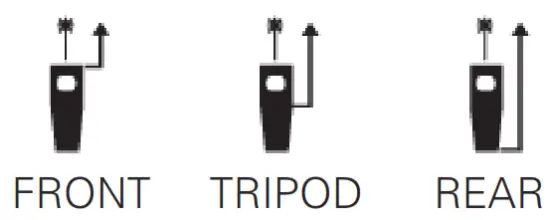
MEASURING REFERENCE ![]()
ADDITION / SUBTRACTION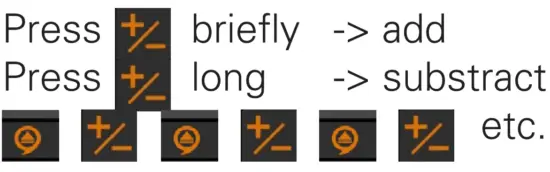
SINGLE MEASUREMENT
Measuring mode: single measurement. Indication: ![]()
For taking measurements press ![]()
CONTINUOUS MEASUREMENT
Keep![]() pressed. Indication:
pressed. Indication: ![]()
Sweep slowly the laser back and forth over the selected target point.
Press ![]() to stop the continuous measurement.
to stop the continuous measurement.
Display indication: maximum, minimum and the last measured value.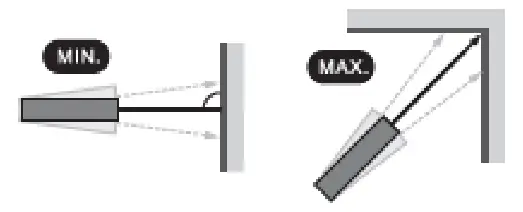
AREA CALCULATION
Press![]() until
until ![]() appears
appears
Press![]() for the 1st distance
for the 1st distance
Press ![]() for the 2nd distance
for the 2nd distance
VOLUME CALCULATION
Press ![]() until
until ![]() appears
appears
Press![]() for the 1st distance
for the 1st distance
Press ![]() for the 2nd distance
for the 2nd distance
Press ![]() for the 3rd distance
for the 3rd distance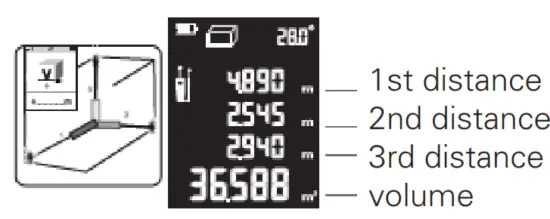
PYTHAGORAS MEASUREMENTS
IMPORTANT – it is essential to observe the following
- When measuring the horizontal distance (2nd dimension), the measurement must be taken at a 90° angle to the measuring surface. To do this, use the inclination indicator (0°).
- All measurements must be vertically in line (without lateral deviation).
- Use a tripod to increase the measuring accuracy.
PYTHAGORAS (2-POINT)
Press![]() until
until![]() appears
appears
Press![]() for the inclined distance
for the inclined distance
Press ![]() for the horizontal distance
for the horizontal distance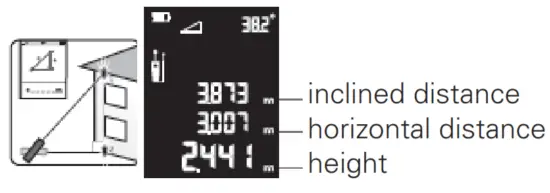
PYTHAGORAS (3-POINT)
Press ![]() until appears
until appears
Press![]() for the inclined distance top
for the inclined distance top
Press ![]() for the horizontal distance
for the horizontal distance
Press![]() for the inclined distance bottom
for the inclined distance bottom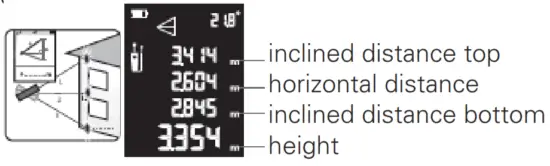
PYTHAGORAS (3-POINT / PARTIAL HEIGHT)
Press ![]() until
until ![]() appears
appears
Press![]() for the inclined distance top
for the inclined distance top
Press ![]() for the inclined distance bottom
for the inclined distance bottom
Press![]() for the horizontal distance
for the horizontal distance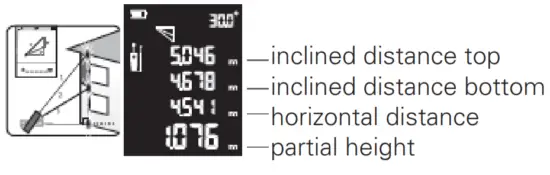
INDIRECT MEASUREMENTS VIA INCLINATION WITH HIGH ACCURACY
Where direct measurements to the target are not possible, e.g. on glass facades without measurement reflection or when the measurement object is obscured:
Measure partial distances, the device will calculate the missing distances.
Here a general note:
- All measurements must be vertically in line (without lateral deviation).
- Use a tripod to increase the accuracy of the measurement.
INDIRECT MEASUREMENT 1
Press![]() until
until![]() appears
appears
Press![]() for the inclined distance – measurement to the top point
for the inclined distance – measurement to the top point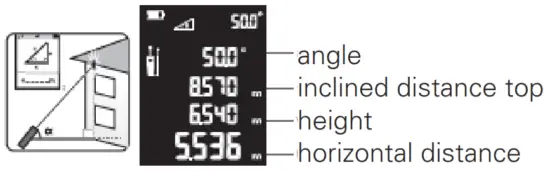
INDIRECT MEASUREMENT 2
Press![]() until
until  appears
Press ![]() for the inclined distance top (top point)
for the inclined distance top (top point)
Press ![]() for the inclined distance botton (bottom point)
for the inclined distance botton (bottom point)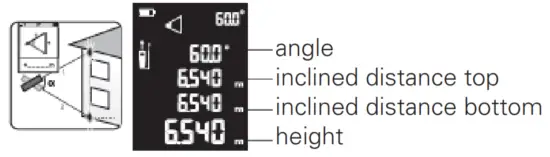
MEMORY
The instrument automatically saves the last 20 measured values.
Memory recall ![]()
TROUBLESHOOTING
| Code | Cause | Corrective action |
| 204 | Calculation error | Repeat the measurement |
| 208 | Excessive current | Contact your dealer |
| 220 | Battery weak | Charge the battery |
| 255 | Signal too weak or measuring time too long | Change the target surface |
| 256 | Signal too strong | Change the target surface |
| 261 | Out of measuring range | Select the measuring distance within the range |
| 500 | Hardware error | Power on/off the unit severaltimes. If the error code still appears contact your dealer. |
SAFETY NOTES
INTENDED USE OF INSTRUMENT
The instrument emits a visible laser beam in order to carry out the following measuring tasks (depending on the instrument): distance measurements.
SPECIFIC REASONS FOR ERRONEOUS MEASURING RESULTS
Measurements through glass or plastic windows; dirty laser emitting windows; after the instrument has been dropped or hit. Please check the accuracy.
Large fluctuation of temperature: If the instrument will be used in cold areas after it has been stored in warm areas (or the other way round) please wait some minutes before carrying out measurements.
CARE AND CLEANING
Handle measuring instruments with care. Clean with soft cloth only after any use. If necessary damp the cloth with some water. If the instrument is wet clean and dry it carefully. Pack it up only if it is perfectly dry. Transport in original container / case only.
ELECTROMAGNETIC ACCEPTABILITY (EMC)
It cannot be completely excluded that this instrument will disturb other instruments (e.g. navigation systems); will be disturbed by other instruments (e.g. intensive electromagnetic radiation nearby industrial facilities or radio transmitters).
CE-Conformity
The instrument has the CE mark according to EN 61326-1:2013, 61326-22:2013, 300 328 v2.1.1:2016, 62479:2010,61010-1:2010.
EXCEPTIONS FROM RESPONSIBILITY
- The user of this product is expected to follow the instructions given in the user manual. Although all instruments left our warehouse in perfect condition and adjustment the user is expected to carry out periodic checks of the product’s accuracy and general performance.
- The manufacturer, or its representatives, assumes no responsibility of results of a faulty or intentional usage or misuse including any direct, indirect, consequential damage, and loss of profits.
- The manufacturer, or its representatives, assumes no responsibility for consequential damage, and loss of profits by any disaster (earthquake, storm, flood etc.), fire, accident, or an act of a third party and/or a usage in other than usual conditions.
- The manufacturer, or its representatives, assumes no responsibility for any damage, and loss of profits due to a change of data, loss of data and interruption of business etc., caused by using the product or an unusable product.
- The manufacturer, or its representatives, assumes no responsibility for any damage, and loss of profits caused by usage other than explained in the user manual.
- The manufacturer, or its representatives, assumes no responsibility for damage caused by wrong movement or action due to connecting with other products.
WARRANTY
This product is warranted by the manufacturer to the original purchaser to be free from defects in material and workmanship under normal use for a period of two (2) years from the date of purchase. During the warranty period, and upon proof of purchase, the product will be repaired or replaced (with the same or similar model at manufacturers option), without charge for either parts or labour. In case of a defect please contact the dealer where you originally purchased this product. The warranty will not apply to
this product if it has been misused, abused or altered. Without limiting the foregoing, leakage of the battery, bending or dropping the unit are presumed to be defects resulting from misuse or abuse.
SAFETY INSTRUCTIONS
- Follow up the instructions given in the user manual.
- Do not stare into the beam. The laser beam can lead to eye injury. A direct look into the beam (even from greater distance) can cause damage to your eyes.
- Do not aim the laser beam at persons or animals.
- The laser plane should be set up above the eye level of persons.
- Use the instrument for measuring jobs only.
- Do not open the instrument housing. Repairs should be carried out by authorized workshops only. Please contact your local dealer.
- Do not remove warning labels or safety nstructions.·
- Keep the instrument away from children.
- Do not use the instrument in an explosive environment.
- The user manual must always be kept with the instrument.
LASER CLASSIFICATION
The instrument is a laser class 2 laser product according to DIN IEC 60825-1:2014. It is allowed to use the unit without further safety precautions. The eye protection is normally secured by aversion responses and the blink reflex. The laser instrument is marked with class 2 warning labels.
Please note:
If you return instruments for repair / for adjustment to us please disconnect batteries or rechargeable batteries from the instrument – this is for safety reasons!
Thank you.
All instruments subject to technical changes. 01/2021
D-34225 Baunatal
Tel. +49 561 / 49 21 45
Fax +49 561 / 49 72 34
[email protected]
www.geo-fennel.de
Precision by tradition.


