![]()
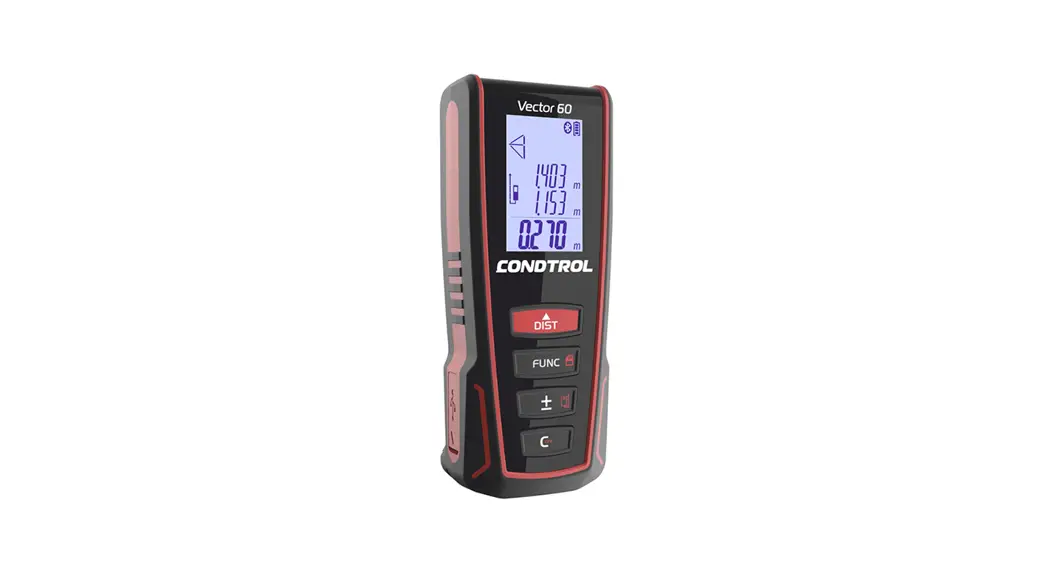
Laser distance meter
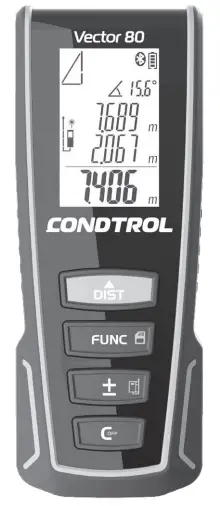
Vector 60/80
User manual 1
Congratulations on your purchase of laser distance meter Vector 60/80 CONDTROL.
Safety instructions can be found in the end of this user manual and should be carefully read before you use the product for the first time.
SAFETY REGULATIONS
The user manual should be read carefully before you use the product for the first time. Unintended use of the product can be dangerous for human health and cause serious injury. Keep this user manual. If the product is given to somebody for temporary use, be sure to enclose the user manual to it.
– Do not misuse the product
– Do not remove warning signs and protect them from abrasion, because they contain information about the safe operation of the product.
The device belongs to laser product class 2 in accordance with EN60825-1.
![]() Laser radiation!
Laser radiation!
Do not stare into beam
Class 2 laser
<1 mW 635nm
EN60825-1: 2007-03
– Do not look into the laser beam or its reflection, with an unprotected eye or through an optical instrument. Do not point the laser beam at people or animals without the need.
You can dazzle them.
– To protect your eyes close them or look aside.
– It is prohibited to disassemble or repair the product yourself.
Entrust product repair to qualified personnel and use original spare parts only.
– Do not use the product in an explosive environment, close to flammable materials.
– Avoid heating the batteries to avoid the risk of explosion and electrolyte leakage. In case of liquid contact with skin, wash it immediately with soap and water. In case of contact with the eyes, flush with clean water for 10 minutes and consult the doctor.
INTENDED USE
Laser distance meters Vector 60 and Vector 80 are intended to measure distance, calculate the area and volume of measured objects, perform calculations by tilt sensor* and Pythagoras’ Theorem, point to point measurements*, store results of measurement/calculation in memory, and also transmit via Bluetooth. The product is suitable for use at both indoor and outdoor building areas.
*-Vector 80 only.
DELIVERY PACKAGE
The delivery package includes:
- Laser distance meter – 1pc.
- Carry pouch with a strap – 1 pc.
- User manual – 1 pc.
- USB charger – 1 pc.
TECHNICAL SPECIFICATIONS
| Vector 60 | Vector 80 | |
| Measuring ranges | 0,05-60 m | 0,05-80 m |
| Measuring accuracy “ | ± 1 5 mm | |
| Smallest unit displayed | 1 mm | |
| Display backlight | + | |
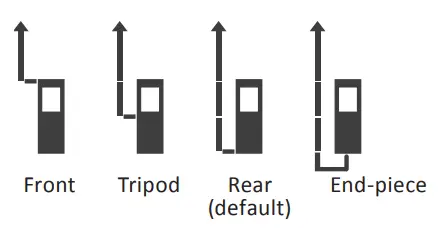
| Reference point | Front, rear, tripod, end-piece | |
| Continuous measurement (tracking) | + | |
| Max./min. value | + | |
| Addition/subtraction | + | |
| Area/ volume | + | |
| Calculations by Pythagoras’ Theorem | + | |
| Bluetooth | + | |
| Wall surface | – | + |
| Calculation of horizontal distance by tilt sensor | _ | + |
| Point-to-point measurement | – | + |
| Memory | up to 30 values | |
| Laser | Class II, 635 nm, <1 mW | |
| Operating temperature | —10 °C … +50 °C | |
| Storage temperature | —20 °C … +60 °C | |
| Dust and water protection | IP54 | |
| Power supply | 3,7 V 850 mAh Li-ion rechargeable battery | |
| Dimensions | 1191’46.28 mm | |
| Weight | 0,1 kg | |
* Use a reflective plate to increase the measurement range during daylight or if the target has poor reflection properties.
** Accuracy can decrease in unfavorable conditions, such as intense sunshine or when measurements are made against glossy or transparent surfaces, moving objects, or objects with a rough surfaces.
In unfavorable conditions or when the measured distance is over 100 m the maximum permissible accuracy is calculated in the following way:
± (Y + 0,25хDх10-3) mm, where
D (mm) – measured distance
Y (mm) – permissible accuracy according to technical data.
PRODUCT DESCRIPTION
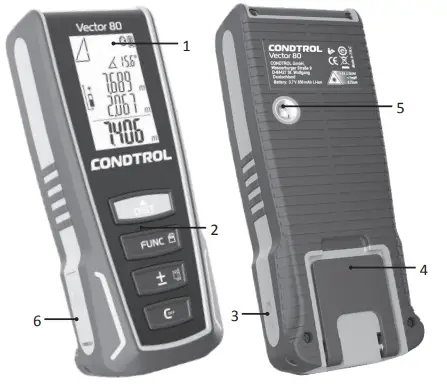
- Display
- Keyboard
- A hole for the strap
- End-piece
- Tripod thread 1/4’’
- Mini-USB connector for charging
Functions of buttons
| Button | Short press | Long press |
| Switch on the device Switch on laser beam Single distance measurement | Continuous measurement (tracking) | |
| Area Wall surface` Volume Tilt sensor` Pythagoras 1 Pythagoras 2 Pythagoras 3 Point to point` | Memory | |
| Addition/ subtraction | Select reference point | |
| Stop measurement/ clear/exit the mode | Switch off the device | |
 simultaneously simultaneously | Select measuring unit |
*-Vector 80 only
Display
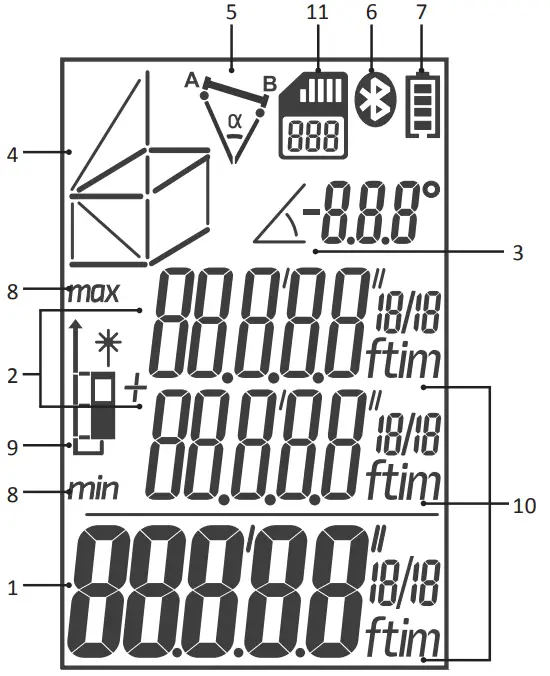
- Main line for displaying measuring results
- Additional lines for displaying measuring results
- Indication of tilt angle
- Indication of the mode
- Indication of point-to-point function
- Indication of Bluetooth
- Indication of battery charge level
- Indication of max/min values
- Indication of reference point
- Indication of measuring unit
- Indication of memory
OPERATION
Battery charging
The charge level is shown on display. Charge the battery when the symbol ![]() appears on the display. Use a USB charger delivered in the set only.
appears on the display. Use a USB charger delivered in the set only.
It is not recommended to use the product while charging.
It takes approximately 3 hours to fully charge the batteries.
Switch on/off the device
To switch on the device short press ![]() .
.
To switch off the device press and hold ![]() for 1 second.
for 1 second.
Measuring unit
Short press ![]() and
and FUNC simultaneously to enter service settings. Short press button ![]() to select the required measuring unit – m/ft/in (meters/feet/inches). Short press
to select the required measuring unit – m/ft/in (meters/feet/inches). Short press ![]() to confirm and return to single distance measurement mode.
to confirm and return to single distance measurement mode.
Reference point
Press and hold the button![]() for 1 second to select the reference point. The appropriate indicator will appear on the display.
for 1 second to select the reference point. The appropriate indicator will appear on the display.
Measurements
Single distance measurement
| Short press | The device will switch on. |
| Short press | Laser beam will switch on. Point the laser beam at the object of measurement. |
| Short press | Make a single distance measurement. |
 | Measurement result |
| Short press | Delete the last measurement result. |
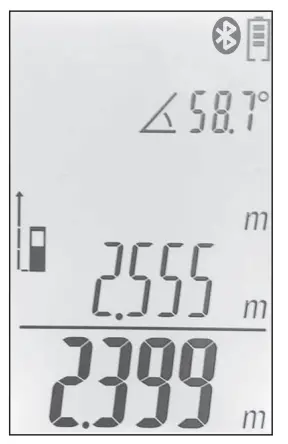
Continuous distance measurement (Tracking)
| Press and hold for 2 seconds | The device will start making measurements one after another, showing current measurement result in the main line, maximal value in the 1st line, minimal value in the 2nd line. |
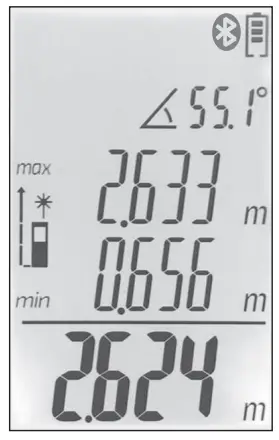 | – Angle value – Maximal value – Minimal value – Current value |
| Press | Stop continuous measurement. The last measured values are shown on the display. |
Addition/subtraction
| Short press | Turn on laser beam. Aim the product at measured object. |
| Short press | Take first measurement. Measuring result appears in the main line. |
| Short press | The symbol of addition/subtraction will appear on the display. |
| Short press | Turn on the laser beam. 1st measuring result moves to line 2 on the display. |
| Short press | Take 2nd measurement. |
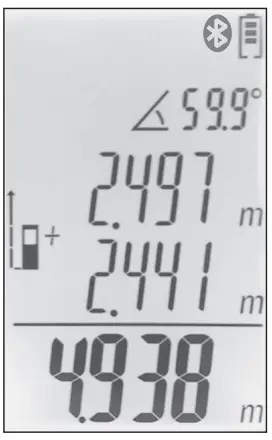 | – 1st measurement – 2nd measurement – result of addition /subtraction |
| To do addition/subtraction of more than 2 measurements short press | |
| Short press | Exit the mode. |
CALCULATIONS
Area
| Short press 1 time. | Symbol |
| Short press | Make the 1st measurement (length). |
| Short press | Make the 2nd measurement (width). Area (length and width multiplication) will be calculated and appear in the main line on the display. |
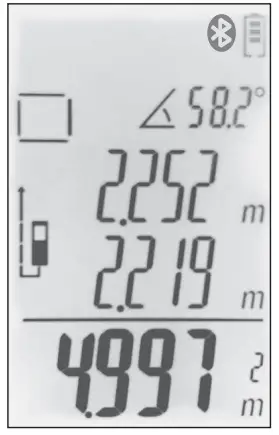 | – Length – Width – Area |
| Short press | Exit the mode. |
Wall surface (Vector 80 only)
| Short press 2 times. | A symbol |
| Short press | Make the 1st measurement (height). |
| Short press | Make the 2nd measurement (length 1). |
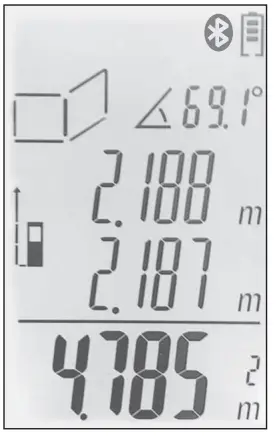 | – Height – Length 1 – Area |
| Short press | Make the 3rd measurement (length 2) |
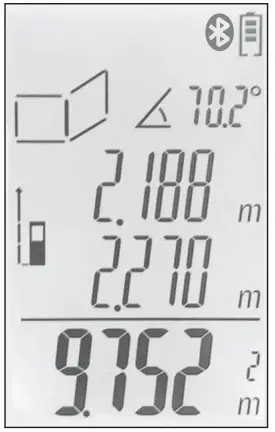 | – Height – Length 2 – Wall area |
| 3rd, 4th, 5th, etc. measurements can be done an unlimited number of times. Each new wall surface is added to the previously calculated wall area result. | |
| Short press | Exit wall area calculation mode. |
Volume
| Short press 2 times. (Vector 60) Short press 3 times. (Vector 80) | A symbol |
| Short press | Make the first measurement (length). |
| Short press | Make the 2nd measurement (width). |
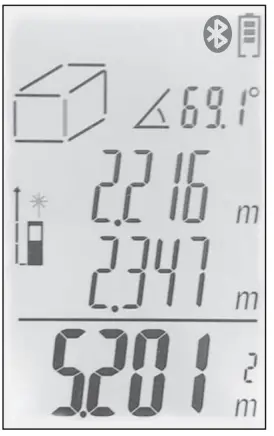 | – Length – Width – Area |
| Short press | Make the 3rd measurement (height). |
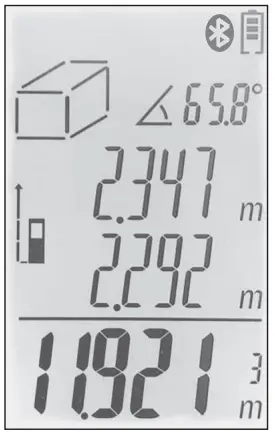 | – Width – Height – Volume |
| Short press | Exit the mode. |
Calculation of horizontal distance with the help of a tilt sensor (Vector 80 only)
| Short press 4 times. | Symbol |
| Short press | Take 1st measurement (hypotenuse). |
 | – tilt angle value (measured) – hypotenuse (measured) – vertical distance (calculated) – horizontal distance (calculated) |
| Short press | Exit the mode. |
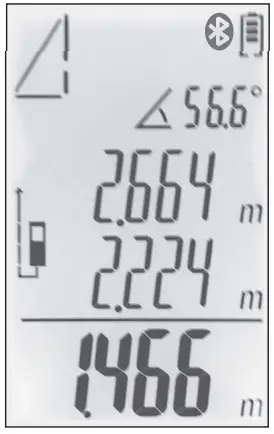
Calculation of distance by 2 additional measurements (Pythagoras 1)
| Short press 3 times. (Vector 60) | A symbol will appear on display. The laser beam is on. |
| Short press | Make the 1st measurement (hypotenuse). |
| Short press | Make the 2nd measurement (cathetus 1). |
 | – Hypotenuse – Cathetus 1 – Cathetus 2 |
| Short press | Exit the mode. |
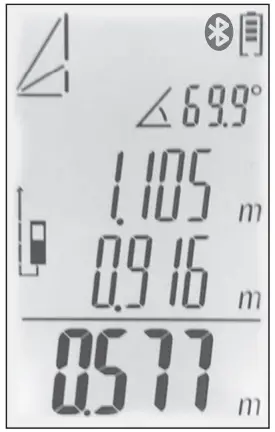
Calculation of distance by 3 additional measurements – the sum of catheters (Pythagoras 2)
| Short press 4 times. (Vector 60) | A symbol |
| Short press | Make the 1st measurement (hypotenuse 1). |
| Short press | Make the 2nd measurement (cathetus). |
| Short press | Make the 3rd measurement (hypotenuse 2). |
 | – cathetus (measured) – hypotenuse 2 (measured) – cathetus (calculated) |
| Short press | Exit the mode. |
Calculation of distance by 3 additional measurements -subtraction of 2 catheters (Pythagoras 3)
| Short press 5 times. (Vector 60) | A symbol |
| Short press | Make the 1st measurement (hypotenuse 1). |
| Short press | Make the 2nd measurement (hypotenuse 2). |
| Short press | Make the 3rd measurement (cathetus). |
 | – hypotenuse 2 (measured) – cathetus (measured) – cathetus (calculated) |
| Short press | Exit the mode. |
Point-to-point measurement (Vector 80 only)
| Short press 8 times. | A symbol |
| Short press | Make the 1st measurement (distance to point A). |
| Short press | Make the 2ndmeasurement (distance to point B). |
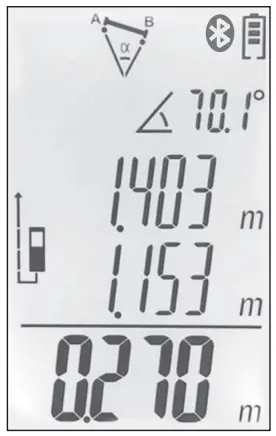 | – distance to point A (measured) – distance to point B (measured) – the distance between points A and B (calculated) |
| Short press | Exit the mode. |
Memory
| Long press for 1 sec. | Enter memory. A number of saved measurement/calculation results is reflected |
| Short press | View saved measurement/calculation results. |
| Short press | Exit the mode. |
Bluetooth
The Bluetooth function is always on by default. The symbol ![]() is is permanently shown on the display.
is is permanently shown on the display.
Activate Bluetooth in the smartphone, tablet PC or laptop. For further operation use the application Smart Measure CONDTROL.
MESSAGE CODES
While operation, the following codes/symbols may appear on the display:
| Message | Problem | Solution |
| 301 | Distance is out of range. | Keep in permissible measuring range. |
| 302 | The reflected signal is too weak. | Use a reflective plate. |
| 303 | Measuring results cannot be displayed (negative or exceeds 99999). | Repeat measurements until you get positive/ smaller measurement results. |
| 304 | Pythagorean theorem calculation error. | Make measurements in correct succession. |
| 305 | Low battery. | Charge the battery. |
| 306 | The temperature is too low. | Warm up the device to the operating temperature. |
| 307 | The temperature is too high. | Cool down the device to the operating temperature. |
| 308 | The ambient light is too strong. | Make measurements in the less illuminated zone. |
CARE AND MAINTENANCE
Attention! The instrument is a precise device and requires careful handling. The following recommendations will extend the life of the product:
– Do not point the product at the sun.
– Protect the product from bumps, falls, and excessive vibration; do not let liquids, construction dust, and foreign objects get inside the product.
– Do not expose the product to extreme temperatures.
– If liquids get inside the product first remove the batteries, then contact the service center.
– Do not store or use the product under high humidity conditions for a long time.
– Clean the product with a soft wet cloth.
– Keep device optics clean and protect it from mechanical damage.
– Сarry out control measurements occasionally, especially if the product is subject to excessive mechanical or another impact, before and after taking important measurements.
UTILIZATION
Expired tools, accessories, and packages should be passed for waste recycling. Please send the product to the following address for proper recycling:![]() CONDTROL GmbH
CONDTROL GmbH
Wasserburger Strasse 9
84427 Sankt Wolfgang
Germany
Do not throw the product in municipal waste!
According to European Directive, 2002/96/ЕC expired measuring tools and their components must be collected separately and submitted to environmentally friendly recycling of wastes.
WARRANTY
All CONDTROL GmbH products go through post-production control and are governed by the following warranty terms. The buyer’s right to claim defects and general provisions of the current legislation do not expire.
- CONDTROL GmbH agrees to eliminate all defects in the product, discovered during the warranty period, that represent the defect in material or workmanship in full volume and at its own expense.
- The warranty period is 36 months and starts from the date of purchase by the end customer (see the original supporting document).
- The warranty doesn’t cover defects resulting from wear and tear or improper use, malfunction of the product caused by failure to observe the instructions of this user manual, untimely maintenance and service and insufficient care, or the use of non-original accessories and spare parts. Modifications in the design of the product relieve the seller from responsibility for warranty works. The warranty does not cover cosmetic damage, that doesn’t hinder the normal operation of the product.
- CONDTROL GmbH reserves the right to decide on the replacement or repair of the device.
- Other claims not mentioned above, are not covered by the warranty.
- After holding warranty works by CONDTROL GmbH warranty period is not renewed or extended.
- CONDTROL GmbH is not liable for loss of profit or inconvenience associated with a defect of the device, or the rental cost of alternative equipment for the period of repair.
This warranty applies to German law except for the provision of the United Nations Convention on contracts for the international sale of goods (CISG).
In the warranty case please return the product to the retail seller or send it with the defect description to the following address:
CONDTROL GmbH
Wasserburger Strasse 9
84427 Sankt Wolfgang
Germany


