
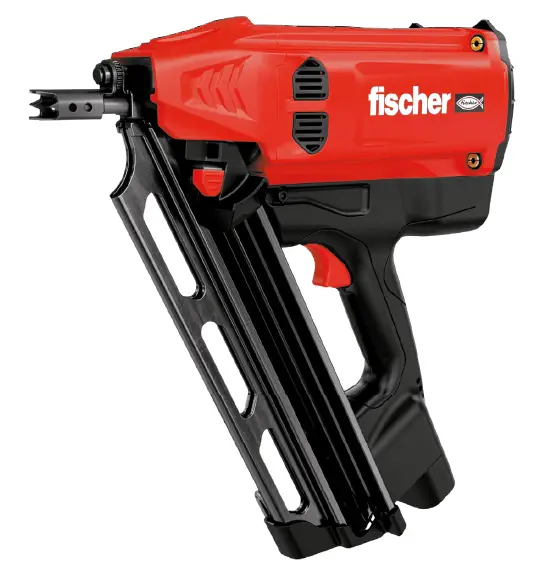
fischer FGW 90F Cordless 1st Fix Framing Nail Gun
Product Information
- Product Name: FGW 90F
- Available Variants: – FGW 90F (EU) – FGW 90F (UK) – FGW 90F (US) – FGW 90F (AUS) Art.-No.: – 560040 (EU variant) – 560041 (UK variant) – 560042 (US variant) – 560043 (AUS variant)
Product Description
The FGW 90F is a tool designed for various applications. It is important to read and understand the user manual before operating the tool. Improper and unsafe use of this tool can result in death or serious injury.
Safety Instructions
It is important that the intended operator reads and understands the user manual before using the tool.
Keep the user manual accessible for others before they use the tool. – Store the user manual in a safe place for future reference.
Product Usage Instructions
- Before using the FGW 90F, read and understand the user manual completely.
- Ensure that the intended operator is familiar with the safety instructions mentioned in the user manual.
- Choose the appropriate variant of the tool based on your region.
- Check the Art.-No. mentioned for the specific variant you have.
- Follow the instructions provided in the user manual for proper handling and operation of the tool.
- Make sure to use compatible nails and gas cartridges as mentioned in the user manual.
- Refer to the technical specifications section in the user manual for detailed information about the tool.
- In case of any issues or questions, refer to the troubleshooting section in the user manual.
- Follow proper environmental protection guidelines mentioned in the user manual.
- Store the tool and user manual in a safe place when not in use.
Note: The above instructions are a general overview. Please refer to the complete user manual for detailed instructions and safety guidelines specific to your variant of the FGW 90F tool.
Improper and unsafe use of this tool will result in death or serious injury. It is very important that the intended operator of this tool reads and understands this manual before operating this tool. Keep this manual available for others before they use the tool. Please keep this manual in safe place for future reference.
Set FGW 90F (EU) Art.-No. 560040
Set FGW 90F (UK) Art.-No. 560041
Set FGW 90F (US) Art.-No. 560042
Set FGW 90F (AUS) Art.-No. 560043
And possibly further variants.

Declaration of conformity
We declare under our sole responsibility: This gas actuated fastening tool, FGW 90F, complies with all relevant requirements of the directives *1) and standards *2). Technical data at *3) – see page 43.
01.07.2021
Dr. Oliver Geibig
Head of Business Units & Engineering,
Member of the Executive Board
Specified use
The gas actuated fastening tool is designed to drive suitable nails into solid wood, laminated timber, plywood as well as chipboard, fiberboard and veneer materials and other materials suitable for the direct fastening technique. The gas tool, fuel cell, battery and nails form a technical unit.
Trouble free fastening can only be ensured if only the recommended battery, fuel cell and nails manufactured by fischer are used. Only use the tool as a hand-held device.
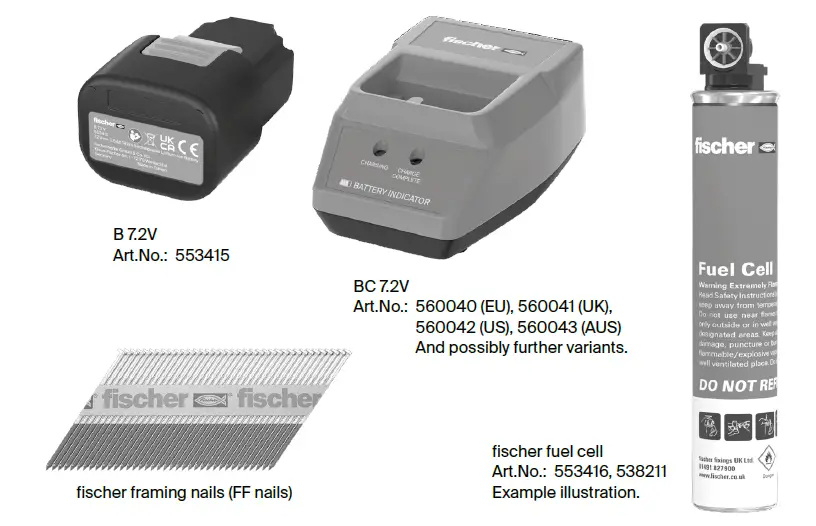
- only use the fischer battery B 7.2V with this product (*A) – see page 34
- only use the fischer battery charger BC 7.2V to charge the battery (*B) – see page 34
- only use the fischer fuel cell with this product (*C) – see page 34
- only use nails with a shank diameter of 2.8 – 3.3 mm and a length of 50 – 90 mm, magazine in a 34° angle with this product (*D/*E) – see page 34
The user bears sole responsibility for any damage caused by improper use. Generally accepted accident prevention regulations and the enclosed safety information must be observed.
Safety instructions
General safety instructions
- Only persons who have read and understood the tool operating/safety instructions should operate the tool.
- Wear suitable eye protection against flying objects, when handling, operating and servicing the tool. It is employer’s responsibility to enforce the user and all other nearby personnel at worksite to wear eye protection when operating the tool. Also, it is recommended to wear a hard hat to prevent a risk of injuries through flying fragments. It is recommended to wear ear protection near or at the job site when using the tool to prevent hearing damage.
- Dress properly. Do not wear loose clothing or jewelry as they can be caught in moving parts. Rubber gloves and non-slip footwear are recommended when working with the tool. Wear protective hair covering to contain long hair. Always wear gloves when you carry out maintenance work of the tool especially when it is still hot.
- Keep body balance when operating the tool, do not over reach.
- Keep the tool, fuel cell, charger and battery out of the reach of children. The tool is dangerous in the hands of untrained persons.
Fastening tool safety warning
- Inspect the tool before operating: determine that the tool is in proper working order. Check for misalignment or bent moving parts or any other condition that may affect the operation of the tool. A tool that is not in proper working order must not be used.
- The tool should not be modified unless authorized in the tool manual. The tool may function unexpectedly after the modification and cause danger.
- Always assume that the tool contains nails. Do not point the tool towards yourself or anyone whether it contains nails or not. Keep bystanders and children away while operating the tool.
- Do not actuate the tool unless the tool is placed firmly against the working surface. Never press the nose piece of the tool against your hand or any other part of the body.
- Do not hold or carry the tool with a finger on the trigger.
- The tool is not designed to be used in explosive atmosphere. The tool generates sparks and the exhaust will also cause possible danger to ignite highly flammable fuel or gas. Do not use the tool in this kind of environment. Do not smoke while using or handling the tool and fuel cell.
- Maintain the tool with care. Refer to the tool maintenance instructions (chapter 8) for detailed information on the proper maintenance of the tool.
- Please keep the tool in clean condition, wipe off grease or oil after work. Do not use any solvent based cleaner to clean the tool. It is possible that the solvent will deteriorate the rubber or plastic components of the tool. Greasy handle and body can cause accidental drop of the tool and injury to nearby persons.
- Please only use the lubrication oil specified in this manual to perform the lubrication. Use of other lubri-cation may cause damage to the tool and implies the risk of malfunction that could injure the operator.
- Do not use the tool with materials that are too hard or too soft. Hard material can ricochet nails that can injure people, soft material may be penetrated easily and cause the nail to free fly. Do only drive nails into proper working surfaces.
- The tool needs to be used in well ventilated areas. Do not inhale the exhaust, the fume or the gas because they are potentially dangerous to human body.
- Do not use the tool to perform any other job than the designated function. Especially do not use the tool as a hammer, impact on the tool will increase the risk of cracked body and could lead to misfunction of the tool.
- When disengaging the nail push button, do not release it and allow it to jump forward. Guide it forward slowly. There is a risk of pinching the fingers.
- Stay alert, focus on your work and use common sense when working with the tool. Do not use the tool when tired, after having consumed drugs or alcohol, or while under the influence of medication.
- Do not drive nails into other nails.
- After driving a nail, the tool may spring back (“recoil”) causing it to move away from the working surface. To reduce the risk of injuries always manage recoil by: Always maintaining control of the tool, allowing the tool to move away from the working surface. Do not completely straighten your arms, always keep them flexed when using the tool.
- When working close to an edge of a working surface or at steep angles use care to minimize chipping, splitting or splintering, or free flight or ricochet of nails, which may cause injury.
- Keep hands and body away from the nail discharge area of the tool.
- Do not operate the tool with any other power source than specified in the tool manual.
- Use extra caution when driving nails into existing walls or other blind areas to prevent contact with hidden objects or persons on the other side (e.g. wires, pipes.)
- When fastening electrical cables, make sure the cables are not energized. Hold the tool only by insulated gripping surfaces. Use only nails designed for electrical cable installations. Inspect that the nail has not damaged the insulation of the electrical cables. A nail that damages the insulation of electric cables can lead to electric shock and fire hazards.
Fuel cell safety warning
- The fuel cell is a high pressure liquefied gas bottle. Keep it away from spark, fire or high tempera-ture and explosive environment. Do not puncture the bottle or attempt to open the fuel cell.
- The content of the fuel cell is extremely flammable, keep it away from all source of ignition.
- Do not leave the fuel cell in direct sun light. Do not use the tool at temperatures higher than 50°C (120°F). Overheating the fuel cell can result in explosion or fire.
- Do not store the fuel cell or tool in temperatures above 50°C (120°F). High temperature can result in explosion or fire and the release of flammable gas. When not in use, keep the tool away from high temperature source or direct sun light.
- When the fuel is used up, do not incinerate the can. Follow the recycle instruction on the can. Recycle the empty fuel cell according to local law. Do not attempt to recharge the fuel cell or incinerate the empty fuel cell.
- Use only the fuel cell recommended by fischer. Read the safety data sheet to understand more of the fuel cell contents.
- Remove the fuel cell when: Not in use, performing any maintenance or repairs, clearing a nail jam, moving the tool to a new location or when the tool is outside of the operator’s supervision or control.
Battery safety warning
- Use only batteries that are supplied by fischer.
- Recycle the battery according to local law. Do not incinerate, puncture or crush the battery.
- Do not immerse the battery into water or any other fluid. Do not expose the battery to rain or snow.
- Do not expose the battery or tool loaded with battery to direct sun light. Do not use the tool at temperatures higher than 50°C (120°F). Overheating the battery can result in explosion or fire.
- Do not allow direct contact of the battery nodes with metal or conductive material.
- Charge the batteries every 3 months even if the tool is not used to prevent a battery over dis-charge over time.
- Remove the battery when: Not in use, performing any maintenance or repairs, clearing a nail jam, moving the tool to a new location or when the tool is outside of the operator’s supervision or control.
- If you have any issue with the battery call the emergency contact (24-hour-number): (001) 352 323 3500 or GBK/Infotrac ID 93435 (USA domestic) from inside US/CANADA (TOLL FREE): 1 800 535 5053.
Battery charger safety warning
- Do not use the battery charger in explosive atmosphere. The electrical device is not designed to be used in such environment.
- Do not charge the battery outdoors or in temperatures below 5°C (40°F).
- Do not charge the battery in direct sunlight or above 50°C (120°F).
- Do not immerse the charger into water or any other fluid. Do not expose the charger to rain or snow.
- Do not use the charger if the cord is damaged or the charger is defect.
- Unplug the charger by pulling the plug, not by pulling the cord.
- Do not cover the charger with anything.
- Do not use a step-up transformer or engine generator as the power source of the charger.
- Please charge the battery for at least 1.5 hours before the first-time use.
Description
Overview of the fastening tool

- Wheel for depth adjustment
- Nail push button
- Magazine
- Battery-LED status
- Trigger
- Cooling air slots/dust filter
- Fuel cell compartment cover
- Battery
- Battery release button
- Belt or rafter hook
- Safety clip
Wheel for depth adjustment
The wheel for depth adjustment can be used to reduce the depth and choose how to set the nails – flush or fully embedded. In the short setting of the nose piece, the nails are set deep. By using the wheel to extend the nose piece, the setting depth of the nail will be reduced.

Magazine
The tool is equipped with a magazine with an angle of 34°. The nail capacity of the magazine is 60 nails.
Indication of battery-LED status
After inserting the battery into the tool, the LED lights indicate the battery power and the status of the tool.
| Status | Meaning |
| All three LEDs lights green | The tool is ready, and the level of capacity is between 100% and 60% |
| Two LEDs lights green | The tool is ready, and the level of capacity is between 60% and 30% |
| One LED light green | The tool is ready, and the level of capacity is between 30% and 10% |
| One LED is flashing green | The tool is ready, and the level of capacity is between 10% and 5% |
| One LED light red | The tool is ready, and the level of capacity is below 5% and should be recharged soon |
| All three LED lights flash red | The tool has some issue and should not be used anymore, see troubleshooting (chapter 9) to get the tool working again |
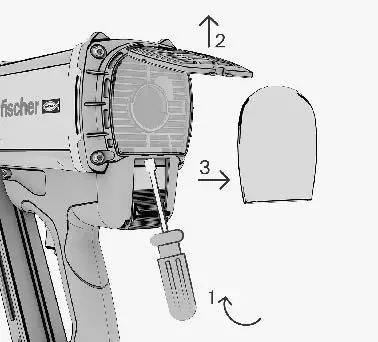
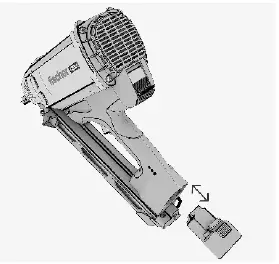
Dust filter
The dust filter at the back of the tool can be removed for cleaning or to interchange it with a new one when dirty. To release the cover of the dust filter use a screwdriver or anything similar and push it into the slot at the bottom of the cover. Rotate the screwdriver downwards to release the cover and take the dust filter out. Clean the dust filter with pressurized air. Do not use water or oil to clean the filter. After the cleaning, put back the dust filter the same way it has been taken out and put on the cover again by pushing it back into lock position.
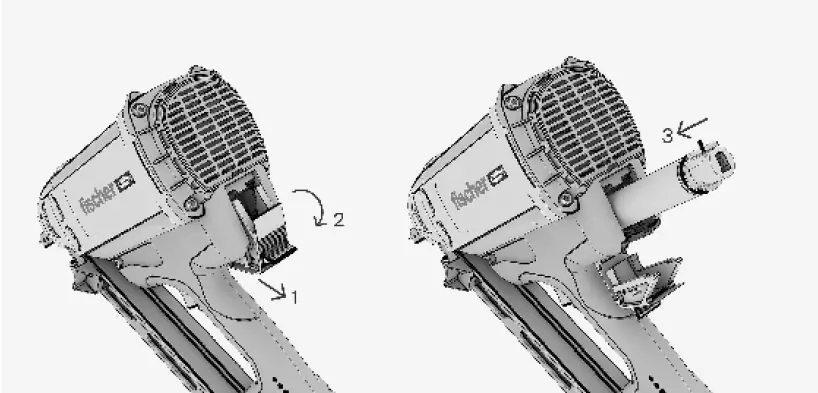
Fuel cell compartment cover
Open the fuel cell cover by pulling the door and rotate. The fuel cell cover needs to be fully opened to be able to insert the fuel cell. Close the door again after inserting the fuel cell.
Belt or rafter hook
The hook can easily be adjusted to the use as belt or rafter hook.
To do this, remove the battery and turn the hook to the desired position.
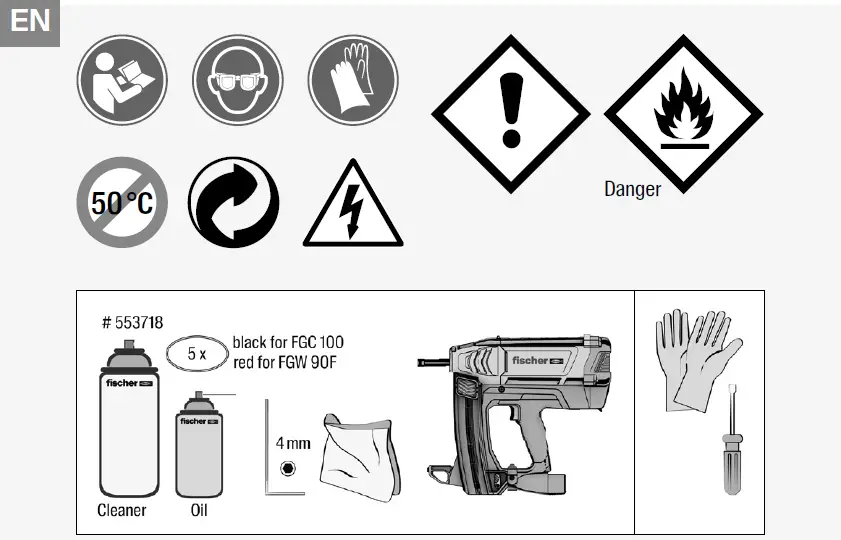
Accessories
Use only genuine fischer accessories. For complete accessories range visit www.fischer-international.com or look through the main fischer catalogue.
| Article description | Art.No. | Article description | Art.No. | |||
| Nail and | FF NFP 51×2.8mm Ring Bright | 534693 | Nail and | FF NFP 63×3.1mm Ring HDG | 558076 | |
| fuel cell | FF NFP 63×2.8mm Ring Bright | 534694 | fuel cell | FF NFP 75×2.8mm Ring HDG | 534710 | |
| package | FF NFP 75×2.8mm Ring Bright | 534695 | package | FF NFP 90×3.1mm Smooth HDG | 558078 | |
| FF NFP 75×3.1mm Ring Bright | 534699 | FF NFP 51×2.8mm Ring SS304 | 534713 | |||
| FF NFP 90×3.1mm Smooth Bright | 534700 | FF NFP 63×2.8mm Ring SS304 | 534714 | |||
| FF NFP 51×2.8mm Ring Galv | 534703 | FF NFP 63×3.1mm Ring SS304 | 534779 | |||
| FF NFP 63×2.8mm Ring Galv | 534704 | FF NFP 75×3.1mm Ring SS304 | 534716 | |||
| FF NFP 63×3.1mm Ring Galv | 534705 | FF NFP 90×3.1mm Smooth SS304 | 534717 | |||
| FF NFP 75×2.8mm Ring Galv | 534706 | Nail | FF NP 51×2.8mm Ring Galv | 558081 | ||
| FF NFP 75×3.1mm Ring Galv | 534707 | package | FF NP 63×2.8mm Ring Galv | 558082 | ||
| FF NFP 90×3.1mm Ring Galv | 534701 | FF NP 63×3.1mm Ring Galv | 558083 | |||
| FF NFP 90×3.1mm Smooth Galv | 534702 | FF NP 75×2.8mm Ring Galv | 558084 | |||
| FF NFP 51×2.8mm Ring HDG | 558077 | FF NP 75×3.1mm Ring Galv | 558085 | |||
| FF NFP 63×2.8mm Ring HDG | 558075 | FF NP 90×3.1mm Ring Galv | 558079 | |||
| FF NP 90×3.1mm Smooth Galv | 558080 | |||||
Initial operation/setting
Loading the fuel cell
If you are using a new fuel cell, proceed as follows:
For the fuel cell with the Art.No. 553416 remove the safety cap and plug on the metering valve.
For the fuel cell with the Art.No. 538211 just plug on the metering valve.
Open the fuel cell compartment cover at the back of the tool. Insert the fuel cell into the compartment in a way that the metering valve of the fuel cell is facing upwards and fitting into the red adapter of the tool. Close the fuel cell compartment cover again.
Inserting the battery
Put the battery into the tool and make sure it is plugged in correctly. Once the battery has been fitted, the battery-LED status lights will light up showing the level of capacity of the battery or the status of the tool.
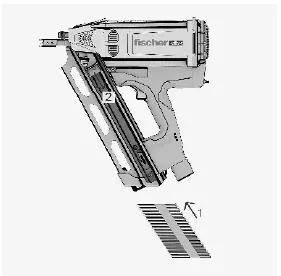
Loading the nails into the magazine
Slide the nail strip into the magazine in a way that the nails point towards the nose piece of the tool. Pay attention to completely push in the nail strip over the safety clip. Now pull back the push button until the end of the magazine and release it in a controlled manner. The push button hooks below the nail strip and pushes the nails upwards.
Warning: Pay attention to keep your fingers clear off the pathway of the push button when releasing it, otherwise there is a risk of finger injury.
Use
Driving nails
- Check the driving depth setting.
- Bring the nose piece into contact with the working surface.
- Press the tool against the working surface as far as it will go and until you hear the fan running.
- Check that the nose piece is positioned correctly on the working surface.
- Pull the trigger to drive a nail.
- Lift the tool completely away from the working surface after driving the nail, now the tool is ready again to drive another nail.
- Check the position of the nail, if it is driven not deep enough or too deep into the surface adjust the driving depth with the depth adjustment wheel accordingly for best setting results.
- Always remove the fuel cell and the battery when the work with the tool is finished or before leaving the tool unattended.
Unload the fastening tool
- Remove the battery
Press the red release button on the bottom of the battery and pull the battery out of the tool. - Remove the fuel cell
Open the fuel cell compartment (see chapter 4.8) and remove the fuel cell. Close the compartment cover again. - Unload the magazine
Push the red button on the nail push button and bring it back to initial position in a controlled manner. Now push the safety clip in the magazine downwards and remove the nail strip.
Usage of the battery charger
To recharge the battery, plug in the battery charger BC 7.2V. When the battery charger is properly plugged in, the green LED will light up and the charger is ready to use. To charge the battery, insert the battery into the battery charger in the right way. When the battery is charging properly, the red LED will light up. When you plug in a battery and the green LED is lighting up, the battery is already fully charged, and no further charging is needed.
Once the battery is fully charged the green LED will light up instead of the red one. A fully charge of an empty battery takes around 1.5 hours. If the red and green LED will flash in alternate sequence, there is an issue or failure with the battery and the battery must not be used anymore.
Maintenance
Caring for the fastening tool
- Clean the tool with a cloth at regular intervals
- Keep the grip areas free from oil and grease
- Do not use pressure jet washers or running water for cleaning
- Only use the fischer cleaning spray. Do not use cleaning sprays with silicone.
- Never use the tool when the air slots are blocked.
Cleaning the fastening tool
Note: The tool must be cleaned and serviced regularly.
We recommend that a cleaning service is carried out, at least after driving 20,000 nails.
- Clean the tool if malfunctions such as misfiring occur increasingly.
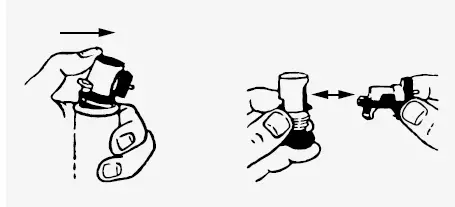
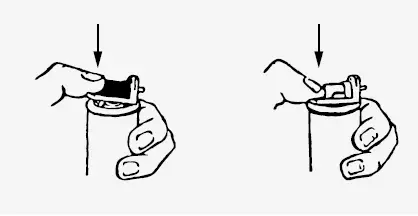
- For cleaning, use only the fischer cleaning set and observe the illustrated cleaning instructions enclosed with the cleaning set.
- Use only genuine fischer spare parts to ensure safe and reliable operation.
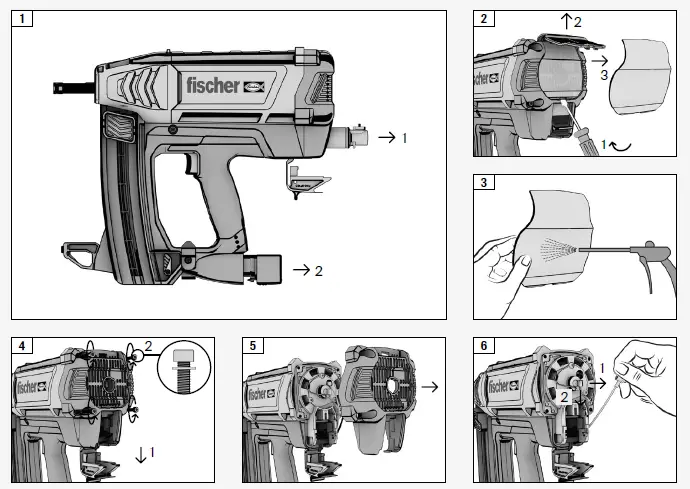
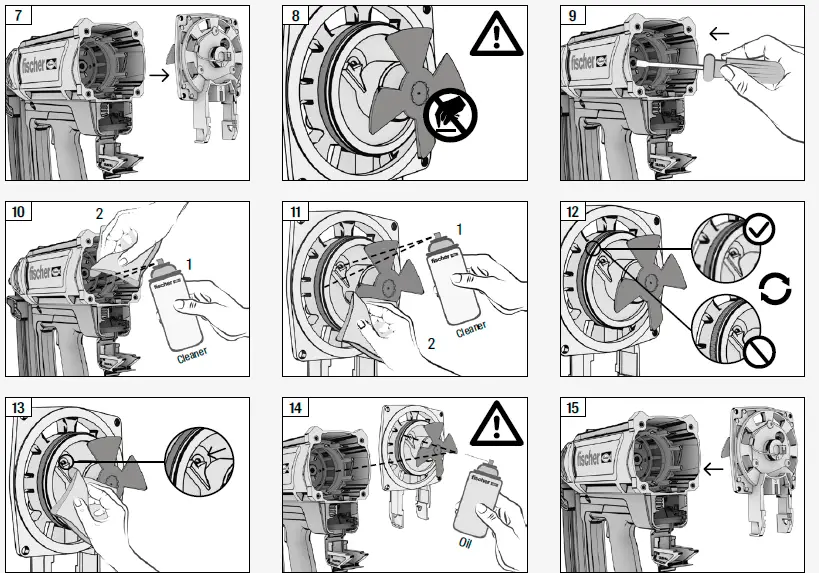
Following illustrations (see next page) describe the cleaning process of all fischer gas actuated fastening tools.
The illustrated tool is exemplary for all fischer gas actuated fastening tools.

Troubleshooting
If the trouble you are experiencing is not listed below or you are unable to remedy the problem by yourself, please contact your fischer contact. Stop using the tool immediately.
| Malfunction | Possible cause | Action to be taken |
| Nails are driven not deep enough. | Driving power is too low. | Turn the depth adjustment wheel to reduce the length of the nose piece. |
| The nails are too long. | Use shorter or smooth nails. | |
| The working surface is too hard. | Use a different fastening method. | |
| Nails are driven too deep. | Driving power is too high. | Turn the depth adjustment wheel to increase the length of the nose piece. |
| The nails are too short. | Use longer nails or nails with ring shank. | |
| Nails bend. | Driving power is too low. | Turn the depth adjustment wheel to reduce the length of the nose piece. |
| The nails are too long. | Use shorter or smooth nails and check the wood for knots. | |
| The fuel cell is empty before all nails of a package were used. | High gas consumption due to a frequent actuation of the tool through pressing it against the working surface without driving a nail. | Avoid actuation of the tool without driving a nail. |
| Malfunction | Possible cause | Action to be taken |
| The nose piece hasn’t returned into its initial position after driving a nail. | A nail jam has occurred in the nose piece. | Clear the nail jam with e.g. a screwdriver. |
| No nails are driven, but the fan is running. | Nail transport is not working anymore. | Check the nail strip, if damaged use a new one. Clean the magazine and the nose piece. |
| Fuel cell is empty. | Insert a new fuel cell. | |
| Incorrect position of the driving piston. | Push back the driving piston all the way into its initial position. | |
| Frequent incorrect position of the driving piston. | Clean the tool as described in chapter 8. | |
| The tool doesn’t drive due to a dirty spark plug. | Clean the tool as described in chapter 8. | |
| The high voltage cable for the spark plug got loose. | Open the back of the tool and plug in the high voltage cable again. | |
| No nails are driven, and the fan is not running. | Not enough nails in the magazine. | Load new nails into the magazine. |
| The battery is discharged. | Change the battery with a fully charged one. | |
| The electric cable of the fan became loose. | Open the back of the tool and plug in the fan cable again. |
Environmental Protection
Observe national regulations on environmentally compatible disposal and on the recycling of disused machines, packaging and accessories.
Batteries must not be disposed with regular waste.
Do not allow battery packs to get in contact with water.
Only for EU countries: Never dispose power tools in your household waste! In accordance with European Guideline 2012/19/EU on used electronic and electric equipment and its implementation in national legal systems, used power tools must be collected separately and handed in for environmentally compatible recycling. Before disposal, discharge the battery pack in the power tool. Prevent the contacts from short-circuiting (e.g. by protecting them with adhesive tape).
Warranty
Please contact your local fischer dealer or representative for any further information regarding the warranty conditions.
Technical data
* 1)
Regulation 2A of S.I. 2008/1597 2006/42/EC (MSD),
2014/35/EU (LVD),
2014/30/EU (EMC),
2011/65/EU (RoHS),
2012/19/EU (WEEE)
* 2)
ISO 8662-11+A1,
BS EN 60745-1+A11,
BS EN 60745-2-16,
BS EN 55014-1,
BS EN 55014-2,
BS EN ISO 12100,
BS EN ISO 11148-13,
BS EN 12549+A1
(additional for battery charger): BS EN 60335-1+A13,
BS EN 60335-2-29+A11 (additional for battery): BS EN 62133-2
*3)
Model name: FGW 90F
Type of tool: Gas nailer
Dimensions (L x W x H): 390 x 108 x 381 mm
Rated input battery charger: 100-240 Vac, 50/60 Hz
Charge time of battery: 90 mins
Battery capacity: ≥ 2500 mAh
Battery voltage: 7.2 Vdc
Operating temperature: -7 °C (19°F) ~ 49 °C (120°F)
Noise characteristic values in accordance with BS EN 12549+A1.
A-weighted sound pressure level at workstation, LEA: 96.2 dB
A-weighted sound power level, LWA: 101.0 dB
Peak C-weighted instantaneous sound pressure level at workstation: < 130 dB
Measurement uncertainty (standard): 2.5 dB
Vibration value according to ISO 8662-11+A1: 2.64 m/s2
Measurement uncertainty (standard): 1.32 m/s2
Nail specifications: Angle 34°, diameter 2.8 – 3.3 mm,
length 50 – 90 mm, paper collated
Exploded view and spare part list
Exploded view of the fastening tool
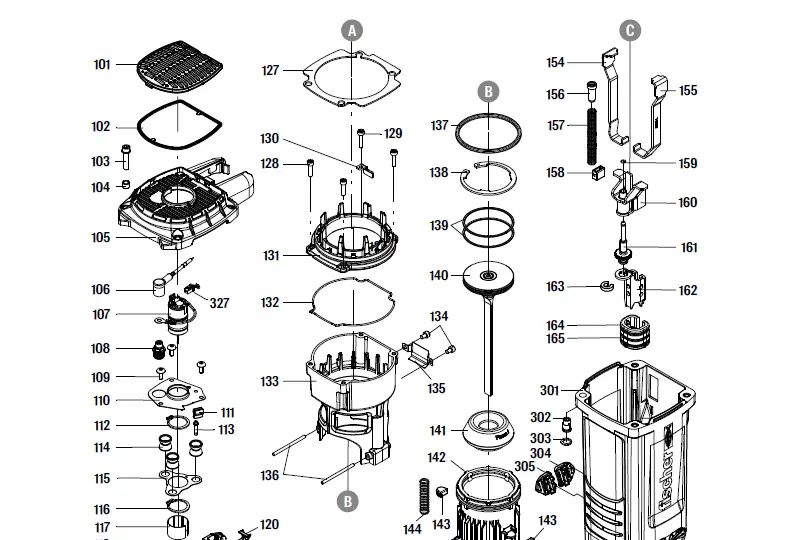
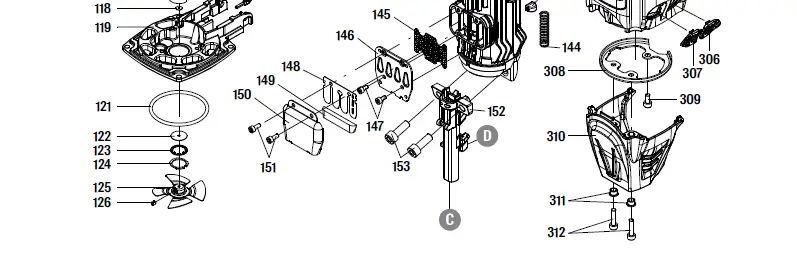
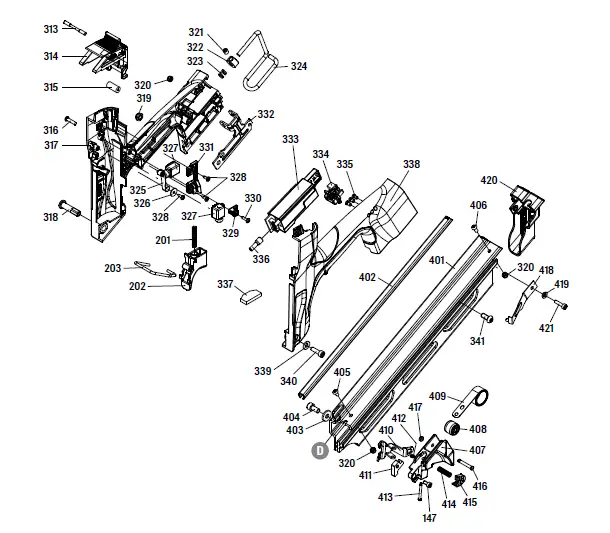
Spare part list
| # | Parts name | # | Parts name | |
| 101 | DEFLECTOR | 133 | COMBUSTION CHAMBER | |
| 102 | FILTER UNIT | 134 | HEX.SOC.HD.BOLT | |
| 103 | BOLT W/FLAT WASHER | 135 | WASHER | |
| 104 | COLLOR | 136 | PIN | |
| 105 | CAP | 137 | O – RING | |
| 106 | HIGH VOLTAGE CABLE SET | 138 | C – RING | |
| 107 | MOTOR UNIT | 139 | PISTON RING | |
| 108 | SPARKLER | 140 | DRIVER UNIT | |
| 109 | HALF ROUND HD.HEX.BOLT | 141 | BUMPER | |
| 110 | POSITIONING SHEET | 142 | CYLINDER | |
| 111 | GROUND WIRE BRACKET | 143 | BUMPER-COMBUSTION CHAMBER | |
| 112 | C – RING | 144 | SAFETY SPRING | |
| 113 | POSITIONING SHAFT | 145 | EXHAUST MESH PLATE | |
| 114 | FEED BUMPER | 146 | EXHAUST BAFFLE | |
| 115 | SPACER | 147 | HEX.SOC.HD.BOLT | |
| 116 | C – RING | 148 | REED VALVE | |
| 117 | SLEEVE MOTOR | 149 | CLEANER | |
| 118 | WASHER-MOTOR SHAFT | 150 | DEFLECTOR | |
| 119 | END CAP-COMBUSTION CHAMBER | 151 | HEX.SOC.HD.BOLT | |
| 120 | FUEL STEM ADAPTER | 152 | NOSE PIECE | |
| 121 | O – RING | 153 | HEX.SOC.HD.BOLT | |
| 122 | SEAL | 154 | SAFETY C (RIGHT) | |
| 123 | SEAL PLATE-MOTOR | 155 | SAFETY C (LEFT) | |
| 124 | IN-CONCENTRIC RING | 156 | SAFETY ROD | |
| 125 | COOLING FAN ASSEMBLY | 157 | SAFETY SPRING | |
| 126 | HEX.SOC.HD.SCREW | 158 | FEED BUMPER | |
| 127 | SPACER | 159 | SELF-LOCKING EXTERNAL NUTS | |
| 128 | HEX.SOC.HD.BOLT | 160 | SAFETY B UNIT | |
| 129 | HEX.SOC.HD.BOLT | 161 | ADJUST AXIE UNIT | |
| 130 | GUIDE | 162 | SAFETY A | |
| 131 | UPPER COMBUSTION CHAMBER | 163 | RING | |
| 132 | PACKING | 164 | PROTECTIVE CASING | |
| # | Parts name | # | Parts name | |
| 165 | FIXED RING | 331 | POSITIONING SHEET | |
| 201 | SPRING | 332 | RAFT HOOK BRACKET | |
| 202 | TRIGGER | 333 | PCB ASSEMPLY | |
| 203 | SAFETY | 334 | CONNECTING UNIT | |
| 301 | GUN BODY | 335 | LED COVER | |
| 302 | CAP NUT | 336 | INSULATING SLEEVE | |
| 303 | WASHER CAP | 337 | SPACER | |
| 304 | SAFETY COVER | 338 | HANDLE A UNIT | |
| 305 | SAFETY COVER | 339 | FLAT WASHER | |
| 306 | SAFETY COVER | 340 | HEX.SOC.HD.BOLT | |
| 307 | SAFETY COVER | 341 | HALF ROUND HD.HEX.BOLT | |
| 308 | CYLINDER BRACKET | 401 | MAGAZINE A | |
| 309 | HEX.SOC.HD.BOLT | 402 | STEEL CHANNEL | |
| 310 | COVER-SAFETY | 403 | FLAT WASHER | |
| 311 | WASHER-NOSE COVER | 404 | HEX.SOC.HD.BOLT | |
| 312 | HEX.SOC.HD.BOLT | 405 | HALF ROUND HD.HEX.BOLT | |
| 313 | PIN-FUEL ACTUATOR | 406 | HALF ROUND HD.HEX.BOLT | |
| 314 | FUEL ACTUATOR | 407 | PROTECTING HOOD COVER | |
| 315 | BUSH-FUEL ACTUATOR | 408 | ROLLING ELEMENT | |
| 316 | TAP BOLT | 409 | SPRING | |
| 317 | HANDLE A UNIT | 410 | PUSHER | |
| 318 | HANDLE BOLT | 411 | SQUARE UNTS | |
| 319 | LOCK NUT | 412 | RETAINER | |
| 320 | LOCK NUT | 413 | TRIGGER PIVOT PIN | |
| 321 | HEX.SOC.HD.SCREW | 414 | SPRING | |
| 322 | POSITIONING AXIS | 415 | GLOVE | |
| 323 | SPRING RETAINER | 416 | ROLL PIN | |
| 324 | BELT HOOK | 417 | PU RETAINER | |
| 325 | MOTOR FAN SWITCH LEVER UNIT | 418 | STOP NAIL PLATE | |
| 326 | FLAT WASHER | 419 | GASKET | |
| 327 | MOTOR CABLE | 420 | PROTECTING HOOD COVER | |
| 328 | SELF TAPPING BOLT | 421 | HEX.SOC.HD.BOLT | |
| 329 | BRACKET UNIT | |||
| 330 | SELF TAPPING BOLT | |||
Circulation and copying of this document, utilization and communication of its contents are prohibited, unless expressly permitted. Non-compliance will lead to damages. All rights are reserved in the case of the patent, utility model or registered design.
This user manual was created with care. However, fischerwerke GmbH & Co. KG does not assume any liability for any errors in this user manual and consequences thereof. Liability is also not assumed for direct damage or consequential loss, which is the result of improper use of the product.
Construction materials (anchoring base) as well as external conditions (e.g. environmental conditions such as temperature, air humidity) vary a great deal. The current condition of the substrate material and its suitability must therefore be examined by the user. If you are in doubt about the condition of your substrate material (e.g. about the strength), please contact the responsible design engineer.
All product designations and brand names used belong to the owner and are not explicitly designated as such. Contents subject to change.
www.fischer-international.com
fischer stands for Fixing Systems
Automotive
fischertechnik
Consulting
Electronic Solutions
fischerwerke GmbH & Co. KG
Klaus-Fischer-Straße 1
72178 Waldachtal
Germany
T +49 7443 12 – 0
F +49 7443 12 – 8297
[email protected]
www.fischer-international.com
00185167 · 01/2022 [ajm] · Printed in Germany [RC] We cannot be responsible for any errors, and we reserve the right to make technical and range modifications without notice.


