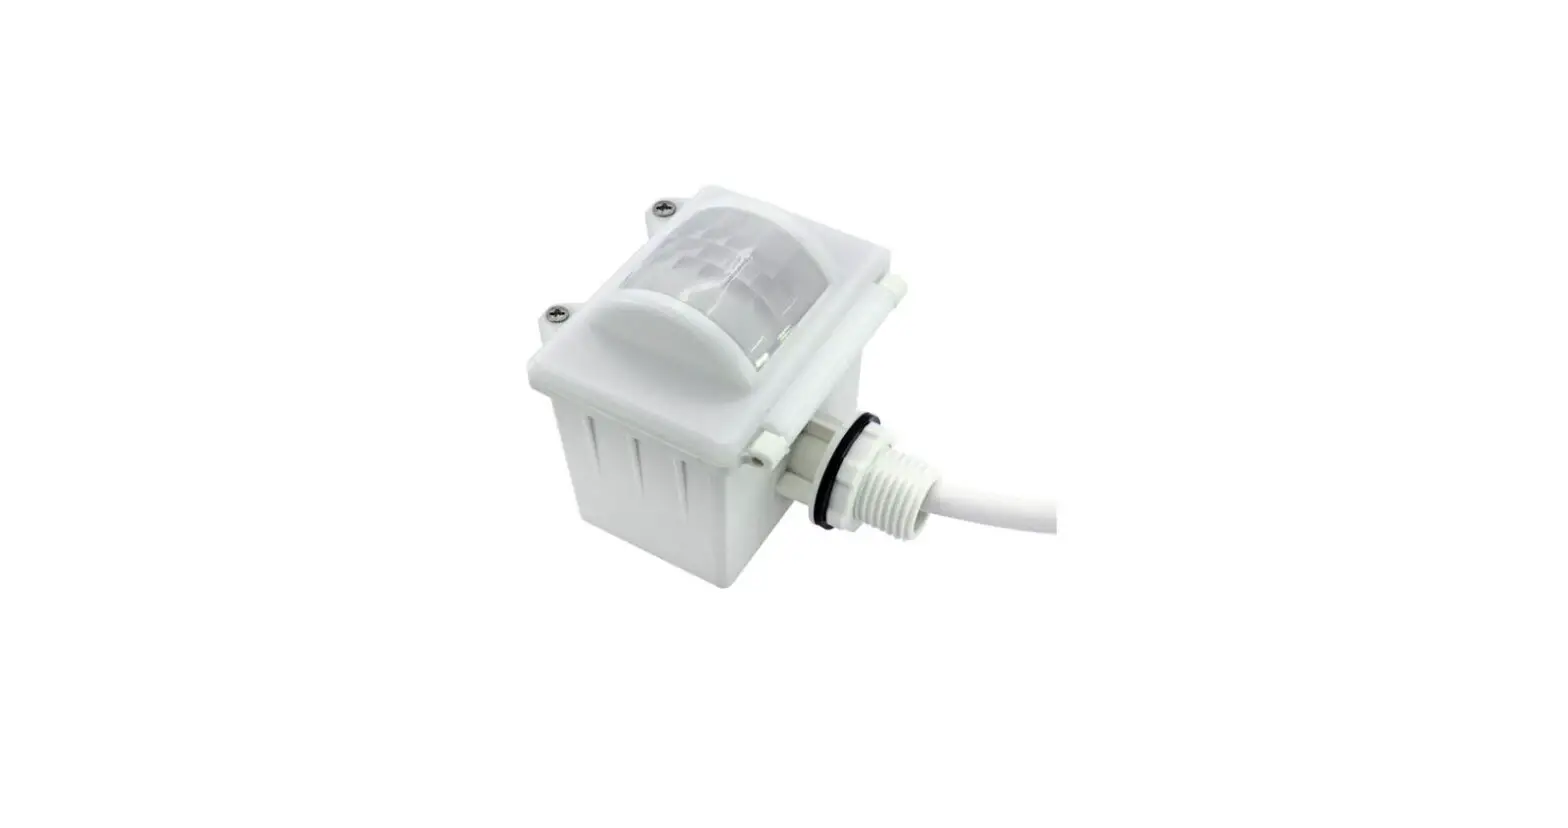
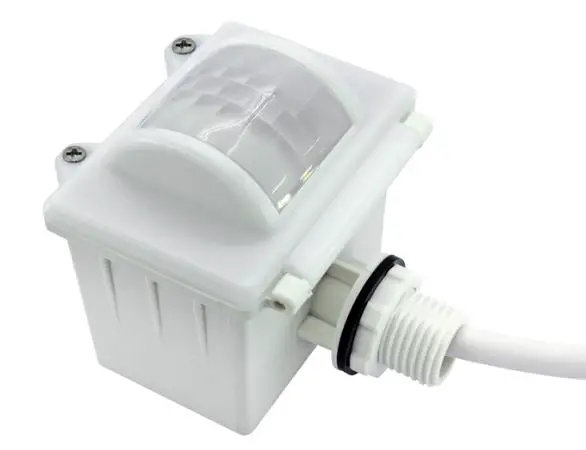
HYTRONIK HIM35 High Bay Dual Sense Independent Dali Sensor
Technical Specifications
| Product type | High bay independent DALI sensor (tri-level control) |
| Operating voltage | 220-240VAC 50/60Hz |
| Switched power | Maximum 20pcs DALI devices, Maximum 40mA |
| Power consumption | < 1W |
| Detection angle | 360o |
| Detection area (Max.)* | Installation Height : 15m Detection Range (Ø) :18m |
| Detection range | 10% / 50% / 75% / 100% |
| Hold time | 2s / 30s / 1min / 5min / 10min / 15min / 20min / 30min |
| Stand-by time | 0s / 10s / 1min / 5min / 10min / 30min / 1h / + ∞ |
| Stand-by dimming level | 10% / 20% / 30% / 50% |
| Daylight threshold | 2 ~ 500Lux, Disable |
| Warming up time | 30s |
| Operating temperature -35oC ~ +50oC | |
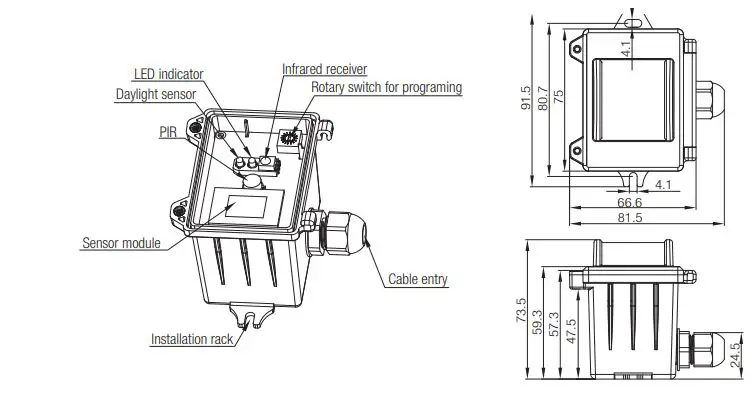
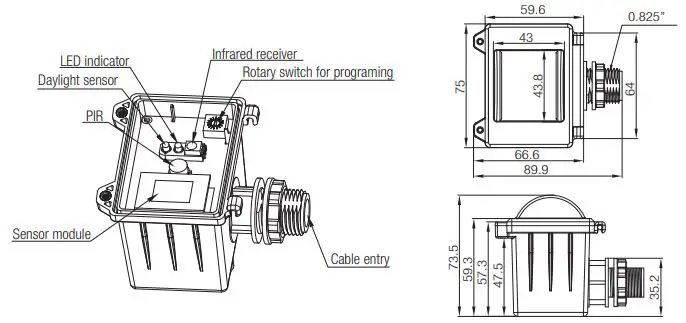
- IP rating: IP65
- Sensor mode: HF, PIR, HF+PIR, HF / PIR
Installation
Warnings
- Installation of the sensor involves connecting it to the mains supply. This work must be carried out by a specialist in accordance with electrotechnical regulations.
- Disconnect power supply before installing.
Ceiling mount
Screw to the Luminaire by conduit
Attach to the shade by clamp
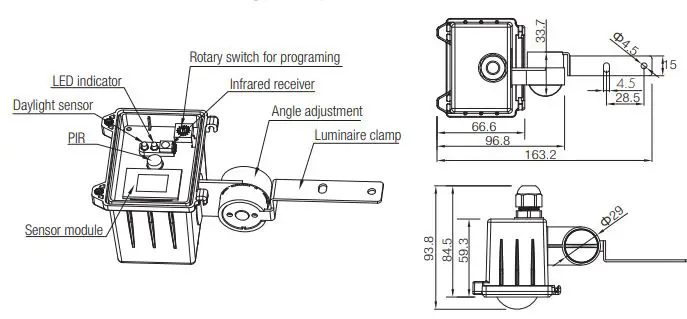
Note: We recommend the mounting distance between sensor to sensor should be more than 2m to prevent sensors from false-triggering.
Rotary Switch Settings
A rotary switch is built inside the sensor for scene selection / fast programming. Total 16 channels available
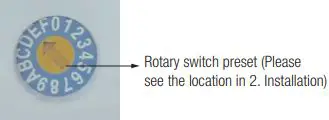

Note: settings can also be changed by remote control HRC-11. The last action controls.
Functions
Tri-level Control (Corridor Function)
Hytronik builds this function inside the motion sensor to achieve tri-level control, for some areas it requires a light change notice before switch-off. It offers 3 levels of light: 100%–>dimmed light–>off; and 2 periods of selectable waiting time: motion hold-time and stand-by period; Selectable daylight threshold and freedom of detection area.
Lux Off Function
The built-in daylight sensor can read ambient natural light and switch off the fixture automatically whenever artificial light is not required (natural light lux level exceeds daylight threshold).
Note: if the stand-by time is preset at “![]() “, the fixture never switches off even when natural light is sufficient.
“, the fixture never switches off even when natural light is sufficient.
Load Indication
The light will flash ONCE rapidly after receiving the command from the remote controller.
Note: There is no load indication (the light will not flash) when button is ON/OFF, POWER 100% or POWER 80% is pressed.
Wiring Diagram

Three Options for PIR Lens and Detection Patterns
(End user can choose the suitable lens in real application for various requirements)
- For single person walking across, the detection range is reduced by 1/3.
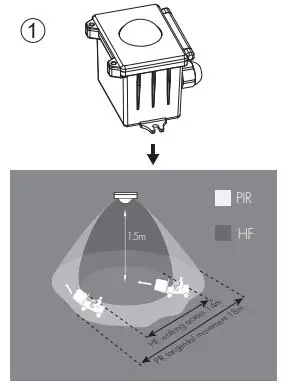
- PIR detection: H x D:15 x 18m (max.)
- HF detection: H x D:15 x 14m (max.)
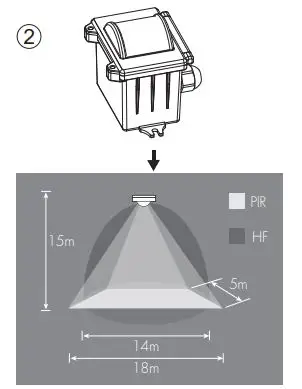
- PIR detection: L x W x H:18 x 5 x 15m (max.)
- HF detection: H x D:15 x 14m (max. )

- PIR detection: L x W x H:5 x 18 x 15m (max.)
- HF detection: H x D:15 x 14m (max. )
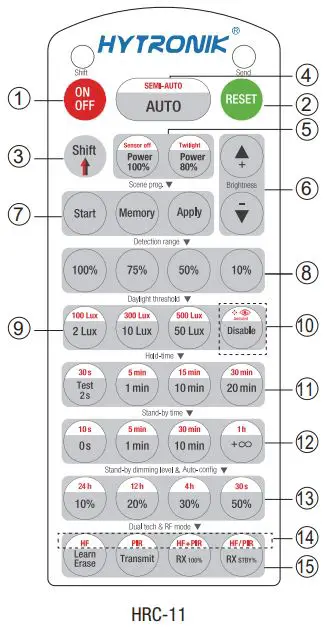
Permanent ON/OFF [button 1]
- Press button 1 ,to select permanent ON or permanent OFF mode.
- Press button 2/4 to resume automatic operation.
- The mode will change to AUTO Mode after power failure.
RESET[ button 2]
- Press button 2, and all settings go back to the rotary switch settings.
Shift [ button 3]
- Press button 3, the LED on the top left corner is on for indication.
- All values/settings in RED are valid for 20 seconds.
Auto Mode [ button 4]
- Press button 4 to initiate automatic mode. The sensor starts working and all settings remain as before the light was switched ON/OFF.
Note: the function of Semi-auto is disabled.
- Press button 5, the light output shifts between 80% and 100%.
Note: the function of “Sensor off” and “Twilight” are disabled.
- Press the button 6 to adjust the light brightness between 10%~100%.
Scene prog. [ zone 7] (One-key-commissioning)
- Press button “start” to program.
- Select the buttons in 8 “Detection range”9, /10 “Daylight threshold”, 11 “Hold time”,12 “Stand-by time”, and 13“Stand-by dimming level” to set all parameters.
- Press button “Memory” to save all the settings programmed in the remote control.
- Press button “Apply” to set the settings to each sensor unit(s). For example, to pre-set detection range 100%, daylight threshold Disable, hold time 5min, stand-by time
 , stand-by dimming level 30%, the steps should be as follows: Press button 7 Start, button 8 100%, 10 Disable, 3 Shift, 11 5min, 3 Shift,12 , 13 30%, 7 Memory. By pointing to the sensor unit(s) and 7 pressing Apply, all settings are passed on the sensor(s).
Detection range [ zone 8]
- Press buttons in zone 8 to set detection range at 100% / 75% / 50% / 10%.
Daylight threshold [ zone 9 ]
Press buttons in zone 9 to set the daylight sensor at 2Lux / 10Lux 50Lux / 100Lux / 300Lux / 500Lux or Disable.
Note: To set daylight sensor at 100Lux / 300 Lux / 500Lux, press button 3Shift at first.
Ambient daylight threshold [ button 10
- Press button 3 Shift, the red LED is on for indication.
- Press button 10, the ambient lux level is sampled and set as the new daylight threshold.
Hold time [ zone 11 ]
Press buttons in zone 11 to set the hold time at 2s / 30s / 1min / 5min / 10min / 15min / 20min / 30min.
- Note: To set hold-time at 30s / 5min / 15min / 30min, press button 3 Shift at first.
- 2s is for test purpose only, stand-by period and daylight sensor settings are disabled in this mode.
To exit from Test mode, press button 2 or any button in zone 11
Stand-by time [ zone 12 ].
Press buttons in zone 12 to set the stand-by period at 0s / 10s / 1min / 5min / 10min / 30min / 1h / +.
Note: “0s” means on/off control; “+” means bi-level control, 100% on when motion detected, and remains at the stand-by dimming level when no presence after hold-time.
Daylight harvest auto-configuration function [ zone 1 3 ]
- Press button “Shift”, the red LED is on for indication.
- Select a time period and the sensor will do light level measurement and determine/save the lowest light level (commission line) with 100%light on, so as to set the target lux level automatically.
Note
- Make sure the light level measurement covers the night time.
- The fixture will go into sensor mode after the measurement, all sensor settings remain unchanged.
Stand-by dimming level [ zone 13 ]
Press buttons in zone 13 to set the stand-by dimming level at 10% / 20% / 30% / 50%.
Note: the function of 24h /12h /4h /30s are disabled.
Dual tech [ zone 1 4 ]
Press buttons in zone to select sensor technology.
- HF+PIR: Light is on when both HF and PIR sensors are activated.
- HF/PIR: Light is on when HF or PIR sensors are activated.
RF mode [ zone 15 ]
All buttons in zone 15 are disabled.
Troubleshooting
| MALFUNCTION CAUSE REMEDY | CAUSE | REMEDY |
| The fixture does not light up | Incorrect daylight threshold setting | Adjust daylight threshold setting |
| Faulty fixture | Replace fixture | |
| No power supply | Check power to sensor | |
| Detection zone not targeted | Check detection area setting | |
| The fixture is always on | Continous movement in the detection zone | Check the detection area setting |
| The fixture is on when it should not | Sudden change in temperature due to weather (wind, rain, snow) or air expelled from fans, open windows | Adjust zone, change installation site |
Hytronik Industrial Ltd.
- www.hytronik.com
- 3rd Floor, block C, complex building, 155#, Bai’gang road south, Bai’gang village, Xiao Jin Kou town, Huicheng district, Huizhou 516023
- Tel: 86-752-2772020
- Fax: 86-752-2777877


