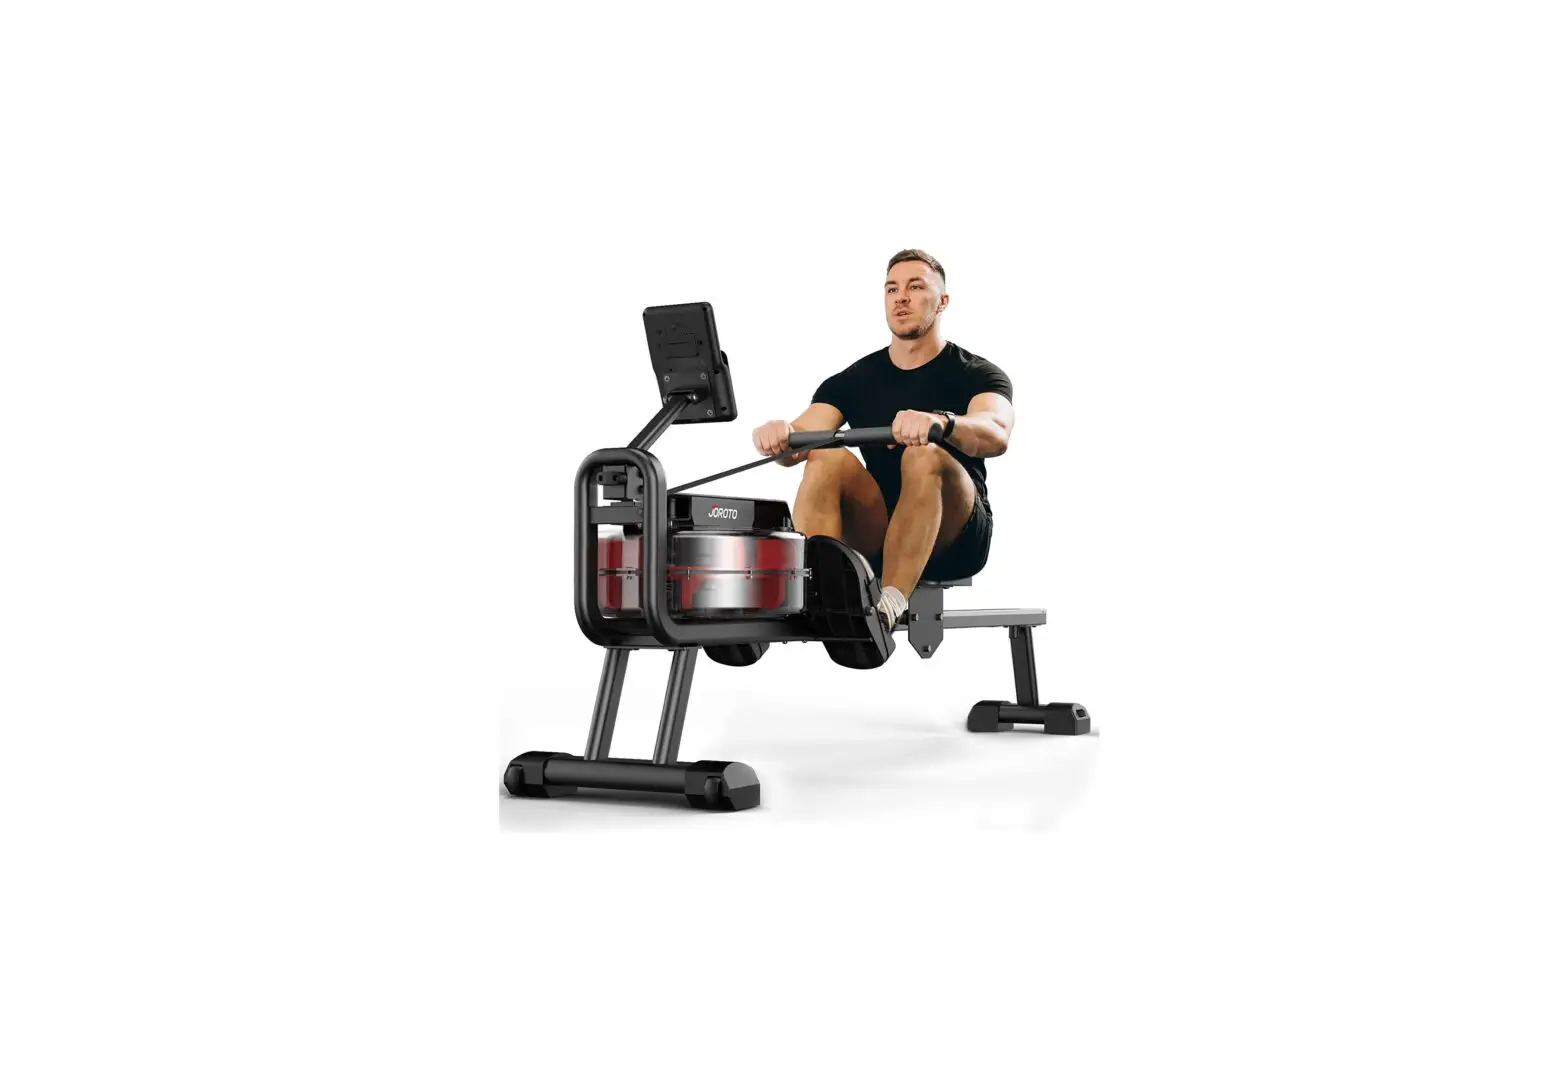
JOROTO MR23 Water Rowing Machine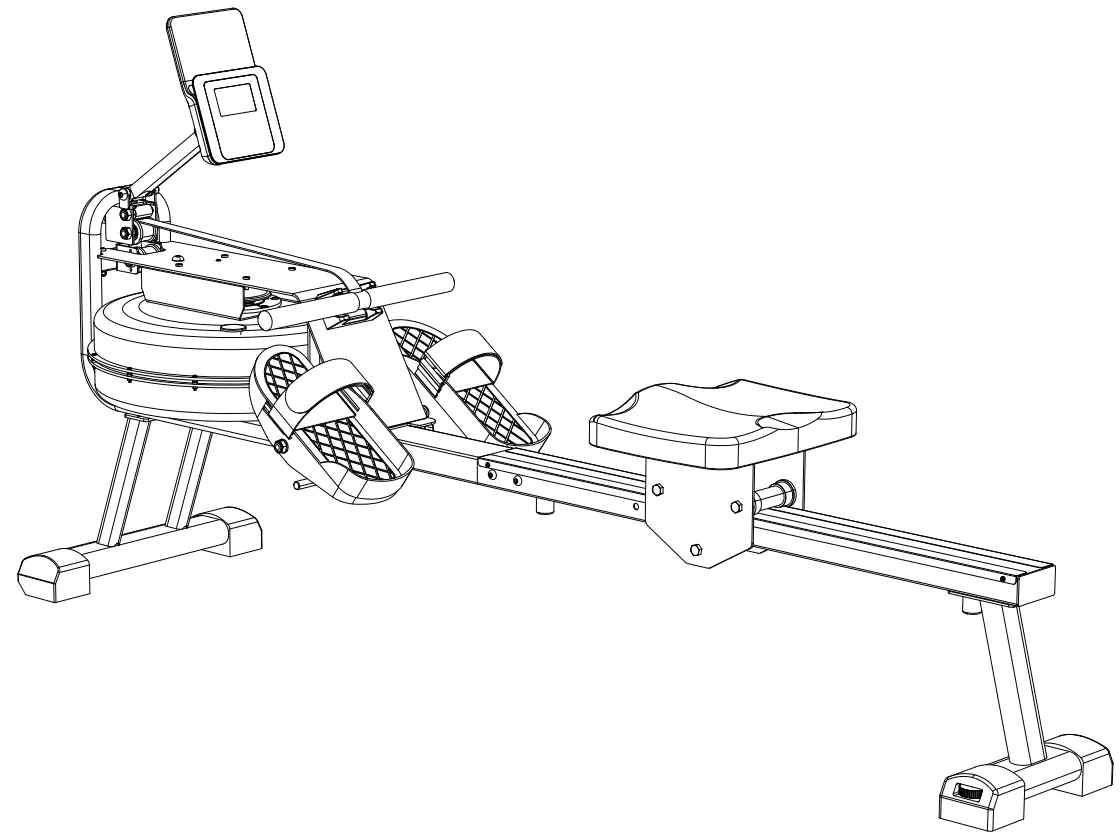
EXPLODED-VIEW & PARTS LIST
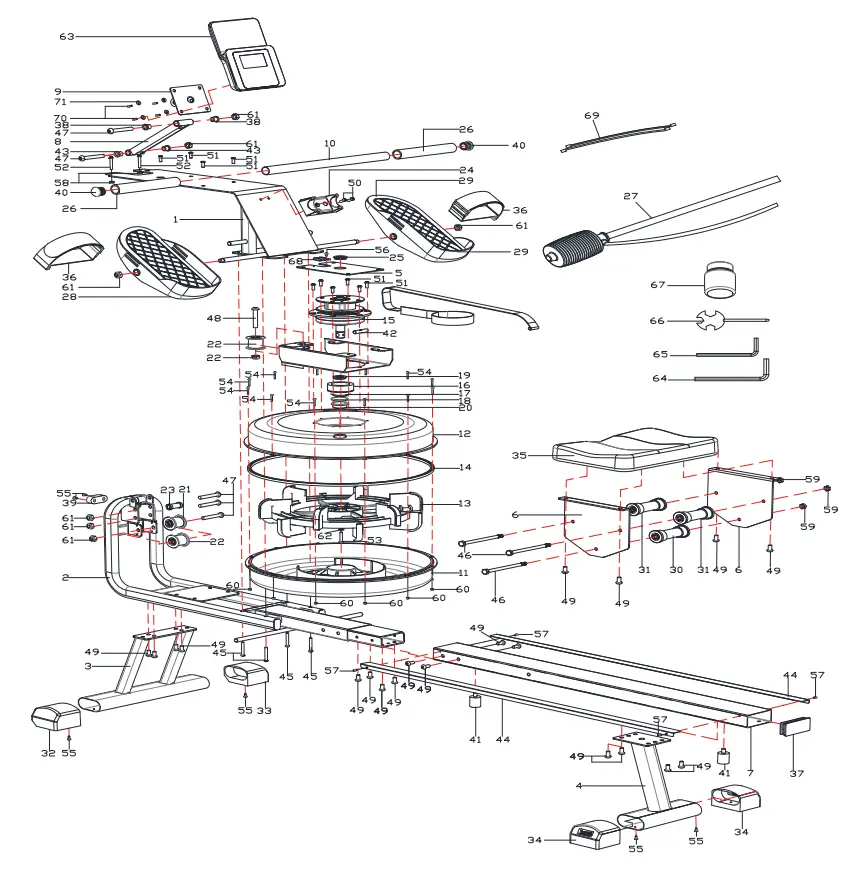
| NO. | NAME | SPEC. | QTY |
| 1 | Main Frame | – | 1 |
| 2 | Base | – | 1 |
| 3 | Front Stabilizer | – | 1 |
| 4 | Back Stabilizer | – | 1 |
| 5 | Holding Pad | – | 1 |
| 6 | Seat Holding Pad | – | 2 |
| 7 | Short Rail Tube | – | 1 |
| 8 | Monitor Adjustment Part | – | 1 |
| 9 | Monitor Fixing Part | – | 1 |
| 10 | Pulling Lever | – | 1 |
| 11 | Downside Tank 2 Cover | 445’69.5 | 1 |
| 12 | Upside Tank 2 Cover | 445*69.5 | 1 |
| 13 | Propeller 2 | 330”106 | 1 |
| 14 | Plug | 430”7 | 1 |
| 15 | Rotator | 140”134 | 1 |
| 16 | Fixing Part of Plug | 60*Q45*32 | 1 |
| 17 | Rubber Gasket 2 | ›42”q25”b2 | 1 |
| 18 | Rubber Sealing Gasket | p60*q45*d1 | 1 |
| 19 | Bearing | NBR/ 20* 40”8 | 1 |
| 20 | Sealing Plug of Tank | Q31.3*10.4 | 1 |
| 21 | Strap Wheel | POM/ 51” 38*3 | 2 |
| 22 | Strap Wheel 1 | POM/Q41*Q34“3 | 1 |
| 23 | Small Wheel | POM/ 19” 10.3”32.5 | 1 |
| 24 | Fixing Part of Lever | ABS/96*54”40 | 1 |
| 25 | Bearings Cover | B30”O20*6 | 1 |
| 26 | Lever Cover | Q30*3“180 | 2 |
| 27 | Pumping Pipe | PE/570 | 2 |
| 28 | Left Pedal | PP/305*125”85 | 1 |
| 29 | Right Pedal | PP/305”125”85 | 1 |
| 30 | Seat Wheel | 38*Q33”91.4 | 1 |
| 31 | Seat Wheel | \›42“ 33”91.4 | 2 |
| 32 | Stabilizer Cap | PP/305”125”85 | 1 |
| 33 | Stabilizer Cap | PP/305”125*85 | 1 |
| 34 | Adjustable Stabilizer Cap | \›42” 33”91.4 | 2 |
| 35 | Seat | 320“260”52 | 1 |
| 36 | 38 Wide Strap | 38*800 | 2 |
| NO. | NAME | SPEC. | QTY |
| 37 | Square Plug in the Tube | 40*80 | 2 |
| 38 | Plastic Bearing Cover | PP/ę18*ę10.2*13 | 2 |
| 39 | Front Foot Pad | 53*23*20 | 1 |
| 40 | 25 Semicircular Plug | 25*1.5 | 2 |
| 41 | Cushion Pad | / 25*32*M8+Q235 | 2 |
| 42 | Lock Pin | SUS304/ę10*40 | 1 |
| 43 | Bearings Sleeve | ę18*ę14*ę10*10 | 2 |
| 44 | Stainless Side Strip | SUS304/946*35.9*60.6 | 2 |
| 45 | Hex Bolt | M6•45•10•S10 | 4 |
| 46 | Hex Bolt | M8 120×20 S14 | 3 |
| 47 | Hex Pan Head Screw | M10•65•15•S6 | 5 |
| 48 | Hex Pan Head Screw | M10•55 15 S6 | 1 |
| 49 | Hex Pan Head Screw | M8•15•S5 | 20 |
| 50 | Hex Pan Head Screw | M6•15 S5 | 8 |
| 51 | Hex Flat Head Screw | M6•15•S4 | 8 |
| 52 | Hex Flat Head Screw | M6•40 S4 | 2 |
| 53 | Hex Pan Head Screw | M6*30•S5 | 1 |
| 54 | Cross Pan Head Screw with Gasket | M3x17xØ6 | 12 |
| 55 | Cross Self-tapping Screws | ST4.2x16xO7 | 6 |
| 56 | Cross Pan Head Screw | M4x6xØ7 | 1 |
| 57 | Cross Pan Head Screw | M4x4xØ7 | 4 |
| 58 | Nut | M6xH6xS10 | 2 |
| 59 | Nut | M8xH7.5xS13 | 3 |
| 60 | Nut | M3xH3.8xS6 | 12 |
| 61 | Nut | M10x1.25xH12xS17 | 7 |
| 62 | Flat Gasket | d6•Ø16•1 | 1 |
| 63 | Monitor | 1 | |
| 64 | Allen Key S5 | 30*80*5 S5 | 1 |
| 65 | Allen Key S4 | 25*60“4 S4 | 1 |
| 66 | Cross Wrench | 13 14 17 | 1 |
| 67 | Water Purification Tablets | 230*152*39 | 1 |
| 68 | Sensor Cable | 200mm | 2 |
| 69 | Sensor Cable | 400mm | 2 |
| 70 | Cross Pan Head Screw | M4x6xØ7 | 4 |
| 71 | Flat Gasket | d5•Ø16•0.5 | 4 |
IMPORTANT SAFETY INFORMATION
Please keep this manual for future reference.
- It is important to read this entire manual carefully before assembling and using the rower. It can be ensured to use this equipment safely and efficiently only if assembled, maintained and used properly. It is your responsibility to ensure that all users of the equipment are informed of all warnings and precautions.
- Before starting any exercise program, please consult your doctor to determine if you have any physical or health conditions that could create a risk to your health and safety, or prevent you from using this equipment. Your doctor’s advice is essential if you are taking medicines about heart rate, blood pressure or cholesterol.
- Be aware of your body’s signals. Incorrect or excessive exercise can damage your health. Stop exercising at once if you experience any of the following symptoms: pain, tightness in your chest, irregular heartbeat, extreme shortness of breath, feeling light-headed, dizziness or nausea. If you have experienced any of these symptoms, please consult your doctor before continuing with your exercise program.
- Keep children and pets away from the equipment. The equipment is only used for adults.
- Put the rower on solid and flat ground when you use it, also, you can consider using an exercise mat under the machine to protect your floor or carpet. For safety, the equipment should have at least 0.5 meters of free space all around it.
- Ensure that all nuts and bolts are tightened securely before using this equipment.
Safe usage of the equipment can only be maintained if it is examined regularly for damage or wear. - Always use the equipment as indicated. Please stop using it immediately, if you find any defective components while assembling or checking the equipment, or hear any abnormal noise from the equipment during use it. Do not use the equipment until the problem has been rectified.
- Wear suitable sport clothes when using the equipment. Avoid wearing loose clothes which may get caught in the equipment, or it may restrict the movement to continue normally.
- This machine is only used for indoor.
- The equipment is not applicable to therapeutic.
- Must be careful when lifting and moving the equipment. Always use proper lifting technique, and seek assistance if necessary.
- Check the integrity of guards and safety devices regularly.
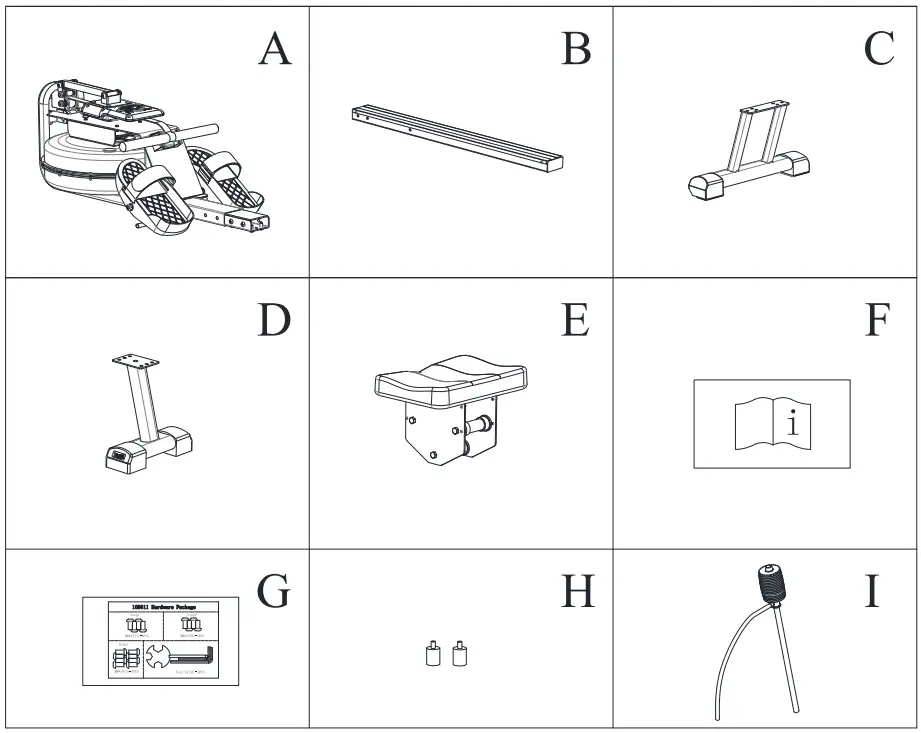
Open the box, you can take the parts below out of it.
Part List
| NO. | NAME | QTY | NO. | NAME | QTY | |
| A | Main Frame | 1PC | B | Rail | 1 PC | |
| Front Stabilizer | 1PC | D | Back Stabilizer | 1PC | ||
| E | Seat | 1PC | F | Manual | 1PC | |
| G | Tool Kit | 1PC | H | Buffer Pin | 2PCS | |
| I | Pumping Pipe | 1 PC | ||||
Tool Kit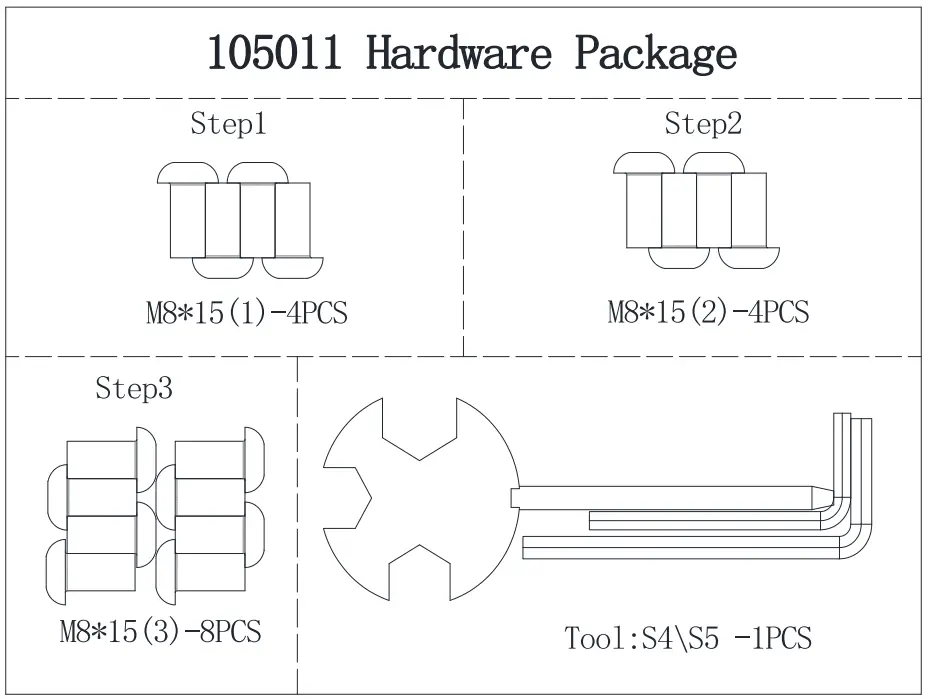
INSTALLATION INSTRUCTION
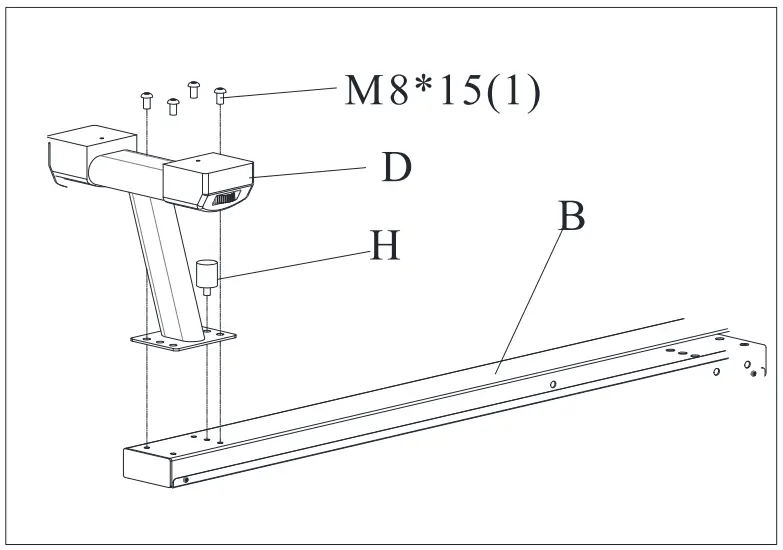
- STEP 1A
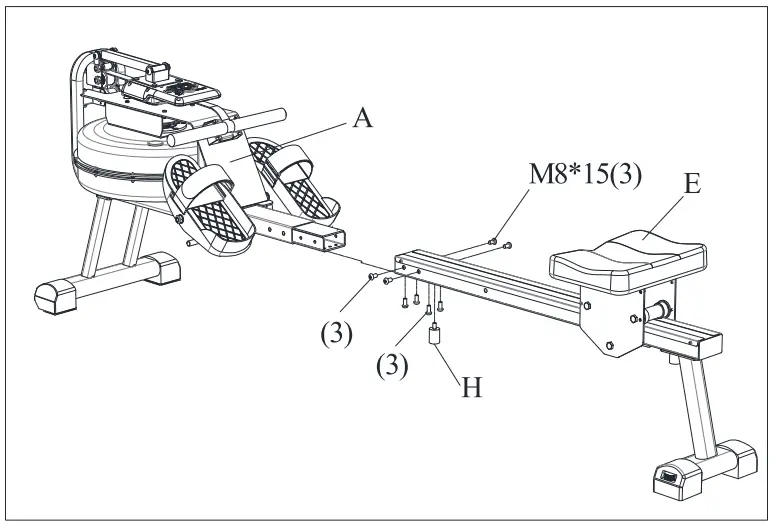
1) Assemble the Back Stabilizer(D) on the Rail(B), using the Inner Hex Screws M8*15(1) to tighten it.
2) Screw the Buffer Pin(H) on the Rail.
- STEP 1B
1) Assemble the Seat(E) on the Rail(B).
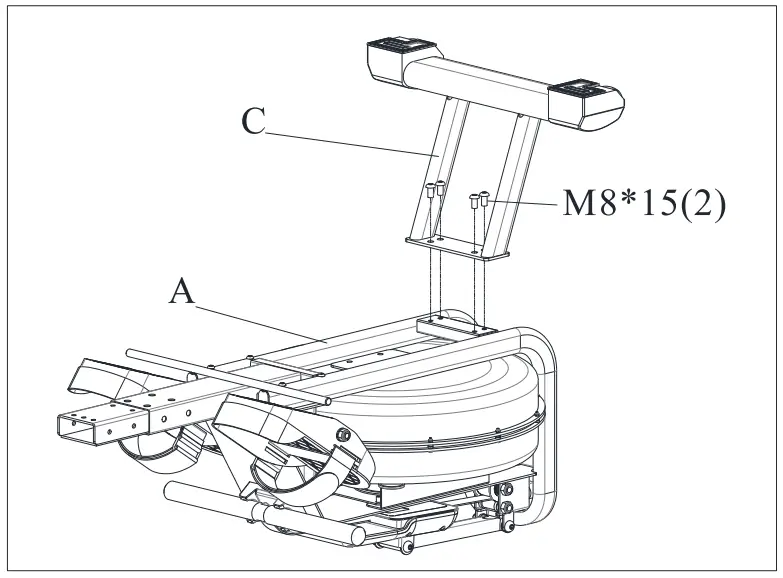
- STEP2
1) Use Inner Hex Screws M8*15(2) to fix the Front Stabilizer(C) on the Main Frame(A).
- STEP3
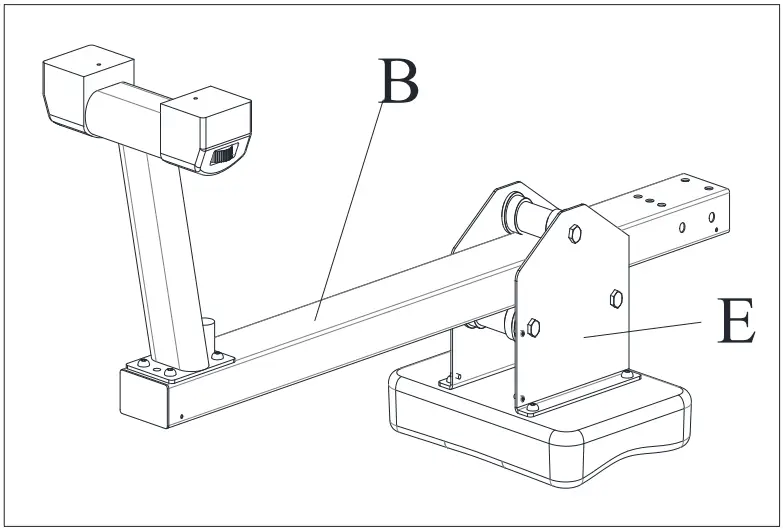
1) Assemble the whole Rail completed in Step 2 with the Main Frame(A) by using the Inner Hex Screws M8*15(3).
2) Assemble the Buffer Pin(H) on the Rail.
3) Confirm all the screws used in the steps above are fixed tightly enough.
- STEP4
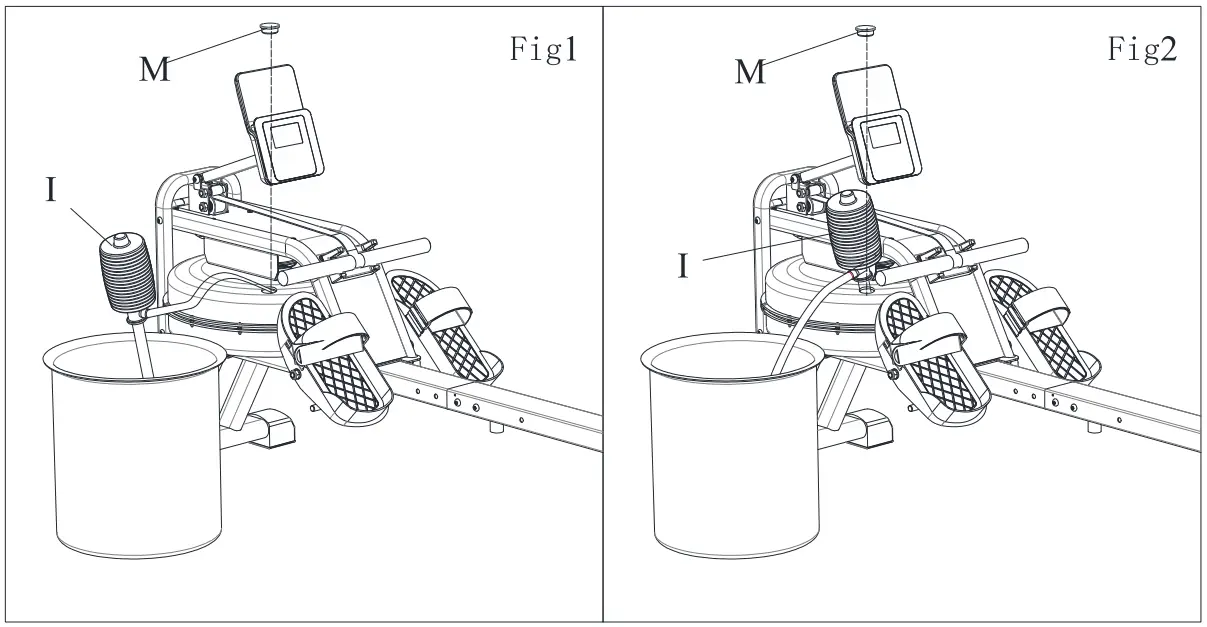
1) Take the Stopper(M) out from the tank.
2) Inject water following Fig 1. Put the Pumping Pipe(I) in the tank, use the Pipe(I) to take water from the water bucket to the tank. Manage the quantity of water according to the tick marks on the side if the tank.
3) Take out water from the tank as Fig 2. Put a bucket beside the machine, use the Pumping Pipe(I) to draw water from the tank to the bucket. Put the Stopper(M) into the tank, clean the water on the machine. Complete the process.
Movement of the machine
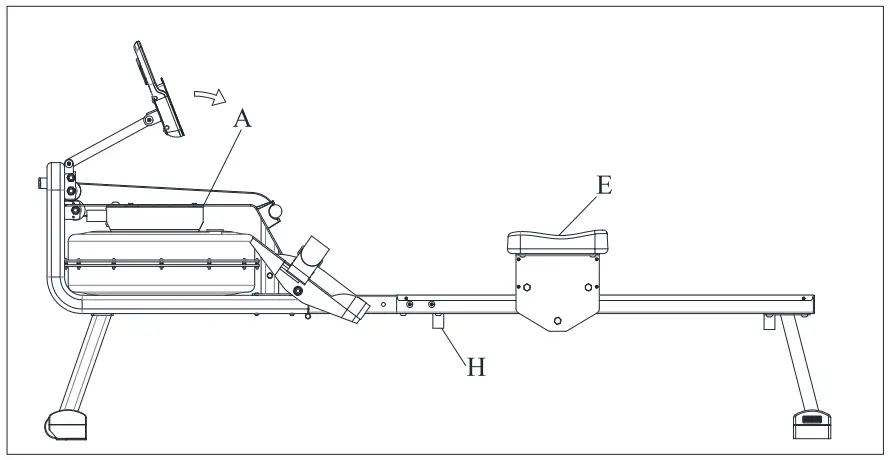
1) When you need to move machine, move the Seat(E) forward to the Buffer Pin(H).
2) Lift the end of the rail, then you can move the machine to the right place you need.

TRAINING GUIDANCE
Ready Status
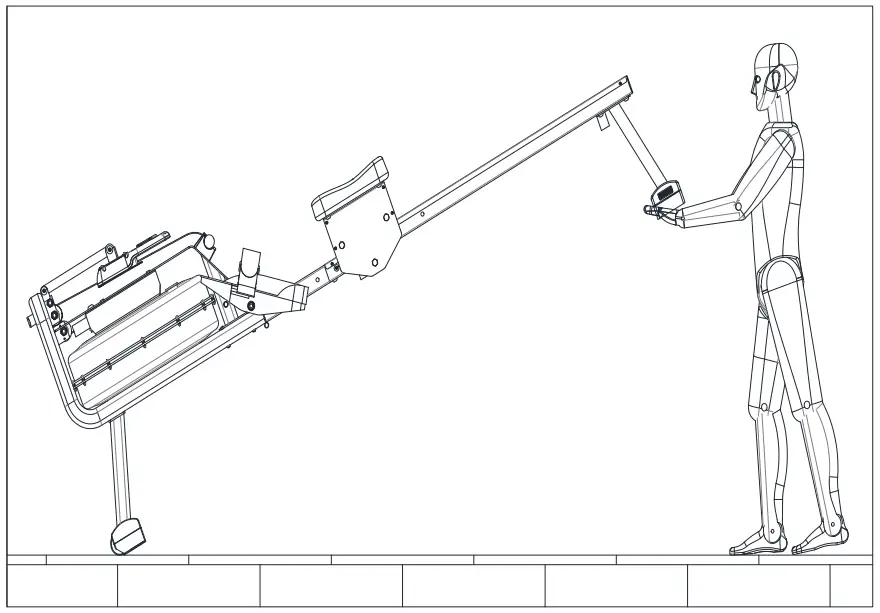
Set your arms forward, release your shoulders. Raise up your head and keep your eyes forward. Holding your feet and legs under your body.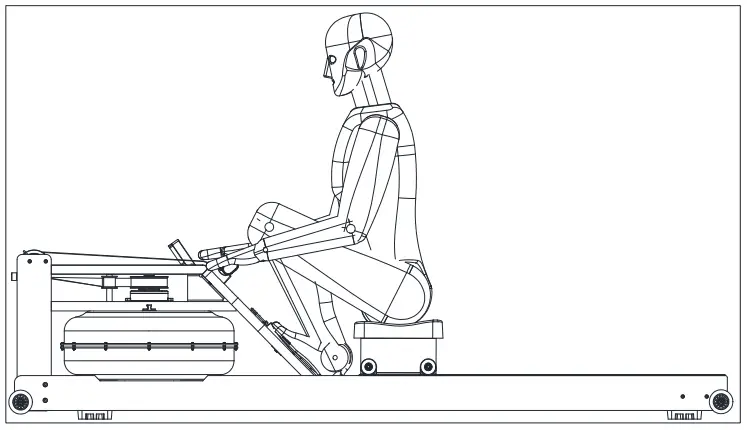
Sliding Status
Grab the lever, set your body at the correct gesture and angle, release your legs to push forward.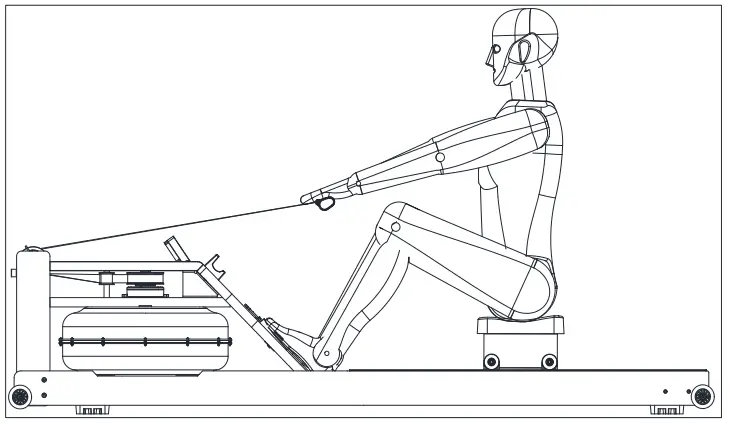
Back to the position
Push forward your legs, pull the lever to your chest and release your shoulders.
Keep eyes looking forward. After regular exercise and get the right rowing method, it will be much easier than rowing a real boat. Soon you will find the advantages of using a rowing machine to exercise.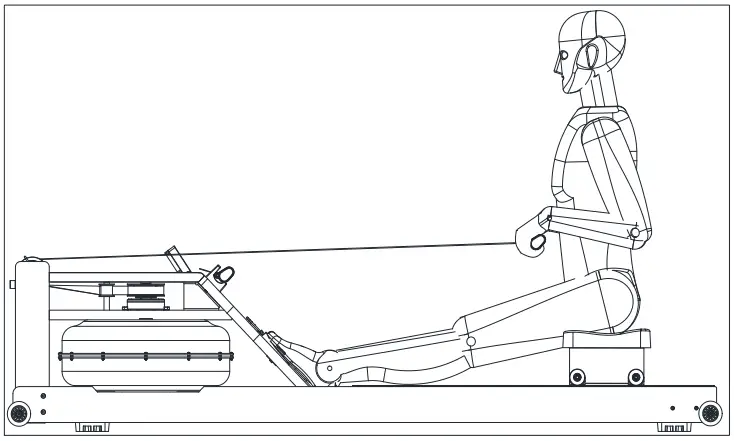
TRAINING INSTRUCTIONS
Use this Rowing Machine will help build your shape and strengthen your body, also with a healthy diet it will help you lose weight.
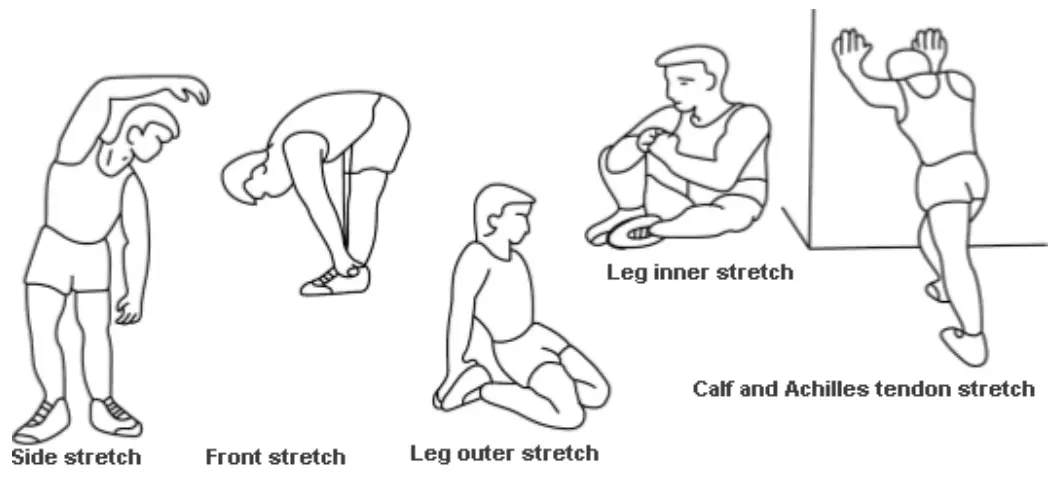
- Warm-up Stage
Warm-up can help reduce the risk of cramps or muscle damage. Stretching exercise is recommended as shown below. Each stretch should be about 30 seconds. Please proceed stretching according to your body condition.–lf you feel painful, please stop.
- Exercise Stage
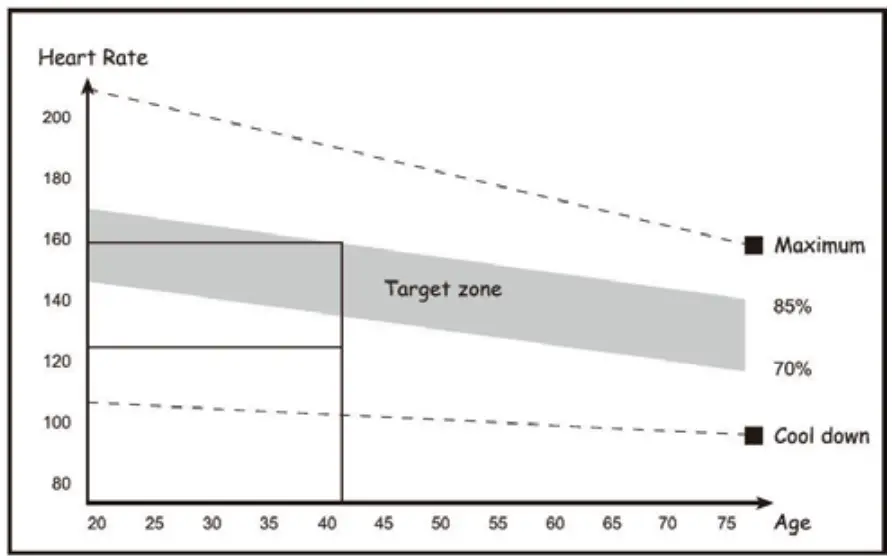
Effort is needed. Your body will be more flexible after regular exercising for a period. It’s very important to exercise with your own steady and acceptable cadence. The intensity of the exercise should allow you to reach the target heart rate range. Refer to the left image, find your age group on the x-coordinate, and then up to find your target heart rate range.
The target heart rate is suggested to last for at least 12mins to reach the exercise goal. It’s suggested to +/- exercise according to the condition of your body. It’s suggested to increase the intensity step by step.
- Calm down Stage
After exercise, repeating the stretching like we do in warm-up stage. It can help relax your body. It’s suggested to last for about 5mins. Please do the stretching according to the condition of your body. Do not force your muscle.
After the training intensity is adopted, it’s suggested to train for at least 3 times a week. - ln Shape
A certain training intensity is required. It means pressure on your leg’s muscle. Please try your best to exercise within the intensity that your body can handle. Keep your heart rate in the target zone and do stretch after training. - Lose Weight
The important factors are your exercise frequency and intensity. Work harder, burn more calories. We want to improve our health by training. The difference is the training goal.
MONITOR FUNCTION INTRODUCTION
| MODE | Setting or reset |
| SET | Set the blink mode, countdown, distance and calories. |
| RESET | Reset the countdown time of the monitor, distance and calories. –At the setting mode, press RESET for 3 seconds to clear all displayed digits. |
Functions
- SCAN
(1) Under SCAN Mode, it will display 5 status in order every 4 seconds: Time, Calorie, Counting, Distance, Total Counting. - COUNT
(1) Accumulate the counting when exercising. Range:0-9999. - TMR
(1) Accumulate the time spent. Begins when you start and ends when you stop.
Range:0:00-99:59 - DST
Accumulate the distance. Begins when you start and ends when you stop.
Range:0.00-999.9km. - CAL
Accumulate the calories you burnt. Begins when you start and ends when you stop.
Range:0.00-999.9kcal. - TCNT
(1) Accumulate the total counting after the battery is assembled. - Stop for 4 minutes(No Pressing & No Training), the monitor will dim and goes into Standby Mode. Also will turn on automatically after pressing or training.
a. Setting: Press MODE to set or reset each function. When the digit blinks, press SET to select the objective time, distance and calorie, press and hold SET to complete the setting.
Press RESET to clear all the digits.Range of functions Scanning Time 4 Sec. Counting(COUNT) 0-9999 Time(TMR) 0:00-99Min.:59Sec. Distance(DST) 0-999.9km Calorie(CAL) 0-9999kca1 Total Counting(TCNT) 0-9999 Battery AAA*2 Using Temperature Range 32°F-104°F Preserve Temperature Range 14°F-168°F
NOTE
- When training, if there is no training motion or pressing or no RPM Signal or no heart beat signal input for 4 minutes, the monitor will go to standby state.
- When the display dims and the digits are not clear, the monitor is in low power, please
replace the batteries. - If there is no signal input, please check if the sensor cable is well attached.
APP
- Search “KINOMAP” in the mobile app store to download the app.

- After the download is complete, open the APP and register your personal information, turn on the Bluetooth of your mobile phone, and make sure that the monitor is powered on and awake.
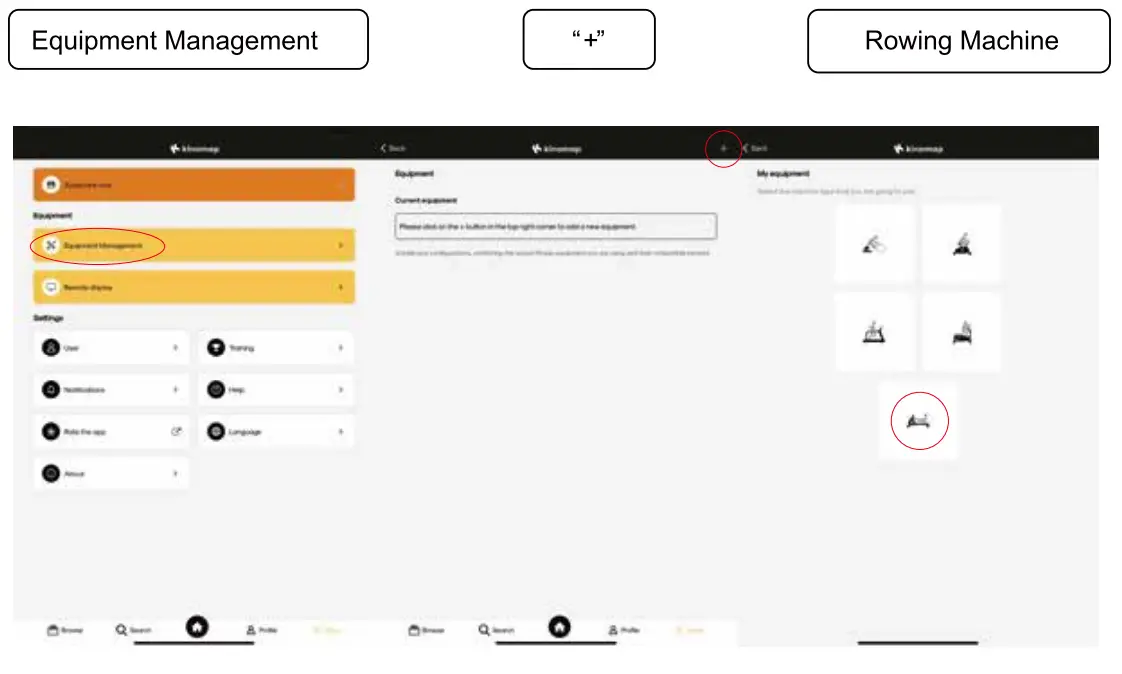
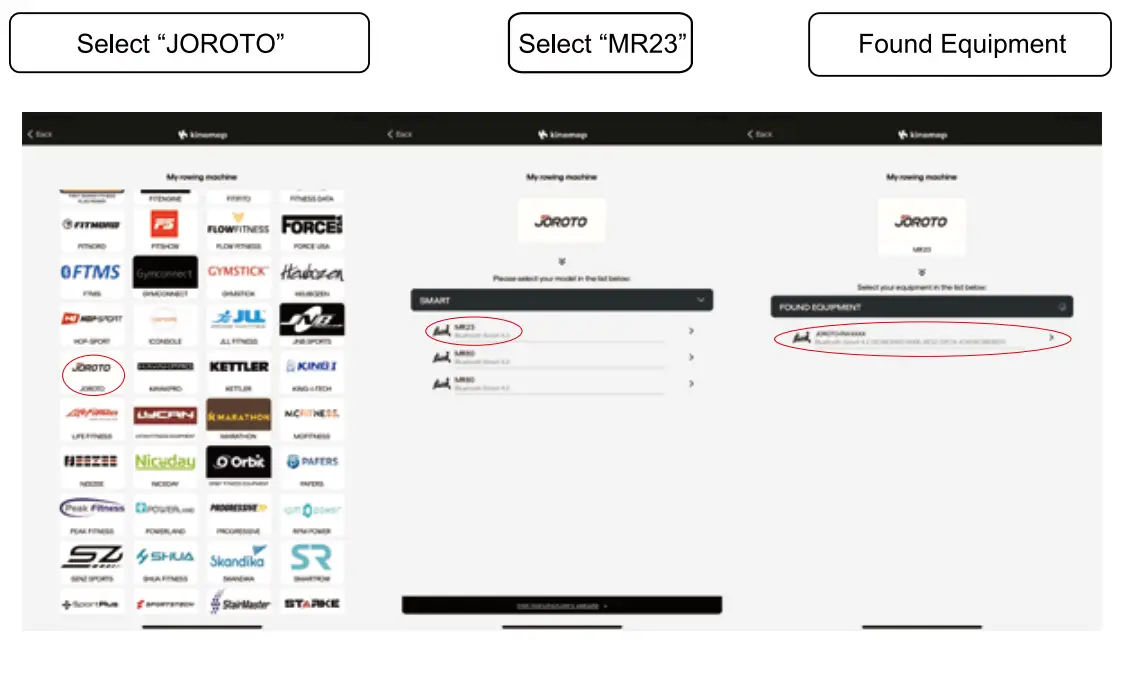
- Add sports equipment, the specific operations are as follows:

- After the equipment is connected, choose the scene you like and start your workout!

FCC Warning Statement
Changes or modifications not expressly approved by the party responsible for compliance could void the user’s authority to operate the equipment. This equipment has been tested and found to comply with the limits for a Class B digital device, pursuant to Part 15 of the FCC Rules. These limits are designed to provide reasonable protection against harmful interference in a residential installation. This equipment generates uses and can radiate radio frequency energy and, if not installed and used in accordance with the instructions, may cause harmful interference to radio communications. However, there is no guarantee that interference will not occur in a particular installation. If this equipment does cause harmful interference to radio or television reception, which can be determined by turning the equipment off and on, the user is encouraged to try to correct the interference by one or more of the following measures:
- Reorient or relocate the receiving antenna.
- Increase the separation between the equipment and receiver.
- Connect the equipment into an outlet on a circuit different from that to which the receiver is connected.
- Consult the dealer or an experienced radio/TV technician for help.
This device complies with part 15 of the FCC Rules. Operation is subject to the following two conditions: (1) This device may not cause harmful interference, and (2) this device must accept any interference received, including interference that may cause undesired operation.
RF Exposure Statement
To maintain compliance with FCC’s RF Exposure guidelines, This equipment should be installed and operated with minimum distance of 5mm the radiator your body. This device and its antenna(s) must not be co-located or operation in conjunction with any other antenna or transmitter.
Customer Service
Read all instructions carefully before using this product. Retain this owner’s manual for future reference. If you have any inquiries or require further assistance, please contact JOROTO Customer Support.
Scan the Instagram QR Code to reach us on line!
Email : [email protected]