![]() GEBRAUCHSANLEITUNG
GEBRAUCHSANLEITUNG
USER MANUAL
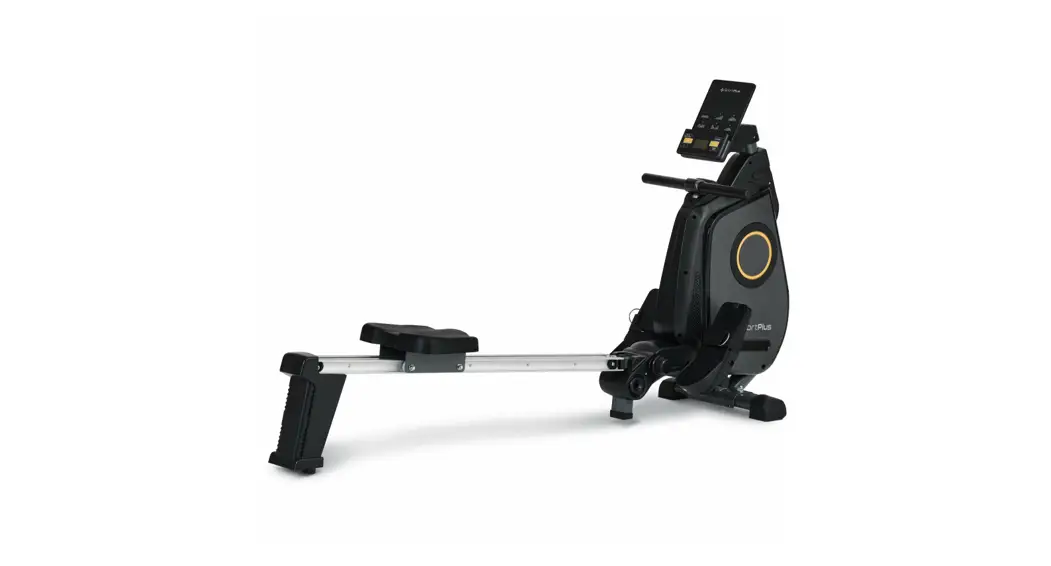
ROWING MACHINE
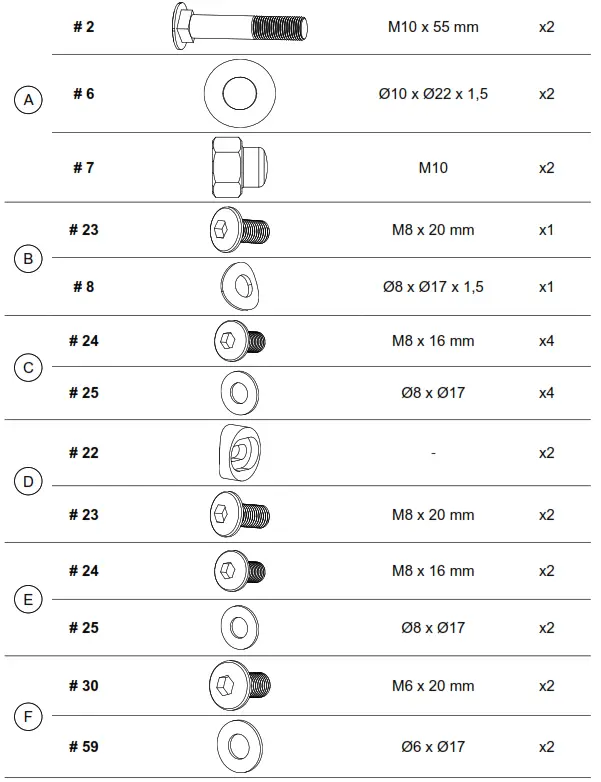
ASSEMBLY KIT
 |  |
SCOPE OF DELIVERY
ASSEMBLY INSTRUCTIONS
 |  |
 |  |
 |  |
 |  |
 |  |
Dear Customer,
Congratulations for choosing a SportPlus product. We have every expectation that you will be fully satisfied with your new purchase.
To guarantee optimal function of this product, please adhere to the following instructions:
Before using this product for the first time, please read the manual carefully! The product has been designed with safety features. Nevertheless, please read the safety instructions carefully and use the equipment only as described in the manual to avoid hazards and personal injury. Please retain this manual for future reference. Should you pass on this product to a third party, ensure to include the corresponding instruction manual.
TECHNICAL DATA
Product specifications
| • Dimensions (L x W x H): | approx. 69 x 19 x 38 in (176 x 48 x 97 cm) |
| • Total weight: | approx. 65 lbs (29.5 kg) |
| • Class: | (Home use), EN ISO 20957-1, EN 957-7 |
| • Max. weight of user: | 331 lbs (150 kg) |
| • Braking system: | speed independent |
Computer information
| • Model: | B-31922 |
| • Computer functions: | Time, total stroke count, stroke count per training, stroke frequency, approx. calorie consumption, pulse display |
| • Radio reception: | 5.3 kHz |
Technical data for power adapter
Manufacturer’s name or trade mark, commercial registration number and address:
Model identifier
Input voltage
Input AC frequency
Output voltage
Output current
Output power
Average active efficiency
Efficiency at low load (10 %)
No-load power consumption
Shenzhen Xinsi hua Technology Co., Ltd.
Floor 4, Building 15, Buji Sanlian Songyuantou
Industrial Zone, Longgang District,
Shenzhen City, Guangdong, China
SZXSH-0900500
| Values and accuracy | Unit |
| 100–240 | V |
| 50/60 | Hz |
| 9 | V |
| 0,5 | A |
| 4,5 | W |
| 95 | % |
| 95 | % |
| 0,05 | W |
SAFETY INFORMATION
ICON KEY Follow the user manual
![]() 12/2020 Date of manufacture
12/2020 Date of manufacture
INTENDED USE
- This product is intended for household use and is not suitable for medicinal or commercial purposes.
- The product is intended for indoor use.
- The maximum permissible weight of a person using this product is 150 kg.
- With regular training, your rowing machine will strengthen your upper, lower and lateral abs as well as your leg muscles.
Electric security
- Before connecting the device to the mains, make sure the current and mains voltage match the specifications on the rating label.
- Never use the device if damaged! Disconnect the device from the mains and contact your customer service if the device has been damaged in any way.
- Avoid damaging the cable by jamming, bending or rubbing it on sharp edges. Keep it away from hot surfaces and open flames.
- Guide the cable in such a way that it cannot be pulled down or tripped over accidentally.
- Warning! Do not immerse any electric parts of the device into water or other liquids. Do not hold the device under running water.
- Never operate the device with wet hands or when standing on a wet floor. Never touch the power plug with wet or moist hands.
- The use of accessories not explicitly recommended by the manufacturer could cause injuries and damage. Only use original accessories.
- Keep the device away from hot surfaces and open flames. Always use the device on a flat, stable, clean and dry surface. Protect the device against extreme heat, dust, direct sunlight, moisture, and dripping and splashing water.
- Do not place any heavy objects on the device. Do not place any objects with open flames (e.g. candles) on or next to the device. Do not place any objects filled with water (e.g. vases) on the device.
- This device is not intended to be used by persons (including children) with reduced physical, sensory or mental abilities or lack of experience and / or lack of knowledge unless they are supervised by a person responsible for their safety or have received instructions on how to use the device.
- Do not pull the cord when disconnecting the adapter from the wall socket and do not wind the mains cable around the device.
- Connect the adapter to a readily accessible wall socket in order to be able to disconnect the device from the mains immediately in case of emergency. Disconnect the adapter from the wall socket to fully switch off the device. Use the adapter as disconnecting device.
- Disconnect the adapter before each cleaning and if not using the device for a longer period of time.
- Only use the adapter included in the delivery scope.
- The user can undertake no measures to modify the product to 50 or 60 Hz. The product switches automatically to 50 or 60 Hz.
DANGER FOR CHILDREN AND OTHER GROUPS OF PERSONS
- Children cannot recognize the hazards that this product may pose. For this reason, keep this product out of the reach of children. The product is not a toy. Store the product at a location out of the reach of children and pets.
- If you allow a child to use the product, do not leave it unattended during use. Make all necessary adjustments to the product yourself and supervise the child during exercise.
- Keep packaging materials out of the reach of children. They pose a suffocation hazard!
CAUTION –RISK OF INJURY
- Do not use the product if it is damaged or defective. In this case, contact a professional workshop or our service center.
- Always verify that the product is in impeccable condition before use. Defective components must be replaced immediately as failure to do so may impair the functioning and safety of the product.
- Make sure that no more than one person uses the product at a time.
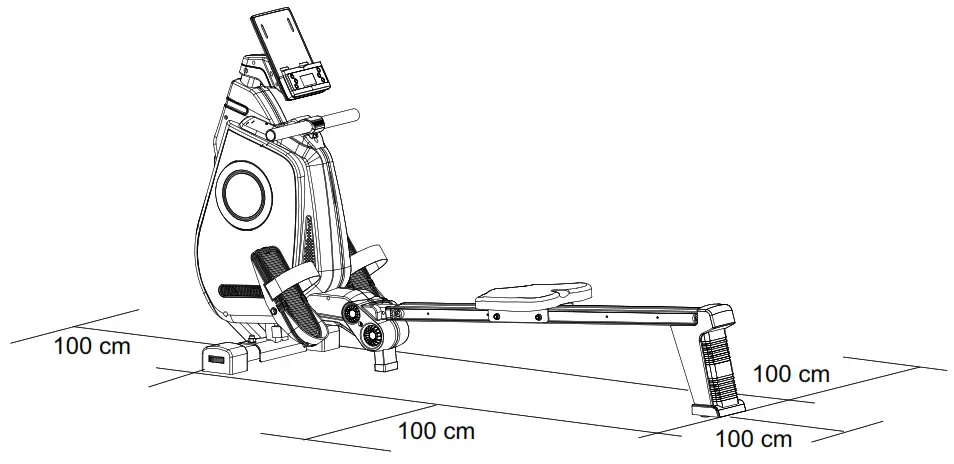
- Always use the product on a horizontal, level, nonslip and solid surface. Never use the product near water and make sure there is a safety clearance of at least 1 meter on all sides of the product.
- Prevent your arms and legs from coming near the product’s moving components. Do not put any objects into any openings on the product.
CAUTION – PRODUCT DAMAGE
- Do not alter the product in any way and use only original replacement parts. Have all repairs carried out in a professional workshop or from similarly qualified persons – improper repairs can lead to serious risks for the user. Use the product for the intended purposes as described in the operating instructions only.
- Shield the product from spraying water, moisture, high temperatures and direct sunlight.
INFORMATION ON ASSEMBLY
- The product should be carefully assembled by a responsible adult. Ask for the assistance of another, technically-skilled person in case of doubt.
- Before beginning assembly of the product, read all assembly steps carefully and review the diagram.
- Remove all packaging materials and lay out all the parts. This will give you a good overview and simplify assembly. Shield the assembly surface from filth and scratching by laying down suitable padding.
- Check the components against the components list to make sure all are present. Do not dispose of all packaging materials until assembly is completed.
- Please note that there is always a risk of injury when using tools to carry out manual tasks. Therefore, please exercise caution when assembling this product.
- Make sure your work environment is hazard-free. For example, do not leave any tools lying around.
- After assembling the product according to the instructions, make sure that all screws, bolts and nuts are installed correctly and tightened.
- If necessary, lay out protective padding (not included) beneath the product to protect your floor as there is no guarantee that, for instance, the rubber feet will not leave marks behind.
Training area
![]() Caution Risk of crushing! Moving parts such as the seat may crush, pinch or cut body parts. Do not touch the slide rail while using the product!
Caution Risk of crushing! Moving parts such as the seat may crush, pinch or cut body parts. Do not touch the slide rail while using the product!
- Make sure that all screws and nuts are securely tightened before using the product.
PREPARATION
Setting the pedals
Adjust the pedals (14) to your foot size by adjusting the strap circumference.

USING THE COMPUTER
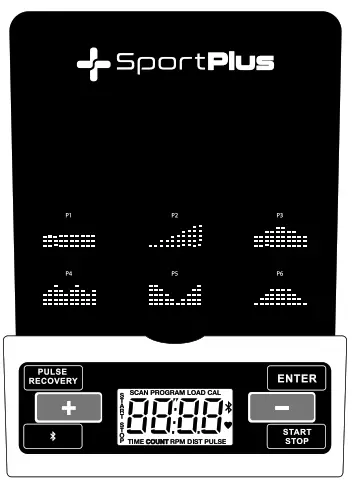
Button functions:
ENTER button
- Press this button to confirm the program selection.
- Press this button to confirm the training value settings.
- Press this button to make program settings for distance, time, calories or heart rate. Please note that not all programs support all the functions.
Start / Stop button:
- Start or stop the workout of the respective program by pressing this button.
- When in stop mode, press and hold this button for 3 seconds in order to reset all values to zero.
+ / – button:
- When in stop mode, press to select a desired program.
- When in stop mode, press to adjust values within a program.
- Press during workout to increase or reduce the resistance level.
PULSE RECOVERY button:
- Press this button to display your recovery pulse after workout (F1 to F6).
Bluetooth®button: - Press this button to turn Bluetooth® on the computer on or off. When Bluetooth® is activated, the Bluetooth® icon flashes on the display.
Control via APP - You can connect the computer via Bluetooth® 4.0 to your smartphone/tablet.
Please download a compatible app (e.g. Kinomap) from the Play Store for Android or the Apple App Store for iOS.
Functions - There are a total of 6 programs available for exercise: Manual (P1), Preset programs (P2-P6), Incline (P2), Hill (P3), Valley (P4), Rolling (P5), Fat Burn (P6).
- Having selected a program, you can use the time, distance and calorie settings to set your specific workout targets.
| Training parameters | Display | Preset value | Steps | Description |
| TIME | 0:00–99:00 | 00:00 | ±1:00 | Time setting 0:00: Shows the duration of the workout. |
| Time setting 1:00–99:00: activated countdown till 0. | ||||
| DISTANCE | 0.00–99.00 | 0.00 | ±1 | Distance setting 0.00: Shows the distance covered during workout. |
| Distance setting 1.0–99.00: Activates countdown to 0. | ||||
| Calories | 0.0–9990 | 0.0 | ±10 | Calories setting 0: Shows the calories burned during workout. |
| Calories setting 0–9990: Activates countdown to 0. |
Program selection and operation
- Connect the power adapter (74) to a suitable wall socket first and then to the adapter socket on the device.
- In stop mode, press the + or – button to select a program.
- Press ENTER to confirm.
- All parameters will start flashing in sequence in the display. Use the + and – buttons to select the respective values.
- Press ENTER to confirm each time.
- If no setting is configured within 20 seconds, the computer will automatically exit the setting mode.
- After all adjustable values have been entered, the computer will emit an acoustic signal. Press the START/STOP button to deactivate the signal and to start the workout.
- You may also press the START/STOP button immediately to start the workout directly without entering any data.
- Please note: Some programs do not support manual configuration of certain parameters.
- Please note: The “time” and “distance” parameters cannot be adjusted manually within the same program.
Manual program (P1):
- Select the manual program using the + or – button. Press ENTER to confirm.
- Use the + and – buttons to enter the desired workout parameters. Press ENTER to confirm each time.
- Press the START/STOP button to start the workout.
- You may also press the START/STOP button immediately to start the workout directly without adjusting any parameters.
- Press the + or – button at any time during the workout to adjust the resistance level as desired.
- Please note: When the value reaches zero, the computer will emit an acoustic signal. Press the start/stop button to continue the workout.
Preset programs (P2-P6)
- Select one of the pre-set programs using the + or – button. Press ENTER to confirm.
- The preset programs differ in regard to resistance, time, distance and calorie consumption settings.
- The following table shows the preset values for the resistance levels of the different programs.
- You may nevertheless press the + or – button at any time during workout to adjust the resistance accordingly.
- Press the start/stop button to start the workout.
| PROGRAM | 1. Min. | 2. Min. | 3. Min. | 4. Min. | 5. Min. | 6. Min. | 7. Min. | 8. Min. | 9. Min. | 10. Min. |
| P2 Steps | L01 | L01 | L01 | L01 | L01 | L04 | L04 | L04 | L04 | L04 |
| P3 Hill | L07 | L07 | L07 | L07 | L07 | L07 | L10 | L10 | L10 | L10 |
| P4 Rolling | L07 | L07 | L07 | L10 | L10 | L10 | L13 | L13 | L13 | L13 |
| P5 Valley | L13 | L13 | L13 | L13 | L13 | L10 | L10 | L10 | L10 | L10 |
| P6 Fat Burn | L01 | L01 | L01 | L04 | L04 | L04 | L07 | L07 | L07 | L10 |
Pulse control
- Consult your doctor to have your body’s ideal pulse range checked.
- Important! Stop exercising immediately if you feel dizzy or if you do not feel safe anymore!
- PULSE (heart rate): The computer has an integrated receiver for a heart rate transmitter that is suitable for nearly all common uncoded 5.0 kHz (5.3 kHz) chest straps (chest strap not included). This function shows your current heart rate.
Recovery pulse program
- RECOVERY (recovery pulse): The use of a chest strap (chest strap not included) is required to calculate your recovery pulse. After training, press the PULSE RECOVERY button. A 60 second countdown begins during which your initial and final heart rate is measured. You should remain quietly seated during measurement. After 60 seconds elapse, your recovery pulse is assessed (F1 = very good, F6 = poor).
- Press any button to return to the main interface.
Auto On/Off
- The computer activates automatically when you begin exercising.
- After 4 minutes, the computer automatically switches to standby mode when no signal is received.
WORKOUT TIPS
IMPORTANT NOTES ON TRAINING
- Please consult your physician before beginning training. Ask your physician about the extent of training appropriate for you. Improper or excessive training may result in damage to health.
- Do not overstrain your own body. Do not train when you are tired or exhausted. If you are unaccustomed to physical activity, begin slowly.
- Cease training immediately if you feel any pain or discomfort.
- Do not eat anything for a half hour before and after training.
- Breathe evenly and calmly during training.
- To prevent injury, begin each training session with warm-up exercises and end with a cool-down phase.
- Be sure to drink enough fluids during training. Please note that the recommended fluid intake of approx. 2 liters daily increases through physical strain. The fluids you drink should be at room temperature.
- Use the product only wearing sports wear and appropriate shoes with nonslip soles. Do not wear loose clothing that could catch on the unit during training.
- Check your pulse regularly. Establish your personal training frequency range to achieve the best training results. Take into consideration your age as well as your physical condition. The following table offers a reference point for establishing your ideal training pulse:
| Age | Heart rate range 50–75 % (beats per minute) – ideal training pulse – | Maximum heart rate 100 % (220 beats – age) |
| 20 years of age | 100-150 | 200 |
| 25 years of age | 98-146 | 195 |
| 30 years of age | 95-142 | 190 |
| 35 years of age | 93-138 | 185 |
| 40 years of age | 90-135 | 180 |
| 45 years of age | 88-131 | 175 |
| 50 years of age | 85-127 | 170 |
| 55 years of age | 83-123 | 165 |
| 60 years of age | 80-120 | 160 |
| 65 years of age | 78-116 | 155 |
| 70 years of age | 75-113 | 150 |
EXERCISE
Position
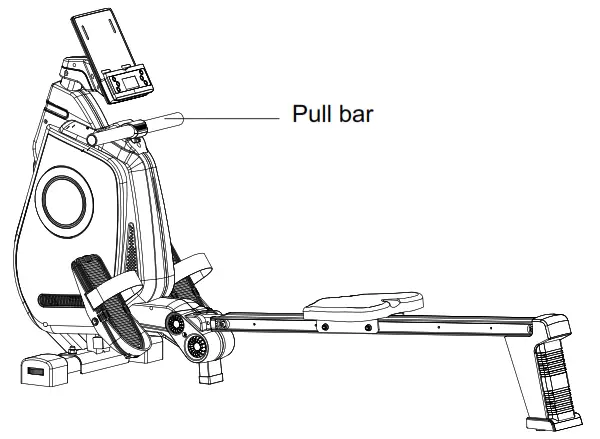
- Sit on the seat (11) and carefully place your feet in the pedals (14 L/R).
- Remove the draw bar from the rack.
- In the initial position, your arms should be straight, your torso slightly bent forward and your legs slightly bent.
Exercise steps
- Stretch your legs without moving your torso.
- After you fully stretch your legs, slightly bend your torso backward.
- Now pull the draw bar to your chest with your arms.
- Then reverse the steps to return to the initial position.
- Repeat the exercise.
MAINTENANCE & CLEANING
- Make sure that all bolts/nuts are correctly tightened after assembly and before use.
- Clean the unit regularly with a slightly damp cloth and a mild cleaning agent. Do not use any solvents to clean the unit.
- This applies to the padding and handles especially since these parts are in constant contact with your body during training. You can cover the pads with a towel during training to protect them.
- You should grease the axles of all moving parts once every one or two years. You can use an off-the-shelf grease to do so.
NOTES ON DISPOSAL
Environmental protection:![]() Packaging materials are raw materials and can be recycled.
Packaging materials are raw materials and can be recycled.
Separate the packaging materials correctly and dispose of them properly in the interest of the environment. Your local administration can provide additional information.![]() Used devices do not belong in household waste!
Used devices do not belong in household waste!
Dispose of used devices properly! Doing so helps fulfill our responsibility to protect the environment.
Your local administration can provide information on collection points and opening hours.
TROUBLESHOOTING
| PROBLEM | CAUSE | WHAT TO DO? |
| Computer | ||
| No display or no function | No cable connection | Check cable connection If this does not solve the problem, contact our service center |
| Heart rate | ||
| No display | Incompatible chest strap | Use an uncoded 5.0 kHz (5.3 kHz) chest strap |
| Inaccurate or interrupted display | Weak chest strap batteries | Replace chest strap batteries |
| Insufficient body contact with strap | Following the manufacturer’s instructions, moisten the chest strap’s contact surfaces or use a contact gel | |
| Mechanics | ||
| Missing parts | – | Check packaging |
| Call our service center | ||
| Rowing machine is squeaking | Parts subject to friction are not greased sufficiently | Grease squeaking part with thick grease or fat |
SERVICE AND REPLACEMENT PARTS
Please do not hesitate to contact our service team in one of the following ways if you have technical questions, questions about our products or to order replacement parts:
| Service time: | Monday to Friday, 9 am to 6 pm |
| Service hotline: | +44 – 203 318 4415* |
| Email: | [email protected] |
| URL: | https://sportplus.de/ |
*National fixed-line network, call charges depend on your phone company/your phone contract.
Please have the following information at hand when you call.
- Instruction manual
- Model number (located on the title page of this manual)
- Description of accessory parts
- Accessory number
- Proof of purchase with purchase date
IMPORTANT NOTE
Please do not send your product to our service team without being requested to do so.
The costs and risk of loss for unsolicited shipments will be borne by the sender. We reserve the right to refuse to accept unsolicited shipments or to return the corresponding
merchandise to the sender carriage forward, that is, at the sender’s expense.
TERMS OF WARRANTY
SportPlus guarantees that the product under warranty has been manufactured from the highest quality materials and has been checked with the utmost care.
The operation and assembly of the product according to the operating instructions is a precondition of this warranty. The warranty can be voided due to improper use and/or improper transport of the product.
The term of warranty lasts 2 years beginning from the date of purchase. If the product you have purchased is defective, please contact our service team within 24 months from the date of purchase. Excluded from the warranty are:
- Damage due to external force.
- Interference, repairs or alterations by amateurs and by persons who have not been authorized by us.
- Failure to observe the operating instructions.
- If the afore-mentioned warranty terms are not met.
- If the defect was caused by improper use or maintenance, neglect or accidents.
- Wear parts and consumable materials such as bearings, pads, belts, seat rollers, and resistance strap/reel are also excluded.
- This product is intended for private use only. There is no warranty for commercial use.
EU DECLARATION OF CONFORMITY
You can find the declaration of conformity at the following link: https://sportplus.de/pages/konformitaetserklaerung
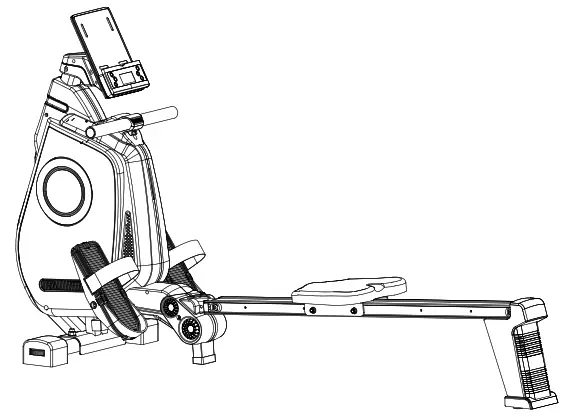
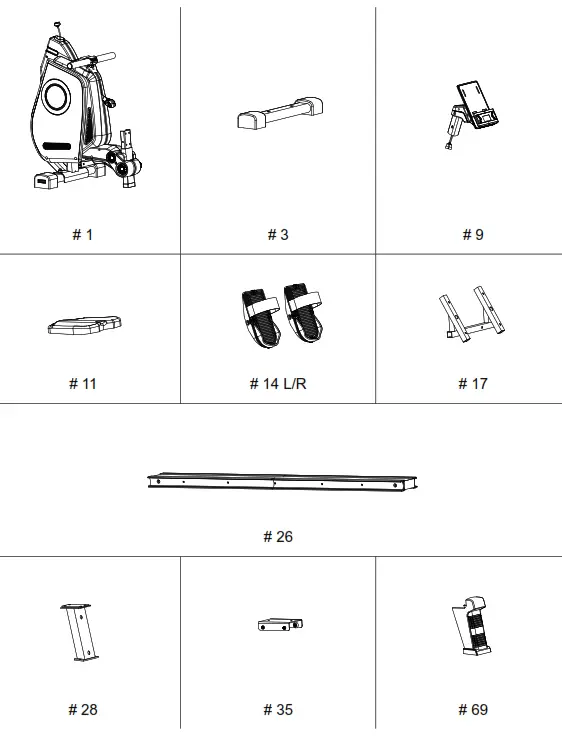
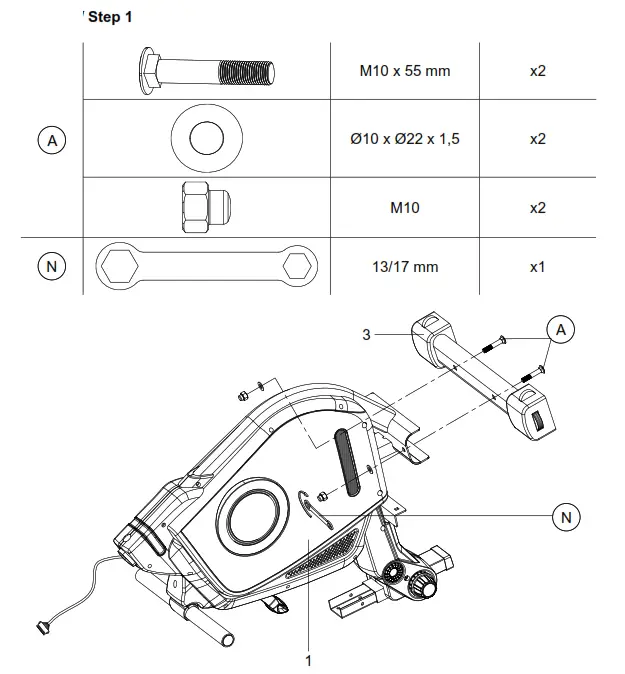
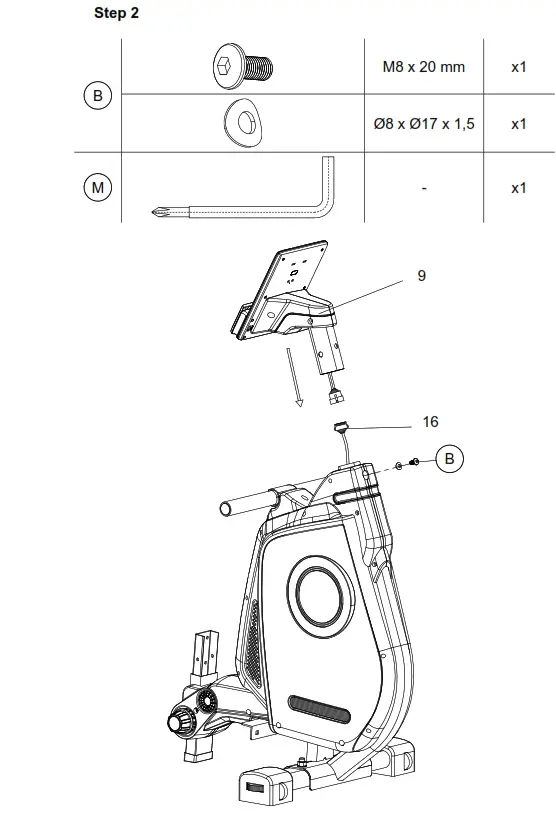
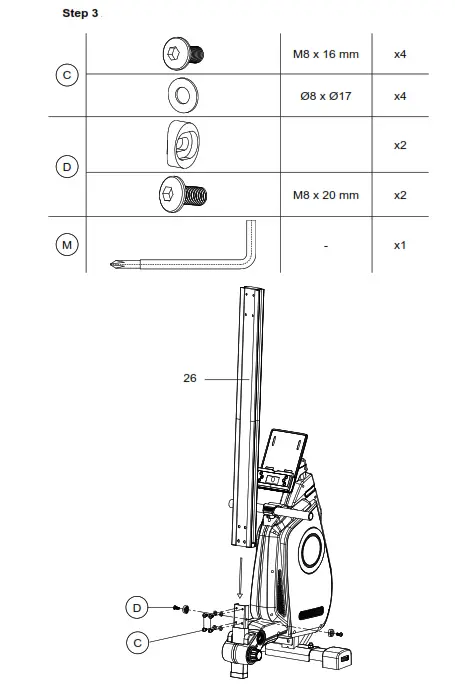
EXPLOSION VIEW

PART LIST
| No. | Description and information | Quantity |
| 1 | Main frame | 1 |
| 2 | Carriage bolt M10 x 55 | 2 |
| 3 | Front stabilizer | 1 |
| 4/L | End cap for front stabilizer L | 1 |
| 4/R | End cap for front stabilizer R | 1 |
| 5/L | End cap for slide rail L | 1 |
| 5/R | End cap for slide rail R | 1 |
| 6 | Washer Φ10 x Ø22 x 1.5 | 3 |
| 7 | Domed nut M10 | 2 |
| 8 | Bent washer Ø8 x Ø17 x 1.5 | 1 |
| 9 | Computer | 1 |
| 10 | End cap 30 x 30 | 6 |
| 11 | Seat | 1 |
| 12 | Screw M5 x 12 | 4 |
| 13/L | Facing L | 1 |
| 13/R | Facing R | 1 |
| 14/L | Left pedal | 1 |
| 14/R | Right pedal | 1 |
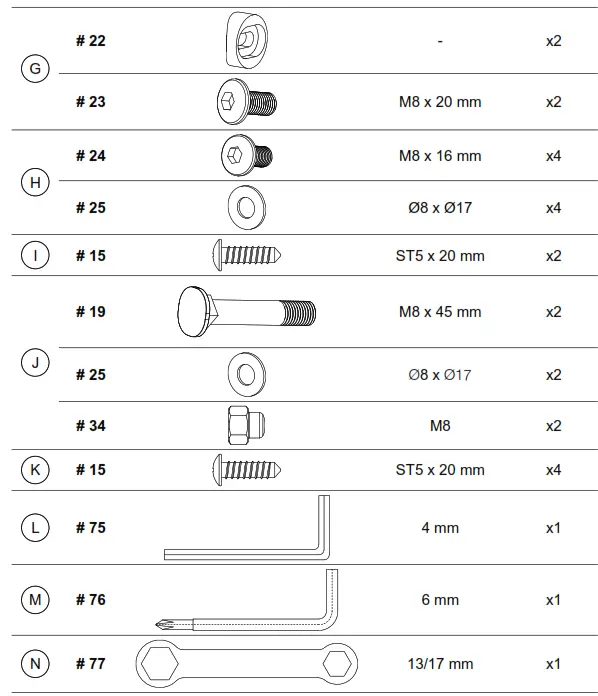
| 15 | Self-tapping screw ST5 x 20 | 22 |
| 16 | Computer cable | 1 |
| 17 | Pedal support tube | 1 |
| 18 | Spring clutch bracket | 2 |
| 19 | Carriage bolt M8 x 45 | 2 |
| 20 | Hex screw M10 x 80 | 1 |
| 21 | Connection tube | 1 |
| 22 | Collar | 4 |
| 23 | Screw M8 x 20 | 5 |
| 24 | Screw M8 x 16 | 10 |
| 25 | Washer Ø8 x Ø17 | 18 |
| 26 | Slide rail | 1 |
| 27 | Screw M5 x 15 | 6 |
| 28 | Rear support frame | 1 |
| No. | Description and information | Quantity |
| 29 | Computer support tube | 1 |
| 30 | Hexagon socket screw M6xX 20 | 2 |
| 31 | Nylon nut M8 | 9 |
| 32 | Wheel for seat support bracket | 4 |
| 33 | Axle for seat support bracket | 4 |
| 34 | Domed nut M8 | 2 |
| 35 | Seat support bracket | 1 |
| 36 | Belt | 1 |
| 37 | Spring clutch w/rope | 1 |
| 38/L | Left chain cover | 1 |
| 38/R | Right chain cover | 1 |
| 39 | Flywheel adjuster | 2 |
| 40 | Nylon nut M6 | 2 |
| 41 | Eye bolt | 2 |
| 42 | Flange nut | 2 |
| 43 | Flywheel | 1 |
| 44 | Hex screw M8 x 105 | 1 |
| 45 | Self-tapping screw 5 x 15 | 11 |
| 46 | Plastic bushing | 2 |
| 47 | Magnet assembly | 1 |
| 48 | Bumper for handle | 1 |
| 49 | Hex head nut | 2 |
| 50 | Hex screw M6 x 25 | 1 |
| 51 | Sensor bracket | 1 |
| 52 | Nylon nut M10 | 1 |
| 53 | Knob M10 | 1 |
| 54 | Facing (L/R) | 1/1 |
| 55 | Self-tapping screw 5 x 35 | 3 |
| 56 | End cap 60 x 30 | 1 |
| 57 | Bearing | 2 |
| 58 | Spacer with powder coating | 2 |
| 59 | Washer Ø6 x Ø17 | 2 |
| 60 | Spring | 1 |
| 61 | Upper cover for handle | 1 |
| No. | Description and information | Quantity |
| 62 | Lower cover for handle | 1 |
| 63 | Handle | 1 |
| 64 | Self-tapping screw | 2 |
| 65 | Tension pulley | 1 |
| 66 | Axle for Idler | 1 |
| 67 | Foam grip | 2 |
| 68 | End cap for handle | 2 |
| 69 | Facing for rear support tube | 1 |
| 70 | Adjustable mat | 2 |
| 71 | Engine cable | 1 |
| 72 | Motor | 1 |
| 73 | Sensor cable | 1 |
| 74 | Power adapter | 1 |
| 75 | Hex key 4 mm | 1 |
| 76 | Hex key 6 mm | 1 |
| 77 | Wrench 13 x 17 mm | 1 |
![]() Servicehotline: +44 – 203 318 4415
Servicehotline: +44 – 203 318 4415
(Call charges depend on your phone company / your phone contract.)
E-Mail: [email protected]
URL: https://sportplus.de/


