
![]() 229229 Pulsar and Pulsar Plus EV Charger
229229 Pulsar and Pulsar Plus EV Charger
Installation Guide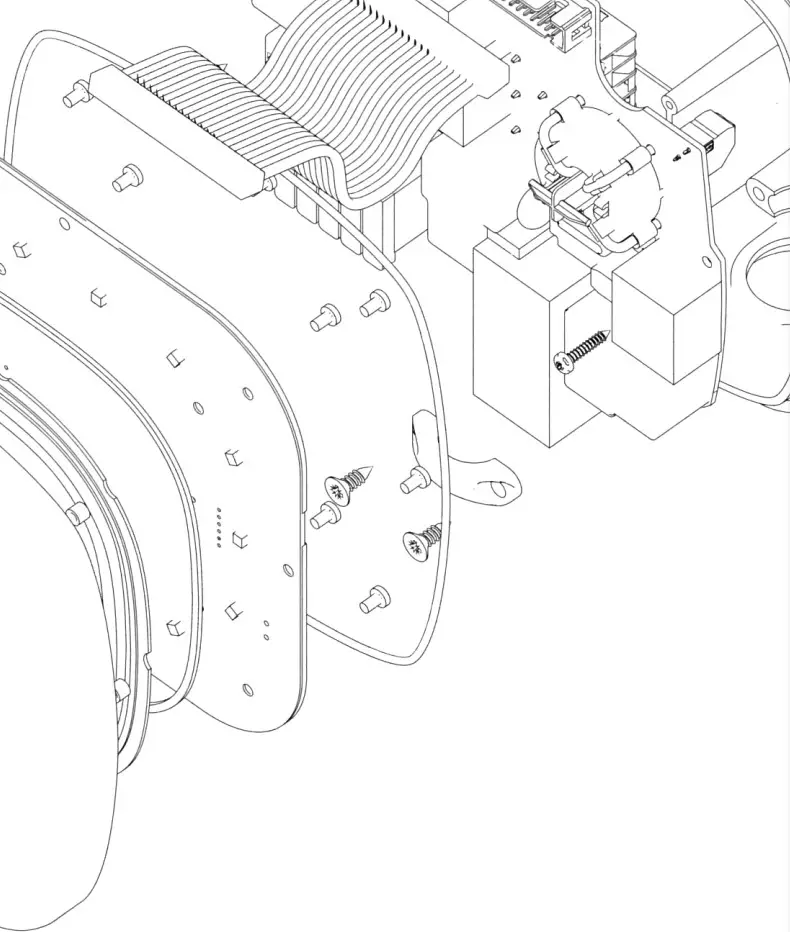
General Specifications
![]() PULSAR & PULSAR PLUS
PULSAR & PULSAR PLUS
A – Charging Mode (IEC 61851-1) 3
B – Dimensions without cable 166x163x82 mm
C – Weight without cable 1 kg
D – Operating Temperature -25 ºC to 40 ºC
E – Storage Temperature -40 ºC to 70 ºC
F – Standards CE mark (LVD 2014/35/EU, EMCD 2014/30/EU)IEC 61851-1, IEC 61851-21-2, IEC 62196-2
Electrical Specifications
A – Charging Power 7,4 kW (1P) 11 kW (3P) 22 kW (3P)
B – Rated Voltage AC ± 10% 230 V 400 V 400 V
C – Cable Section 5 x 6 mm² (Pulsar) 5 x 10 mm² (Pulsar Plus)
D – Rated Frequency 50 Hz / 60 Hz
E – Protection Rating IP54 / IK08
F – Overvoltage Category CAT III
G – External RCCB required per local regulations Type A or Type B
H – Residual current protection AC 30mA / DC 6mA
I – Protection against electric shock CLASS I
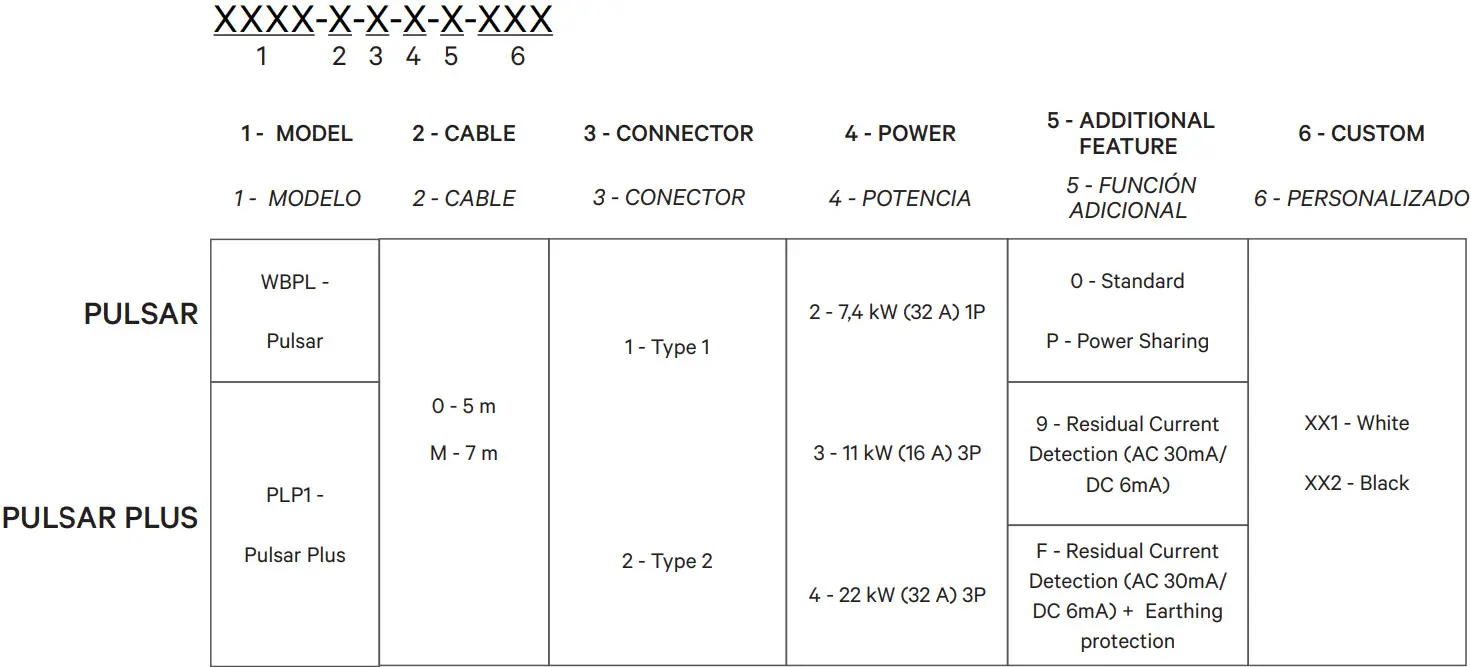
Part Number Structure
Safety Warnings
| A risk of injury. | B | C |
| D | E | F |
Tools
REQUIRED TOOLS
| A | B | C | D |
| E | F | G | H |
Mounting Parts
INCLUDED MOUNTING PARTS
| I | J | K |
| L Protective Caps | M | N |
| O | ||
Drilling
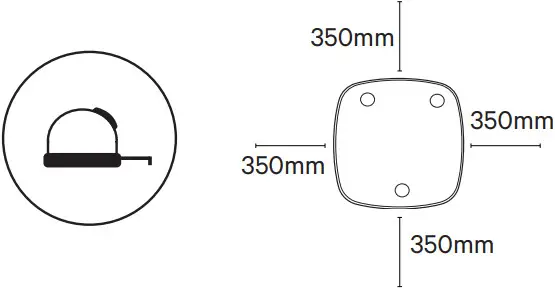
A. Place the drilling template on the wall and mark the three fixing points.
 B. Drill holes where the fixing points are marked.
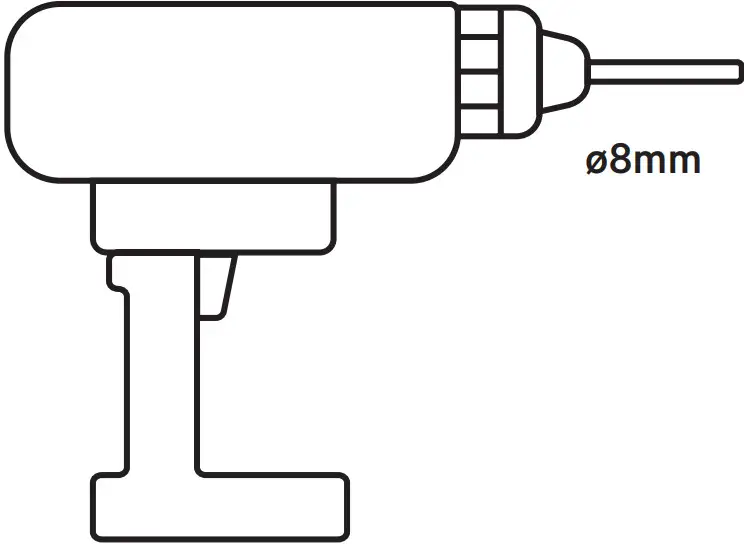 C. Insert the anchor screws into the fixing holes.
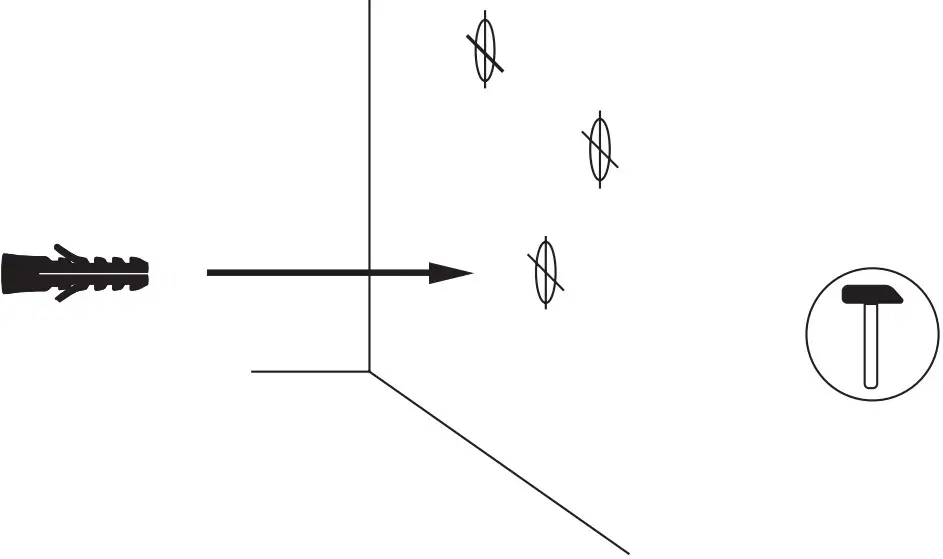

Lower Connection
A. Fix the device on the wall by inserting the screws and then the protective caps.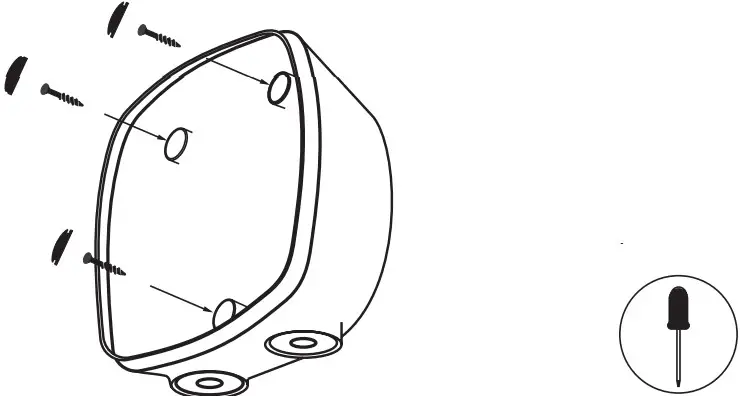 B. Make an incision on the rubber grommet for the power supply cable.
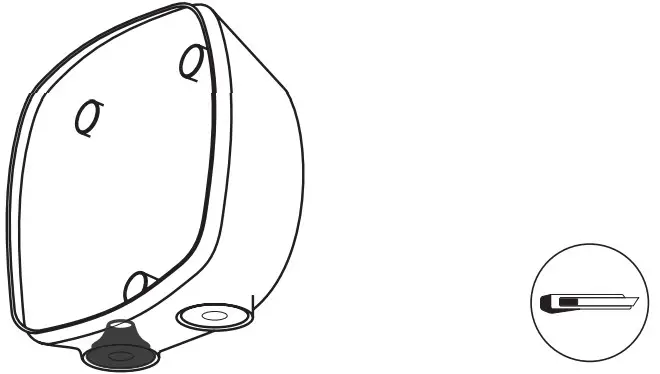 C. Insert the power supply cable through the grommet.
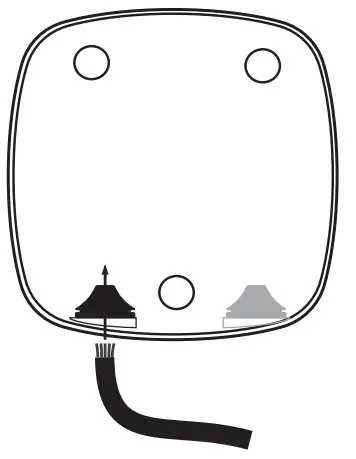

Rear Connection
A. Cut the thin plastic area on the back of the charger, and insert the grommet.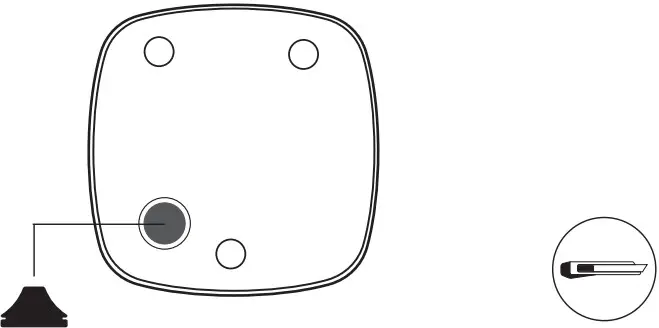 B. Make an incision on the grommet and insert the power supply cable.
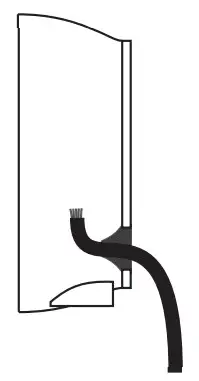 C. Fix the device on the wall by inserting the screws and then the protective caps.
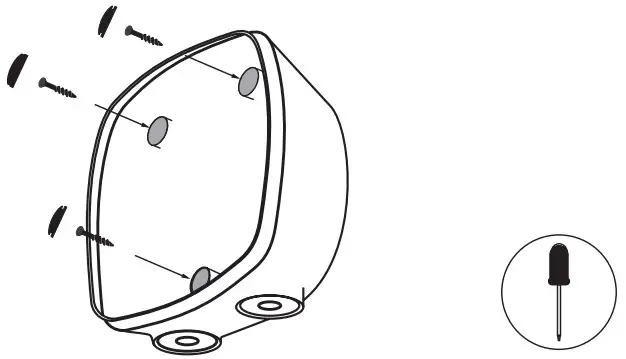

Electrical Wiring
A. Single Phase Set-up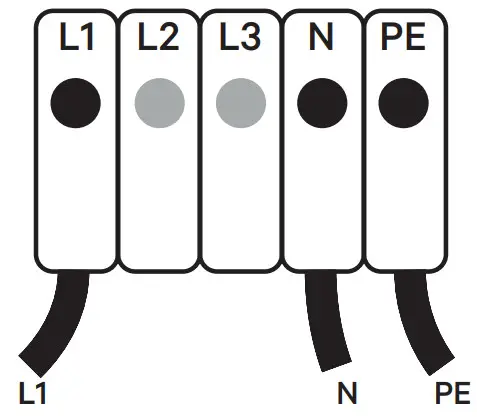 | B. Three-Phase Set-up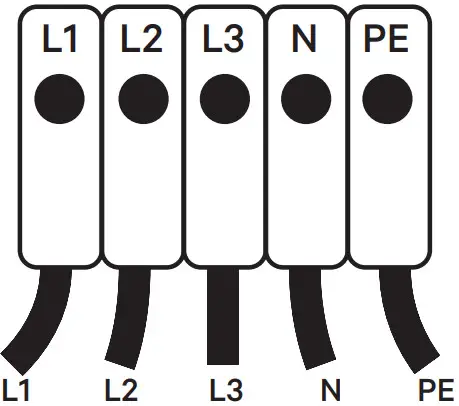 |
C. Three-Phase No Neutral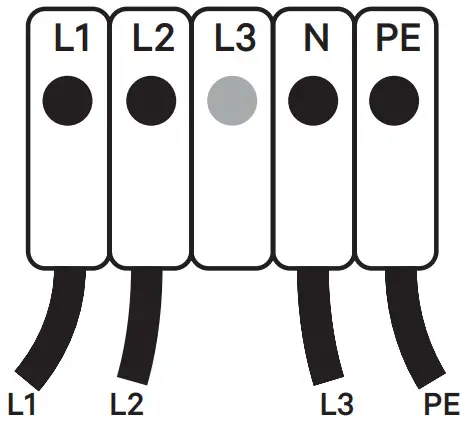 | D. Bi-phase No Neutral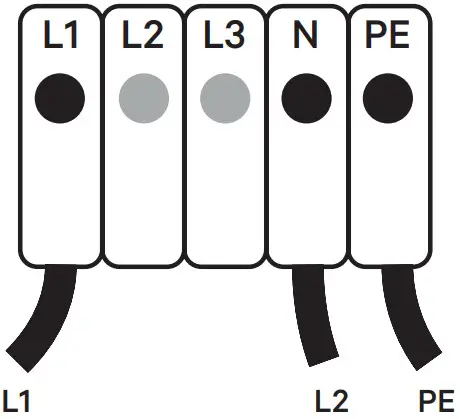 |
E. Bi-phase Set-up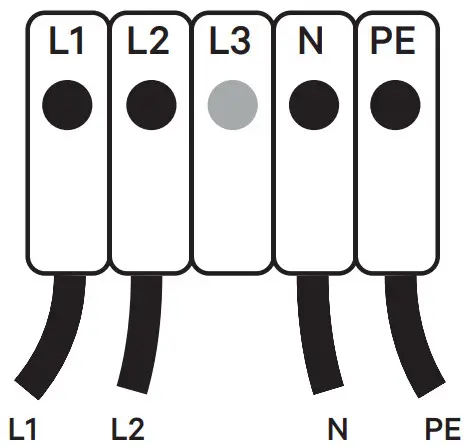 | |
![]() For Pulsar, tighten the terminal screws up to 0.9 Nm. Do not over-tighten. Ensure that the maximum voltage is less than 264 V between L & N inputs.
For Pulsar, tighten the terminal screws up to 0.9 Nm. Do not over-tighten. Ensure that the maximum voltage is less than 264 V between L & N inputs.![]() See Earthing Protection section for installations with PME.
See Earthing Protection section for installations with PME.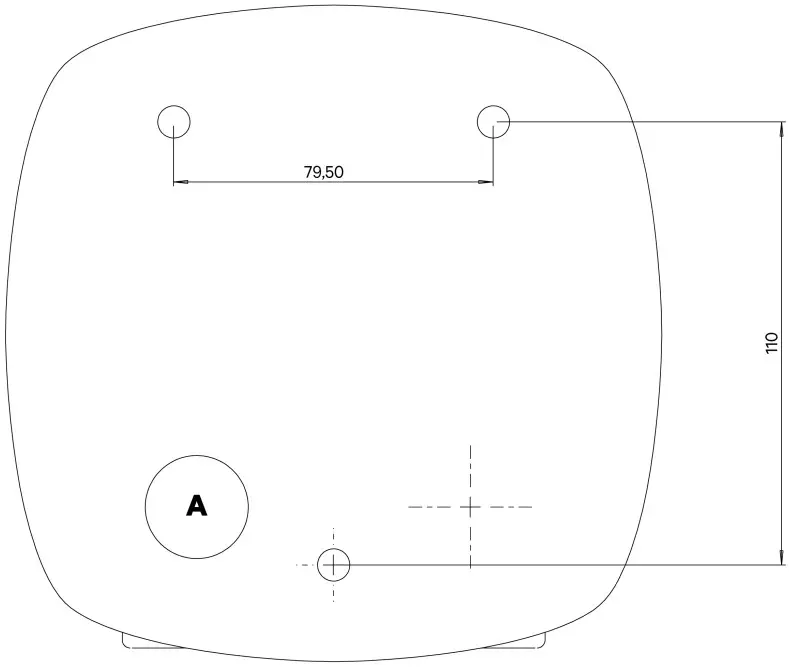 Drilling Template
A Wall Cable Hole
Closing the Charger
A. Position the current selector to an appropriate setting.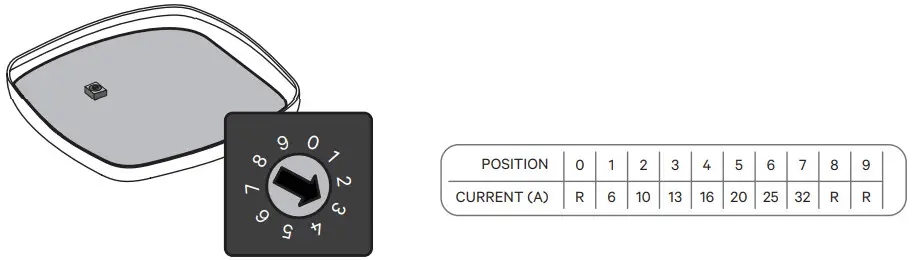
Positions 0, 8, and 9 are reserved for Power Sharing Smart.
B. Attach the open end of the communications cable to the connector. Close the device by clipping the cover.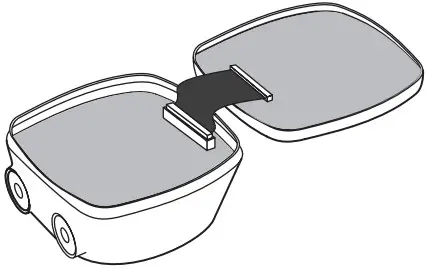 C. Tighten the security screw. Recommended tightening torque 0.7 Nm +/- 10%.

Installing the Plug Holder
A. Place the plug holder on the wall and mark the fixing points.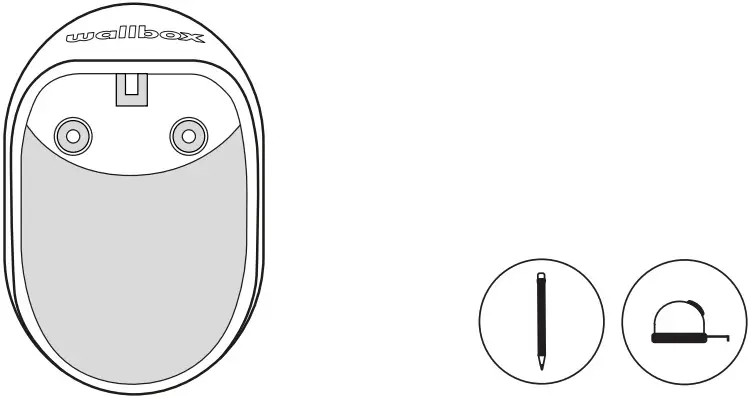 B. Drill holes where the fixing points are marked.
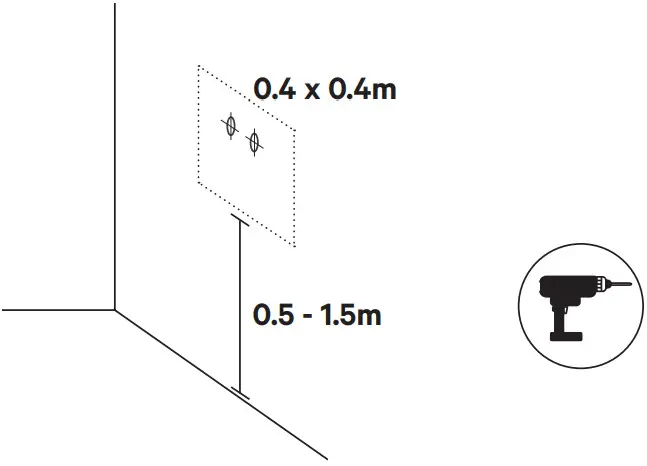 C. Insert the anchor screws into the fixing holes. Fix the device on the wall by inserting and tightening the screws.
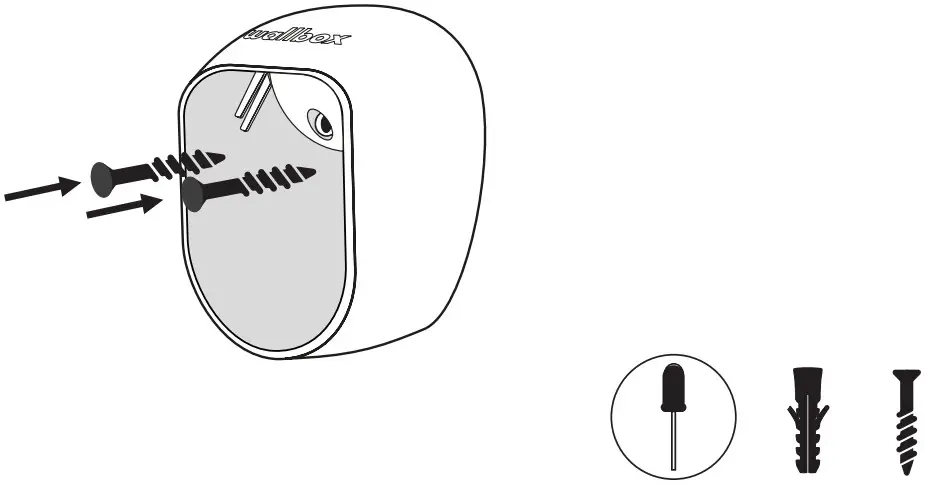

Registering the Charger
A. Locate the Serial Number (SN) and the UID of your charger.
 {“SerialNumber”:”15000″,”UID”:”YggVpHrn”}
B. Download the myWallbox App and register.
 https://itunes.apple.com/es/app/wallbox/id1188288011?mt=8 https://itunes.apple.com/es/app/wallbox/id1188288011?mt=8 |  https://play.google.com/store/apps/details?id=com.wallbox https://play.google.com/store/apps/details?id=com.wallbox |
C. Add your charger by introducing the requested data.
ONLY FOR PULSAR SOLO PARA PULSAR
D. Configure the device in the advanced settings.![]() E. Select the Earthing type manually. Remember to unlink the charger if you are the installer.
E. Select the Earthing type manually. Remember to unlink the charger if you are the installer.
F. Check for latest updates.
 https://support.wallbox.com/en/knowledge-base/how-to-update-the-firmware-of-your-pulsar/ https://support.wallbox.com/en/knowledge-base/how-to-update-the-firmware-of-your-pulsar/ |  https://support.wallbox.com/en/knowledge-base/how-to-update-the-firmware-of-your-pulsar-plus/ https://support.wallbox.com/en/knowledge-base/how-to-update-the-firmware-of-your-pulsar-plus/ |
 See the OCPP Activation Manual at
https://support.wallbox.com/en/knowledge-base/ocpp_activation_manual/
Earthing Protection
This section outlines the information for installation of Wallbox Pulsar Plus in the UK region.
Part Numbers Affected: PLP1-X-X-2-F-XXX-A
In the UK region, the PME system with an incoming earthing point is widely used by residential and business electricity consumers. The RCCB does not provide protection against open circuit PME faults, so touch voltage hazards could occur without triggering a disconnection of the mains electricity supply to the building.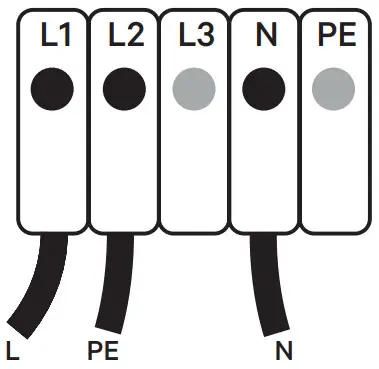 To follow and be compliant with the regulations specified by IET in clause 722.411.4.1(iv), Wallbox Pulsar Plus uses a technology that enables you to directly connect your charger to a PME supply.
The Wallbox Pulsar Plus UK charger now includes a safety monitoring system to detect potential earth-neutral faults. If faults are detected in the circuit, the charge cycle ends thus isolating the vehicle from the power supply.
This removes the risk of touching the vehicle and a potential shock if the earth-neutral fault is present.
Safety and Maintenance Instructions
- Installation, maintenance, & servicing of the charger must be performed only by qualified personnel per the applicable local regulations. Unauthorized installation and modifications make the manufacturer warranty void
- Do not use if the enclosure or connector is broken, cracked, opened, or shows any indication of damage. Please contact your distributor
- Do not touch the charging cable if the connector emits smoke or begins to melt. if possible, stop charging
- Power off the charger before opening the cover or cleaning the unit. Do not use cleaning solvents on any part of the charger. Use a clean, dry cloth to remove dust and dirt. Do not open the cover in the rain
- Take appropriate precautions with electronic medical implants
- Use the Wallbox charger under the operating parameters and within normal ambient conditions specified in the General and Electrical Specifications.
- Ventilation not supported
- It is not recommended to install the charger in a position that has direct sunlight or under extreme weather conditions.
Simplified EU declaration of conformity
Hereby, Wallbox declares that the equipment (Pulsar/Pulsar Plus) is in compliance with Directive 2014/53/EU, Directive 2014/30/EU and Directive 2014/35/EU. The full text of the EU declaration of conformity is available at the following internet Address: https://support. wallbox.com/en/knowledge-base/ce-declaration/
Safety Recommendations
• Follow all the safety and installation instructions carefully
• Failure to follow instructions may be a safety hazard and/or cause equipment malfunction
• Any resulting damage due to disregard or actions contrary to the instructions in this manual is excluded from the product warranty.
Connector Recommendations and Installation Instructions
- Do not use if the charging cable is frayed, has broken insulation, or has any signs of damage or the vehicle plug or electrical outlet is dirty, wet, or damaged
- Do not use the charging cable with a cable adaptor or an extension cable
- Under any circumstances, do not tighten the charging cable while it is connected
- It is mandatory to use the plug holder provided with the unit to protect the connector from dirt and other weather elements and from slipping during usage.
Installation Instructions
- Watch the installation video for your charger available at the Wallbox Academy webpage: https://support.wallbox.com
- Ensure that the mounting surface can adequately support the weight of the charger and withstand mechanical forces associated with usage
- The charger must be permanently connected to the electrical Earth of the installation
 Install the charger in a sufficiently ventilated area. Do not install the charger in direct sunlight, or near flammable, explosive, or combustible materials, chemicals or solvents, gas pipes or steam outlets, radiators or batteries, and areas prone to flooding, high humidity, and running water.
Electrical Protection ![]()
- The power supply line must be wired to an existing installation and be in accordance with local regulations.
- The charger must be electrically protected by installing externally a Miniature Circuit Breaker (MCB) and a Residual Current Circuit Breaker (RCCB).
- MCB: Recommended C curve, 6kA rated short-circuit capacity. Rated current according to the power supply and charger set but no more than 32 A.
- RCCB: According to local regulations, Type A or Type B. Manual reset type only. Local regulations may require an emergency switch to be installed externally.
Disposal Advice
• In accordance with Directive 2012/19/EC, at the end of its useful life, the product should not be disposed of as urban waste. It should be taken to a collection center or to a distributor that provides disposal of special and differentiated waste.
Limited Warranty
- Wallbox warrants this product against defects in materials and workmanship for a period of 3 years from the date of purchase
- During this period, at its discretion, Wallbox will either repair or replace any defective product at no charge to the owner
- Replacement products or repaired parts will be guaranteed for only the unexpired portion of the original warranty or six months whichever is greater.
- Any defect resulting from any accident, misuse, improper maintenance, or normal wear and tear is not covered by the limited warranty
- Substitution or incorporation of any part by the client will be considered as incorrect usage
- Except to the extent permitted by applicable law, the terms of this limited warranty do not exclude, restrict, or modify, and are in addition to, the mandatory statutory rights applicable to the sale of the product to you. If you believe your product is defective, contact Wallbox for instructions on where to send or bring it for repair.
Legal Notice
- Any information in this manual may be changed without prior notice and does not represent any obligation on the part of the manufacturer. Images in this manual are for illustration purposes only and might differ from the delivered product. For more information on setting up your charger, visit the Wallbox Academy page https://support.wallbox.com

References
 Home - Wallbox Academy
-
CE declaration - Wallbox Academy
 Wallbox | Smart, electric car charging stations
 CE declaration - Wallbox Academy
-
Home - Wallbox Academy
-
Home - Wallbox Academy
-
Home - Wallbox Academy
-
Articles Archive - Wallbox Academy
-
CE declaration - Wallbox Academy
-
CE declaration - Wallbox Academy
-
Articles Archive - Wallbox Academy


