![]()
NERO ARC 4/6/8/SUB 70V/100V/8PENDANT SPEAKERS
INSTALL GUIDE
Preparation:
Tools For Installation
- Pencil
- Drill
- Tape Measure
- Wire Cutter
- Phillips Screwdriver
- Utility Knife
- Safety Eye Wear
- Gloves
Considerations
- Where is the best place to install the speakers?
- Where do the speakers sound the best?
- Separate the speakers 6 – 10 feet apart.
Speaker Wire Guide
18AWG minimum – for distances up to …………………. 10 ft
16AWG – from ……………………..…… 10 to 50 ft
14AWG – from ……………………… 50 to 100 ft
Introduction
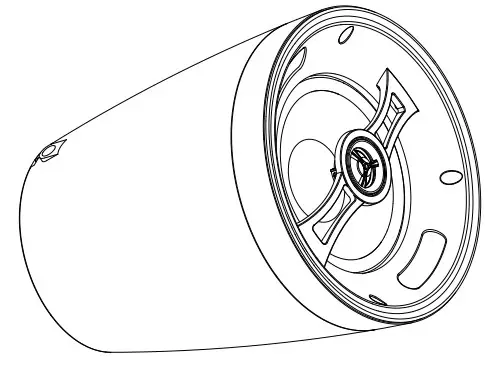
The Nero-ARC Series Products are designed for high ceilings and open space environments. Featuring silk dome tweeters and Graphite woofers with an aluminum rust-resistant grille. A UV-resistant enclosure makes it ideal for outdoor applications as well. The Nero-ARC Series also comes with a built-in 6-position tap for 8 Ohm and 70/100V set-ups.
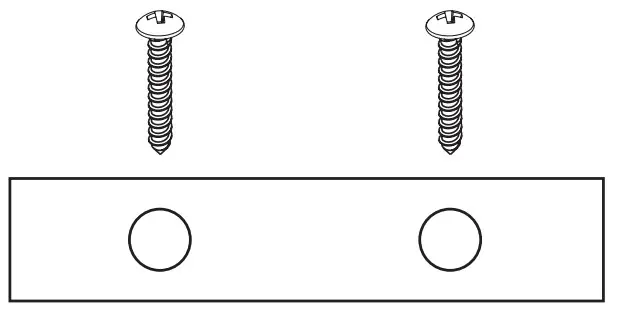
Included
 speaker
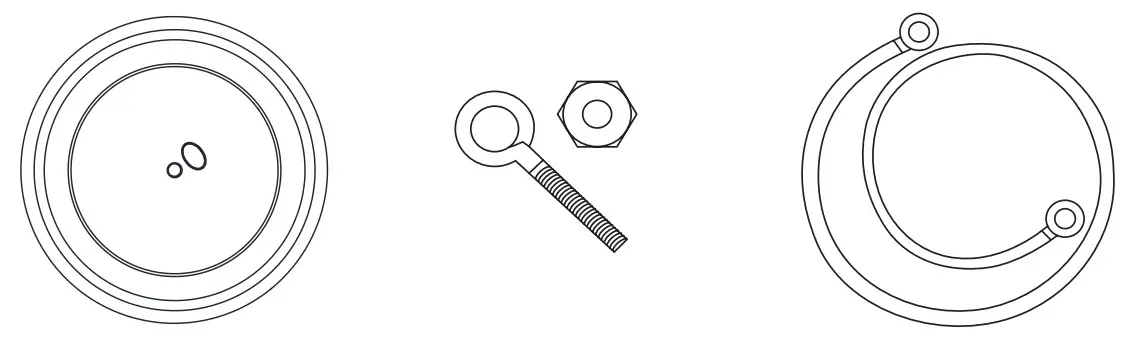 | ||
| top cover | eye hook & nut | hanging cable
|
 | ||
| carabiner x2 | screws x2 | user manual |
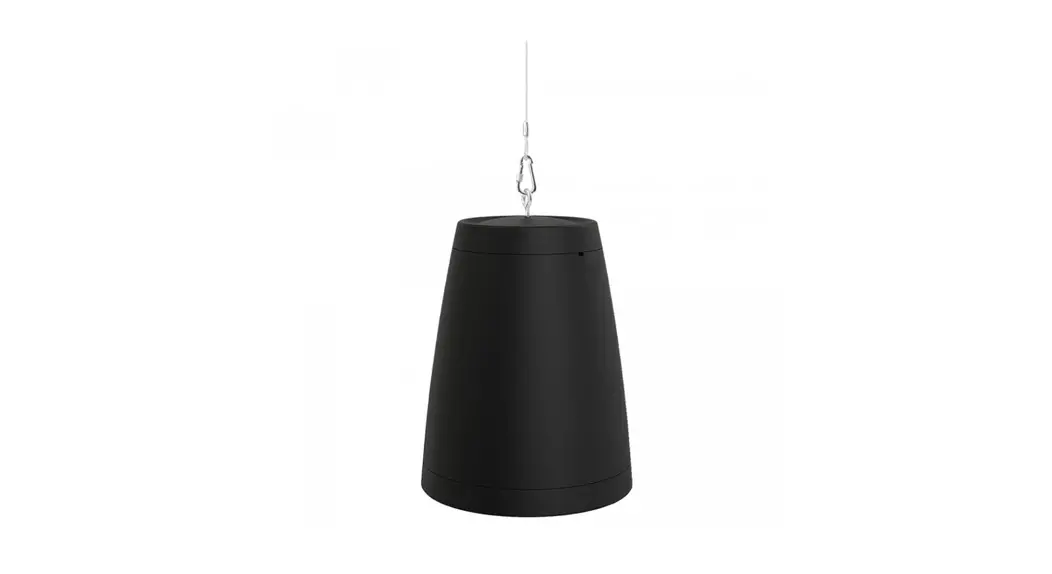
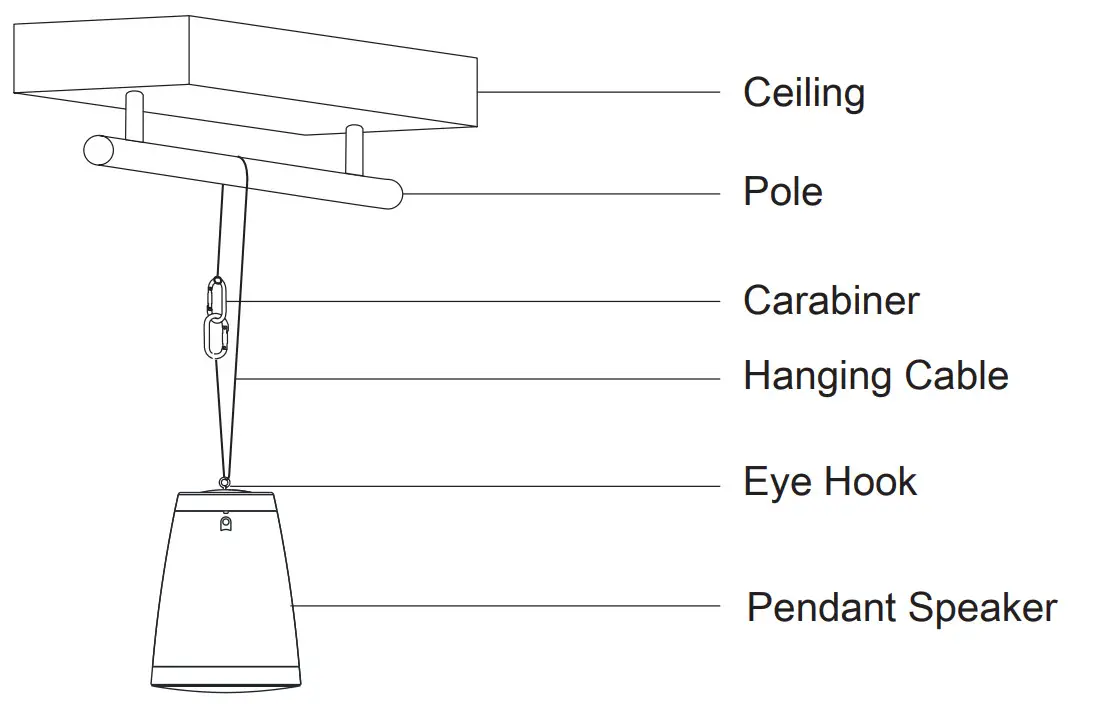
Hanging Information
- Buckle part to fix connection cable
![]() Make sure the speaker is properly secured to the ceiling/building’s structure. Please use the proper screws, bolts, or anchors (not included). Failure to do so may cause the speaker to become unsecured & cause potential damages/injuries.
Make sure the speaker is properly secured to the ceiling/building’s structure. Please use the proper screws, bolts, or anchors (not included). Failure to do so may cause the speaker to become unsecured & cause potential damages/injuries.
Set Up & Operation
Nero-ARC Series Products are designed to hang from the ceiling. A safety cable should be used when installing the speakers to avoid personal injury and damage to the speaker.
- Set the proper speaker setting for your application 6 position switch (8ohm-0-Wx-xW-Wx-Wx).
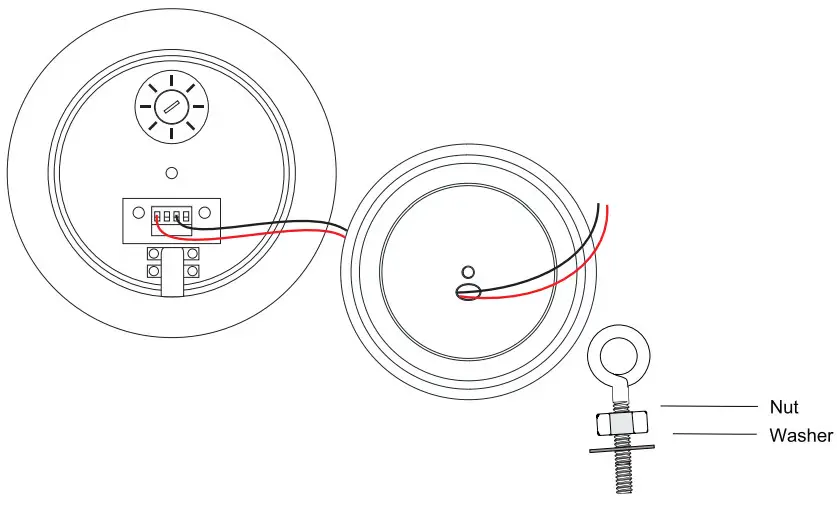
- Install the top cover and fasten the provided eye hook, nut and washer to the top cover and speaker as illustrated below.
- At each speaker location, route the speaker cable(s) hanging from the ceiling area through the top cover, and dress the cables to the wire rope using plastic cable ties. Slide the speaker cables through the supplied back cover. Strip the ends back to 1/8″ to 3/16″.
- Connect the wires from the amplifier to the supplied terminal block, Using the IN terminals: red to + and black to -. Please refer to the following pages for examples of various types of applications.
- Attach the safety cable to the speaker.
- If using the bracket to wall or ceiling mount, be sure to use the appropriate hardware to securely attach the speaker.
Standard 8 Ohm Application 
70V Application 
![]() When Installing multiple rows of speakers, we strongly recommend doing multiple wire runs, one run per row. We do not recommend doing a single wire run.
When Installing multiple rows of speakers, we strongly recommend doing multiple wire runs, one run per row. We do not recommend doing a single wire run.
Specifications
| Model | NERO-ARC4 | NERO-ARC6 | NERO-ARCS | NERO-ARCSUB |
| Tweeter | 0.75120 mm) Silk soft dome | 1″ (25mm) Silk soft dome | 1.1″(28 mm) Silk soft dome | NIA |
| Woofer | 4″ (100 mm) Graphite Cone , Rubber Surround | 6.5″ (165 mm) Graphite Cone . Rubber Surround | 8″ (203 mm) Graphite Cone . Rubber Surround | 8″ (203 mm) Graphite Cone . Rubber Surround |
| Frequency Ranges3 | 75Hz – 20kHz | 65Hz – 20kHz | 55Hz – 20kHz | 50Hz – 125Hz |
| Power Handing RMS | 60W program. 30W pink noise | 150W program. 75W pink noise | 200W program. 100W pink noise | 300W program. 150W pink noise |
| Sensitivity | 83 dB | 85 dB | 86 dB | 84 dB |
| Taps | 70V: 80.0.10W.5W.2.5W.1.25W 100V: 80.0.20W.10W,5W.2.5W | 70V: 80.0.20W.10W.5W.1.25W 100V: 80.0.40W.20W.10W.5W | 70V: 80.0.25W.12.5W.6.25W.3.25W 100V: 80.0.50W.25W.12.5W.6.25W | 70V: 40.0.25W.12.5W.6.25W.3.25W 100V: 40.0.50W.25W.12.5W.6.25W |
| Impedance | 8 ohms | 8 ohms | 8 ohms | 4 ohms |
| Termination | Pluggable Terminal Blocks | Pluggable Terminal Blocks | Pluggable Terminal Blocks | Pluggable Terminal Blocks |
| Attachment | Brackets/Safety rope | Brackets/Safety rope | Safety rope | Safety rope |
| Dimensions NV | 8.5 x 6.1′ (215mm x 155mm) | 11.8 x 9′ (300mm x 230mm) | 13.5 x 10.6″ (343mm x 270mm) | 13.5 x 10.6″ (343mm x 270mm) |
| Certifications | IP66 | IP66 | IP66 | IP66 |
| Material | PP | PP | pp | pp |
Troubleshooting
| Problem | Possible Cause | Fix |
| There is no sound | Power Off Equipment setting is wrong | Assure power is applied to all equipment in a system. Check that routing in/output controls are set correctly. |
| Low sound level | SettingNolume is set too low. Connection is shorted or bad. | Check volume controls or amplifiers are equalizers. Check that connection aren’t partially shortened. |
| Sound cuts in and out | System overload/oscillation intermittent connection | Check for overload conditions or bad connection |
| Distortion at an increased level | Amplifier/speaker overdriven | Check that power to the speaker isnt over limits, the amplifier isn’t over-driven. Reduce power to amplifier slightly. |
| Speaker makes a “buzzing” noise | Hardware lose or speaker damaged | Make sure the speaker is tight. Check speakers for loose parts or speaker damage. |
WARRANTY
All OSD AUDIO electronics have (15) year Limited Warranty against defects in materials and workmanship. Proof of purchase must accompany all claims. During the warranty period OSD AUDIO will replace any defective part and correct any defect in workmanship without charge for either parts or labor OSD AUDIO may replace returned electronics with a product of equal value and performance. In such cases, some modifications to the mounting may be necessary and are not OSD AUDIO’s responsibility. For this warranty to apply, the unit must be installed and used according to its written instructions. If necessary, repairs must be performed by OSD AUDIO. The unit must be returned to OSD AUDIO at the owner’s expense and with prior written permission. Accidental damage and shipping damage are not considered defects, nor is damage resulting from abuse or from servicing performed by an agency or person not specifically authorized in writing by OSD Audio OSD AUDIO sells products only through authorized dealers and distributors to ensure that customers obtain proper support and service. Any OSD AUDIO product purchased from an unauthorized dealer or another source, including retailers, mail order dealers, and online sellers will not be honored or serviced under the existing OSD AUDIO warranty policy. Any sale of a product by an unauthorized source or in another manner not authorized by OSD AUDIO shall void the warranty on the applicable product. Damage to or destruction of components due to the application of excessive power voids the warranty on those parts. In these cases, repairs will be made on the basis of the retail value of the parts and labor. To return for repairs, you must email customer service at [email protected] for a Returned Merchandise Authorization (RMA) number then the unit must be shipped to OSD AUDIO at the owner’s expense, along with a note explaining the nature of service required. Be sure to pack the product(s) in a corrugated container with at least 3 inches of resilient material to protect the unit from damage in transit. This Warranty Does Not Cover: Damage caused by abuse, accident, misuse, negligence, or improper operation (installation)
- Any products that have been altered or modified
- Any product whose identifying number of decal, serial #, etc. has been altered, defaced or removed
- Normal wear and maintenance.


