![]()
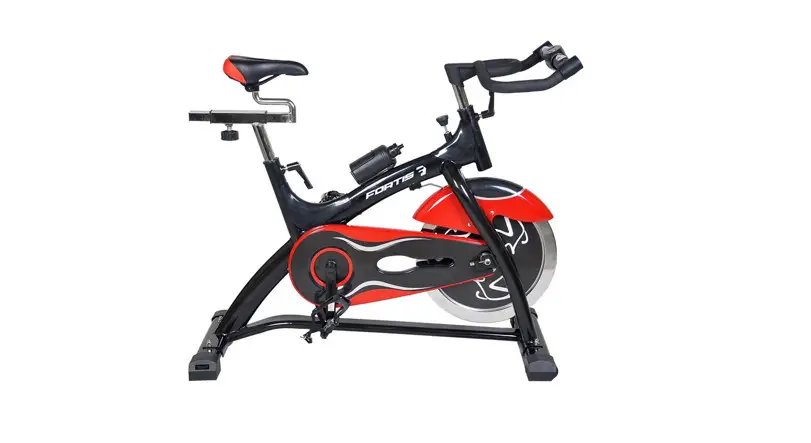
18KG Spin Bike SX2000 FSSPNBKX18A
USER MANUAL
Important Safety Warnings
CAUTION: Before starting any exercise program, consult with your physician or health professional.
IMPORTANT: Read all instructions carefully before using this product. Keep a copy of this guide handy for future reference.
- You can stop the bike immediately by using the emergency break on the left side of the handlebars.
- Keep the bike away from children. Do not allow children to play nearby while you are using the bike.
- Do not ride the bike in the standing position.
- Wear appropriate clothing, suitable for biking.
- Always wear rubber soled shoes or tennis shoes while riding.
- Always place the bike on a flat, stable surface.
- This bike is suitable for users up to 100kg.
- Before use, check that all of the fastenings on the unit are securely tightened. If you find any defective parts, do not use the bike. Contact the Kogan customer support team immediately.
- Check the brakes and brake pads before use.
- Examine the bike at regular intervals for proper maintenance.
WARNING-KEEP BATTERIES OUT OF REACH OF CHILDREN
- Swallowing may lead to serious injury in as little as 2 hours or death, due to chemical burns and potential perforation of the oesophagus.
- If you suspect your child has swallowed or inserted a button battery immediately call the 24-hour Poisons Information Centre on 13 11 26 for fast, expert advice.
- Examine devices and make sure the battery compartment is correctly secured, e.g. that the screw or other mechanical fastener is tightened. Do not use if compartment is not secure.
- Dispose of used button batteries immediately and safely. Flat batteries can still be dangerous.
- Tell others about the risk associated with button batteries and how to keep their children safe.
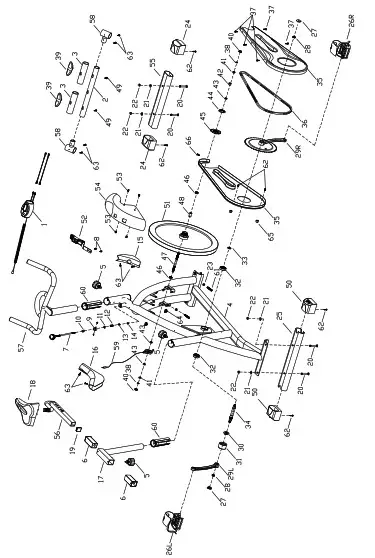
Parts List
| Part # | Description | QTY | Part # | Description | QTY |
| 1 | Monitor | 1 | 32 | 6203 Bearing | 2 |
| 2 | Handrail tube | 1 | 33 | Sleeve Φ18*Φ22*6 | 1 |
| 3 | Handle form | 2 | 34 | AxisΦ17*116 | 1 |
| 4 | Main frame | 1 | 35 | Chain cover | 2 |
| 5 | Spring button | 3 | 36 | Chain | 1 |
| 6 | Bushing(30*30) | 2 | 37 | Screw ST4.8×14, headφ9 | 5 |
| 7 | Tension knob | 1 | 38 | Washer d10 | 2 |
| 8 | Screw M5×11, headΦ8 | 2 | 39 | HAND PAULSE | 2 |
| 9 | Stand of tension adjuster | 1 | 40 | Flange nut M10×1×Φ20, S15 | 2 |
| 10 | Bushing(φ12×φ9X12) | 1 | 41 | Hex nut M10×1, S=15, H=9 | 2 |
| 11 | Nut M8 | 1 | 42 | Bushing | 1 |
| 12 | Spring φ12.4×φ1.6 | 1 | 43 | Hex nut M10×1, S=17, H=4 | 2 |
| 13 | Hex nut M6 | 1 | 44 | Nut M33×1 | 1 |
| 14 | Nylon nut M6 | 1 | 45 | Small wheel | 1 |
| 15 | Front decorative cover | 1 | 46 | Bearing 6000Z | 2 |
| 16 | Back decorative cover | 1 | 47 | Axle M10×1×L48×l45xL56 | 1 |
| 17 | Seat tube | 1 | 48 | Bushing | 1 |
| 18 | Seat | 1 | 49 | Screw ST4×20, headφ8 | 2 |
| 19 | End cap(30*30) | 1 | 50 | Rear End Cap | 2 |
| 20 | Bolt M8×55, | 4 | 51 | Flywheel | 1 |
| 21 | Flat Washer d8 | 4 | 52 | Brake | 1 |
| 22 | Nut | 4 | 53 | Screw M5*15 | 4 |
| 23 | Bolt M8 | 2 | 54 | Flywheel cover | 1 |
| 24 | Front end cap | 1 | 55 | Front bottom tube | 1 |
| 25 | Rear bottom tube | 1 | 56 | Horizontal seat tube | 1 |
| 26 | Pedal L&R | 2 | 57 | Handle bar | 1 |
| 27 | End cap for crank | 2 | 58 | Handlebar fitting | 2 |
| 28 | Bolt M10×18, S=14 | 2 | 59 | Inductor | 1 |
| 29 | Crank L&R | 2 | 60 | Sleeve(φ50 x φ38) | 2 |
| 30 | Hex nut M20*1.5 | 1 | 61 | Bolt M8×40 | 2 |
| 31 | Bearing sleeve φ50 | 1 | 62 | SCREW ST4.8*20 | 6 |
| 63 | SCREW ST4.8*16 | 4 | 64 | Self-adhesive plastic fixed block | 2 |
| 65 | SCREW ST6*12 | 1 |
Please refer to the exploded parts diagram on next page. Check that all parts are present before commencing.
Exploded View
Assembly Steps
Step One
Use 2 x bolts (20), 2 x flat washers (21), 2 x nuts (22) each to assemble the front bottom tube (55) and rear
bottom tube (25) with the main frame.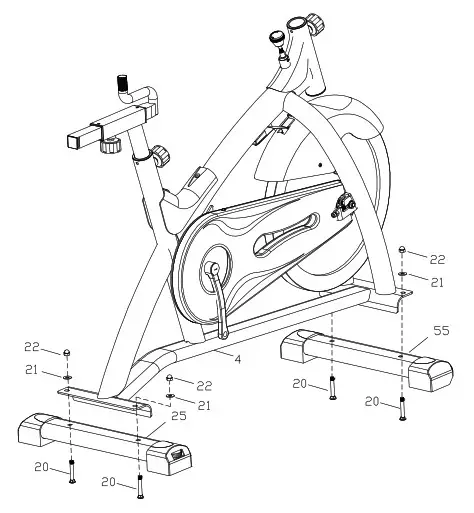 Step Two
Firmly screw the pedals (26) into the crank arms (29) correspondingly.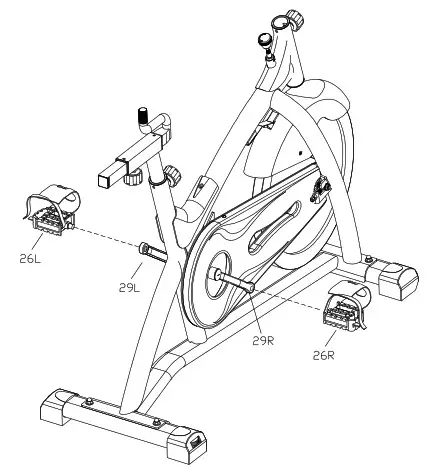 Step Three
Assemble the seat (18) with the horizontal seat tube.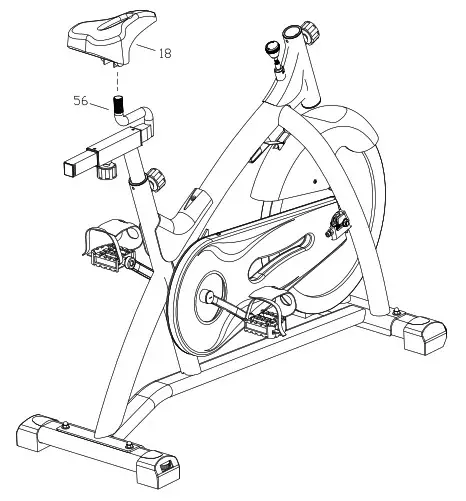 Step Four
To connect the Handle Bar (57) with the main frame (4). Then connect the monitor (1) and the inductor (59).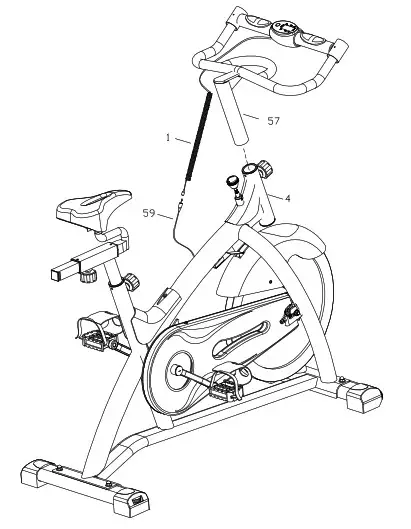 After assembling the product, check that all of the fastenings are fixed securely.
Operating Instructions
Resistance Adjustment
Pedalling resistance is controlled by the tension knob located under the handlebar. To increase resistance, turn the tension knob clockwise, whereas to decrease the resistance, turn the tension knob anti-clockwise. PRESS THE TENSION KNOB AS AN EMERGENCY BRAKE
Seat Adjustment
Properly adjust the seat to ensure maximum exercise efficiency and comfort. The most appropriate seat position while be while the rider has one knee slightly bent when one pedal is at a 90 degree angle to the ground.
- To adjust the seat height, simply turn the adjustable knob loose, then move the seat up or down to the required height, then retighten the knob.
- To adjust the seat position, turn the adjustable knob loose, move the seat backwards or forwards to the right position, then retighten the knob.
Handlebar Adjustment
To adjust the handle bar height, simply turn the adjustable knob loose, then adjust the bar to the required height and retighten the knob.
Chain Adjustment
The chain on the bike has been pre-adjusted and should not require immediate attention. Continuous use of the bike may cause the chain to stretch or become loose, needing adjustment. To adjust the chain, loosen the nuts on both sides of the main axle, then tighten the bolts and nuts on the two sides of the axle.
CAUTION: Ensure you have tightened all of the bolts and nuts before beginning your workout.
Computer Usage
Functional Button
Mode/Reset
– Push down to select functions.
– Push down to reset time, distance and calories for 4 seconds
Functions and Operations
- Scan: Press MODE until ▼ appears at the SCAN position. The monitor will rotate through the following functions: time, speed, distance, calories and pulse. Each will display for 4 seconds.
- Time: Count the total exercise time from start to end.
- Speed: Display the current speed.
- Distance: Count the exercise distance from start to end.
- Calorie: Count the calories burned during exercise.
- Pulse Rate: Press MODE until ▼ appears at the PULSE position.
Before measuring your pulse rate, please place both palms on the contact pads, and the monitor will show your current heartbeat rate in beats per minute (BPM) on the LCD after 6-7 seconds. During the process of pulse measurement, due to the contact jamming, the measurement value may be higher than the virtual pulse rate during the first 2-3 seconds, then it will return to normal levels. Measurements taken using this device cannot be regarded as the basis for medical treatment.
Notes
- If the display is faint or shows no figures, please replace the batteries.
- The monitor will automatically shut off if there is no signal received after 4 minutes.
- The monitor will be auto-powered on when exercise is started.
- The monitor will automatically start calculating when you start to exercise and will stop calculating when you have stopped exercising for 4 seconds.
Monitor Specifications
| FUNCTION | AUTO SCAN | Every 4 seconds |
| TIME | 00:00 ~ 99:59 | |
| CURRENT SPEED | Up to 99.9KM/H | |
| TRIP DISTANCE CALORIES | 0.00~99.99KM | |
| PULSE RATE | 0.1 ~ 999.9kCAL | |
| TRIP DISTANCE CALORIES | 40 – 206BPM | |
| BATTERY TYPE | 2 x AAA | |
| OPERATING TEMPERATURE | 0°C ~ 40°C | |
| STORAGE TEMPERATURE | -10°C ~ 60°C | |
Exercise Instructions
Using your SPIN BIKE provides you with several benefits, it will improve your physical fitness, tone muscle and in conjunction with calorie controlled diet help you lose weight.
Warm-up Phase
This stage helps get the blood flowing around the body and the muscles working properly. It will also reduce the risk of cramp and muscle injury. It is advisable to do a few stretching exercises as shown below. Each stretch should be held for approximately 30 seconds, do not force or jerk your muscles into a stretch – if it hurts, STOP.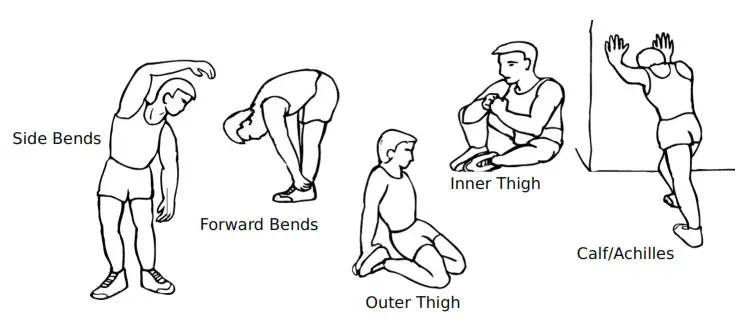 The Exercise Phase
This is the stage where you put the effort in. After regular use, the muscles in your legs will become stronger. Work to your own pace, but it is very important to maintain a steady tempo throughout. The rate of work should be sufficient to raise your heart beat into the target zone shown on the graph below.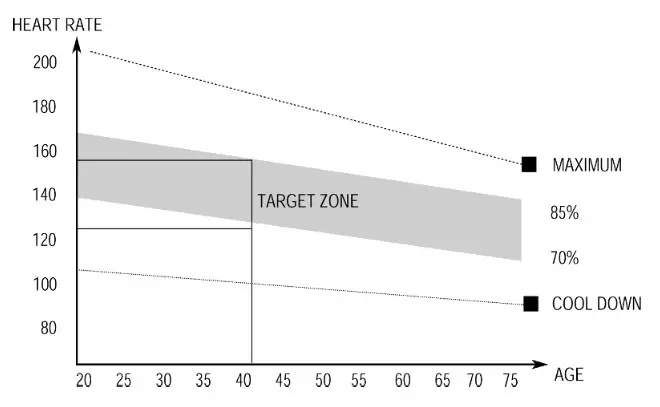
This stage should last for a minimum of 12 minutes, although most people start at about 15-20 minutes.
As you get fitter you may need to train longer and harder. It is advisable to train at least three times a week, and if possible space your workouts evenly throughout the week.
Muscle Toning
To tone muscle while on your SPIN BIKE you will need to have the resistance set quite high. This will put more strain on your leg muscles and may mean you cannot train for as long as you would like. If you are also trying to improve your fitness you need to alter your training program. You should train as normal during the warm up and cool down phases, but towards the end of the exercise phase you should increase resistance, making your legs work harder than normal.
You may have to reduce your speed to keep your heart rate in the target zone.
Weight Loss
The important factor here is the amount of effort you put in. The harder and longer you work, the more calories you will burn. Effectively, this is the same as if you were training to improve your fitness, the only difference is your goal.
Use
The tension control knob allows you to alter the resistance of the pedals. A high resistance makes it more difficult to pedal, whereas a low resistance makes it easier.
For the best results, set the tension while the bike is in use.
If you have any problems or concerns regarding this product, please contact the Kogan customer support team.


