
![]() HSA11FWB Switch
HSA11FWB Switch
Instruction Manual
WARNING:
- This product is to be installed or used in accordance with electrical codes and regulations.
- For indoor use only. Do not use in wet locations.
- If you are unsure of any part of these instructions, consult an electrician.
- Save this instructions sheet. It contains important technical data along with testing and troubleshooting information which will be useful after installation is complete.
- This switch is not compatible with standard 3-way or 4-way switches.
- Do not disassemble the product, or make repairs yourself. You run the risk of electric shock and voiding the limited warranty. If you need service, please contact the after sales services.
- The load power rating limit of the device below the Specification sheet does not exceed the limit.
Package Contents
Smart Switch *1
Quick start guide*1
Accessories package*1
Product Description
The switch turns your lights smart by enabling you to control them through the smart home APP on your phone at or away from home.
Specification
| Model number | HSA11FWB |
| Power supply: | 120V-, 60Hz |
| Maximum load: | Incandescent 600W, CFL/LED 300W |
| Operational temperature: | 0-40°C |
| Storage Temperature Range | -20-60°C |
| Humidity | 0-85%,non condensing |
| Radio protocol: | 2.4G, IEEE 802.11b/g/n |
| Range: | About 40m indoors (line of sight) |
Feature list:
| Function | Description |
| Remote Control | Turn your light on and off from anywhere using the mobile app. |
| Schedule | Set specific times for your light to turn on/off as setting connected lighting turn on at 19:00 every Monday. Or like setting lights to come on at dusk or turn off at sunrise. |
| Countdown | Set a countdown timer to have the switch turn off automatically. As setting after 30 minutes turns off automatically. |
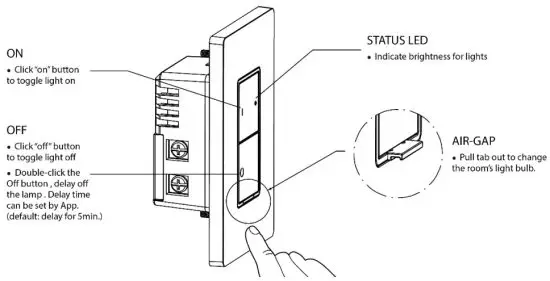
| Delay-Off | Double-click the Off button (interval is less than 500ms), and delay the lamp. The delay time can be set in the App. If it is not set, the factory default is to delay the switch off for 5min. Take the latest user operation as the highest priority, and close the delay-off function at the same time. |
| Timer | Set a timer to have the switch turn on or off automatically. As setting after 30 minutes turns on automatically. |
| Power Memory | Re-Power, switch restore the state that before power off. |
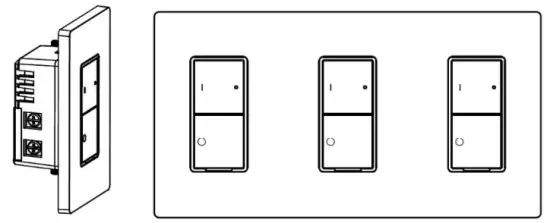
Installing the switch by itself or with multi-gang
If installing the switch in a single gang application, proceed with the Product install introduction. If installing the switch in a multi-gang application, proceed with the following:
Multi-gang application
In multi-switch installations, the reduction of the switch’s capacity may be required. Refer to the chart for maximum load per switch.
Note: No derating is required for LED or CFL bulb applications.
| Maximum Load Per Switch for Multi-gang | |||
| Load | Single | Two-Gang | Three-Gang |
| inland | 600W | 500W | 500W |
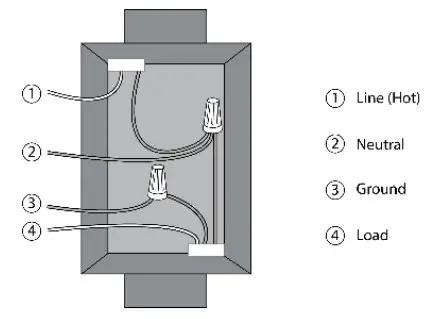
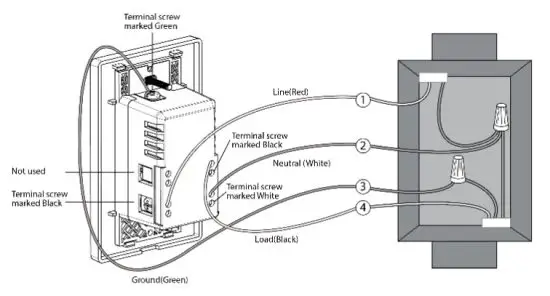
Product install introduction
- Turn the power off at the circuit breaker
- Remove the existing switch and connect the new switch


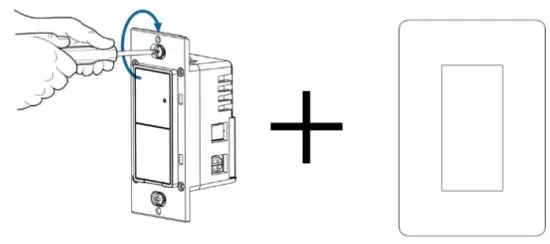
- Mount the Switch using the screws and attach the faceplate.

- Turn power ON at circuit breaker
- Quick start guide

Step 1:
Download the LinKind App on App Store or Google Play.

Step 2:
Create an account and sign in.
Step 3:
- Ensure the switch is properly wired and power is applied
- Upon initial power-up, the LED indicator will have green and orange scrolling blinking to show the accessory is ready to configure
- If the LED indicator is no longer green and orange scrolling blinking when you are ready to add the accessory, press the “on” and “off” buttons for 5 seconds until the LED indicator keeps in red and releases the button
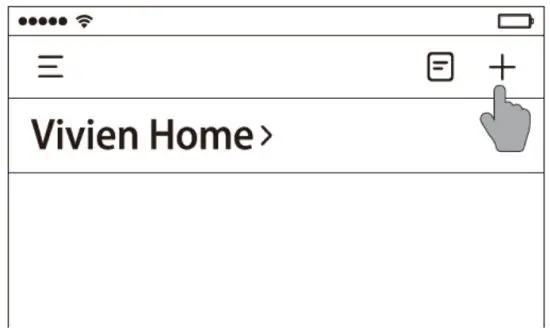
- Press the ‘+’ button to add the device.
Step 4:
Follow the instructions on App.
LED Indicator
Under normal working state. LED indicator is solid green— turn on, LED indicator is off —Turn off.
| Indicator Status | Behavior |
| Green and Orange scrolling blinking | To be configured status. |
| Quick Blinking Orange | Connecting to the network |
| Solid Green | Connected to the network, and then the switch is turned on. LED indicator keeps in green status for 3s and then turns off. If the switch is not turned on. |
| Solid Red | Connected failed. LED indicator keeps in red status for 3s and then turns off. |
| Off | The Smart switch is turned off and the switch is not configured |
| Solid Green | The Smart Switch is turned on |
| Triple Blink Orange | When the countdown starts, triple blink orange, and light on or off the LED indicator according to the actual situation |
Connect to the network
| Status | Behavior |
| To be configured status | LED indicator green and orange scrolling blinking. Remark: Powering on the switch, is ready to start switch network configuration |
| Connecting to the network | LED indicator quick blinking orange statue. |
| Connected to the network | LED indicator keeps in green status for 3s and then turns off. If the switch is not turned on. |
| Connected failed. | LED indicator keeps in red status for 3s and then turns off. Remark: while connected failed, the led indicator turn off, to reset the smart switch to factory settings. |
| Factory default (reset) | Hold the “on” and “off’ buttons for a total of 5 seconds, and the LED solid red, release the button and it will reset. After a total of 5 seconds, the switch gets into to be configured statue. |
Troubleshooting
| Problems | Possible cause |
| Lights Flickering | The lamp has a bad connection |
| Wires not secured firmly under terminal screws of switch | |
| The light does not turn ON and the LED indicator does not turn ON | The circuit breaker or fuse has tripped. |
| The lamp is burned out. | |
| Lamp Neutral connection is not wired. | |
| Light can be turned ON and the LED indicator does not turn ON | The switch has not to be configured, reset the switch and connect to the network. |
| The remote does not operate | Confirm switch is connected to the network |
| lights | Ensure wiring is correct |
FCC Statement
This device complies with Part 15 of the FCC Rules. Operation is subject to the following two conditions:
- This device may not cause harmful interference.
- This device must accept any interference received, including interference that may cause undesired operation.
Note: The grantee is not responsible for any changes or modifications not expressly approved by the party responsible for compliance. Such modifications could void the user’s authority to operate the equipment.
Note: This equipment has been tested and found to comply with the limits for a Class B digital device, pursuant to part 15 of the FCC Rules. These limits are designed to provide reasonable protection against harmful interference in a residential installation.
This equipment generates uses and can radiate radio frequency energy and, if not installed and used in accordance with the instructions, may cause harmful interference to radio communications. However, there is no guarantee that interference will not occur in a particular installation. If this equipment does cause harmful interference to radio or television reception, which can be determined by turning the equipment off and on, the user is encouraged to try to correct the interference by one or more of the following measures:
- Reorient or relocate the receiving antenna.
- Increase the separation between the equipment and receiver.
- Connect the equipment into an outlet on a circuit different from that to which the receiver is connected.
- Consult the dealer or an experienced radio/TV technician for help
RF Exposure Statement
This equipment complies with FCC radiation exposure limits set forth for an uncontrolled environment. This equipment should be installed and operated with a minimum distance of 20 cm between the radiator and your body.


