![]()
![]() 2173354 Rapid Wood Shelf Kit
2173354 Rapid Wood Shelf Kit
Instructions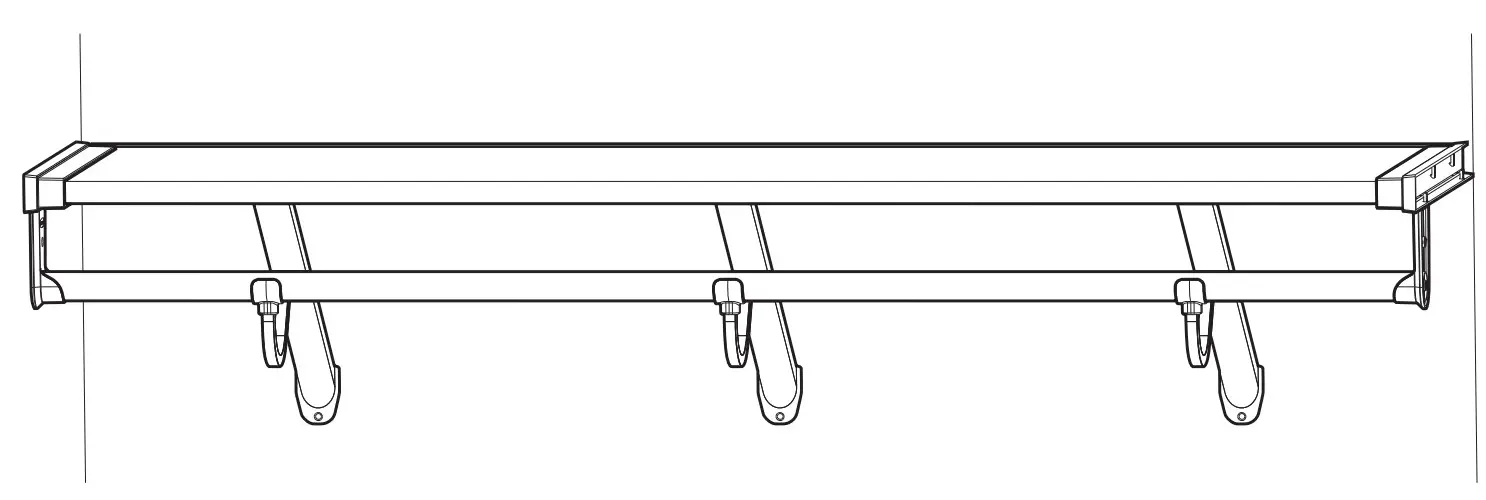 © 2022 Rubbermaid Incorporated,
8900 NorthPointe Executive Park Dr.
Huntersville, NC, 28078-1801 U.S.A.
www.rubbermaid.com
1-888-895-2110 US | 1-866-595-0525
2173354/2173357
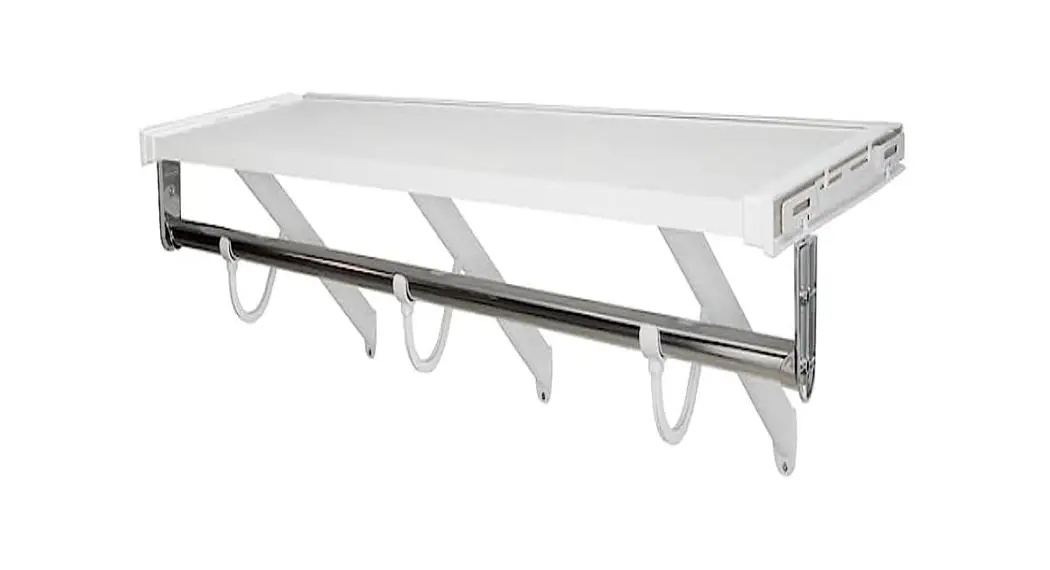
2173354 Rapid Wood Shelf Kit
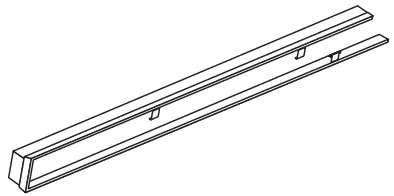
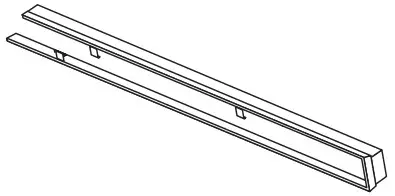
4 ft Premium Wood Shelving Kit
Please check that you have all parts before beginning and follow the instructions carefully.
Tools Required: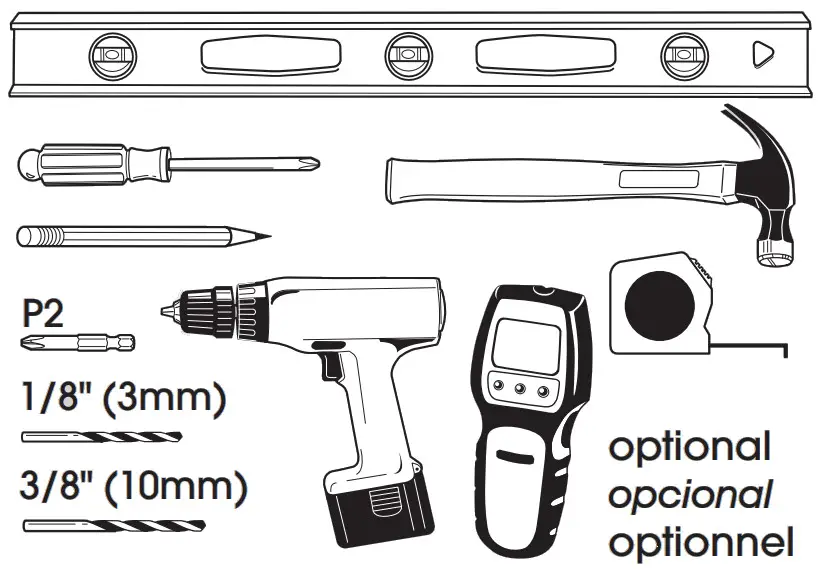
| Letter | Quantity | Part Number | Description | |
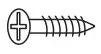
 | A | 16 | 2174772 | Screw, #10 x 2″ Wood Screw |
 | B | 17 | 2174767 | Screw, #10 x 3/4″ Wood Screw |
 | C | 16 | 2131904 | Drywall Anchor |
 | D | 1 | 2131866 | Push Pin |
 | E | 1 | 2174495 – WHT 2174503 – BLK | Back Channel |
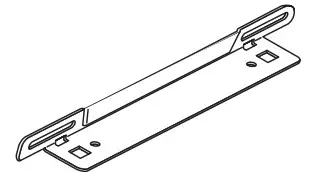 | F | 2 | 2174776 | Side Bracket |
 | G | 1 | 2174754 – WHT 2174773 – BLK | Shelf Trim Left |
 | H | 1 | 2174791 – WHT 2174755 – BLK | Shelf Trim Right |
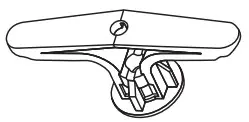
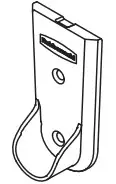 | I | 2 | 2174794 | Pole Cup |
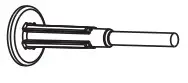
 | J | 1 | 2174874 | Hang Rod |
 | K | 1 | 2175239 – WHT 2175225 – MAHOG | Melamine Board |
 | L | 3 | 2174757 – WHT 2174775 – BLK | Angle Bracket with Hook |
STEP 1
Mark the desired height of the shelf on the wall using a pencil. Using a stud finder, locate and mark studs.
Note: If installing this kit from wall to wall in a closet that has a width less than 48”, measure the width from Wall A to Wall B. Cut the back channel (E) 1” shorter than this width.  STEP 2
Place the back channel (E) on the wall so the marks show through the holes in the back channel (E). Place a level on the back channel (E) and level it. Using a pencil, evenly add additional marks on the wall through the holes in the back channel (E) until you have six total marks. STEP 3
Remove the back channel (E) and drill pilot holes into all marks using an 1/8-inch drill bit.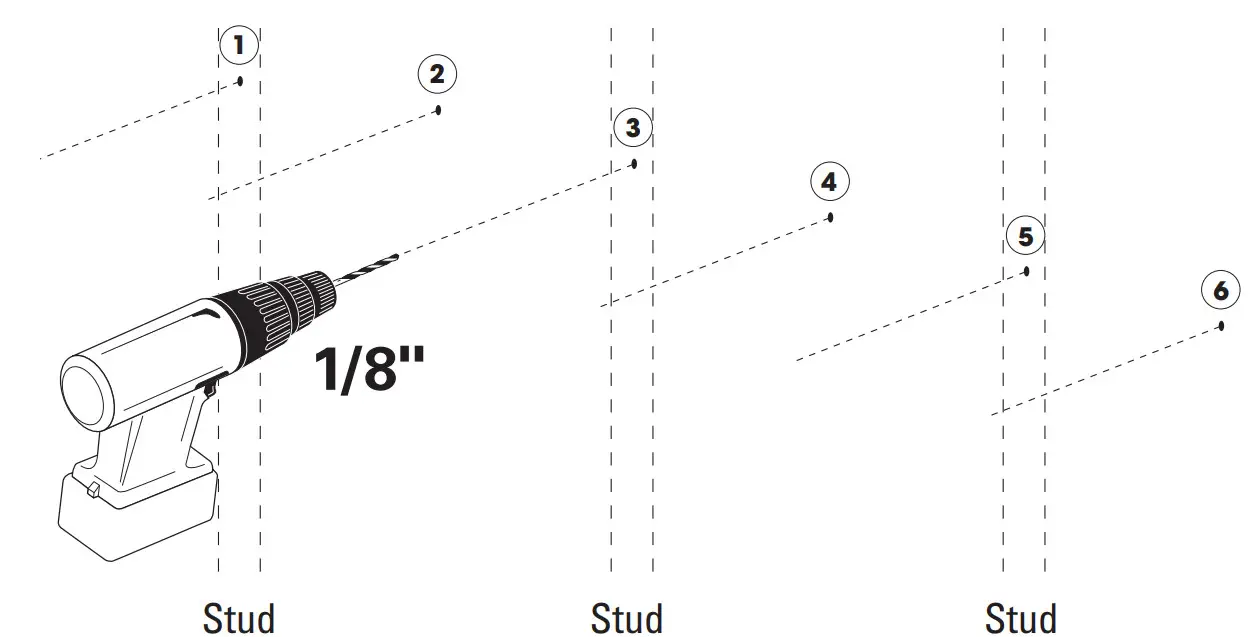 STEP 4
Re-drill holes that do not hit studs with a 3/8-inch drill bit. Place one drywall anchor (C) into these pilot holes and press with the black push pin to expand the drywall anchor. 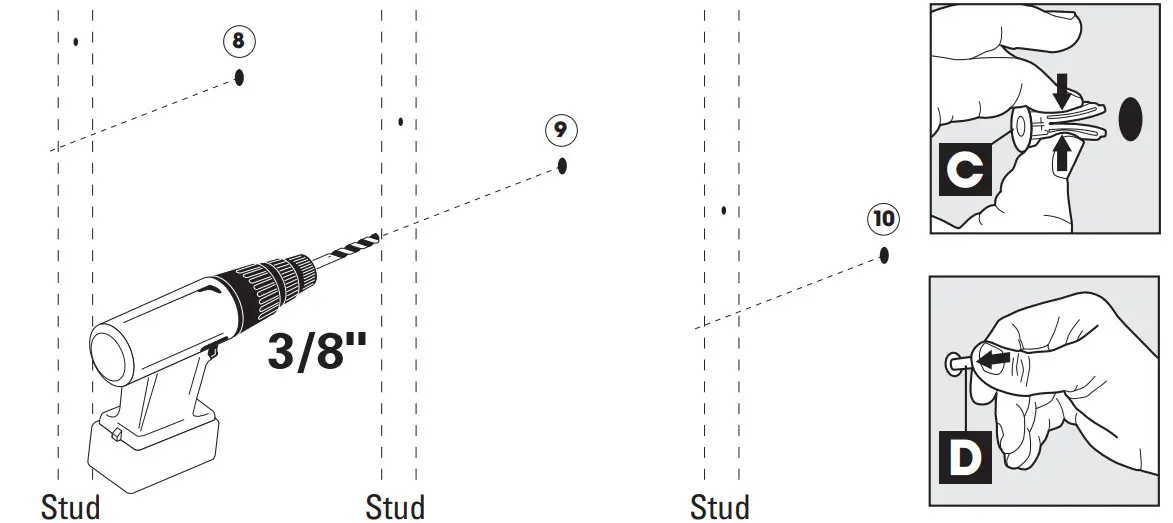 STEP 5
Mount the back channel (E) by inserting one screw (A) into the pilot hole or drywall anchor towards the center of the back channel (E). Place a level on to the back channel (E) to ensure it’s level and then insert the remaining 5 screws (A) into the remaining pilot holes or drywall anchors.  STEP 6
Place one side bracket (F) on a side wall and slide it backwards until it contacts the rear surface of the back channel (E). Ensure there is no gap between the side bracket and the front edge of the back channel.  STEP 7
Level the side bracket (F) and using a pencil, mark the wall through the top slots in the side bracket. 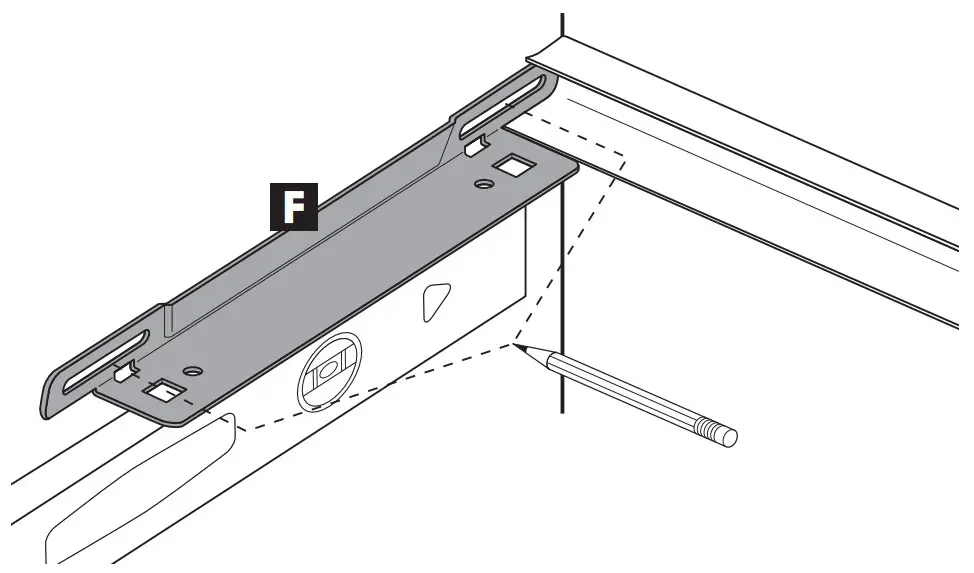 STEP 8
Remove the side bracket (F) and drill pilot holes into all marks using an 1/8-inch drill bit.
Note: If a stud is not hit, re-drill the pilot holes with a 3/8-inch drill bit. Place one drywall anchor (C) in these pilot holes and press with the black push pin to expand the drywall anchor.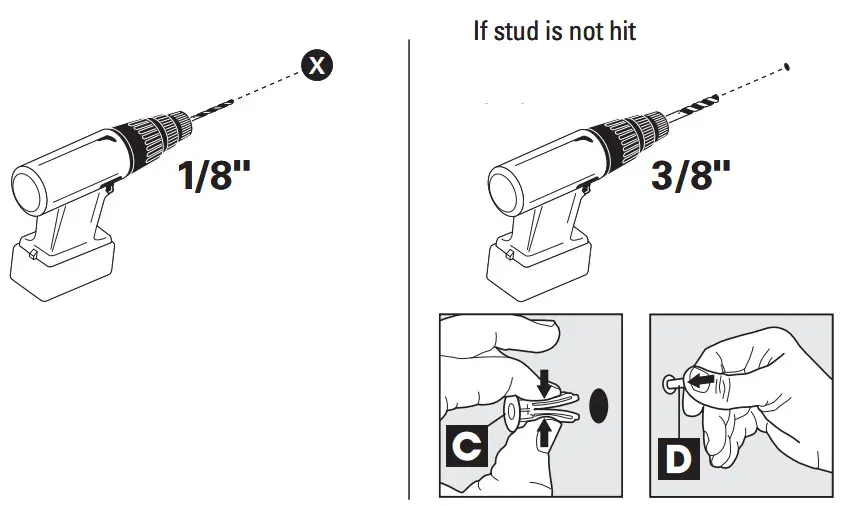 STEP 9
Place the side bracket (F) on the side wall and, using a Philips #2 drill bit, secure it by inserting two screws (A) into the pilot holes or drywall anchors.
Repeat steps 7-10 on the other side to secure the second side bracket (F). 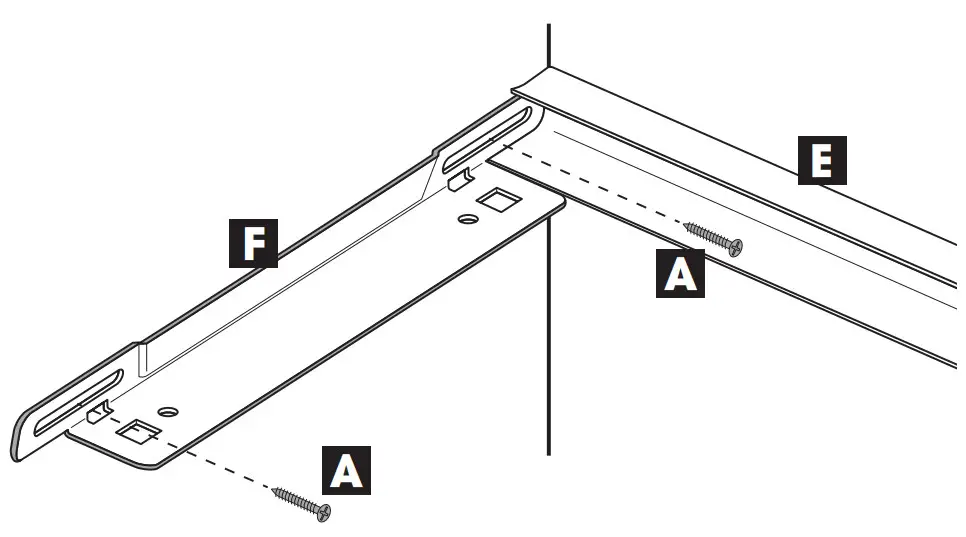 STEP 10
Rest the melamine board (K) on the installed side brackets (F) and slide it backwards into the back channel (E). Push firmly to ensure it contacts the rear surface of the back channel.
Note: If installing this kit from wall to wall in a closet that has a width less than 48”, measure the width from Wall A to Wall B. Cut the Melamine Board (K) 1/2” shorter than this width. 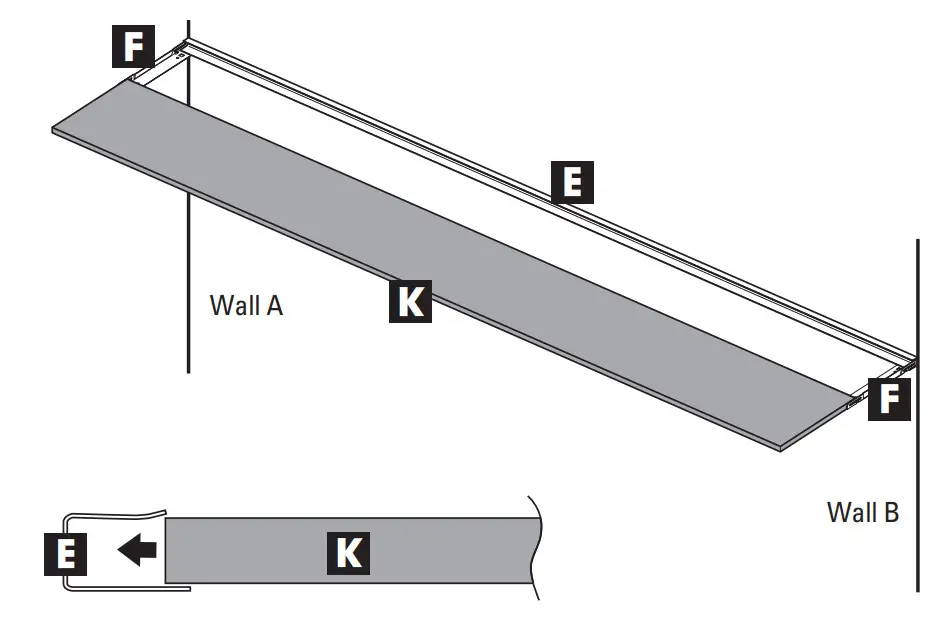 STEP 11
Using a Philips #2 drill bit, attach the melamine board (K) to the back channel (E) from the underside by inserting 6 screws (B) through the holes in the bottom of the back channel. 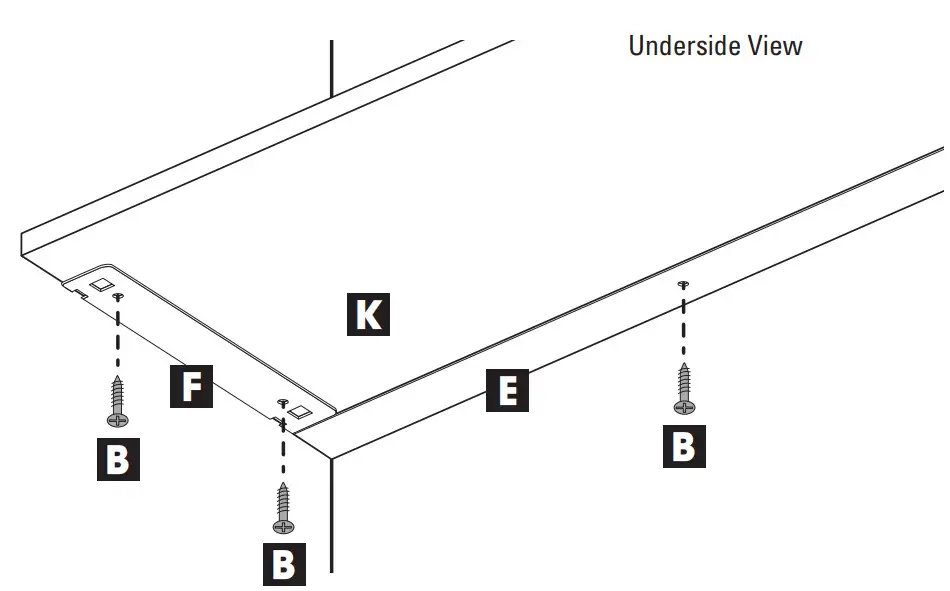 STEP 12
Ensure you have the correct component part for each side of the shelf: Use shelf trim (G) for left side and shelf trim (H) for right side. Also ensure you review the orientation: The top is shorter in length than the bottom, and the taller side of the shelf trim will contact the side wall.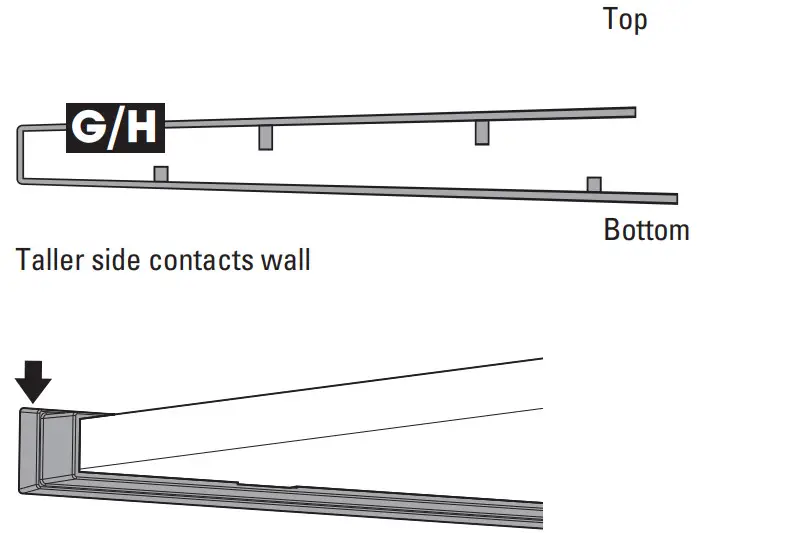 Expand the shelf trim (G, H) over the installed melamine board (K). Slide it backwards until in contacts the front edge of the melamine board.
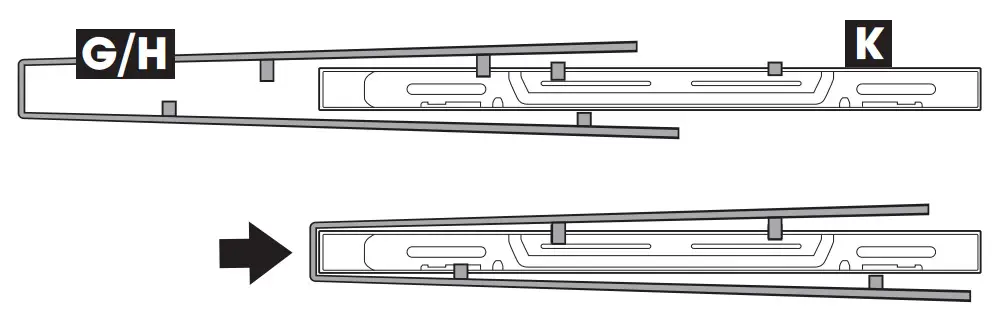 STEP 13
Press firmly from the top and bottom to snap the shelf trim (G, H) into the installed side bracket (F) in four places, two on top and two on the bottom. Repeat this process on the other side of the melamine board. 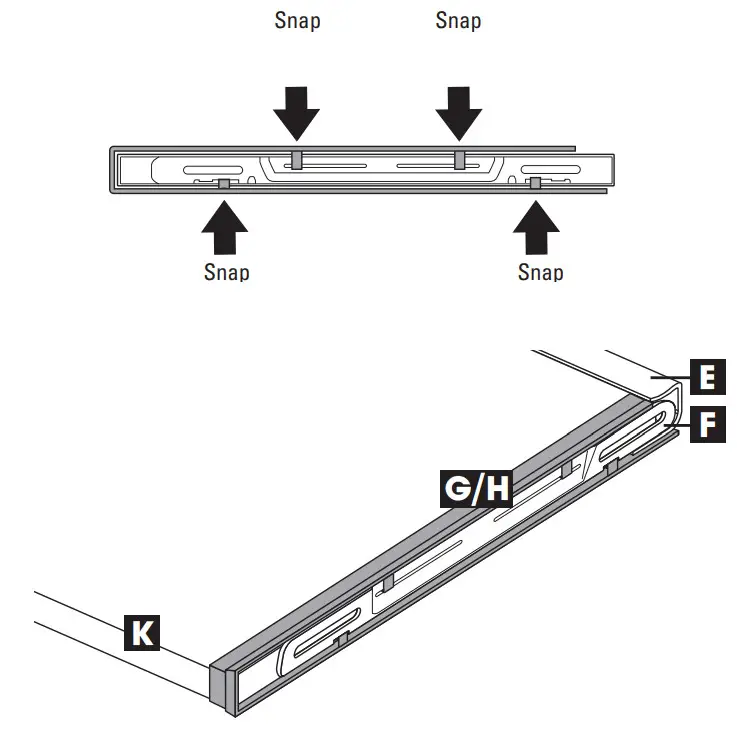 STEP 14
Select the location for the three angle brackets with hook (L) to suit the desired aesthetics and mark these locations 7” down from installed melamine board (K).
Note – Angle brackets with hook (L) must be 8” or less from the end of the melamine board (K). 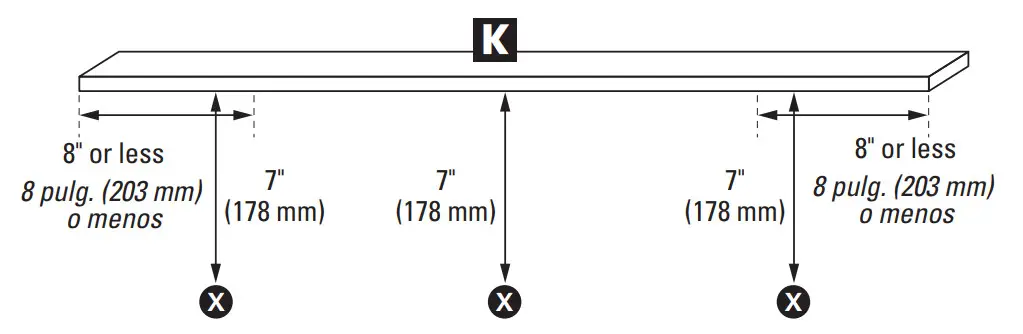 STEP 15
Drill pilot holes into all marks using an 1/8-inch drill bit.
Note: If a stud is not hit, re-drill the marks with a 3/8-inch drill bit. Place one drywall anchor (C) in these pilot holes and press with the black push pin to expand the drywall anchor.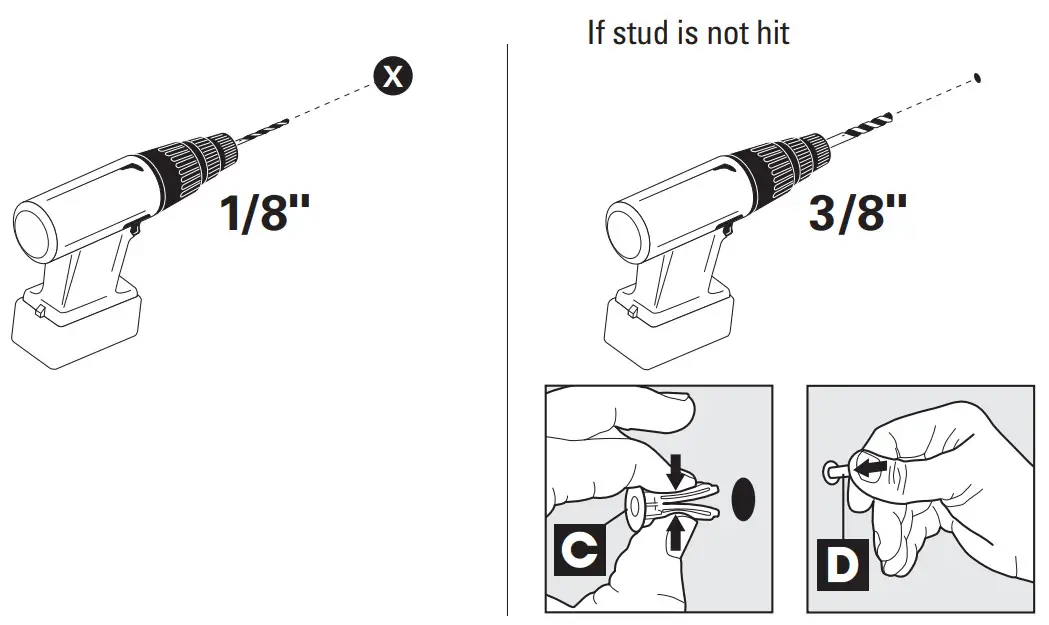 STEP 16
Using a Philips #2 drill bit, fasten screws (A) into the pilot holes or drywall anchors until the threads are no longer visible, about 1/4″ from the wall.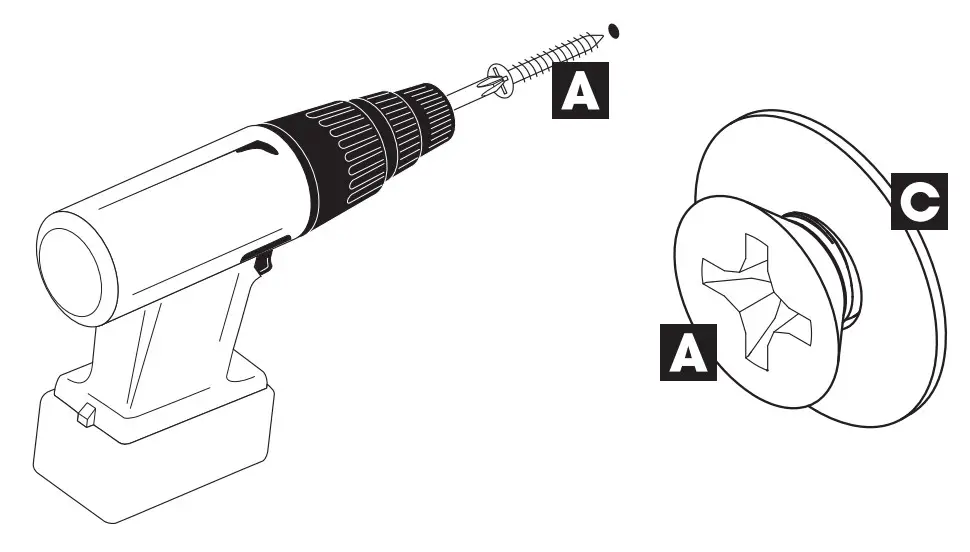 STEP 17
Place an angle bracket with hook (L) on the wall by aligning the keyhole in the angle bracket with a screw on the wall. Press the angle bracket with hook down to engage. 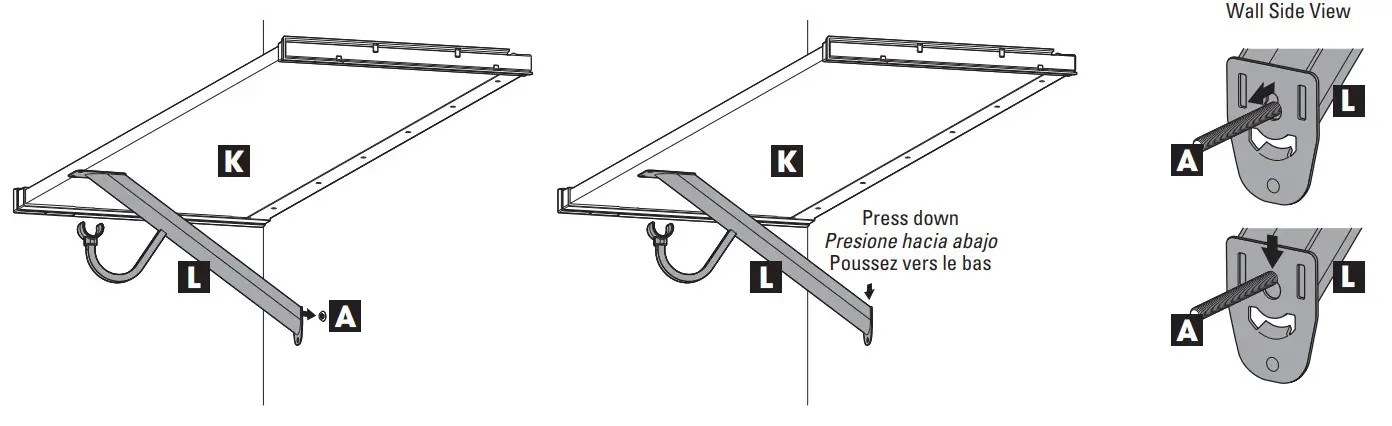 STEP 18
Drill a pilot hole through the hole in the bottom of the angle bracket with hook (L) using an 1/8-inch drill bit.
Note: If stud is not hit, remove the angle bracket with hook (L) and re-drill the pilot hole using a 3/8-inch drill bit. Place one drywall anchor (C) in the pilot hole and press with the black push pin to expand the drywall anchor. Place the angle bracket with hook back onto the wall by aligning the keyhole in the angle bracket with a screw on the wall. Press the angle bracket with hook down to engage.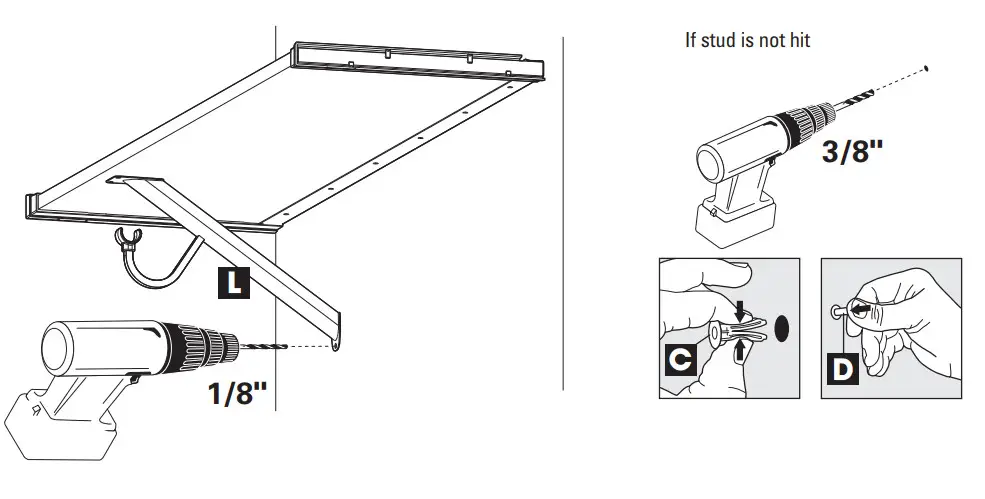 STEP 19
Using a Philips #2 drill bit, secure the angle bracket with hook (L) to the wall by inserting one screw (A) through the hole in the bottom of the angle bracket into the pilot hole or drywall anchor. 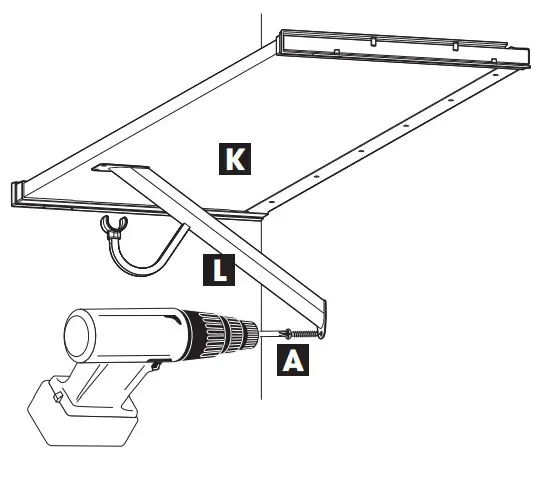 STEP 20
Place a level on top of the melamine board (K) to ensure it’s level and secure the angle bracket with hook (L) to the melamine board by inserting two screws (B) through the holes in the top of the angle bracket. Repeat steps 17-20 for the remaining two angle brackets with hook (L).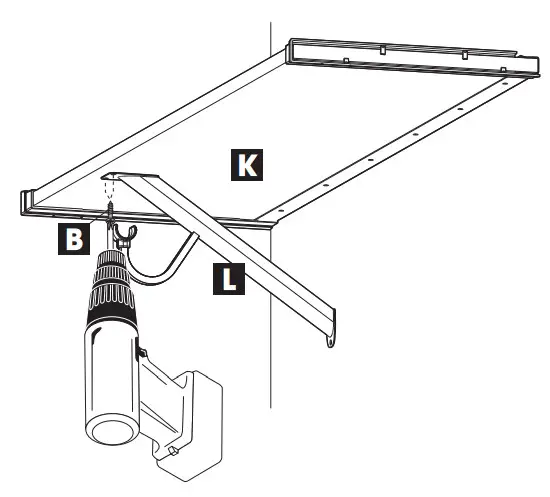 STEP 21
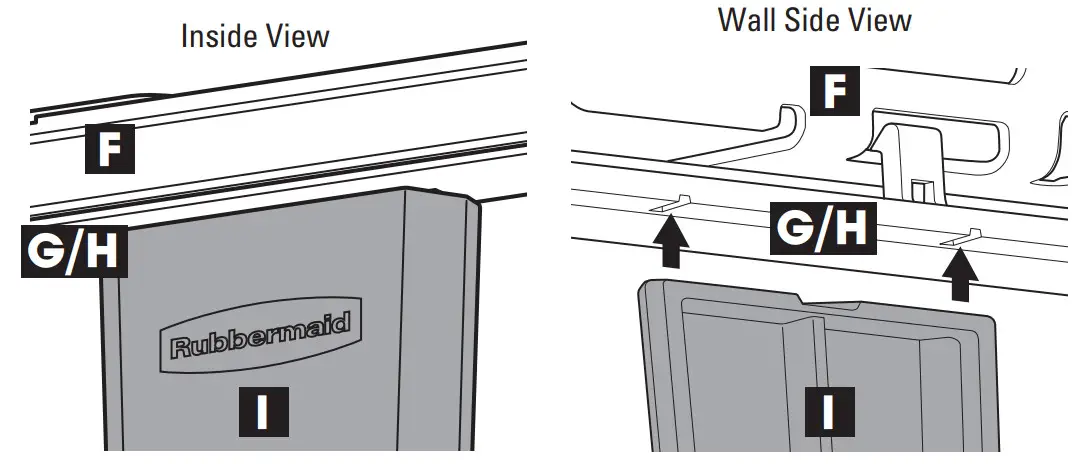
Position the pole cup (I) on the side wall in line with the locator marks on the bottom of the installed shelf trim (G, H). Ensure there’s no gap between the installed shelf trim and the pole cup.
 STEP 22
Using a pencil, outline the two holes in the pole cup (I). 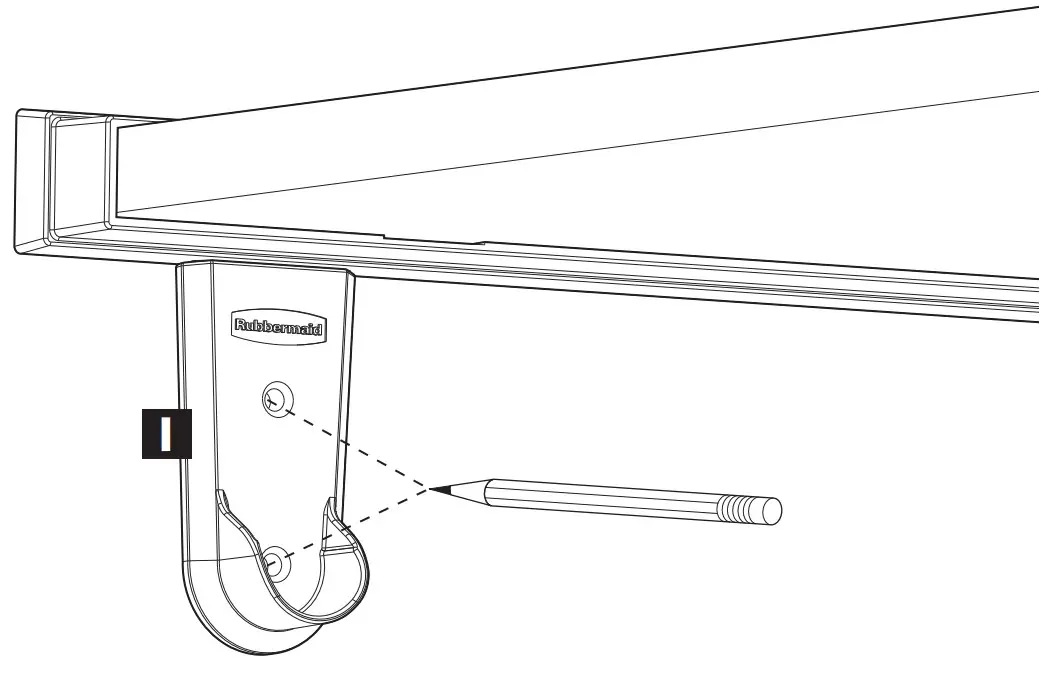 STEP 23
Remove the pole cup (I) and drill pilot holes into all marks using an 1/8-inch drill bit.
Note: If a stud is not hit, re-drill the pilot holes with a 3/8-inch drill bit. Place one drywall anchor (C) in these pilot holes and press with the black push pin to expand the drywall anchor.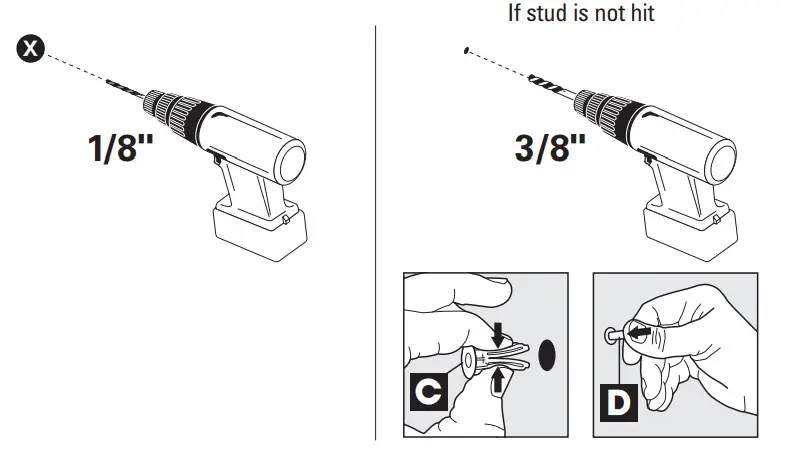 STEP 24
Place the pole cup (I) on the side wall and, using a Philips #2 drill bit, secure it by inserting two screws (A) into the pilot holes or drywall anchors.
Repeat steps 21 – 24 on the other side to secure the second pole cup (I)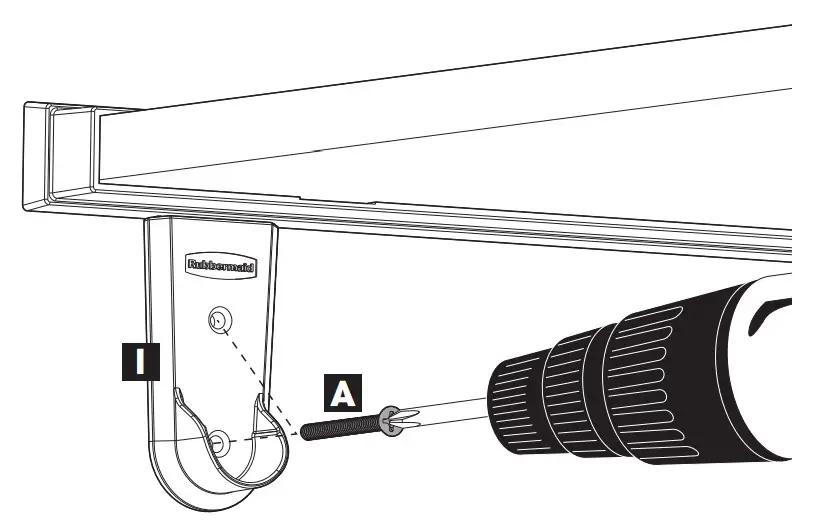 STEP 25
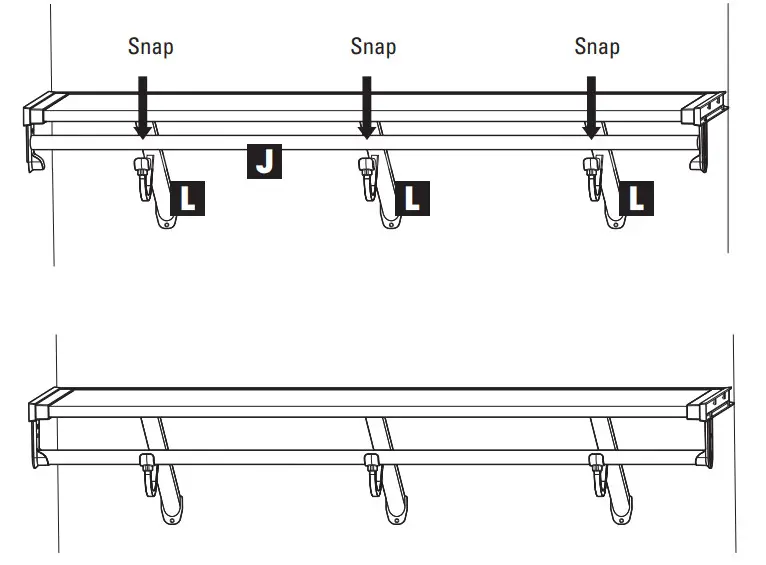
Place the hang rod (J) in the installed pole cups and on top of the hooks on the angle brackets (L). Press the hang rod (J) down to snap it into place.
![]()


