virtufit KH 1 Home Gym Workout Station

For questions or missing items, please contact Fitness Benelux:
Twekkelerweg 263
7553 LZ Hengelo
The Netherlands
T +31 (0)74-7600219
E [email protected]
W www.fitnessbenelux.nl
IMPORTANT SAFETY PRECAUTION
This exercise machine is built for optimum safety. However, certain precautions apply whenever you operate a piece of exercise equipment. Be sure to read the entire manual before you assemble or operate your machine. In particular, note the following safety precautions:
Note: the following precaution before assembling or operating the machine.
- Keep children and pets away trom the machine at all times. DO NOT leave children unattended in the same room with the machine.
- Only one person at a time should use the machine.
- lf the user experiences dizziness, nausea, chest pain, or any other abnormal symptoms, STOP the workout at once.
- Position the machine on a clear, leveled surface. DO NOT use the machine near water or outdoors.
- Keep hands away trom all moving parts.
- Always wear appropriate workout clothing when exercising. DO NOT wear robes or other clothing that could become caught in the machine. Running or aerobic shoes are also required when using the machine.
- Use the machine only for its intended use as described in this manual. DO NOT use attachments not recommended by the manufacturer.
- Do not place any sharp object around the machine.
- Disabled person should not use the machine without a qualified person or physician in attendance.
- Before using the machine to exercise, always do stretching exercises to properly warm up.
- Never operate the machine if the machine is not functioning properly.
WARNING: BEFORE BEGINNING ANY EXERCISE PROGRAM, CONSULT YOUR PHYSICIAN. THIS IS ESPECIALLY IMPORTANT FOR INDIVIDUALS OVER THE AGE OF 35 OR PERSONS WITH PRE-EXISTING HEALTH PROBLEMS. READ ALL INSTRUCTIONS BEFORE USING ANY FITNESS EQUIPMENT.
EXPLODED VIEW

PARTS LIST
| Number | Name | Quantity |
| 1 | Base frame | 1 |
| 2 | Seat post | 1 |
| 3 | Rear stabilizer | 1 |
| 4 | Seat support tube | 1 |
| 5 | Upright support tube | 1 |
| 6 | Leg curl tube | 1 |
| 7 | Guiding tube | 2 |
| 8 | Bridge tube | 1 |
| 9 | Pull unit | 1 |
| 10L | Butterfly arm – left | 1 |
| 10R | Butterfly arm – right | 1 |
| 11 | Handlebar | 2 |
| 12 | Lat bar | 1 |
| 13 | Lower pull bar | 1 |
| 14 | Foam tube for leg curl | 2 |
| 15 | Bracket for seat/backrest | 2 |
| 16 | Hex head bolt M12 X 108mml | 2 |
| 17 | Bracket for pulley | 2 |
| 18 | Two way bracket for pulley | 1 |
| 19 | Select bar | 1 |
| 20 | Pully Bracket | 2 |
| 21 | Axle for pull Unit | 1 |
| 22 | Hex head bolt M8 x 20mmL | 10 |
| 23 | Hex head bolt M10 x 60mmL | 2 |
| 24 | Hex head bolt M8 x 15mmL | 18 |
| 25 | Hex head bolt M10 x 40mmL | 9 |
| 26 | Hex head bolt M10 x 45mmL | 1 |
| 27 | Hex head bolt M10 x 75mmL | 4 |
| 28 | Hex head bolt M10 x 70mmL | 1 |
| 29 | Hex head bolt M12 x 75mmL | 1 |
| 30 | Hex head bolt M10 x 80mmL | 7 |
| 31 | Powder metal ring 12 | 4 |
| 31A | Powder metal ring 16 | 2 |
| 32 | Select pin | 1 |
| 33 | Curve washer OD22XID8.3 | 6 |
| 34 | Curve washer OD23XID10.3 | 6 |
| 35 | Flat washer OD23XID10.3 | 22 |
| 35A | Flat washer OD23XID8.3 | 20 |
| 36 | Flat washer OD24XID12.3 | 8 |
| 37 | Flat washer OD40XID12.5 | 1 |
| 38 | M8 nylon nut | 2 |
| 39 | M10 nylon nut | 24 |
| Number | Name | Quantity |
| 40 | M12 nylon nut | 5 |
| 41 | Fixed pin for weight stack | 1 |
| 42 | End cap | 6 |
| 43 | 60 Round cap | 2 |
| 44 | 60 Flat cap | 2 |
| 45 | 50.8 Flat cap | 8 |
| 46 | 25.4 Flat cap | 6 |
| 47 | Pin | 1 |
| 48 | Rubber ring | 2 |
| 49 | Pulley | 11 |
| 49A | Pulley A | 1 |
| 50 | Cap for small pulley | 2 |
| 51 | Plastic bushing | 4 |
| 52 | Rubber stopper | 1 |
| 53 | Foam for butterfly arm | 2 |
| 54 | Foam for leg curl | 4 |
| 55 | Foam for Handlebar | 2 |
| 56 | Hand grip | 4 |
| 57 | Bushing for weight stack | 1 |
| 58 | Round cap for select bar | 1 |
| 59 | Beck cushion | 1 |
| 60 | Seat | 1 |
| 61 | Chain 6 links | 2 |
| 62 | Hook | 5 |
| 63 | Weight stack 10 lbs | 1 |
| 64 | Weight Stack 10 lbs | 14 |
| 65 | Cable for lat bar | 1 |
| 66 | Cable for butterfly arm | 1 |
| 67 | Cable for lower pull bar | 1 |
| 68 | Cushion support tube | 1 |
| 69 | Bushing | 1 |
| 70 | Rubber stopper | 1 |
| 71 | knob | 1 |
| 72 | Elbow cushion | 1 |
| 73 | Bracket for cloth cover | 4 |
| 74 | Spring | 1 |
| 75 | Cloth cover for left/right | 2 |
| 76 | Plum-nut | 1 |
| 77 | Ankle strap | 1 |
ASSEMBLY INSTRUCTION
Put all the components on the floor and make sure you have enough room to assemble the device. Keep all the rings, bolts and screws in the plastic bags to make sure you don’t mix them up, and you can keep a clear overview.
STEP 1
- Attach the Rear Stabilizer (03) to the Seat Support Tabe (04) and tighten by X2 Hex Head Bolt (27), X4 Curve Washer (34) and X2 Nylon Nuts (39).
- Attach the Upright support tube (02) to the Seat Support Tabe (04) and tighten by X2 Hex Head Bolt (30), X4 Flat Washer (35) and X2 Nylon Nuts (39).
- Attach the Base Frame (01) to Upright support tube (02) and tighten by X2 hex Head Bolt (27), X4 FX2X2 lat Washer (34) and X2 Nylon Nuts (39).
- Attach the Main support tube (05) to the Seat Support Tube(04)and tighten by X2 hex Head Bolt (30), X4 Flat Washer (35) and X2 Nylon Nuts (39).

STEP 2
- Attached the Bracket for Cloth Cover L(73) to he Rear stabilizer (03) and tighten by X2 Hex Head Bolt (24), X2 Washer (35A).
- Do the same procedure for the Bracket for Cloth Cover R(73) to the right side of Rear stabilizer (03) by the same parts.
- Slide bath Guiding Tube (07) through Rubber Ring (48) into the 2 holes on the Rear Stabilizer (3), tighten trom the bottom side by X2 Curve Washer (33) and X2 Hex Head Bolt (22).
- Place the Weight Stack (64) into the Guiding tube (07). (Watch out personal safety).
- Place the Bushing for Weight Stack (57) onto the Select Bar (19) and fixed by the Fixed Pin (41). Then place the Weight Stack (63) upper the Select Bar (19) and place the Flat Washer (37) upper the Weight Stack (63).
- lnsert the Select Pin (32) through the Weight Stack (64) into the hole of Select Bar (19).
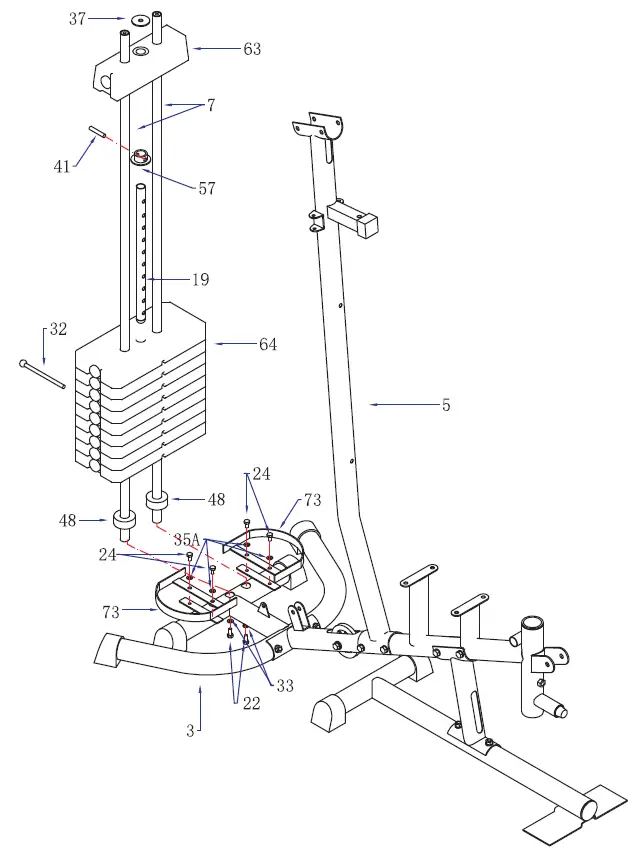
STEP 3
- Place the Guiding Tube (07) into the Bridge Tube (8) and tighten by X2 Flat Washer (33) and X2 Hex Head Bolt (22).
- Attach the Bridge Tube (8) to the Upright Support Tube (05) and tighten by X2 Hex Head Bolt (30), X4 Flat Washer (35) and X2 Nylon Nuts (39.)

STEP 4
- Attach the Backrest (15) to the Upright support tube (05), tighten by X2 Curve Washer (34) and X2 Nylon Nuts (39) through the thread holes on the Upright support tube (05).
- Attach the Backrest Cushion (59) onto the Upright Support Tube (05) by putting the screw on the Bracket for Backrest (15) into holes on Upright Support Tube (05), tighten by X4 hex Flat washer
(35A), X4 Hex held bolt (24). - Attach the Seat (60) onto the Seat Support Tube (04) by putting the screw on the Bracket for Seat into holes, tighten by X4 hex Flat washer (35A), X4 Hex held bolt (24) .
- Attach the Elbow Cushion (72) onto the Elbow Cushion Support Tube (68) tighten by X4 Washer ( 35A), X4 Hex held bolt (24) .
- Attach the Elbow Cushion Support Tube(68) into the Seat Support Tube(04), then roll with the Knob(71).
- Screw-in the Small Rubber Stopper (52) into the front side of Seat Support Tube (04).
- Attach the Leg Curve Tube (06) to the front side of Seat Support Tube (04), tighten by X1 Hex Head Bolt (29) X2 Flat Washer (36) and X1 Nylon Nut (40).
- Attach the Foam Tube for Leg Curl (14) into the holes on Leg Curl Tube (06) and front/upper bracket of Seat Support Tube (04).
- Attach the Foam for Leg Curl Tube (54) onto the 2 sides of each Foam Tube for Leg Curl (14).

STEP 5
- Attach the Pull Unit (09) to the Bridge Tube (08), insert the Axle for Pull Unit (21) through X2 Powder Metal Ring (31A), X2 Flat washer (36), X2 Nylon Nuts (40).
- Attach the Butterfly Arm R (1OR) to the right side of Pull Unit (09) through X2 Powder Metal Ring (31) and X1 Hex Head Bolt (16) and X2 Flat Washer (36) and tighten by X2 Nylon Nut (40).
- Do the same procedure for the Butterfly Arm L (1OL) to the Pull Unit (9) by same parts.
- lnsert the Rubber Stopper C 70) to the bracket on the Upright Support tube(05) .Then adjust the Pull Unit (09) to match the hole in the bracket.
- Put the Foam for Butterfly Arm (53) onto the RIL Butterfly Arm (10R & 10L) and adjust to certain position.
- Attach the Handlebar (11) onto the Butterfly Arm R (1OR), tighten by X3 Curve Washer (33) and X3 Hex Head Bolt (22). Do the same procedure of Butterfly Arm L (1OL) with the ether Handlebar (11).
- Attach the Pulley Bracket (20) onto the 2 sides of Upright Support Tube (Oq) tighten by X2 Hex Head Bolt (23), X4 Flat Washer (35) and X2 Nylon nuts (39) for 2 sides.

STEP 6
- Attach the cable for lat bar (65) to the opening bracket at the front of the Bridge Tube (8). Note: the ball stopper of the Cable (65) should be underneath the Bridge Tube (8). Attach the cable (65) onto the small pulley (49A) and put the Cap for Small Pulley (50) to the two side of Small Pulley (49A). Note: the Cable (65) has to come out of the Cap (50) from the opening sides. Tighten to the bracket by X1 Hex Head Bolt (26) and X1 Nylon Nut (39).
- Draw the cable (65) towards the back side of the machine trough the upper opening of upright support tube (05) and around pulley (49), then attach the pulley (49) into bracket A as drawing, tighten by X1 Hex Head Bolt (25) and X1 Nylon Nut (39).
- Draw the cable (65) Downwards and around pulley (49). Attach the Pulley (49) with the bracket for Pulley (17) on two sides then tighten by X1 Hex Head Bolt (25) and X1 Nylon Nut (39).
- Draw the Cable (65) upwards and around pulley (49). Attach the Pulley (49) to bracket B and tighten by X1 Hex Head Bolt (25) and X1 Nylon Nut (39).
- Draw the Cable (65) downwards between the two Guiding Tube (07) and fully thread the bolt on the end of the Cable (65) into the top opening on the Select Bar (19).
- Attach the Lat Bar (12) /Ankle Strap (77) to the front end of the Cable (65), connect by X1 Hook (62).

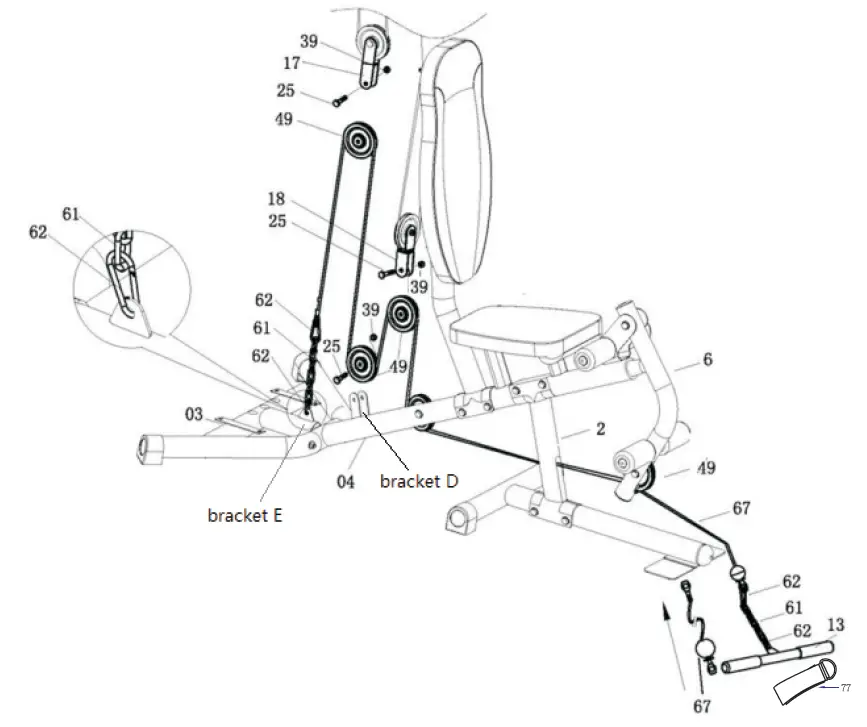
STEP 7
- Attach one end of the Cable for Butterfly Arm (66) to the hook on the Right Butterfly Arm (10R), tighten by X1 Hex Head Bolt (24), X1 Flat Washer (35A) and X1 Nylon Nut (38).
- Draw the Cable (66) around the Pulley (49) then attach the Pulley (49) to the Pulley Bracket
(20) on right side of the Upright Support Tube (05), tighten by X1 Hex Head Bolt (25) and X1 Nylon Nut (39). - Draw the Cable (66) downward and around the Pulley (49), attach the Pulley (49) to the upper part of Two Way Bracket for Pulley (18) and tighten by X1 Hex Head Bolt (25) and X1 Nylon Nut (39).
- Draw the Cable (66) upward and around Pulley (49). Attach Pulley (49) to the Pulley Bracket
(20) on the left side of the upright Support Tube (05), tighten by X1 Hex Head Bolt (25) and X1 Nylon Nut (39). - Attach the ether end of Cable (66) to the hookon the Left Butterfly Arm (10L), tighten by X1 Hex Head Bolt (24), X1 Flat Washer (35A) and X1 Nylon Nut (38).

STEP 8
- Attach the end with stopper ball of Cable for Lower Pull Bar (67) to the open bracket leg Curl Tube (6), around the underside of Pulley (49). Then draw the Cable (67) through the opening space on the lower part of Seat post (02), around the Pulley (49) from under side then draw the Cable (67) upward and around the upper side of Pulley (49). Attach the Pulley (49) to the underside of Two Way Bracket for Pulley (18), tighten by X1 Hex Head Bolt (25) and X1 Nylon Nut (39).
- Draw the Cable (67) downward and around the underside of Pulley (49). Attach the Pulley (49) to bracket D on the Seat post tube (4) and tighten by X1 Hex Head Bolt (25) and X1 Nylon Nut (39).
- Draw the Cable (67) upward and around the upperside of pulley (49). Attach the Pulley (49) to the underside of Bracket for Pulley (17) set and tighten by X1 Hex Head Bolt (25) and X1 Nylon Nut (39).
- Draw the Cable (67) downward and connect with bracket E on Rear stabilizer (3) by Chain 6 links (61) and X2 Hook (62). Note: adjust the Cable (67) to be tighten enough and lock on certain position of Chain (61) by Hook (62).
- Attack the Lower Pull Bar (13)/ Ankle strap (77) to the front end of Cable (67), connecting by Chain 6 links (61) and X2 Hook (62).
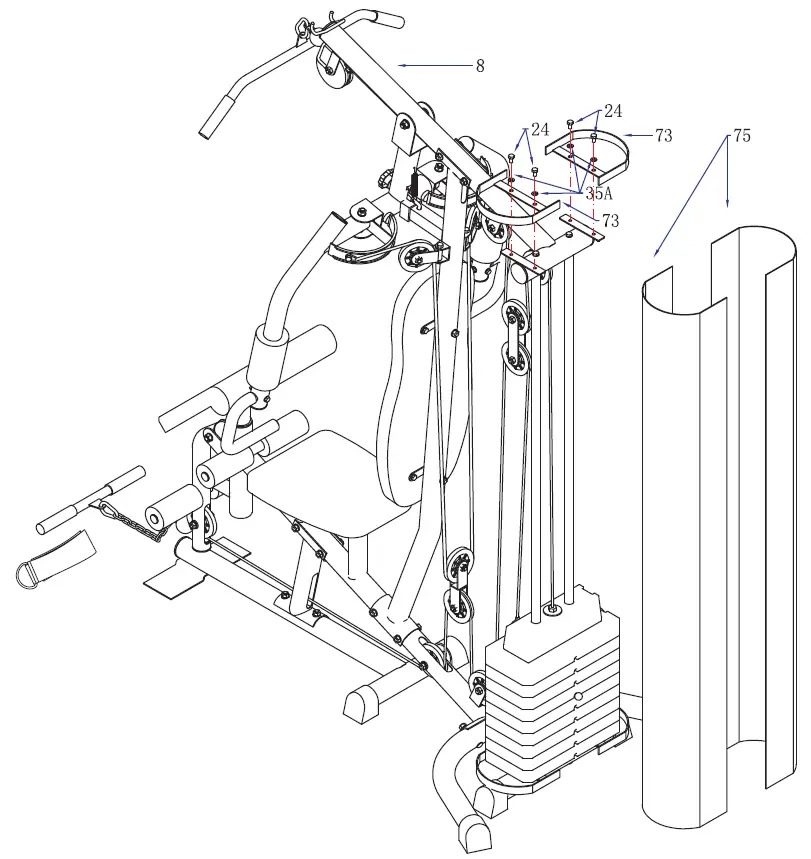
STEP 9
- Attached the Bracket for Cloth Cover L (73) to the Bridge Tube (08) and tighten by X2 Hex Head Bolt (24), X2 Washer (35A).
- Do the same procedure for the Bracket for Cloth Cover R (73) to the right side of Bridge Tube (08) by the same parts.
- Attach the Left Cloth Cover (75) to the Bracket for Cloth Cover L (73).
- Do the same procedure for Right Cloth Cover (75) to the right side by the same part.
WARNING: make sure all spare parts are tigten enough before using the machine.
EXERCISES

MAINTENANCE
Regular maintenance is important for optimal use and reduction of wear. Check all the components regularly and make sure everything is tight and secure. Replace damaged components immediately and contact your supplier.
Keep the home gym dust free. After use, make sure you use a wet towel and a bit of soap to clean the homegym. After cleaning dry with a soft towel.


