
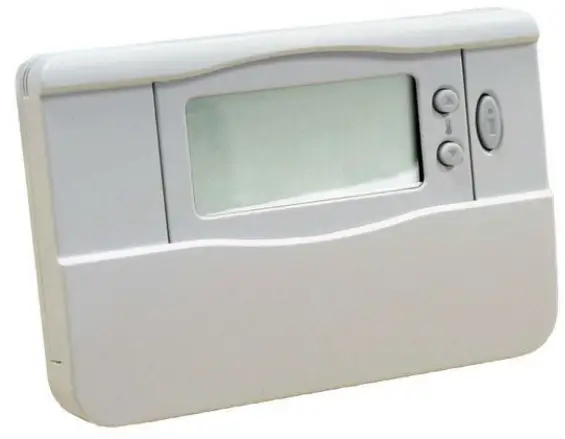
CENTER EHE0200361 RF Programmable Room Thermostat
Description
The EHE0200361 RF programmable room thermostat is designed to control your heating system efficiently, providing comfortable temperatures when you are at home and energy savings when you are away. The following instructions explain how to program and use the thermostat to provide the most home comfort at the least cost.
Features of the EHE0200361
- Ergonomic user interface featuring an ‘OK-button’.
- Large LCD (Liquid Crystal Display) Screen.
- 7-day heating program to match your lifestyle, whilst maximising energy savings.
- 4 independent temperature levels per day (from 5 °C to 35°C).
- Built-in Memory holds the user program indefinitely.
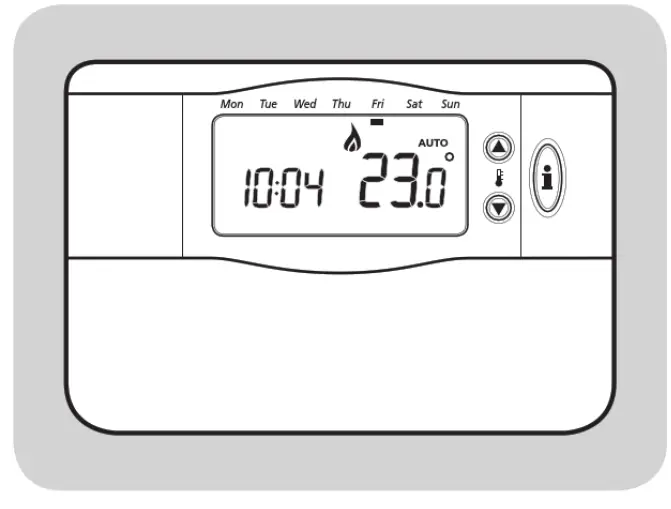
Controls Layout
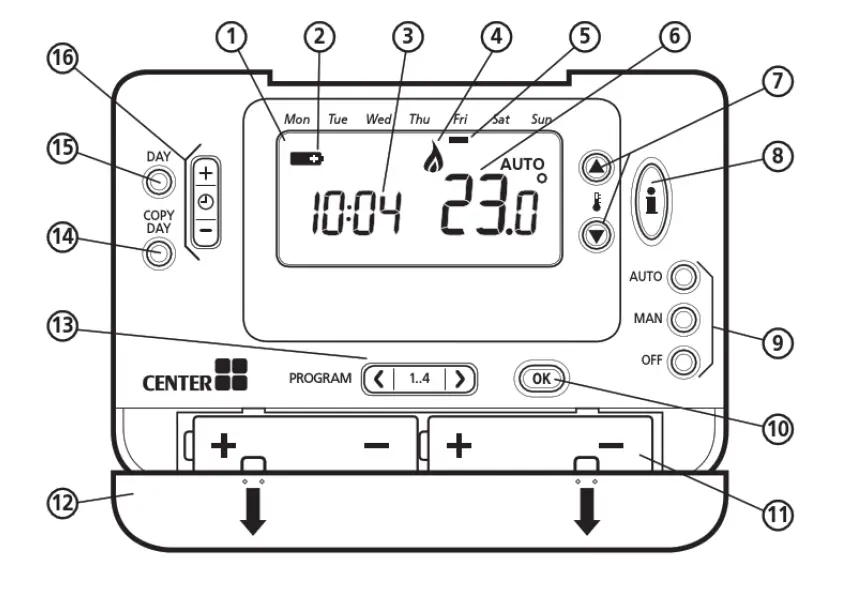
- LCD Screen
- Battery Low Indicator
- Time Display
- Burner On Indicator
- Day Indicator
- Temperature Display
- Temperature Change Buttons
- Temperature Enquiry Button
- Operating Mode Buttons
- OK Button
- Battery Compartment
- Battery Cover
- Program Buttons
- Copy Day Button
- Set Day Button
- Time Change Buttons
Setting-up the EHE0200361
This section shows you how to setup and run the thermostat in 3 simple steps:
STEP 1: Installing the Batteries
Note: Please follow the instructions in this section only if the thermostat screen is blank (no symbols or digits are displayed). If the room temperature is already displayed move on to Step 2: Setting the Date and Time.
To install the Batteries:
- Lift up the front cover of the thermostat to reveal the battery cover and product controls.
- Remove the battery cover by pressing down and sliding out.
- Insert the 2 x AA LR6 Alkaline Batteries supplied with the thermostat, ensuring the correct orientation.
- Insert the 2 x AA LR6 Alkaline Batteries supplied with the thermostat, ensuring the correct orientation.
- After a short pause the thermostat will display information on the screen and is now ready for use .
- Replace the battery cover by sliding it firmly back into the front of the thermostat.
STEP 2: Setting the Time
To set the Date and Time:
- Press the DAY button once and the ‘day indicator’ will begin to flash.
- Press the DAY button until the correct day is reached (Day 1 = Monday). Press the
 button to confirm.
 - Press either of thee
 or
or  buttons once to enter time setting mode. The LCD screen flashes the time digits (when the unit is powered for the first time the display shows 12:00).
 - Use the e) (±) or 8 buttons to set the correct time then press the button to confirm. Each press of the buttons will change the time by one minute and holding them down will change the time slowly at first and get progressively quicker.
Note: If this mode is entered accidentally then press the AUTO, MAN or OFF buttons to exit.
STEP 3: Running the Built-in Heating Program
The thermostat is now ready for operation. Press the AUTO button and the built-in heating program will start running.
Note: The built-in heating program has been designed t o provide normal comfort requirements, but if you want to customise the settings please see the next section ‘Programming the EHE0200154
Programming the EHE0200361
The Built-in Heating Program
The built-in heating program has 4 temperature level changes per day that can be set between 3.00am and 2.SOam the following day – allowing you to maintain the evening temperature after midnight. Each temperature level can be set between S°C and 3S°C, and adjusted in O.S°C increments. The factory default program for heating is as follows.
| Monday to Friday | Period | 1 | 2 | 3 | 4 |
| (Day 1 to S) | Time | 6:30 | 8:00 | 18:00 | 22:30 |
| Temperature | 21°c | 18°( | 21°c | 16°( | |
| Saturday & Sunday (Day 6 & 7) | Period Time | 1 8:00 | 2 10:00 | 3 18:00 | 4 23:00 |
| Temperature | 21°c | 21°c | 21°c | 16°( |
Reviewing the Heating Program
To review or edit the heating program use the PROGRAM ![]() or
or ![]() buttons to navigate between the 4 individual programming periods for that day. Use the DAY button to step through each day of the week, so the complete 7 day heating program can be reviewed or edited.
buttons to navigate between the 4 individual programming periods for that day. Use the DAY button to step through each day of the week, so the complete 7 day heating program can be reviewed or edited.
Modifying the Heating Program
To change the heating program: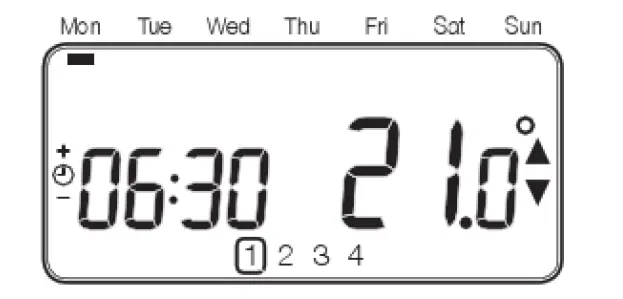
- Press either of the PROGRAM
 or
or  buttons to enter the programming mode. The time/ temperature settings for period
  on Monday (Day 1) will be flashing as shown. The active period is highlighted by a flashing square around the numbers at the bottom of the screen and the selected day is shown with the day indicator.
 - To adjust the period start time use thee or buttons, the ‘OK?’ indicator will be displayed to confirm the change. Holding the button down will change the time quickly.
- Note: If you are pressing the or buttons and the display flashes the next period, it means the next period will be pushed forward.
- Once the required time is reached press the button to confirm.
- Note: If the original time setting did not require adjustment press the button to move to step ‘d’.
- The temperature setting for period on Monday (Day 1) will now be flashing. To adjust this press the
 or
or  buttons and confirm the setting again by pressing the button.
 - The next time and temperature period will now be active. Adjust this by repeating steps b – d above until all 4 periods are set for Monday or press the AUTO button to run the program as set, at any time.
You now have a choice of how to set the program for the next day: - Press the COPY DAY button to copy Monday’s program into Tuesday. The display will go blank apart from the ‘non flashing’ day indicator, which indicates the day copied and the ‘flashing’ target day to copy the program to. To accept this day press the button. To select a different target day press the DAY button until the ‘flashing’ day indicator is under the required day, then accept it by pressing the button.
Note: Once the target day is confirmed it becomes the day that is copied if the COPY DAY button is pressed again. OR Press the DAY button to move the day indicator to Tuesday (Day 2). The program for that day can then be adjusted by following steps b to e. Programs for the remaining days can be set in the same way, using the DAY button to move to the next day.
To exit the programming mode select the desired operating mode by pressing the AUTO, MAN or OFF buttons. Note: To run the adjusted program select the AUTO
mode.
Disabling / Enabling Time Periods
The thermostat has 4 periods each day that can be programmed, but you may not need all of these switch points for your heating requirements. Therefore, any period from 2 to 4 can be removed from (or returned to) the heating program profile.
To disable or enable time periods:
- To disable unwanted periods go to the desired period (
 to
to  ) using the PROGRAM or buttons to navigate, ensure the correct period is highlighted with the flashing square symbol. Press and hold the
  button for at least 2 seconds and the display will indicate the period has been removed from the program.
 - To enable periods again follow the same procedure as above, navigating to the already disabled period. To enable this period again press and hold the button for at least 2 seconds.
Operating the EHE0200361
Choosing the Operating Mode
The thermostat can operate in three different modes: Automatic, Manual or Off. To set the operating mode press either of the AUTO, MAN or OFF buttons. The screen indicates which mode is currently active by displaying AUTO, MAN or OFF.
- AUTO (automatic) mode sets the thermostat to follow the built-in temperature program (default or personalised). Operating the thermostat in this mode is the best way . to maintain a high level of temperature comfort whilst maximising your energy savings.
- MAN (manual) mode sets the thermostat to act as a simple thermostat with a fixed setpoint throughout the day. The setpoint can be adjusted from S°C to 3S°C by using the or buttons. The thermostat will continue to maintain this temperature until another operating mode or temperature is selected.
- OFF mode sets the thermostat to control to a minimum temperature setting of S°C (default) that acts as a frost protection measure for your home.
During Normal Operation
- Temperature Enquiry
In AUTO, MAN and OFF operating modes the thermostat will display the current room temperature. To review the programmed ‘target’ temperature (the temperature which the thermostat is trying to maintain) press the button. This ‘target’ temperature value will be displayed flashing for S seconds before returning to the current room temperature value. - Temperature Override
During normal operation (AUTO mode) the programmed temperature can be adjusted manually by pressing the or buttons or the button. The ‘target’ temperature will be displayed and flash for S seconds – during this time the or buttons can be used to modify the set value. - Note: This temperature override is cancelled at the next programmed temperature change.
Adjusting the Time
To adjust only the time during normal operation use the ![]() or
or ![]() buttons to adjust the time and press the
buttons to adjust the time and press the ![]() button again to confirm any changes.
button again to confirm any changes.
Troubleshooting the EHE0200361
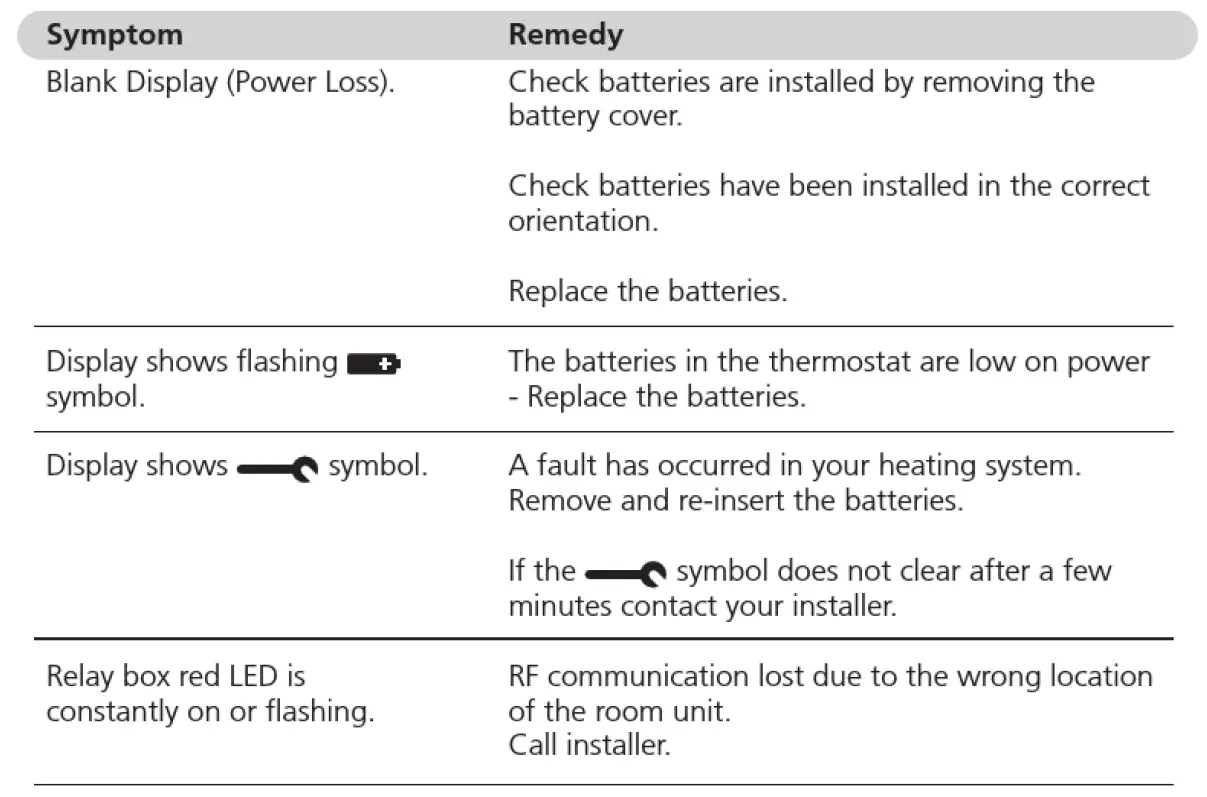
NOTE: You can control the boiler manually when the RF communication is lost. Press the push button on the relay box to switch the boiler on and off. When the green LED is on – the boiler is on.
FAQ’s
How do I change the batteries on the thermostat when they run out?
The thermostat constantly monitors the battery power level. which typically lasts for about 2 years before the batteries need to be replaced. When the power is running low a flashing ![]() the symbol will be displayed on the screen. To change the batteries follow the steps in the above section (‘STEP 1: Installing the Batteries’, replacing the used batteries with new ones in Step c. Note: While changing the batteries your program settings will be stored but you may need to adjust the time settings to be correct.
the symbol will be displayed on the screen. To change the batteries follow the steps in the above section (‘STEP 1: Installing the Batteries’, replacing the used batteries with new ones in Step c. Note: While changing the batteries your program settings will be stored but you may need to adjust the time settings to be correct.
How do I set one temperature for the whole day?
To operate as a simple thermostat with one temperature throughout the day, select the manual operating mode by pressing the MAN button. Adjust the temperature
by pressing the  or
or ![]() buttons – this can be set anywhere from S°C to 3S°C in 0.5°C steps. The thermostat will continue to maintain this temperature until another
buttons – this can be set anywhere from S°C to 3S°C in 0.5°C steps. The thermostat will continue to maintain this temperature until another
operating mode is selected or the temperature is adjusted.
Relay Box Controls layout
The relay box will normally be found mounted close to the boiler.
- What does it mean when the Relay Box green LED is ON?
- The green LED indicates normal operation of the radio frequency system. When the green LED is ON the boiler is also ON. When the LED is OFF the boiler is OFF.
- When do I need to use the push button?
- You should use the push button to control your boiler only when the RF communication is lost (see Troubleshooting the EHE0200361 ).
- For further information telephone 0870 8506538?
- Whilst every care has been taken to ensure that the information included in this document was accurate at the time of printing, we reserve the right to change specifications at any time.
- The photographs reproduced in this publication are within the constraints of the printing process and are NOT to be used for matching purposes. E&0E.
A WOLSELEY company


