![]()
INSTALLATION INSTRUCTIONS
D-SERIES ® , D-SS ™ & SR-Q SERIES ®
THANK YOU FOR PURCHASING RIGID INDUSTRIES’ PRODUCTS FOR YOUR VEHICLE.
Please read through all of these Instructions and tips before proceeding with the installation. We do our best to provide a simple installation process for all applications however a professional installation is always recommended.
IMPORTANT Always disconnect any power sources connected to your vehicle before servicing fuses or electrical systems.
WIRING INSTRUCTIONS
STEP: 1 When routing a wire harness through any metal surface be sure it is free of any sharp edges and protected using wire sheathing or a grommet.
STEP: 2 Follow the WIRING DIAGRAM to ensure proper connection to switch and battery terminals.
STEP: 3 If connecting to existing wiring, make sure to use appropriate fusing and wire gauge. Be sure to use heat shrink tubing on all connections to ensure a weather-tight seal.
STEP: 4 Be aware of the current rating of your selected switch, if the switch rating is less than the amperage required to power your lighting then a relay must be added in line to prevent failure of the switch.
STEP: 5 Connect the positive and negative battery terminals once all connections have been made and test to verify functionality.
WIRING DIAGRAM FOR
RELAY HARNESS
NOTE: GOLD Spade is the Top of the Switch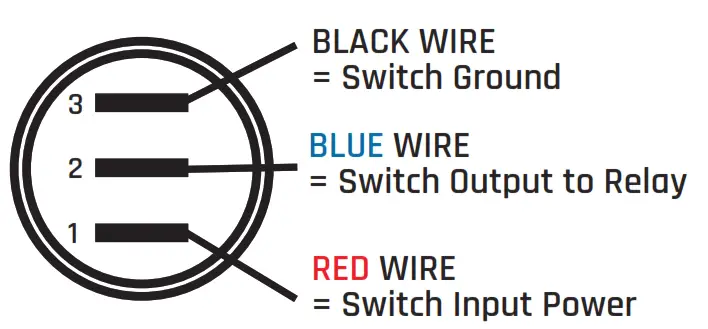
WIRING DIAGRAM FOR
NON-RELAY HARNESS
NOTE: GOLD Spade is the Topthe of Switch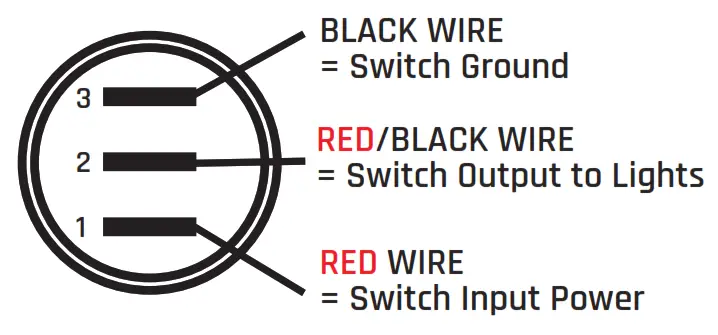
INSTALLATION INSTRUCTIONS
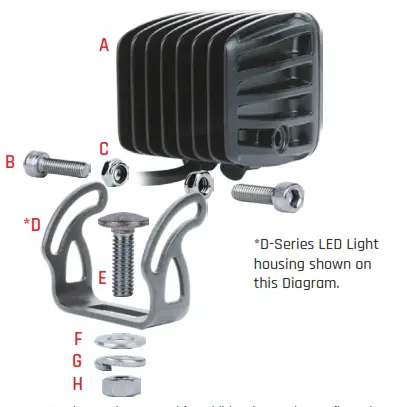
MOUNT INSTRUCTIONS & DIAGRAM FOR
D-SERIES & D-SS
- Place 5/16”- 18 Carriage Bolt (E) into Mounting Bracket (D).
- Use M6 Allen Socket Head (B) and M6 Nyloc Nut (C) to attach the Mounting Bracket (D) to Housing (A).
- Drill a 5/16” hole into desired mounting location.
- Use 5/16”: Flat Washer (F), Lock Washer (G), and Nut (H) to secure the light assembly to the vehicle.
- Tighten all hardware.
A – LED Light (Housing)
B – M6 Allen Socket Head (2)
C – M6 Nyloc Nut (2)
D – Mounting Bracket
E – 5/16”- 18 Carriage Bolt
F – 5/16” Carriage Washer
G – 5/16” Carriage Lock Washer
H – 5/16”- 18 Carriage Nut
SR-Q SERIES
- Place 5/16”- 18 Carriage Bolt (E) into Mounting Bracket (D).
- Use 1/4“- 20 Allen Socket Head (B) and 1/4”- 20 Nyloc Nut (C) to attach the Mounting Bracket (D) to Housing (A).
- Drill a 5/16” hole into desired mounting location.
- Use 5/16”: Flat Washer (F), Lock Washer (G), and Nut (H) to secure the light assembly to the vehicle.
- Tighten all hardware.
A – LED Light (Housing)
B – 1/4” – 20 Allen Socket Head
C – 1/4“ – 20 Nyloc Nut
D – Mounting Bracket
E – 5/16”- 18 Carriage Bolt
F – 5/16” Carriage Washer
G – 5/16” Carriage Lock Washer
H – 5/16”- 18 Carriage Nut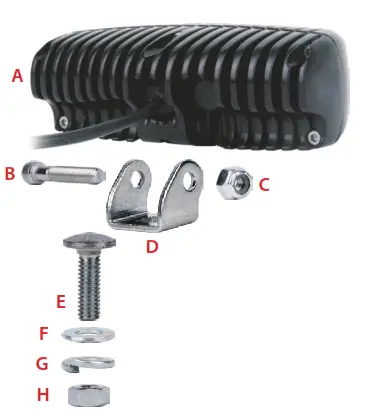
Your installation is now complete.
Welcome to the Rigid Nation!
WARRANTY INFORMATION
For warranty information, visit www.rigidindustries.com/about/warranty 779 N Colorado St, Gilbert, AZ 85233 • 855-760-5337
www.rigidindustries.com
RIGID, SR-Q Series, D-Series, and D-SS and Rigid Industries are registered and/or common law marks owned by JST
Performance, LLC, a Delaware limited liability company d/b/a Rigid Industries.
IS-D-SRQ-E


