![]() Quick Installation Guide
Quick Installation Guide
0.7-3.3kW Single Phase Inverter
Packing List
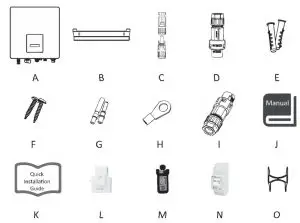
| Object | Quantity | Description | Object | Quantity | Description |
| A | 1 | Inverter | I | 1 | Communication connector |
| B | 1 | Bracket | J | 1 | Product manual |
| C | 2 | DC connector (F/M) | K | 1 | Quick installation guide |
| D | 1 | AC connector | L | 1 | CT (Optional) |
| E | 2 | Expansion tube | M | 1 | WiFi/LAN/GPRS(Optional) |
| F | 2 | Expansion screw | N | 1 | Meter (Optional) |
| G | 2 | DC pin contact (2*positive, 2*negative) | 0 | 2 | Unlock tool |
| H | 1 | Earth terminal |
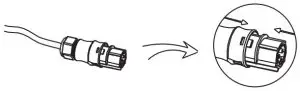
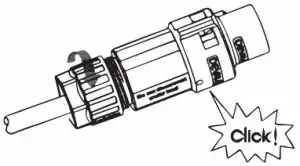
- Push the threaded sleeve to connection terminal until both are locked tightly on the inverter.

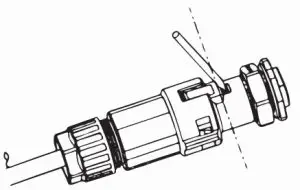
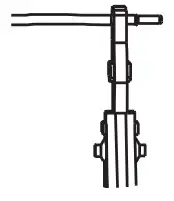
- Remove the AC connector, press the bayonet out of the slot with a small screwdriver or the unlock tool and pull it out, or unscrew the threaded sleeve, then pull it out.

DC Wiring
- Turn off the DC switch.
- Choose 12 AWG wire to connect the PV module.
- Trim 6mm of insulation from the wire end.

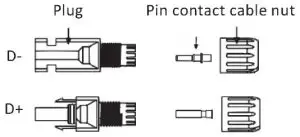
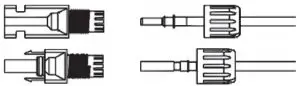
- Separate the DC connector as below.


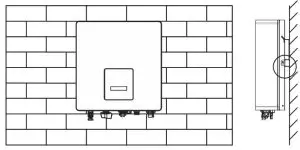
Inverter Installation
Please make sure the inverter will be installed with a proper distance as shown below.
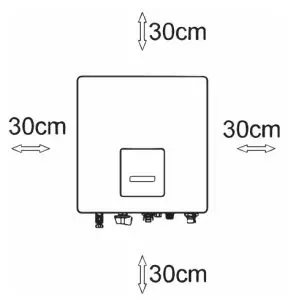
| Position | Min Size |
| Left | 30cm |
| Right | 30cm |
| Top | 30cm |
| Bottom | 30cm |
| Front | 30cm |
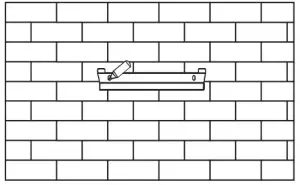
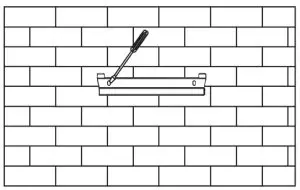
Step 1: Fix the bracket on the wall
Choose the place you want to install the inverter. Place the bracket on the wall and mark the position of the 2 holes from the bracket.
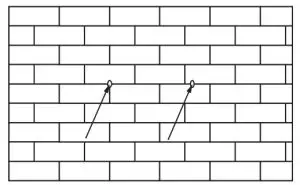
Drill holes with an electric drill, make sure the holes are at least 50mm deep and then tighten the expansion tubes.
- Insert stripped cable into pin contact and ensure all conductor strands are captured in the pin contact.
- Crimp pin contact by using a crimping plier. Put the pin contact with striped cable into the corresponding crimping pliers and crimp the contact.

- Insert pin contact through the cable nut to assemble into the back of the male or female plug. When you feel or hear a “click” the pin contact assembly is seated correctly.

- Unlock the DC connector
– Use the specified wrench tool.
– When separating the DC + connector, push the tool down from the top.
– When separating the DC- connector, push the tool down from the bottom.
– Separate the connectors by hand.
Insert the expansion tubes into the holes and tighten them. Install the bracket with the expansion screws.
Step 2: Match the inverter with a wall bracket
Hang the inverter over the bracket, slightly lower the inverter, and make sure the two mounting grooves on the back are properly fixed with the two bracket bars.
Wiring Steps
AC Wiring
- Cable dimensions
Model (kW) 0.7 1.0 1.5 2.0 2.5 3.0 3.3 Cable 2.5mm2 2.5mm2 2.5mm2 4mm2 4mm2 4mm2 4mm2 Micro-Breaker 16A 16A 16A 25A 25A 25A 25A
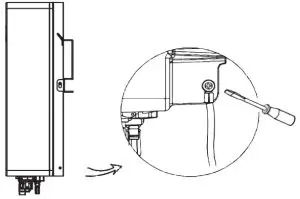
Grounding Wiring
Screw the ground screw with a screwdriver as shown below.
Startup Procedure
- After checking all connections are correct, turn on the external DC /AC breakers.
- Turn the DC switch to the “ON” position.
- The inverter will start automatically when PV panels generate enough energy, the LED will be green.
- Complete inverter Start-up guide
After the initial start-up of the inverter, the display will go to the language settings page, short press to switch language, and long press to confirm the selection. Once the language is set, the display will guide set the of safety regulations. Short press to switch safety regulation, and long press to confirm the selection.
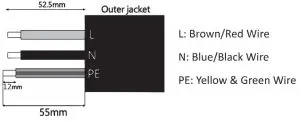
- Trim all the wires to 52.5mm and the PE wire to 55mm.
- Use the crimping pliers to trim 12mm of insulation from all wire ends as shown in the picture.
 Note: Please refer to local cable type and color for the actual installation.
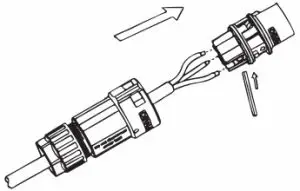
 - Separate the AC plug into three parts as below.
a. Hold the middle part of the female insert, rotate the back shell to loosen it, and detach it from the female inset.
b. Remove the cable nut (with rubber insert) from the back shell.
Note: Please refer to local cable type and color for the actual installation. - Separate the AC plug into three parts as below.
a. Hold the middle part of the female insert, rotate the back shell to loosen it and detach it from the female inset.
b. Remove the cable nut (with rubber insert) from the back shell.
- Slide the cable nut, then the backshell onto the cable.

- Push the threaded sleeve into the socket, tighten up the cap on the terminal.
 Note:
Note: - When starting the inverter for the first time, the country code will be set by default to the local settings. Please check if the country code is correct.
- Set the time on the inverter using the button or by using the APP.
 Note: Please refer to local cable type and color for the actual installation.
 Note:
Note:


 Three-phase High Performance Inverter User Manual")


 Three Phase Solar Inverter User Manual")


