AUDIBAX Flint Kit
Packing List
Quantity
- Bluetooth Digital Amplifier………………………………………………………………………………1
- Bottom Box…………………………………………………………………………………………………….1
- Remote Controller………………………………………………………………………………………….1
- Ceiling Speaker……………………………………………………………………………………………..2
- User Manual…………………………………………………………………………………………………..1
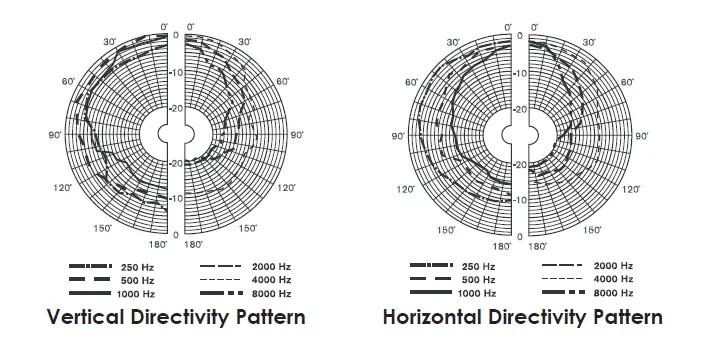
Directivity Curves
Introduction
Thank you for choosing our products. All products are strictly tested before leaving the factory, with guaranteed quality.
In order to facilitate the installation, configuration and use of the product, please read the manual carefully before installation.
Product Overview
This stereo music system is composed of a high-fidelity bluetooth digital amplifier and two full-range ceiling speakers, with excellent sound quality, fashionable design, and compact size, easy to install. It is an ideal choice for small building environments, such us residential rooms, small offices and small retail stores.
High-fidelity Bluetooth Digital Amplifier
- Mode selection: FM, USB, SD, AUX, BLUETOOTH.
- Support MP3, WAV, FLAC and other compressed and lossless audio formats.
- Support adjustable sensitivity for AUX input.
- Support FM, which can search stations automatically and manually, and can store 20 channels.
- Support AUX OUT.
- Wide voltage input, adaptable for 100~240VAC, 50/60Hz.
- Class D differential output.
- Support infrared remote control operation.
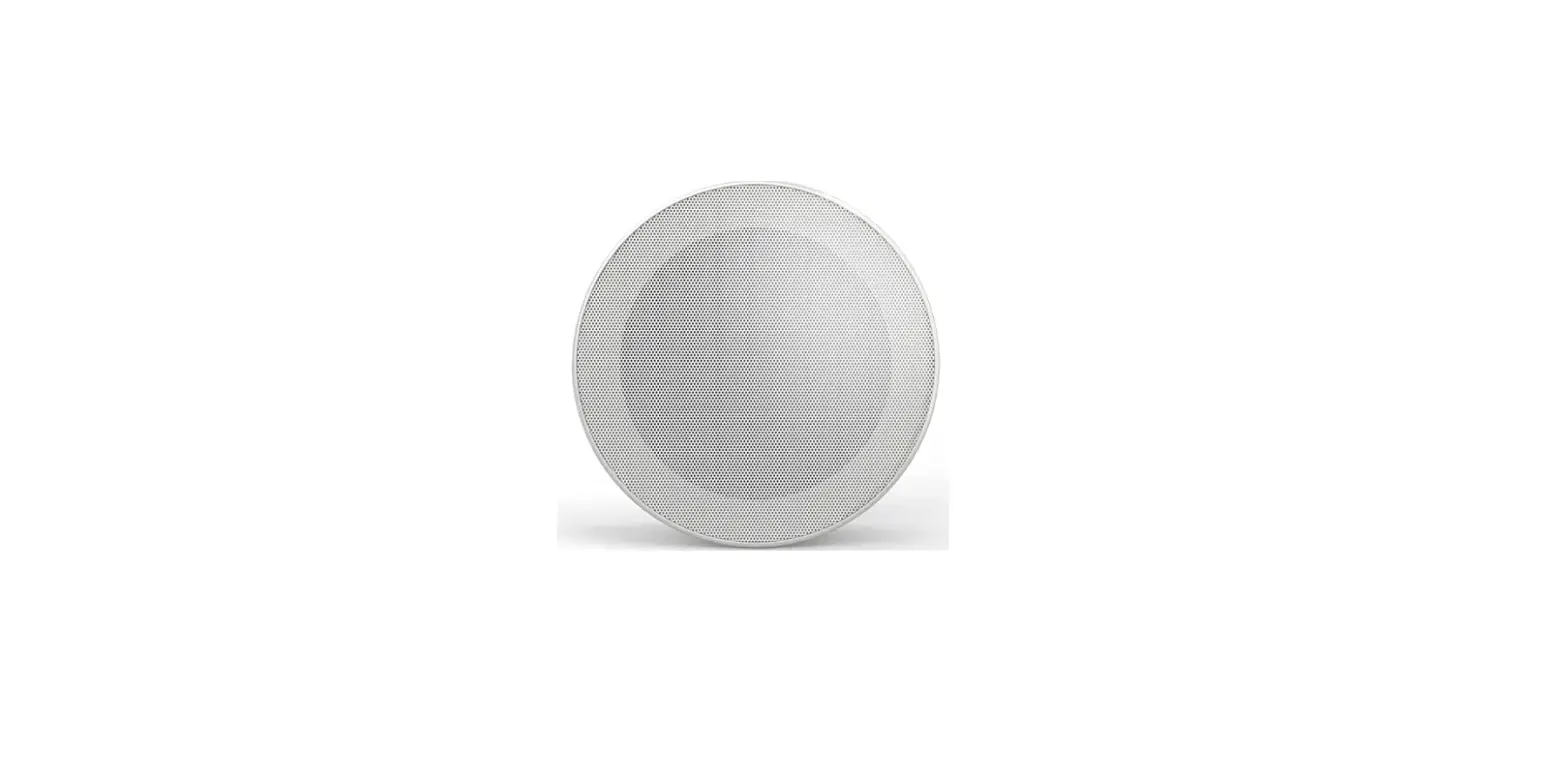
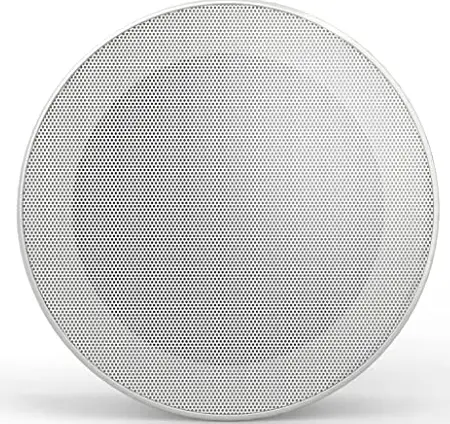
Full-range Ceiling Speaker
- Carbon alloy aluminum mesh with RAL white coating, which can be perfectly integrated with any indoor occasion.
- Full range 6.5″ speaker with magnet circuit coated by a special process of engineering plastics, and marine algae paper formed by biological deduction and heat compression, to reproduce perfect sound and voice. (M3 is a coaxial speaker, which has 6.5″ woofer and 0.75″ tweeter).
- Compliance with IEC 268-5 power handling capability (PHC) standard, it can work continuously for 100 hours at rated power. With simulate acoustic feedback exposure (SAFE) test, it can withstand twice the rated power in a short period of time, which ensures the high reliability of the speaker under extreme conditions, prolongs the service life and significantly reduces the chance of failure or performance degradation
Frequency Response and Distortion Curves

Technical Parameters
| High-fidelity Bluetooth Digital Amplifier | Power Input | ~100-240V |
| Output Power (Peak) | 2 ×10W | |
| Rated Impedance | 8Ω | |
| THD | ≤0.3% (1KHz, 1W, 8Ω) | |
| SNR | >81dB | |
| Frequency Response | 20Hz – 20KHz | |
| AUX IN Sensitivity (Adjustable) | AUX: 1.0V / 500mV | |
| AUX OUT Sensitivity (Adjustable) | AUX: 0-1.0V | |
| Audio Format | MP3, WAV, FLAC, etc. | |
| Bluetooth Input | BT2.1+EDR | |
| Storage | USB, SD card | |
| Product Dimensions | 86×86×38mm | |
| Full-range Ceiling Speaker | Speaker Unit | 6.5”×1 |
| Frequency Range | 140Hz-16kHz | |
| Rated Power | 5W | |
| Maximum Power | 10W | |
| MAX. SPL. | 92±2dB | |
| Sensitivity (1m/1w) | 100±2dB | |
| Storage Temperature | -25℃~+55℃ | |
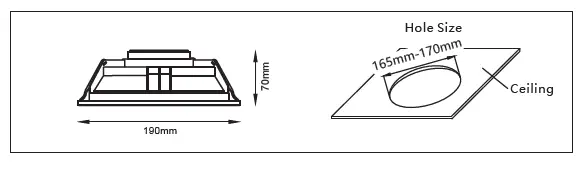
| Product Dimensions | 190mm×70mm | |
| Weight | 0.52kg |
Product Information
High-fidelity bluetooth digital amplifier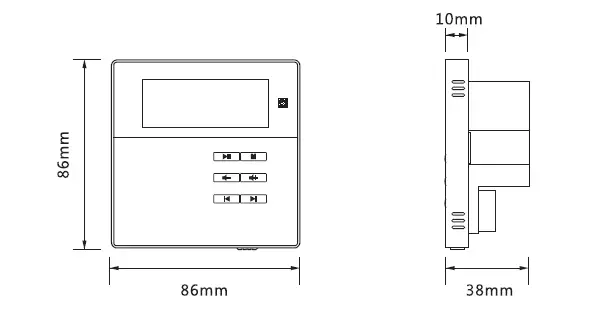
Full-range Ceiling Speaker
Basic Functions of Digital Amplifier
Control Panel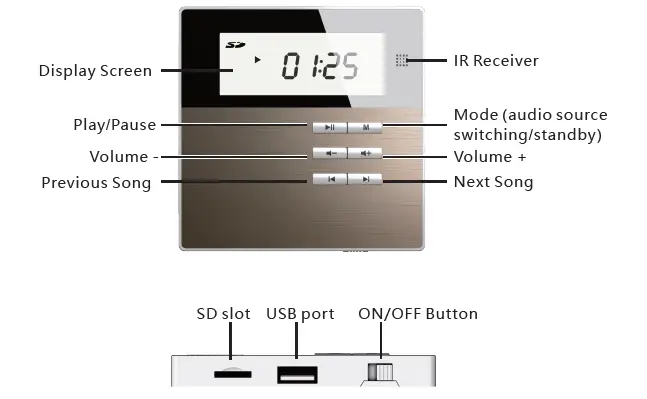
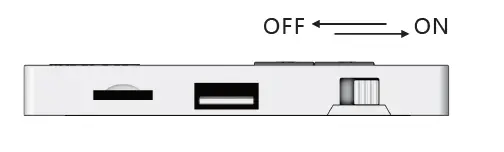
ON/OFF, Standby Operation
- ON: Toggle the switch button to the right to turn on the device. OFF: Toggle the switch button to the left to turn off the device.
- Standby: Long press M to enter the standby state, and press M again to resume the ON state
Exposed Installation of Bottom Box
Note:
- The bottom box depth purchased can not be less than 40mm. Drill holes in the wall needs to be installed according to the screw holes at the four corners of the bottom surface of the box.
- Thread the line end through the reserved holes around the box, and fix the box on the wall securely with 4 self-tapping screws

- Please arrange the line connection according to the actual hole position of the box
- Please refer to step 3, step 4 and step 5 in Concealed Installation of Bottom Box to complete the installation.

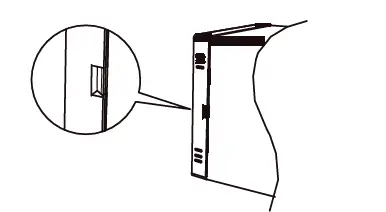
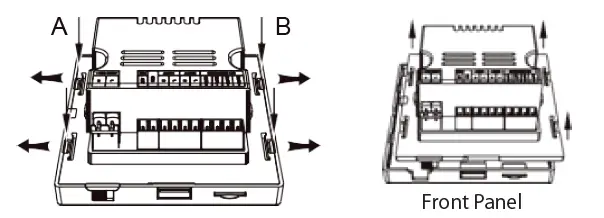
Disassembly
- Find the gap between the right side of the front panel of the amplifier and the base.

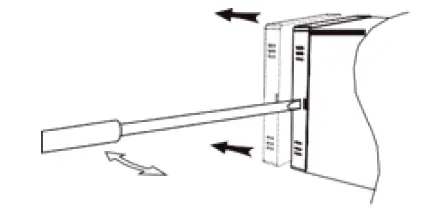
- Use a slotted screwdriver to pry the buckle part of the gap carefully, and then hold the front panel of the amplifier with both hands, and seperate the front panel of the amplifier from the base as parallelly as possible. Be careful not to damage the pins on the base.

- As shown in the figures below, select the two clips in the direction of A or B, push the outer edge outward to loosen the clips, and carefully separate the front panel of the amplifier and the base.

- Connect the line end to the port on the base of the amplifier, and fix the base on the two mounting columns with two screws

- Align the front panel of the amplifier with the fixed base in parallel, carefully close and fasten them, and check the stability.


Note: When the front panel is fastened to the base, the pins will be inserted into the holes on the front panel. Do not bend or damage the pins, otherwise it will cause serious damage to the amplifier
Play Functions of Digital Amplifier
FM
- Short press the “M” button to select the FM mode.
- Auto-Search: Long press “
 ” to start auto searching, and the system will save the effective radio stations automatically.
 - Manual Fine-tuning mode: Long press”
 ” or “
 “to enter the manual fine-tuning mode, short press “ ” or “ ” to fine-tune the current channel manual. If there is no operation within 5 seconds, it will save the current channel and exit the manual fine-tuning mode.
 - Mute: Short press “ ” to mute the FM.
- Channel Switching: Short press” ” or “ “to switch the saved channels.
- Volume Adjustment: Short press ”
 ” or “
 ” to increase or decrease the current volume
USB
- Short press the “M” button to select the USB mode. When there is no USB device, the screen will display “NO” and flash. When there is a USB device, it will read the card, and the screen will display “—-” when there is no music or it cannot be decoded; and it will play the music automatically when there is music and it can be decoded.
- Play Control: Short press” ” or ““to switch to the previous song or next song, long press them to fast forward or fast backward; short press “ ” to switch between Play and Pause.
- Volume Adjustment: Short press “” or “” to increase or decrease the current volume.
SD
- Short press the “M” button to select the SD mode. When there is no SD, the screen will display “NO” and flash. When there is a SD, it will read the card, and the screen will display “—-” when there is no music or it cannot be decoded; and it will play the music automatically and the screen will display the playback progress then there is music and it can be decoded.
- Play Control: Short press “ ” or ““to switch to previous song or next song, long press them to fast forward or fast backward; short press ” ” to switch between Play and Pause.
- Volume Adjustment: Short press “” or “” to increase or decrease the current volume
AUX
- Short press the “M” button to select the AUX mode.
- Play Control: Short press “” to switch between Play and Mute. When it is muted, the LCD screen will flash.
- Volume Adjustment: Short press “” or “” to increase or decrease the current volume.
- Sensitivity Adjustment: Long press” ” or ““to fine-tune the sensitivity, which can be switched between S1 and S2. (S1: input 500mV, S2: input 1000mV)
AUX OUT
This device can be used as an audio source output to other amplifier devices. When the
AUX OUT interface is connected to other devices, and when FM/USB/SD/AUX-IN/Bluetooth is selected for playback, the audio signal can be transmitted to those devices for synchronized playback.
Bluetooth
- Short press the “M” button to select the BT mode. When there is no connection, the screen will flash “BT”, and when the device is connected successfully, the screen will display “BT”.
- The Bluetooth name displayed on other devices is “DM835”, with the password of 0000.
- Volume Adjustment: Short press “” or “” to increase or decrease the current volume.
System Settings
First, please prepare a computer and connect the device to the computer via a USB cable. Open the DM835 configuration tool in the computer
- Display the device information and connection status.
- Device bluetooth name and password settings. Enter the desired Bluetooth name and password in the name and password box, and click “Configure” to complete the modification.
- Maximum volume limit settings. The maximum volume of the device that can be allowed to be set by the user includes 25%, 50%, 75%, and 100%. Select one of them, and click “Configure” to complete the settings
Terminal Function Table
| Function | Power Input | FM | GND | AUX IN | AUX OUT | Amplifier Output 8Ω | ||||||
| Symbol | N | L | ANT | R | L | R | L | OUTL+ | OUTL- | OUTR- | OUTR + | |
|
Name |
Null Line |
Live Line | FM Antenna |
Signal Ground | Audio Input Right | Audio Input Left | Audio Output Right | Audio Output Left | Left Speaker+ | Left Speaker- | Right Speaker- | Right Speaker+ |
Digital Amplifier Installation
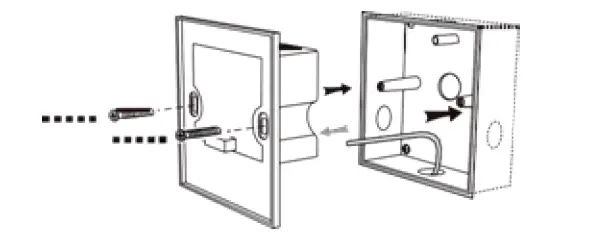
Concealed Installation of Bottom Box
Note: The bottom box depth purchased can not be less than 40mm. Open a groove suitable for the box dimension on the wall that needs to be installed, drill holes in the groove according to the screw holes at the four corners of the bottom surface of the box, and prepare to connect lines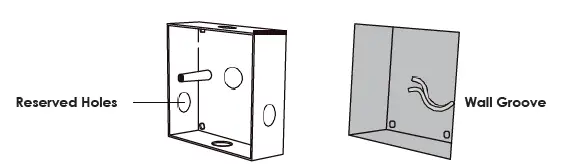
Please arrange the line connection according to the actual hole position of the box.
Thread the line end through the reserved holes around the box, put the box into the wall groove, and fix the box in the wall groove securely with 4 self-tapping screws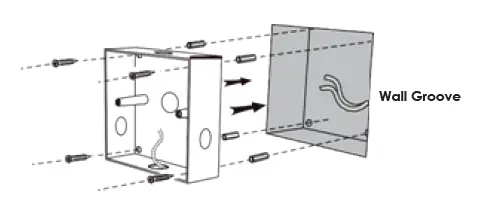
Finally, check whether the installation is firm and reliable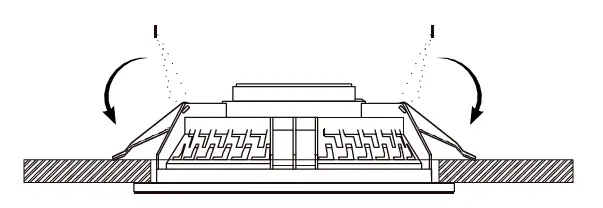
Digital Amplifier Connection
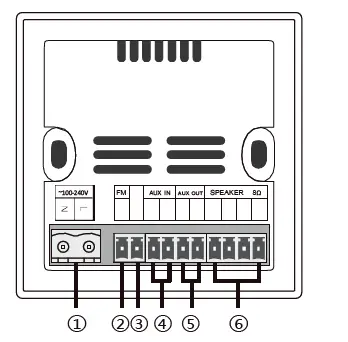
Connection Ports:
- Power Input ~100-240V
- FM Antenna
- Signal Ground
- Audio Input (2×0.3mm² double-shielded audio cable)
- Audio Output (2×0.3mm² double-shielded audio cable)
- Amplifier Output (Oxygen-free copper speaker cable)
Note: All wire connectors cannot be exposed.
Remote Controller
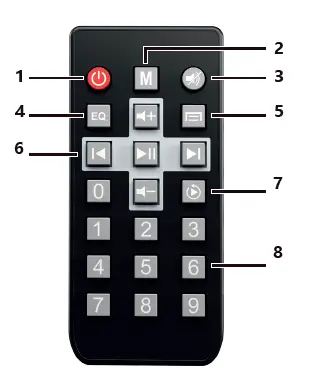
- Standby Switch.
- Mode Selection. Click the button to display: FM, USB, SD, AUX, BT.
- Mute.
- Sound Mode Selection.
- Menu (not available yet).
- Play Control Area. Can Play/Pause, switch to the previous song or next song, and control the volume.
- Play Mode Selection. Click the button to display in a loop: single cycle, and order play.
- Number Keys Area. In SD card mode, use the number keys to directly select the track for playback; in FM mode, use the number keys to directly input the FM frequency.
The input range is 0870~1080. If the input frequency is out of range, it will not respond.
For example input 0875, indicating 87.5MHZ
Installation and Connection
Ceiling Speaker Installation
The recommended and optimal playback space for the speakers: 50m² (including 2 ceiling speakers)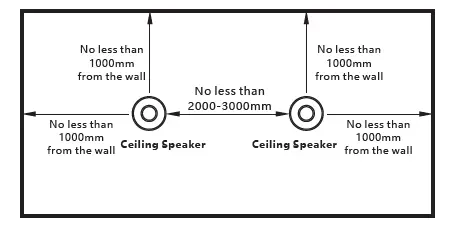
- Please refer to the following figure, select the hole size of the corresponding model, and open the installation hole in the position that needs to be install

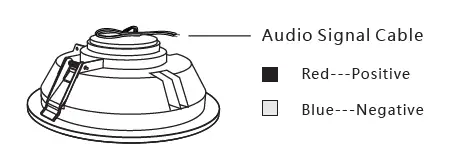
- Connect the audio signal cable as shown below

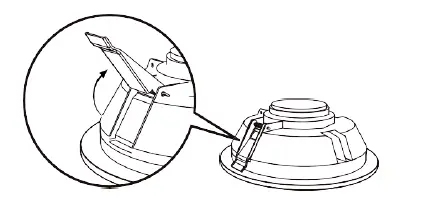
- Push up the spring clamps on both sides of the speaker and keep them in this state (it is recommended to wear working gloves for this operation to avoid spring clamps).

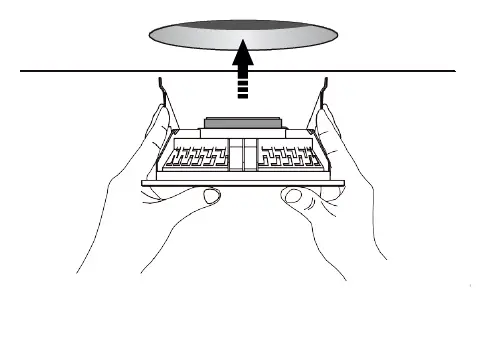
- Carefully push the speaker into the open mounting hole, then slowly release the spring clamps and gently push the speaker into the ceiling (see below)