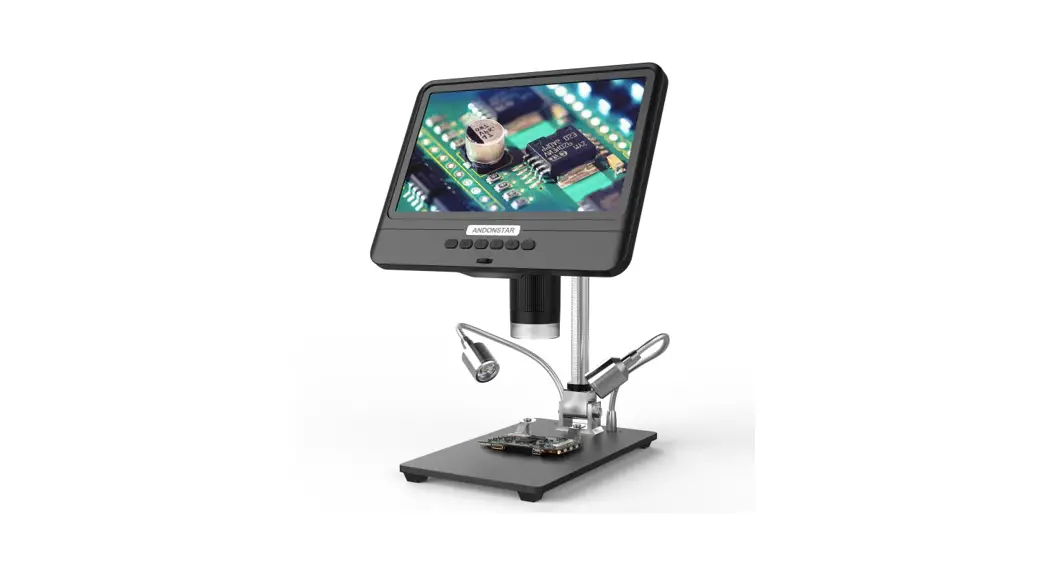
User Guide Of Digital Microscope AD208![]()
Safety Instruction & Maintenance
- Please read this manual before using the digital microscope to avoid permanent damage to the equipment caused by non-compliance with the manual. Keep the device in clean and dry environment and Keep it away from oil, water, gas and other materials that may cause corrosion. It is not recommended to use this product outdoors. This product is not waterproof and cannot be exposed in extreme circumstances.
- The product contains tiny parts and is inedible, so please avoid accidental ingestion by children under the guidance of a guardian or teacher. This product is not suitable for use by people with disabilities, illnesses or those who have allergy symptoms. Also, this product is not intended for medical use.
- Clean the protective UV lens underneath the main unit lens when you notice a deterioration in image quality. Carefully wipe the microscope with a soft, clean cotton cloth (such as an eyeglass cloth) moistened with alcohol. If you need to wipe the microscope with a damp cotton cloth, disconnect the power first, and wipe only the insulated part of the microscope housing gently with a damp cloth. Check if the microscope is dry again before turning on the power again.
- The display on the main unit is very fragile, so please use it with care. Do not drop it, press it hard or touch the display with sharp objects. The display is not waterproof, please clean it with dry and soft material. Do not press the display when adjusting the angle of the monitor.
Installation
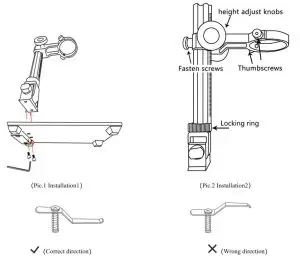
(Pic.3 Mounting metal clips)
- Screw the optical bracket on the base (see the picture above, Pic.1 )
- Screw the microscope screw (see Pic.2) on the cross-beam ring outwards, leaving enough space for the microscope to fit in.
- Insert the microscope into the ring of the column.
- Adjust the position and orientation of the main unit and then tighten the microscope’s fixing screw to hold it in place. Do not jam the microscope in the position of focus cylinder during this process. If the installation is done correctly, the focus cylinder, microscope screen and the angle between the column and the base plate can be adjusted freely after installation.
- The microscope comes with a metal clip, if you need to fix the object, you can assemble it on the base. (See Pic.3)
- Please pay attention to the installation direction of the metal clip. Please install it with the help of a screwdriver and other tools when you fix the metal clip the base. If you have any question or problem for the installation during the process of installation, please contact us as soon as possible to avoid damage to the product caused by improper installation.
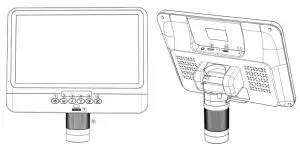 (Pic.4 buttons)
| ① Power on/off | ⑦ Light controller |
| ② Mode/menu | ⑧ Focus controller |
| ③ Up | ⑨ Memory card slot |
| ④ Down | ⑩ USB port |
| ⑤ OK/Start recording video | ⑪ Reset hole |
| ⑥ Take photos |
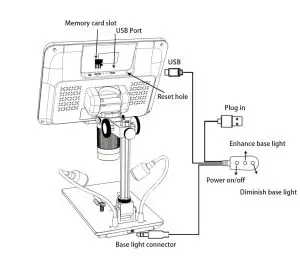 (Pic.5 Wiring Diagram)
Quick Start
- connect the microscope mainframe with the power supply via the switch cable. (See Pic.5)
- Press the power button (Pic.4/ ①) until the display lights up. (It is normal for the main unit to turn itself on when the power is applied.)
*Troubleshooting
If the screen appears to be stuck, reset the system using the “Reset hole” (Pic.4/⑪). The “reset hole” is a small hole on the back of the monitor that can only be pressed with the aid of other tools such as pins. Restart the machine after the system reset (all settings of the machine will turn back to the factory settings, but the images and video files stored in the memory card will not be deleted).
Adjust the magnification and focus
①Use the large knobs on the optical bracket to raise or lower the microscope to the desired height. The lower the height, the greater the magnification is. But be careful not to let the bottom of the lens contact the object. (When adjusting the height of the microscope mainframe, the positions of the two light sources at the base can be adjusted appropriately for better effect.) Then gently rotate the focus controller (Pic.4/ ⑧) to obtain a clear picture.
②Digital zoom. Use the “UP (Digital Zoom)” button (fig. 4/ ③) to zoom in digitally. To return to the effect before digital zoom, use the “Down” button (Pic. 4/ ④).
Using a Micro SD Card to Save Images/Videos
By using a Micro SD card (not provided), you can save images and videos to review later or export to a computer or other device . Insert the Micro SD card in to the TF slot on top back of the monitor. (be careful with the direction. The side which has metal exposed should face down. See the picture 6 ) Push it in until you hear a click. (If you don’t push it in far enough, it will be ejected. ) The Mode button(number ② from the picture “Buttons”, marked with an “M”) can be used to cycle between three modes: video standby ( ![]() ), still image (
), still image (![]() ), and review (
), and review (![]() ). In video standby mode, there shows ‘time’ & ‘1080FHD’(white color font)at the top right of the display. The ‘time’ means how many time the rest storage of the card would allow you to record video. The‘1080FHD’ means the video resolution is 1080FHD in this mode.
). In video standby mode, there shows ‘time’ & ‘1080FHD’(white color font)at the top right of the display. The ‘time’ means how many time the rest storage of the card would allow you to record video. The‘1080FHD’ means the video resolution is 1080FHD in this mode.
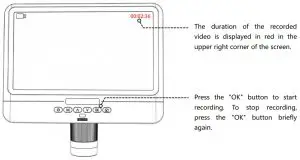
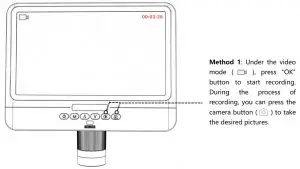
To record videos
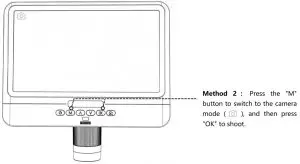
To capture pictures
Note: Photos or videos cannot be taken under the playback mode.
Reviewing pictures and videos
To review images and videos on the display, use the “Mode”(M) button to enter review mode.
Use the “Up”and “Down”buttons to browse the pictures and videos.
To play a video, press the “OK”button to start playing. Press the OK button again to pause. Press Mode button to stop playing the current video.
Settings
In each mode, press the “M” button and hold it for a while until the Video/Still/Playback Menu shows up on the display(Or you can press MENU button on the remote).
Hit M button again, get into the general Setup Menu.
For example, if you are in Video standby mode, and you press MENU, this is the first menu would show, the “Video menu”: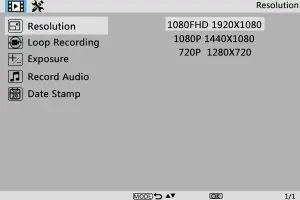
(Pic.6 Video Menu)
Then, press “Menu” button (or M on the monitor) again, you get into the Setting menu, like this:
(Pic.7 Setting Menu)
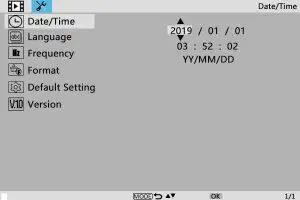
Date/Time
Press “OK” into Date/time setting. Use “Up” and “Down” to select the correct number for year/month/day. Once you finish setting a number, press “OK” on the monitor to the next number. Or, you can use “Left” and “Right” on the remote to get to the one that you want. Press “MENU” button on the remote to exit date/time setting directly. If you don’t have the remote, you have to go through all over these settings one by one and then press OK again to exit.
To save settings
After you set everything right, you should turn off the device by pressing ON/OFF button on the monitor and hold it until the device switching off.
If you turn off the device by pressing the button on the switch cable, or just simply cut off the power supply, the setting would not be saved.
FAQ
- Why can’t I turn on the computer properly?
Please make sure that the wiring is connected correctly according to Picture 5 and that the product is powered on. If the product still cannot be turned on normally after confirming the correct operation, please use the reset hole on the back of the main unit to restart the machine. - Why can’t I take pictures even if I press the “camera” button?
Please check the mode status of the product. Under the video mode, you can take photos by pressing the “Camera” button during video recording, but under the camera mode, you can only take photos by pressing the “OK” button. You can’t take photos in playback mode. Please refer to the instructions of “Taking Pictures” under the section “Saving Pictures or Videos Using the Memory Card” for the detailed operation, and follow the instructions in the instruction. - Why can’t I get clear pictures?
Make sure that the LED lights work properly. Adjust the light to illuminate the object, adjust the object distance by using the large knob on the stand, and then rotate the focus controller. If you still cannot obtain a clear image, gently wipe the lens with a clean, dry cotton cloth or paper towel to ensure that the lens is clean. - Why can’t I save the settings?
After each setting is completed, you need to press and hold “Power on/off” button to switch off the microscope in order to save the settings. Through the switch cable to power off the main unit or directly cut the power, the settings will not be saved. - Why does the machine restart repeatedly?
Please check the power adapter and use a high-quality 5V 2A power adapter. - Why does “memory card error” or “full memory card” message appear after inserting TF card? After inserting the TF card, please format it first. (Steps for formatting: press and hold the “M” buttonfind the formatting option in the menu bar- press the down button to select confirm – press the “OK” button to confirm the formatting)
PS: If you have any other questions, please contact us and we’ll do our best to help you! Thank you for your support!
Warranty Card
| Warranty Card | |||
| User’s name : | Address : | ||
| Phone number: | Post code : | email : | |
| Model name : | Purchase date : | ||
| Fault feedback : | |||
| Date : | Fault : | ||
| Notice: | |||
| Our warranty doesn’t cover: | |||
| 1 | If users can not provide the purchase proof or the Warranty. | ||
| 2 | If users use it in an improper environment, such as incompatible power supply, high-temperature environment etc. | ||
| 3 | If the fault caused by accident, oversight, misoperation or natural disasters etc. | ||
| 4 | If the fault is caused by people who do not belong to authorized organizations of our company during repacking, repair, dismantling, Or if users repack, repair or dismantle the device not following our advice. | ||
| 5 | Out of warranty period. | ||


