TWIN EAGLES TEWD30-C Warming Drawers Instruction Manual
TWIN EAGLES WARMING DRAWERS INSTALLATION, USE, AND CARE MANUAL
Congratulations on your purchase of TWIN EAGLES Warming Drawer. In addition to its Unique Style, Superb Performance and High Quality, this unit is built with pride in the U.S.A. Twin Eagles is committed to making outdoor cooking products you will be proud to own for years.
This manual gives you easy to follow instructions for installing, operating and maintaining your TWIN EAGLES Warming Drawer. We recommend reading this manual carefully before your first use to ensure safety, proper care and operation. Keep this manual in a safe place for future reference.
Thank you and welcome!
TWIN EAGLES
 WARNING: CALIFORNIA PROPOSITION 65
 WARNING: CALIFORNIA PROPOSITION 65
This product can expose you to chemicals including carbon monoxide which is known to the State of California to cause cancer and reproductive harm. To minimize exposure to the by-products of the burning fuel or from combustion, always operate this unit according to the use and care manual and provide good ventilation. California law requires businesses to warn customers of potential exposure to such substances. For more information go to www.P65Warnings.ca.gov.
IMPORTANT SAFETY INSTRUCTIONS
IMPORTANT: When using electrical appliances, basic safety precautions should always be followed including the following:
- Read all instructions.
- Do not touch hot surfaces. Use handles or knobs. Use only dry potholders. Moist or damp potholders may cause a steam burn.
- To protect against electrical shock, do not immerse cord, plugs, or base in water or other liquid.
- Close supervision is necessary when the appliance is used by or near children.
- Unplug from outlet when not in use and before cleaning. Allow to cool before putting on or taking off parts.
- Do not operate any appliance with damaged cord or plug or after the appliance malfunctions or has been damaged in any manner. Return appliance to the nearest authorized facility for examination, repair or adjustment.
- The use of accessory attachment not recommended by the appliance manufacturer may cause injuries.
- For indoor and outdoor use.
- Do not let cord hang over edge of table or counter or touch hot surfaces.
- Do not place on or near a hot gas or electric burner or in a heated oven.
- Extreme caution must be used when moving an appliance containing hot oil or other liquids.
- Always attach plug to appliance first, then plug cord into the wall outlet. To disconnect, turn any control to “off”, then remove plug from wall outlet.
- Do not use appliance for other than intended use.
- Be sure that the warming drawer is installed and grounded properly by a qualified technician. It is rated at 120V, 60Hz, 450W, and 4Amp.
- Keep the warming drawer away from water sprinklers.
- Do not store any materials in the drawer, other than manufacturer’s recommended accessories, when not in use.
- Flammable materials should not be stored in the drawer, at any time.
- Always place steam racks in desired position while the appliance is cool.
- Keep warming drawer vent ducts unobstructed.
- Do not use plastic wrap to cover foods or plastic food containers in the drawer for heating. Plastics can melt inside the warming drawer.
- Use care when opening the drawer. Let hot air or steam escape before removing or replacing food.
- Do not touch the heating elements or interior surface of the drawer while it is in use.
- Do not place food in unopened containers in the drawer. Pressure could build up and cause the container to burst.
- Do not repair or replace any part of this drawer. All servicing should be done by an authorized service agency.
- Save these instructions.
ELECTRICAL REQUIREMENTS
The appliance should only be taken apart by a qualified technician, or electrical shock may occur. It is rated at
120V, 60Hz, 450W and 4A. REMINDER:
Keep any electrical supply cord and the fuel supply hose away from any heated features.
WARNING !
Electrical Grounding Instructions:
The Warming Drawer is equipped with a three prong (grounding) plug for your protection against shock hazard and should be plugged directly into a properly grounded three prong outlet. Do not cut or remove the third prong from this plug.
Electrical equipment provided with the outdoor appliance shall follow these guidelines:
- To protect against electrical shock, do not immerse cord or plugs in water or other liquid;
- Unplug from the outlet when not in use and before cleaning. Allow to cool before putting on or taking off parts;
- Do not operate any outdoor appliance with a damaged cord, plug, or after the appliance malfunctions or has been damaged in any manner. Contact the manufacturer for repair;
- Do not let cord hang over the edge or touch hot surfaces;
- Do not us an outdoor appliance for purposes other than intended;
- When connecting , first connect plug to the outdoor appliance then plug appliance into outlet;
- Use only Ground Fault Interrupter (GFI) protected circuit with this outdoor appliance;
- Never remove the grounding plug or use with an adapter of two prongs; and
- Use only extension cords with three prong grounding plug, rated for the power of the equipment, and approved for outdoor use with a W-A marking.
WARMING DRAWER INSTALLATION
- BE SURE THAT THE WARMING DRAWER IS PROPERLY GROUNDED AND INSTALLED BY A QUALIFIED TECHNICIAN. THE ELECTRICAL CORD HAS A 3 PRONG PLUG. DO NOT CUT ANY OF THE PRONGS.
- MAKE SURE THAT THE ISLAND IS FREE OF CRACKS THAT WOULD ALLOW WATER OR OTHER LIQUIDS TO GET IN THE ELECTRICAL CONTROLS.
- KEEP THE WARMING DRAWER AWAY FROM SPRINKLERS.
- WHEN NOT IN USE, COVER THE ISLAND TO PROTECT FROM THE RAIN AND HARSH WEATHER CONDITIONS
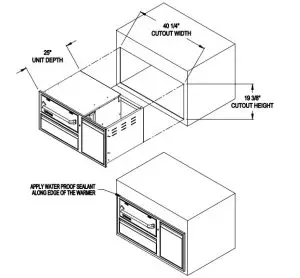
WARMING DRAWER INSTALLATION – CONT.
TYPICAL ISLAND INSTALLATION
- Provide a 10” x 28 ½” cutout to the front of the island.
- Provide support beams using metal studs.
- Pull the drawer section out to gain access to the mounting holes at the front of the casing.
- Insert the drawer casing in cutout.
- Secure the drawer casing with screws at the inside front top and bottom, using the pre-punched holes.
- Re-assemble the drawer section into the drawer casing.
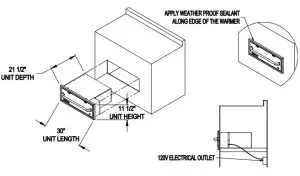
- Apply weather proof sealant along the edges of the warmer.
- Plug-in the warmer to a weather proof and properly grounded electrical outlet.
OPERATING INSTRUCTIONS
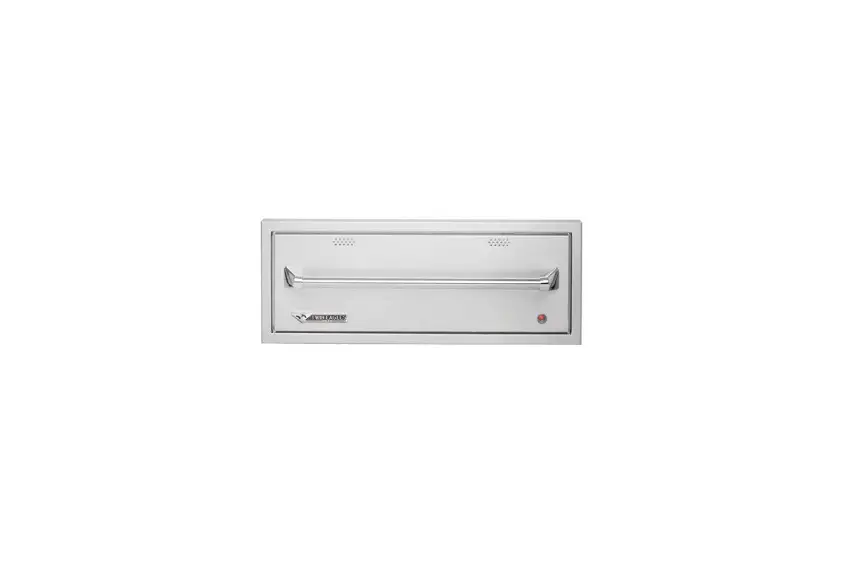
TEMPERATURE CONTROL
The temperature control dial is used to select the temperature of the warming drawer. It is located on the right hand side of the control panel and has dial settings from 1 to 10. The #1 setting is the lowest temperature, which is around 60oF, while the setting “10” is the highest temperature, which is around 220oF.
The majority of foods are held between temperature settings of 5-6.
The warming drawer should only be opened when adding or removing food. Continuous opening of the drawer allows warm air to escape and make the food colder.
NOTE: Do not use aluminum foil to line the drawer. It is an excellent heat insulator and will trap heat beneath it. This may affect the performance of the warming drawer and the interior finish. HEAT-ON LIGHT
The heat-on light is located below the temperature control knob. The red light turns on when the control knob is set and cycles “on” and “off” with the heating element as temperature is maintained.
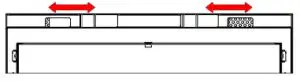
MOISTURE VENT CONTROL
The moisture vent control is located at the top inside of the warming drawer. It can be adjusted in any position
between “open” and “close” to maintain desired degree of moisture.
a) For crispy foods, slide the moisture vent control inward to open the vents and allow the moisture to escape.
b) For moist food, sLide the moisture vent control outward to close the vents and seal the moisture inside the drawer
- Dry Heat
a) The main function of the warming drawer is to hold hot cooked foods at serving temperature.
b) Place previously prepared foods directly into the empty steam pans (no water) and set the moisture vent control.
c) For crispy foods, slide the moisture vent control inward to open the vents and allow the moisture to escape.
d) Set the temperature control dial. Heat-on light will appear until the desired temperature is reached. - Moist Heat
a) The warming drawer also seals moisture within the drawer to keep the food moist.
b) Put just enough of water, approximately 1/2” high, in the steam pans.
c) Place the steam rack inside the steam pan.
d) Place the food directly on the rack or use a suitable container that will fit in the steam pans. Do not
use plastic containers or utensils.
e) Slide the moisture vent control outward to close the vents and seal the moisture inside the drawer.
f) Set the temperature control dial. Heat-on light will appear until the desired temperature is reached.
g) Periodically, check the water level in the steam pans and add water when necessary. - Proofing Yeast Dough
a) Yeast dough can be proofed in a warming drawer.
b) Place the dough in a bowl and turn the temperature control at the lowest setting, to facilitate the fermentation process.
c) Place a towel over the dough to minimize surface drying.
d) Let the dough remain in the warming drawer until it has doubled in size and a slight depression remains when the surface is touched gently with a finger.
CLEANING AND MAINTENANCE
Stainless Steel & General Product Care
To keep your Warming Drawer free of surface corrosion and in good working order, it is important to take additional precautions under certain conditions. If your Warming Drawer is located in corrosive conditions, such as:
- A coastal environment where corrosive salty air is present
- Near a swimming pool, hot tub or water feature with exposure to corrosive pool chemicals and/or chlorinated water
- Areas where muriatic acid (hydrochloric acid) or other corrosive cleaning solutions are used to clean concrete and masonry
- Areas where corrosive masonry dust and debris are created by cutting stone or mixing cements
These conditions can create a highly corrosive environment that will cause the corrosions resistant type 304 stainless steel to develop surface oxidation, corrosion or rust.
TWIN EAGLES products have been tested in saline solutions, highly chlorinated solutions and have been tested against exposure to highly acidic foods. The test results proved the type 304 stainless steel can withstand exposure over prolonged periods of time. However, the conditions outlined above, along with neglect, can lead to surface corrosion or rust.
ATTENTION:
- Do not allow food particles or grease to be left in the drawers. These can attract rodents, which are unsanitary and are likely to cause physical damage by chewing on the wiring, which can cause permanent damage to the electrical components.
- Specks of grease can gather on the surface of the stainless steel and get baked-on. These can be removed by using a mild abrasive pad with a stainless steel cleaner. Use the mildest cleaner and always scrub in the direction of the grain. Do not use steel wool to clean any surfaces on the Warming Drawers.
- In the event that surface corrosion has developed on the stainless steel, it is typically not the stainless steel that is corroding but corrosive particles that have been deposited on the surface.
WARNING:
It is recommended that your TWIN EAGLES products be kept dry and covered when not in use. This is even more important when long-term storage is intended.
If you are located along the coast or in the desert, wind driven sand is extremely abrasive and can pit and scratch the stainless steel. Keep your TWIN EAGLES products covered when not in use.
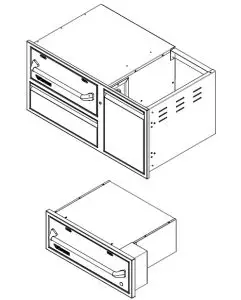
EXPLODED VIEW – TEWD30
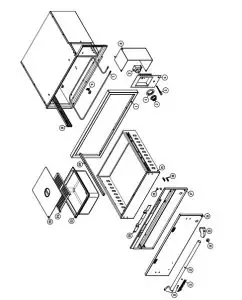
REPLACEMENT PARTS LIST – TEWD30
| ITEM NO. | PART NUMBER | DESCRIPTION | QTY. |
| 1 | S20480 | FRAME FRONT, OUTSIDE | 1 |
| 2 | S15304 | THERMOSTAT | 1 |
| 3 | S15305 | KNOB | 1 |
| 4 | S13103 | CHROME BEZEL | 1 |
| 5 | S16113 | PILOT LIGHT, RED | 1 |
| 6 | S20442WY | RECESSED CONTROL PANEL WELDED ASSEMBLY | 1 |
| 7 | S16202 | HEATING ELEMENT | 1 |
| 8 | S20424 | ELECTRICAL BOX | 1 |
| 9 | S20417 | HOLDER, BULB | 1 |
| 10 | S14411 | DRAWER SLIDE, 18” | 2 |
| 11 | S13203 | EMBLEM, TWIN EAGLES | 1 |
| 12 | S14160 | CLIP, TINNERMAN | 2 |
| 13 | S12364 | TUBE, HANDLE, 30 | 1 |
| 14 | S16129 | WINDOW PLUG | 1 |
| 15 | S13209 | TRI TO RD ENDCAP | 2 |
| 16 | S20452 | DOOR, PANEL | 1 |
| 17 | S20428 | DOOR LINER WELDED ASSEMBLY | 1 |
| 18 | S14111 | SCREW, 250-20 X 1.25, PH, TR, SS | 4 |
| 19 | S14113 | SCREW, 250-20 X 375, PH, TR, SS | 2 |
| 20 | S20406 | VENT SLIDE | 2 |
| 21 | S20401 | DRAWER BODY | 1 |
| 22 | S20407 | RAIL, STEAM PAN | 1 |
| 23 | S14412 | STEAM PAN | 2 |
| 24 | S20426 | STEAM RACK | 2 |
| 25 | S14413 | STEAM PAN LID | 2 |
EXPLODED VIEW – TEWD42C
REPLACEMENT PARTS LIST – TEWD42C
| ITEM NO. | PART NUMBER | DESCRIPTION | QTY. |
| 1 | S15304 | THERMOSTAT | 1 |
| 2 | S20468 | PANEL, CONTROL, INSIDE | 1 |
| 3 | S13103 | CHROME BEZEL | 1 |
| 4 | S15305 | KNOB | 1 |
| 5 | S14424 | HINGE LATCH | 2 |
| 6 | S14423 | HINGE DOOR | 2 |
| 7 | S14430 | SLOW CLOSE, CLIP ON | 1 |
| 8 | S16113 | PILOT LIGHT, RED | 1 |
| 9 | S20417 | HOLDER, BULB | 1 |
| 10 | S16202 | HEATING ELEMENT | 1 |
| 11 | S22578-R | ANGLE, DRAWER, TANK, RH | 1 |
| 12 | S14411 | DRAWER SLIDE | 4 |
| 13 | S20455 | TANK DRAWER | 1 |
| 14 | S20486WY | ACCESS DOOR | 1 |
| 15 | S14428 | DRAWER SLIDE, 18” | 2 |
| 16 | S20484Y | FRONT DRAWER ASSEMBLY | 1 |
| 17 | S14111 | SCREW, 250-20 X 1.25, PH, TR, SS | 4 |
| 18 | S20407 | STEAM RAIL | 1 |
| 19 | S20401Y | DRAWER BODY ASSEMBLY | 1 |
| 20 | S20406 | VENT SLIDE | 2 |
| 21 | S20404 | DOOR LINER | 1 |
| 22 | S20454 | DOOR PANEL, 42 | 1 |
| 23 | S12365 | TUBE, HANDLE, 42 | 1 |
| 24 | S13209 | TRI TO RD ENDCAP | 2 |
| 25 | S13203 | EMBLEM, TWIN EAGLES | 1 |
| 26 | S14160 | CLIP, TINNERMAN | 2 |
| 27 | S14412 | STEAM PAN | 2 |
| 28 | S20426 | STEAM RACK | 2 |
| 29 | S14413 | STEAM PAN LID | 2 |
TROUBLE SHOOTING GUIDE
| PROBLEM | WHAT TO DO |
| 1. Heat –on light does not come “on”. | 1. Check if the unit is plugged in to an electrical outlet. 2. Check if the temperature control dial is set properly. 3. Check if the circuit breaker is open. |
| If service is required: | 1. Call your dealer, or authorized service agency. 2. Provide the following information: a. Model number b. Serial number c. Date purchased d. Name of dealer where the unit was purchased from |
TWIN EAGLES LIMITED PRODUCT WARRANTY
LIMITED TWO YEAR WARRANTY: Twin Eagles warrants the Warming Drawer to be free from defects in materials and workmanship under normal residential use for a period of two years from the original date of purchase. The actual part will be repaired or replaced, free of charge, with the owner paying for all other costs including labor, shipping and handling.
ONE-YEAR FULL WARRANTY: Twin Eagles warrants the Warming Drawer and all other components to be free from defects in materials and workmanship under normal residential use for a period of one year from the original date of purchase. Twin Eagles will repair or replace parts found to be defective at no cost to the original purchaser. Warranty service must be performed by a Twin Eagles authorized representative during normal business hours.
WARRANTY LIMITATIONS & EXCLUSIONS
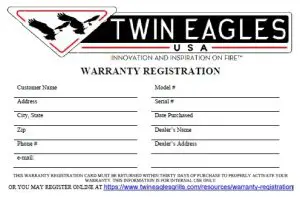
This warranty shall apply only to the products purchased and located in the continental United States and Canada. The warranty coverage begins on the original date of purchase and proof of date of purchase is required. To activate the warranty, we require that you send in the attached warranty registration card. This warranty applies only to the original owner and may not be transferred.
This warranty excludes discoloration, surface scratches, weather and atmospheric related staining, and minor surface rust and oxidation which are normal conditions and are to be expected with any outdoor product. This warranty does not apply to damages resulting from negligence, alteration, misuse, abuse, accident, natural disaster, loss of electrical power to the product for any reason, improper installation or improper operation, unauthorized adjustments or calibrations, dings, dents, scratches, or damages due to harsh cleaning chemicals. This warranty does not apply to commercial use, or to products with altered or removed serial numbers. Display models are generally sold “as is” and are subject to the following warranty exclusions: missing components, scratches, dents and other exterior or cosmetic damages, electrical, gas and ignition system. Twin Eagles shall not be liable for incidental, consequential, special or contingent damages resulting from its breach of this written warranty or any implied warranty.
WARRANTY SERVICE & REPLACEMENT PARTS: Call your authorized selling dealer or call Twin Eagles directly at 800-789-2206. Be prepared to furnish the following information: Purchaser’s name, model and serial number of the appliance, date of purchase and the accurate description of the problem. Twin Eagles will not pay for service calls for correcting an installation problem. Owner shall be responsible for proper installation, providing normal care and maintenance, providing proof of purchase upon request and making the warming drawers accessible for service. In the event of any warranty replacement, all removal, replacement, installation and shipping costs are the responsibility of the owner. If the unit is located in a remote area where Twin Eagles factory authorized service is not available, you may be required to bring the unit to a Twin Eagles authorized service location at your own cost and expense.
Some states do not allow limitations on how long an implied warranty lasts, or the exclusions of or limitations on consequential damages. This warranty gives you specific legal rights and you may have other rights, which vary from state to state.
THIS PAGE IS INTENTIONALLY LEFT BLANK
HOW TO OBTAIN SERVICE
For service, please contact your TWIN EAGLES dealer or call TWIN EAGLES direct at (800) 789-2206 or (562) 802-3488 or fax (562) 802-3391
Mailing address:
Twin Eagles, Inc. 13259 East 166th Street Cerritos, CA 90703
Visit us at http://twineaglesgrills.com/
Please provide:
- Model number
- Serial Number
- Date of Purchase
- A description of the problem