
![]() EVERPURE® BWS350 REVERSE OSMOSIS (RO)
EVERPURE® BWS350 REVERSE OSMOSIS (RO)
SYSTEM WITH TANK
SIMPLE INSTALLATION GUIDE
For Models: BWS350
164-14366 BWS350-16
164-14375 BWS350-50
164-14376 BWS350-50HF
Installation Guide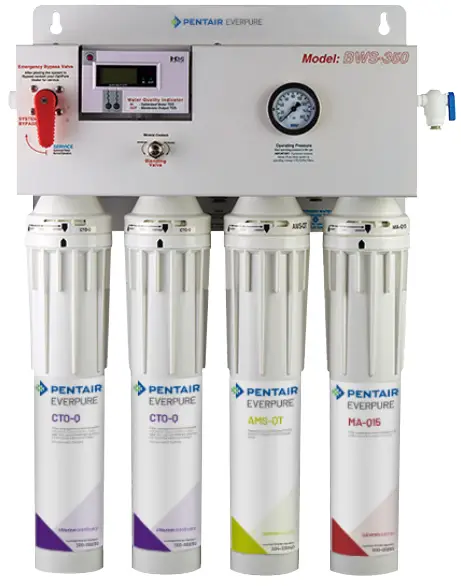
INTRODUCTION
General Information
- The system must be installed indoors and easily accessed for service and maintenance.
- Use cold water only at a minimum of 50 psi and a maximum of 80 psi.
- A ½” water supply with full flow ball valve and pressure gauge, drain, and 120VAC power supply is required within four (4) feet of installation.
- Installation must conform to all local codes and regulations.
- Keep tubing and hoses as short as possible avoiding loops or kinks in tubing. Do not cut tubing with wire crimpers or dikes.
- Install system as close as possible to the equipment served.
- Never restrict flow of water from the system to drain during operation. This flow is necessary to carry contaminants away from the membrane.
Instant Fittings Quick Assembly
| Connection | |
1 Achieve a square cut edge with a tube cutter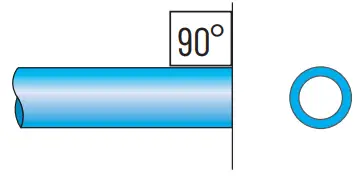 2 Simply push the tubing until it can go no further. Holding and sealing is accomplished instantaneously 2 Simply push the tubing until it can go no further. Holding and sealing is accomplished instantaneously 3 Pull on the tubing to verify gripping action 3 Pull on the tubing to verify gripping action | 1 Make sure there is no flow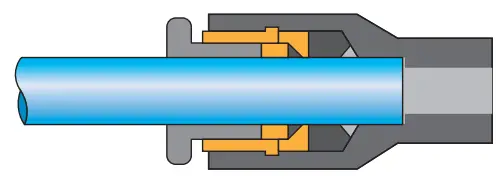 2 Depress the manual push button, then pull the tube out 2 Depress the manual push button, then pull the tube out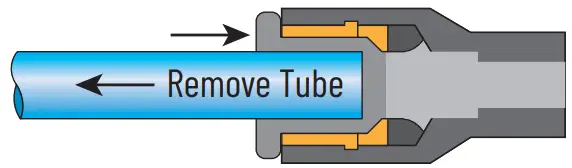 |
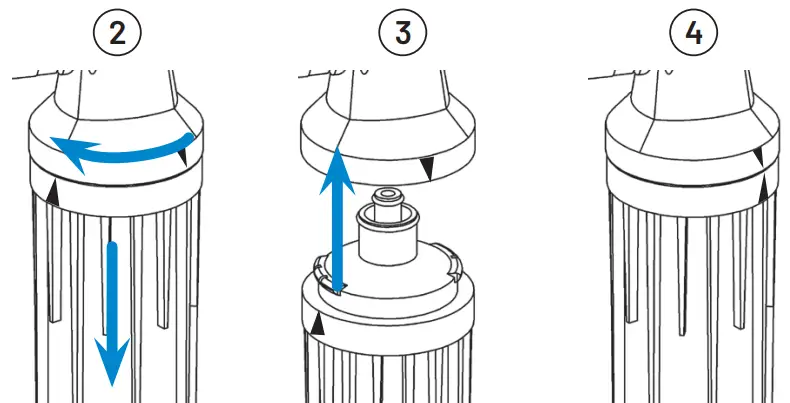
Installing or Replacing QT Cartridges
NOTE: Before installing or replacing QT cartridges, make sure to remove the plugs in the QT heads.
- Close feed water valve.
- Twist and pull down to remove cartridges.
- Align the upward-pointing arrow on the new cartridge with the upward-pointing arrow on the head. Push cartridge up into head until it stops.
- Turn to right until it stops.
NOTE: labels might not always face forward. - Open feed water valve.
- Mount the Processor
A. Select a secure mount location with access to water supply, drain, and a 120VAC power supply. B. Attach water processor at the upper and lower keyhole mounts. DO NOT PLUG IN.
 C. Using green tubing, connect the water supply to [A] water processor feedwater inlet.
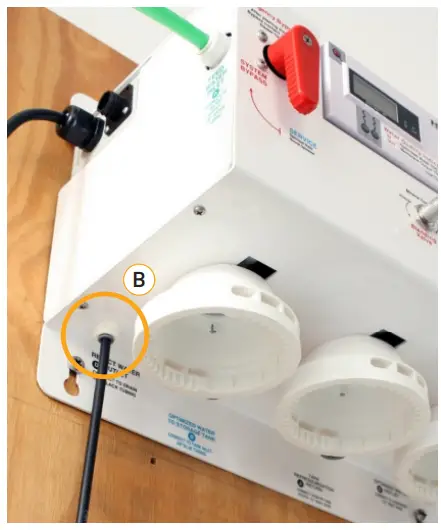
- Make the Drain Connection
A. Connect ¼” black tubing to [B] reject water outlet. B. Connect black tubing from [B] reject water outlet to an approved air gap [C] and drain line.
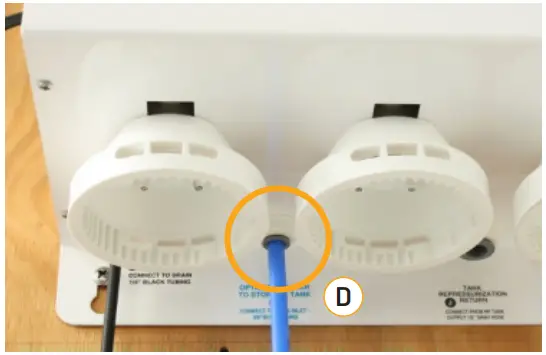
- Make the Processor to Storage Tank Connection
A. Connect 3/8″ blue tubing to [D] the optimized water to storage tank outlet. B. Route blue tubing to the optimized water storage tank.
 C. Connect 3/8″ blue tubing to the inlet of the tank inlet divert valve.
- Make the Storage Tank to Processor Connection
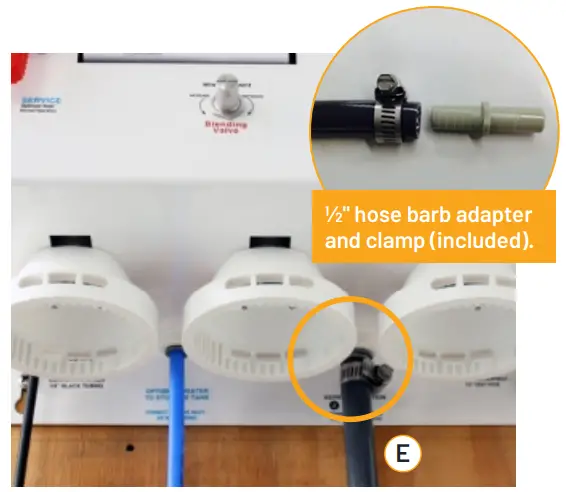
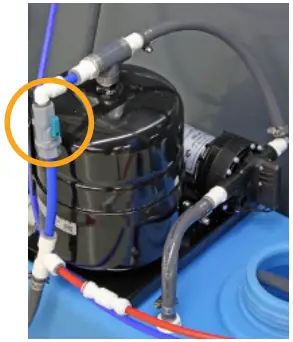
A. Connect ½” ID gray hose to ½ “hose barb adapter and clamp. Then connect to [E] tank repressurization return. B. Route gray hose to optimized water storage tank.
C. Connect ½” ID gray hose to the ½” hose barb adapter and the clamp. Then connect to the repressurization assembly outlet.
- Make the Optimized Water Outlet Connection
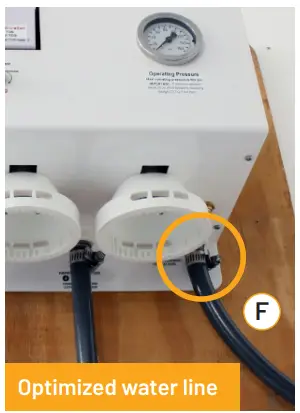
A. Connect ½” ID gray hose to ½” hose barb adapter and clamp.
Then connect to [F] optimized water outlet.
The optimized water line will be connected directly to the equipment, or to the optional post-treatment filter, and then on to the equipment.
DO NOT CONNECT THE LINE TO THE EQUIPMENT AT THIS TIME.
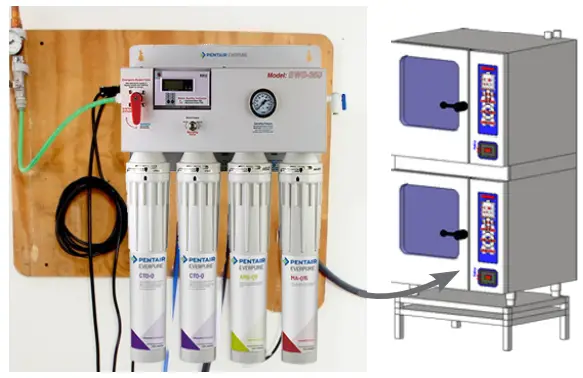
- Install Membrane and Pre-Filter Cartridges
A. Install the AMS-QT membrane into the QT head and turn to align arrows. Remove plug from the elbow at the bottom of the AMS-QT cartridge by pushing in on the gray collar and pulling on plug.
B. Connect ¼” black reject tubing C. Install two (2) CTO-Q cartridges into the QT heads 1 and 2 and starting from the left side of the processor and turn to align arrows.
 D. Install the MA-Q15 mineral cartridge in the same manner into the forth (far right) head.
 - Make the Float Switch Connection
A. Connect tank switch cable connector.
Do NOT connect pump to power until the tank is at least half full of water.
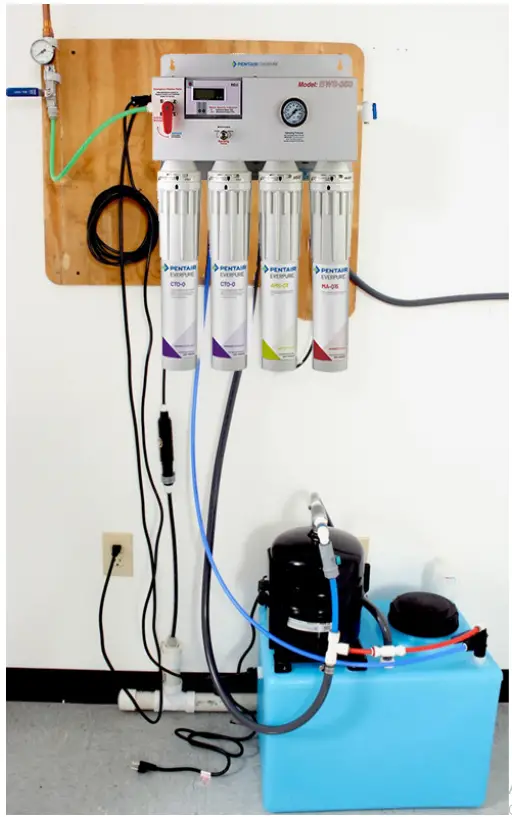
 Overall view of completed installation.
 B. Attach water processor at the upper and lower keyhole mounts. DO NOT PLUG IN.
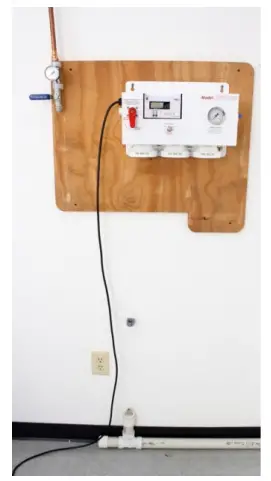 C. Using green tubing, connect the water supply to [A] water processor feedwater inlet.
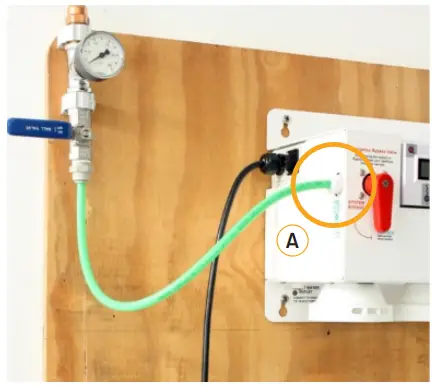
 B. Connect black tubing from [B] reject water outlet to an approved air gap [C] and drain line.
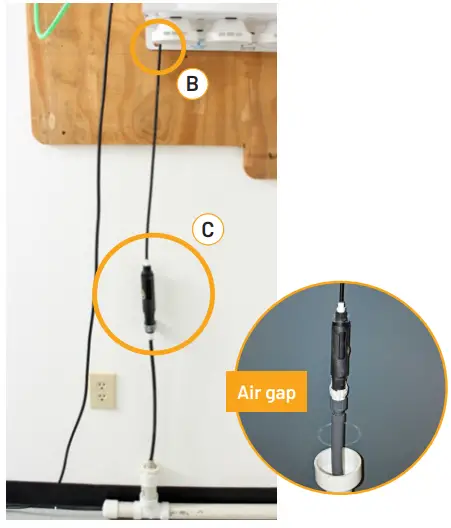
 B. Route blue tubing to the optimized water storage tank.
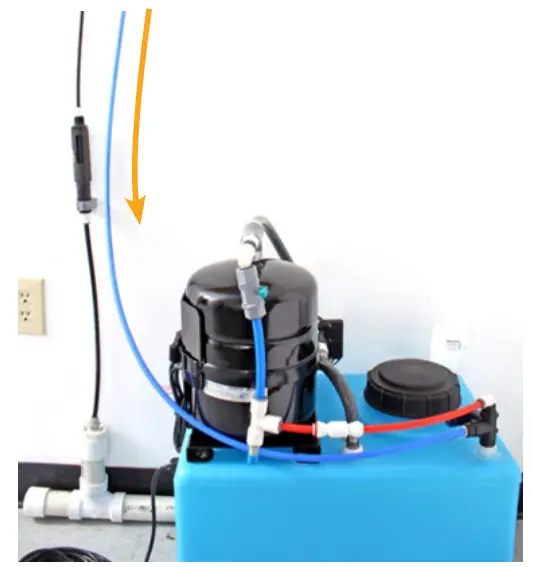 C. Connect 3/8″ blue tubing to the inlet of the tank inlet divert valve.
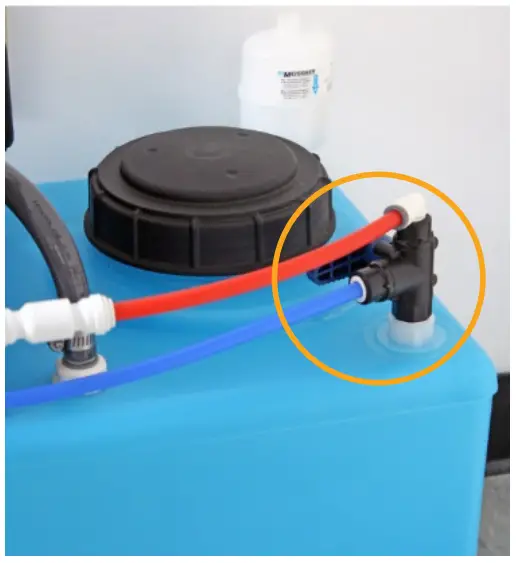
 B. Route gray hose to optimized water storage tank.
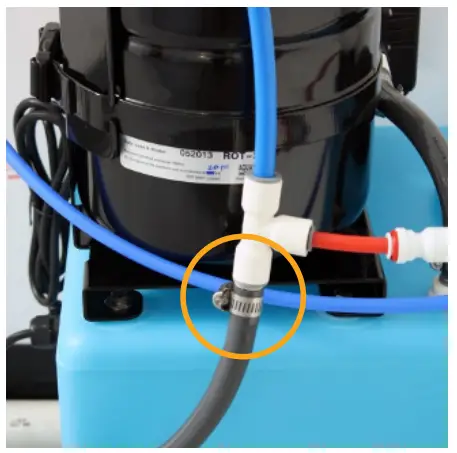
 C. Install two (2) CTO-Q cartridges into the QT heads 1 and 2 and starting from the left side of the processor and turn to align arrows.
 D. Install the MA-Q15 mineral cartridge in the same manner into the forth (far right) head.
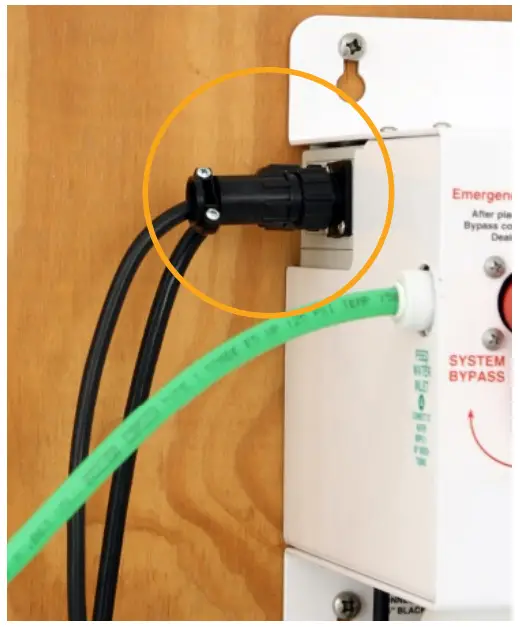
 Overall view of completed installation.
SYSTEM START-UP
- Purge Air and Flush System
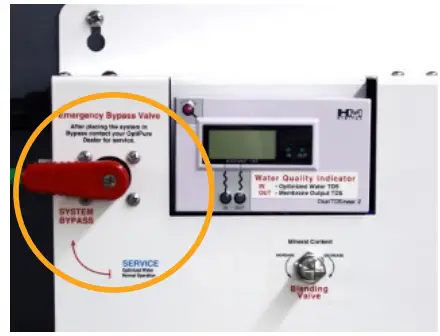
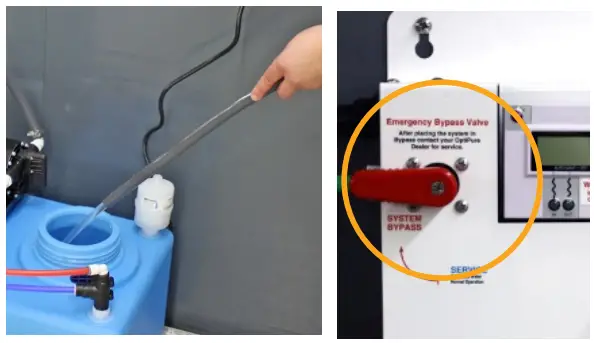
A. Turn emergency bypass valve to the “System Bypass” mode.
While holding the optimized water line over a drain, turn on the water supply valve (user supplied). Allow to flush until water runs clear and free of air. B. Turn emergency bypass valve to the “Service” mode and plug in the processor. Allow pre-filters and the membrane to purge air and flush.
 C. After several minutes the water will start flowing to the drain and the optimized water will start filling the tank.
(Optimized water flow rate is less than 0.25 gpm). - Check the Tank Float Switch and Set the Blend TDS
A. Check tank float switch operation. Remove tank lid, raise the float (point upward) and listen for the solenoid valve to click off and watch water flow to tank and drain stop. Lower the float to resume normal operation. B. Set blending valve to desired optimized water TDS.
a. Turn on power to water quality indicator.
b. Press the “IN” button to determine optimized water TDS.
c. Adjust blending valve to user specified TDS.
Make ½ turn adjustments and wait 30 seconds until TDS responds on meter.
- Rapid Fill the Storage Tank
VERY IMPORTANT– PRIME THE REPRESSURIZATION (RP)
PUMP before connecting optimized water line to equipment.
To prime the RP pump the storage tank must be at least half full.
A. While holding the optimized water line over the tank opening, turn the emergency bypass valve to the “Bypass” position. B. DO NOT PLUG IN THE PUMP AT THIS TIME.
Allow the tank to reach half full.
C. When the tank is half full, turn the emergency bypass valve to the “Service” position to resume normal operation.
- Prime the RP Pump
A. Open the buffer tank valve B. Holding the optimized water line over tank opening, plug in RP pump and allow to run until water flow is steady and free of air.
 C. After flow is steady, close buffer tank valve and allow buffer tank to fill. The RP pump should turn off. If the RP pump does not turn off then air is present, repeat step 4b.
- Make Connection to Equipment
A. Connect the optimized water line to post-treatment and downstream equipment. B. Open the buffer tank valve and start downstream equipment. Check for leaks.
 B. Turn emergency bypass valve to the “Service” mode and plug in the processor. Allow pre-filters and the membrane to purge air and flush.
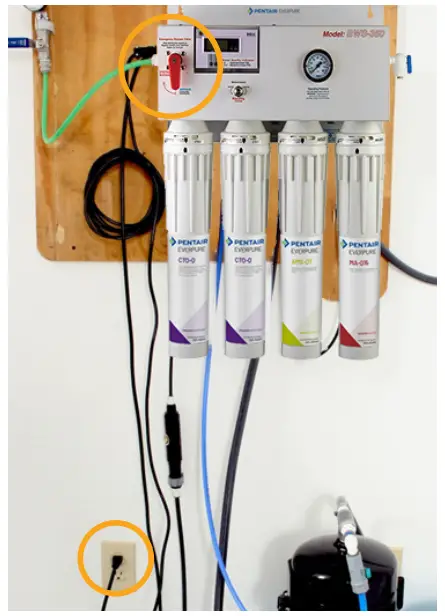 C. After several minutes the water will start flowing to the drain and the optimized water will start filling the tank.
 B. Set blending valve to desired optimized water TDS.
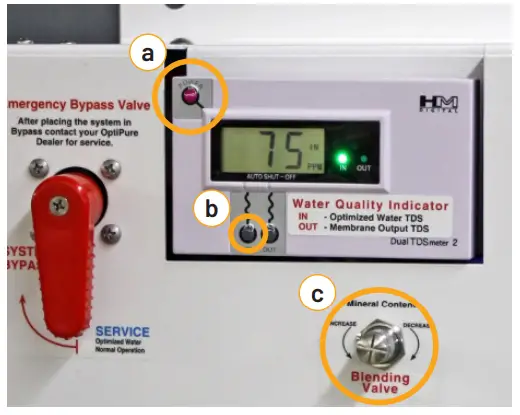
 B. DO NOT PLUG IN THE PUMP AT THIS TIME.
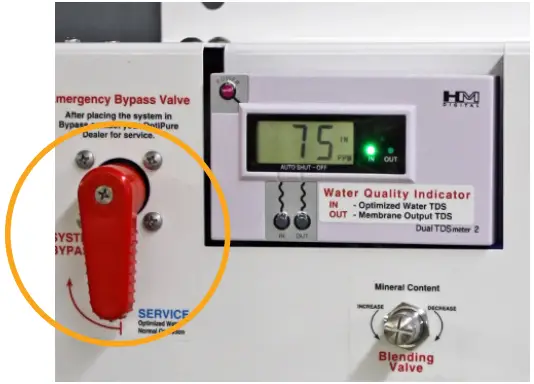
 B. Holding the optimized water line over tank opening, plug in RP pump and allow to run until water flow is steady and free of air.
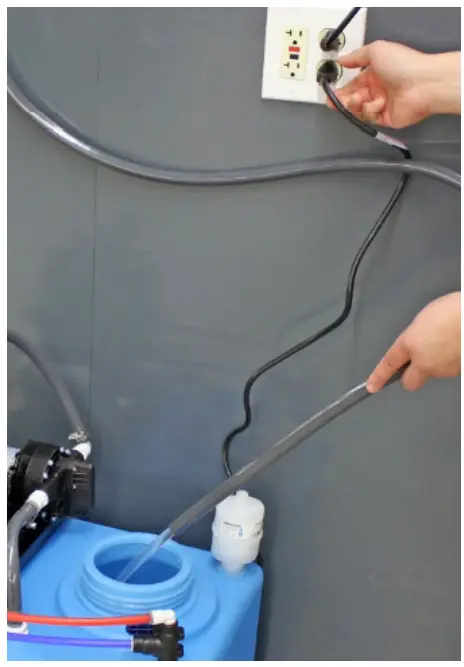 C. After flow is steady, close buffer tank valve and allow buffer tank to fill. The RP pump should turn off. If the RP pump does not turn off then air is present, repeat step 4b.
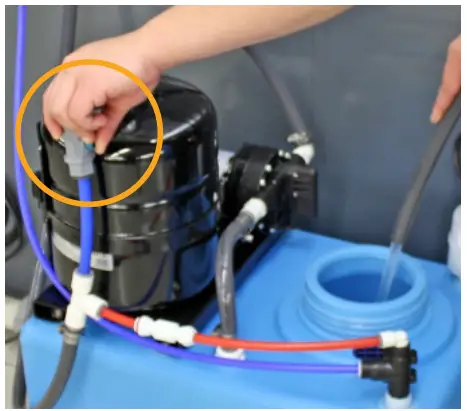
 B. Open the buffer tank valve and start downstream equipment. Check for leaks.
COMPLETE THE INSTALLATION
Secure tubing, hoses, and wires as needed to assure the installation is neat and not susceptible to damage.
For Everpure Product Warranties visit:
http://pentair.com/assets/foodservice-warranty
Technical Support: 972.881.9797![]() United States
United States
1040 Muirfield Drive
Hanover Park, IL 60133
800.942.1153 (US Only) 630.307.3000 Main
[email protected] | foodservice.pentair.com
BWS350 REVERSE OSMOSIS SYSTEM WITH TANK SIMPLE INSTALLATION GUIDE
©2022 Pentair. All Rights Reserved.
All indicated Pentair trademarks and logos are property of Pentair. Third party registered and unregistered trademarks and logos are the property of their respective owners
970-09709 Rev A MR22
 System With Tank Installation Guide")


 Water Purification System Q6 User Manual")
 Processor Instruction Manual")


