![]()
User Manual
Model 1399
4K Video Distribution Amplifier
Introduction
The Model 1399 combines interactivity with video switching and distribution in ultra-high definition 4K resolution. Configure each output to scale 4K to 1080p or apply color space conversion (4:4:4 to 4:2:0), as appropriate. This splitter also includes a special “Group Mode” which allows the unit to function as two independent 1×4 splitters. When Group Mode is enabled, each of the 2 HDMI inputs are routed to their own discrete set of 4 outputs. This unit can also periodically reset input selection on CEC-compatible connected displays. Configurable via an intuitive set of the front panel controls, OSD, as well as RS-232.
Package Contents
- 1x HDMI splitter
- 1x 5V 3A DC power adapter
- 1x Terminal block to RS-232 cable
- Operation manual
Features
- HDMI with HDR, 3D & 4K@60Hz support, DVI 1.0 compatible
- HDCP 2.2 and HDCP 1. x compliant
- Supports up to 4K UHD (18Gbps, 4K@50/60Hz 4:4:4, 8-bit) video signals
- 8 output HDMI splitter with 2 selectable inputs and automatic input switching support
- Special “Group Mode” allows the unit to function as two independent 1×4 splitters in a single box
- Supports current 10-bit and 12-bit HDR (High Dynamic Range) formats
- Supports pass-through of LPCM 7.1, Bitstream, and advanced HD Bitstream audio formats
- Per-output, selectable, 4K to 1080p down-scaling/color space conversion (4:4:4 to 4:2:0)
- Independent HDCP management engine for each output ensures stable performance
- Supports eight internal EDIDs, eight external EDIDs copied from connected devices, and two user-provided EDIDs
- Support for the CEC “active source” command to periodically reset input selection on CEC-compatible connected displays
- Controllable via front-panel buttons with OSD and RS-232
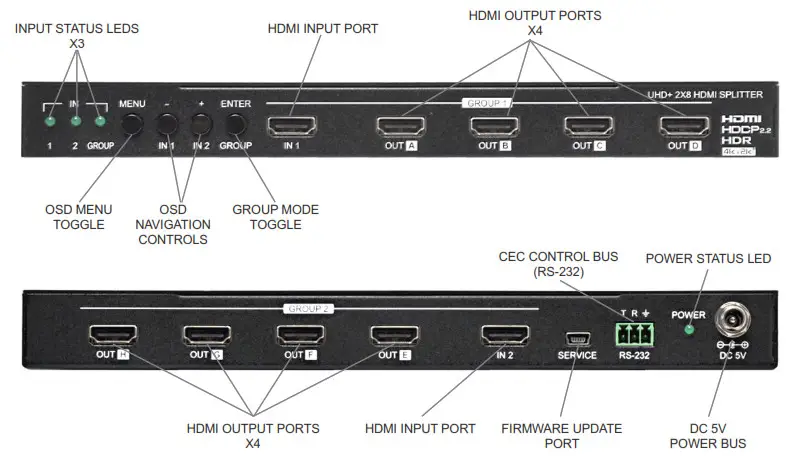
Eight HDMI Outputs
The model 1399 HDMI outputs deliver up to 4K@60 video + audio content to HDMI display screens, AVRs or soundbars.
CEC commands can be used to control the sink device.
Video File Information
MPEG-4 encoded videos are supported with maximum video resolution up to 4K@60. Test all files before deployment.
Two HDMI Inputs
The model 1399 has two HDMI inputs to connect peripheral devices such as MediaHubs, game consoles, and set-top boxes.
Each input can control its own group of products (up to two groups).
Group Mode
The Model 1399 distributes content and power two separate presentations utilizing group mode. The interface on the front panel allows the user to set each presentation manually. Also configurable via RS-232 and CEC commands.
Control Port (RS-232)
The model 1399 can send and receive serial commands via RS-232 at 19200. The port connects to a computer, game console, or other devices. The model 1399 is unit ID 0, all on-board positions respond to commands addressed to ID 0. All commands are echoed on the RS-232 control port and RS-485 control bus, regardless of ID.
Communication
OSD Menu
All primary functions of this unit can be controlled by using the OSD (On Screen Display) which is activated by pressing the Menu button on the front of the unit. Use the + (PLUS), − (MINUS), and ENTER buttons to navigate the OSD menu. Press the Menu button to back out from any menu item and then press it again to close the menu.
| MAIN MENU | LEVEL 2 | LEVEL 3 |
| Input Switch | Switch to Select the input to display when Group Mode is disabled
| INPUT 1 |
| INPUT 2 | ||
| Auto Switch Enable / Disable auto switch function Group Mode Enable / Disable Group Mode
| ON | |
| OFF | ||
| Input Information | Inputs 1-2 | Show current vendor name |
| Name | Show current product name | |
| Fmt | Show current video format | |
| Reso | Show the resolution and frame rate | |
| Freq | Show current signal frequency | |
| Depth | Show current color bit-depth | |
| Color | Show current color space | |
| HDCP | Show current HDCP status | |
| Audio | Show current audio format | |
| HDR | Show current HDR status | |
| Output 4K Converter | All Sets the 4K conversion mode for all outputs. Setting this to bypass will disable the function Out A-H Sets the 4K conversion for each output individually | BYPASS |
| TO YUV420 | ||
| TO 1080P | ||
| AUTO | ||
| Output Information | Out A-H | Show the connection status, resolution, and framerate for each output |
| EDID Control | In 1-2 Assign the current EDID to Input 1 or Input 2 | INT FHD 2CH |
| INT FHD MCH | ||
| INT UHD 2CH | ||
| INT UHD MCH |
| MAIN MENU | LEVEL 2 | LEVEL 3 |
| EDID Control | In 1-2 Assgn the co’rer1 ELLD :a int.a: t at Input 2 | t NT WHO. 2CH |
| INT UHD. KICH | ||
| INT NOR 2CH | ||
| INT HDR KICH | ||
| USER I | ||
| USER 2 | ||
| COPY OUT A | ||
| COPY OUT 8 | ||
| COPY OUT C | ||
| COPY OUT 0 | ||
| COPY OUT E | ||
| COPY OUT F | ||
| COPY OUT G | ||
| COPY OUT H | ||
| Vndr | Show current vendor name | |
| Name | Show current monitor name | |
| Reso | Show current max supposed resolution | |
| Freq | Show current max supported frequency | |
| Depth | Show current max supported di-depth | |
| YCbCr | ||
| Show current supported color spaces | ||
| HDR | Confirm HDR support | |
| HOCP Control | IN 1-2 | APPLE MODE |
| Sets the HDCP mode to use with Input I or 2 | REFER SOURCE | |
| REFER SINK | ||
| Out A-H Snow the current HOCP status for each output | ‘HDCP Status Information’ | |
| CEC | Auto Active Enable or Made CEC •actnesourc• commands to connected displays every ten minutes Auto Standby Enable or disable CEC –standby command to connected displays if no live input is detected for more than ten minutes | ON |
| OFF | ||
| Out A-H | Show the CEC status of each dispay | |
| Remote Control | Link With Set the display to accept CEC remote commands from a control unit | OFF |
| OUT A-H | ||
| Hot Key Enables or disables support for additional front panel hot key functionality. | ON | |
| OFF | ||
| (Button and Hot Key Assignment] List of where each hotkey is assigned on the remote control unit. Normsl funcbcciakty is retained in the absence of an assignment. | ||
| OSD Setting | Timeout Sets the time out duration or disables the function | NEVER |
| 1-60 | ||
| Horizontal | 0-100 | |
| Vertical | 0-100 | |
| Transparency | 0-7 | |
| Contrast | 0-1 |
| MAIN MENU | LEVEL 2 | LEVEL 3 |
| OSD Setting | Panel Color | RED |
| GREEN | ||
| BLUE | ||
| GRAY | ||
| Font Color | BLACK | |
| WHITE | ||
| RED | ||
| GREEN | ||
| BLUE | ||
| YELLOW | ||
| CYAN | ||
| MAGENTA | ||
| Free Run Set the color to display when no source is detected | NO | |
| RED | ||
| GREEN | ||
| BLUE | ||
| BLACK | ||
| COLOR | ||
| Default Reset the OSD settings to factory default | NO | |
| YES | ||
| System Setting | VID | [Vendor ID] |
| PM | [Product ID] | |
| SN | [Sena’ Number] | |
| System Settings | FW Ver | [Firmware Version] |
| Factory Reset Reset the units configuration to factory defaults | NO | |
| YES | ||
| Software Control Enable or disable RS-232 support for deuces connected to EDID Management Software | OFF | |
| ON |
RS-232 Control
Internal Settings
| Port | 0 |
| Baud Rate | 19200 |
| Data Bits | 8 |
| Parity | None |
| Stop Bits | 1 |
| Flow Control | None |
Pinout
| Pin | Pinout | Pin | Pinout |
| 1 | 6 | ||
| 2 | Tx | 7 | |
| 3 | Rx | 8 | |
| 4 | 9 | ||
| 5 | Ground |
Command-List
| Command | Response |
| ? | Show the full command list. |
| HELP | Show the full command list. |
| HELP N1 | Show details about a specific command. |
| GET MODEL NAME | Show the unit’s model name. |
| GET FW VR | Show the unit’s current firmware version. |
| SET SYSTEM REBOOT | Reboot the unit. |
| SET DESCRIPTION N1 | Set the description/name of the unit. |
| GET DESCIRPTION | Show the unit’s current description/name. |
| SET KEYLOCK N1 | Enable or disable the front panel key lock. |
| GET KEYLOCK | Show the current front panel key lock status. |
| SET OSD DEFAULT | Reset the OSD configuration to the factory defaults. |
| SET FACTORY DEFAULT | Reset all configurations to the factory defaults. |
| GET IN PORT NUMBER | Report the number of inputs supported by the unit. |
| GET IN TYPE LIST | List the video format supported by each Input. |
| GET IN N1 FORMAT | Show Input N1’s video format. |
| GET IN N1 COLOR SPACE | Show Input N1’s current color space. |
| GET IN N1 COLOR DEPTH | Show Input N1’s current color bit depth. |
| GET IN N1 TIMING | Show Input N1’s current resolution and timing. |
| GET IN N1 HDCP MODE N2 | Set Input N1’s HDCP mode to N2. |
| GET IN N1 HDCP MODE | Get Input N1’s current HDCP mode. |
| GET IN N1 HDCP STATUS | Get Input Nis current HDCP status. |
| SET IN N1 EDID N2 | Assign EDID N2 to be used with Input N1. |
| GET IN N1 EDID | Show Input N1’s current EDID mode. |
| GET IN N1 EDID DATA | Show the raw hex data for the EDID currently assigned to Input |
| GET N1 EDID INFORMATION | Show a description of the EDID assigned to Input N1. |
| GET OUT PORT NUMBER | Report the number of outputs supported by the unit. |
| GET OUT TYPE LIST | Show the video format supported by each output. |
| SET OUT ROUTE N1 | Route Input N1 to all Outputs. |
| GET OUT ROUTE | Show the current video routing source. |
| SET OUT AUTO-SWITCH N1 | Enable or disable automatic input source switching. |
| GET OUT AUTO SWITCH | Shows the current automatic input source switching setting. |
| SET OUT-GROUP MODE N1 | Enable or disable Group Mode. |
| GET OUT GROUP MODE | Show the current Group Mode setting |
| SET OUT N1 CONVERT N2 | Sets the 4K source conversion mode to use on Output N1. |
| GET OUT N1 CONVERT | Show the 4K source conversion mode used by Output N1. |
| GET OUT N1 HPD | Show the current hot-plug status of Output N1. |
| GET OUT N1 RSENSE | Show the current receiver sense status of Output N1. |
| GET OUT N1 HDCP STATUS | Show the current HDCP status of Output Ni. |
| GET OUT N1 EDID DATA | Show the raw hex data of the EDID read from Output N1. |
| GET OUT N1 EDID INFORMATION | Show the raw hex data of the EDID read from Output N1. |
| GET USER EDID NUMBER | Show the number of User EDIDs supported by the unit. |
| SET USER N1 EDID DATA N2 | Update the contents of User EDID N1 with new raw hex data. |
| GET USER N1 EDID DATA | Show the raw hex data of the EDID stored in User EDID N1. |
| GET USER N1 EDID INFORMATION | Show a description of the EDID stored in User EDID N1. |
| SET OSD TIMEOUT N1 | Set the OSD timeout value. |
| GET OSD TIMEOUT | Show the current OSD timeout value. |
| SET OSD HORIZONTAL N1 | Set the OSD menu’s horizontal position. |
| GET OSD HORIZONTAL | Show the OSD menu’s current horizontal position. |
| SET OSD VERTICAL N1 | Set the OSD menu’s vertical position. |
| GET OSD VERTICAL | Show the OSD menu’s current vertical position. |
| SET OSD TRANSPARENCY N1 | Set the OSD menu’s transparency level. |
| GET OSD TRANSPARENCY | Show the OSD menu’s current transparency level. |
| SET OSD CONTRAST N1 | Set the OSD menu’s contrast level. |
| GET OSD CONTRAST | Show the OSD menu’s current contrast level. |
| SET OSD PANEL COLOR N1 | Set the OSD menu’s background color. |
| GET OSD PANEL COLOR | Show the OSD menu’s current background color. |
| SET OSD FONT COLOR N1 | Set the OSD menu’s font color. |
| GET OSD FONT COLOR | Show the OSD menu’s current font color. |
| SET OSD FREERUN COLOR N1 | Set the Free Run mode and the color used when the input signal is lost and Free Run is active. |
| GET OSD FREERUN COLOR | Show the current Free Run color setting. |
| SET CEC AUTO ACTIVE N1 | Enable or disable sending the CEC “active source” command to connected displays every 10 minutes. |
| GET CEC AUTO ACTIVE | Show the current CEC Active Source setting. |
| SET CEC AUTO STANDBY N1 | Enable or disable sending the CEC “standby” command to connected displays if there has been no live input source detected for more than 10 minutes. |
| SET CEC REMOTE LINK N1 | Select the display/output to accept CEC remote control commands from, control the unit, or disable the feature. |
| GET CEC REMOTE LINK | Show the current CEC Remote Link setting. |
EDID Control
This unit uses an EDID Management application which allows the user to copy the EDID from an attached display, edit an existing EDID file stored on the PC, or create a basic EDID from scratch. The EDID can then be uploaded to the unit for use. Please obtain the EDID Management software from your authorized dealer and save it in a directory where you can easily find it.
Before connecting the unit to your PC, please install the EDID Management software. After the installation has successfully completed, an icon for it will appear on the windows desktop. Launch the software by double-clicking on the icon and the EDID Management device detection window will open up on your screen. After launching the software, power the unit on and then connect it to the PC/laptop using an RS-232 cable. Click on the “Search” button and any detected units will be displayed in the list. Clicking on a detected unit will open the EDID Management window.
- Mode Select: Under the “EDID Controller” tab the user may select the EDID to be sent to the selected HDMI input from 8 Internal, 8 External (bypass), or 2 User EDID options. When a new EDID is selected, the EDID used by the unit will change immediately.
- Save/Upload/Analysis: EDIDs may also be saved, uploaded, or analyzed.
- Save: Any EDID from the unit or a connected HDMI display can be saved to your PC as a *.bin file by selecting the EDID source from the drop-down menu and then clicking the “Save” icon.
- Upload: Previously saved EDID files (*.bin format) can be re-uploaded into any of the “User” EDID slots by selecting the User EDID to replace from the dropdown and then clicking the “Upload” icon. Before accepting the upload, the software will check and verify that the EDID’s header and checksum values are acceptable.
- Analysis: To analyze any EDID stored within the unit, select the EDID to view from the dropdown and click on the “Analysis” icon. From the Analyzer window, it is possible to open the currently analyzed EDID in the “EDID Creator” by clicking the “Edit” button.
- Select: Click on the “EDID Creator” tab to begin designing a new EDID from scratch (select the “New” icon), to modify an existing EDID stored on the PC as a *.bin file (select the “Load” icon) or to edit an EDID copied from the unit via the EDID Analyzer’s edit option. – Selecting “New” will automatically populate the various EDID fields with basic information that can be easily edited to match the user’s preferences.
– Clicking on the “Load” icon will open a file load window and after the *.bin file has been selected and loaded the EDID fields will be populated with the information from that file. The same will happen when the EDID is copied from the “EDID Analyzer” window. - Edit: The following tabs provide access to a wide range of EDID information which can be edited:
– Descriptor: This tab allows for the editing of various description and information fields within the EDID file such as Manufacturer Name, Monitor Name, etc.
– PC Timing & SD/HD/UHD: These tabs allow for the selection of the resolutions and refresh rates that the EDID will report as support.
– Audio1 & Audio2: These tabs allow for the selection of which audio formats, audio frequencies, channels, and speaker locations are supported.- Color Space: This tab allows for the selection of which color formats and bit depths are supported,
including BT.2020 and HDR support options. – Others: This tab contains options for supporting 3D and defining the CEC Address. Once the user is finished editing or creating an EDID it can be saved to a *.bin file locally or uploaded directly to the unit using the “Save” and “Upload” icons respectively. - Configuration & Firmware: Select the “System” tab to edit the software’s description (select the “Rename” icon), reset the unit to factory defaults (select the “Reset” icon), and to view the unit’s current hardware and firmware version information.
Installation
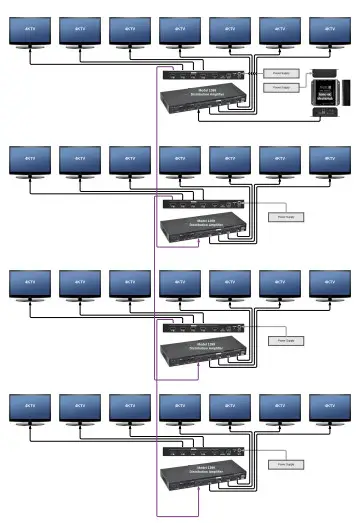
- Attach the player to a flat surface with the screws provided
- Connect the Model 1399 and MH6-4K to their power supplies
- Connect the MH6-4K to HDMI Input 1
- Connect Outputs A-G to their corresponding devices
- Connect Output H to the next Model 1399 Input A
- Repeat the previous steps until all devices are connected
- For more information check our website: www.audioauthority.com/1399
Product Specifications
| HDMI Bandwidth | 600MHz/18Gbps |
| Input Ports | 2×HDMI |
| Output Ports | 8×HDMI |
| Control Interfaces | 1×RS-232 [3-pin Terminal Block] 1×USB [Mini-B] |
| HDMI Cable Distance | 3m, 4K@60Hz (YUV 4:4:4, 8-bit) 5m, 4K@30Hz (8-bit) 10m, 1080p@60Hz (12-bit)15m, 1080p@60Hz (8-bit) |
| Power Supply | 5V/3A DC(US/EU standards, CE/FCC/ UL certified) |
| ESD Protection | Human Body Model:±8kV (Air Discharge) ±4kV (Contact Discharge) |
| Dimensions | 240mm×24mm×103mm (W×H×D) [Case Only] 240mm×25mm×103mm (W×H×D) [All Inclusive] |
| Weight | 616g |
| Chassis Material | Metal |
| Silkscreen Color | Black |
| Operating Temperature | 0 ˚C–40 ˚C/32 ˚F–104 ˚F |
| Storage Temperature | -20 ˚C–60 ˚C/-4 ˚F–140 ˚F |
| Relative Humidity | 20–90% RH (Non-condensing) |
| Power Consumption | 9.57W |
Example System
This display leverages a large-scale television display to attract and communicate utilizing the Model 1399’s ability to chain together multiple units to demonstrate a variety of products. Each of the eight HDMI ports can play up to 4K resolution, depending on the requirements of the device. The MH6-4K MediaHub is an innovative and effective way to organize your presentation. It connects directly to one of the two HDMI inputs.
![]()

https://www.audioauthority.com/product_details/1399
Ascentic is a trademark of Audio Authority Corp.
2048 Mercer Road, Lexington, Kentucky 40511-1071
800-322-8346 • 859-233-4599 • Fax: 859-233-4510
www.audioauthority.com • [email protected]
E-227
20210818


