
![]()
![]()
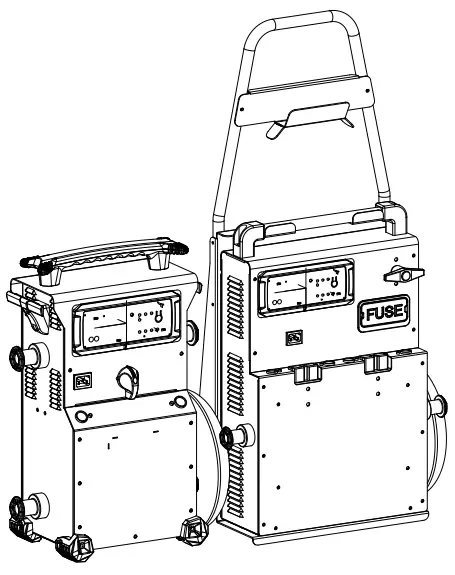 STARTPACK 12.24 CI
STARTPACK PRO 12.24 CI
SAFETY INSTRUCTIONS
![]() This manual includes guidelines on the operation of your device and the precautions to follow for your own safety. Ensure it is read carefully before first use and keep it handy for future reference. These instructions should be read and understood before anyone operates the product. Any modifications or maintenance that are not specified in the manual should not be undertaken. The manufacturer is not liable for any injury or damage due to non-compliance with the instruction manual. In case of problems or uncertainties, please consult a qualified person that is able to handle the device correctly. This device should only be used for start-up within the limits indicated on the device and in the manual. The safety instructions must be followed. In case of improper or unsafe use, the manufacturer cannot be held responsible
This manual includes guidelines on the operation of your device and the precautions to follow for your own safety. Ensure it is read carefully before first use and keep it handy for future reference. These instructions should be read and understood before anyone operates the product. Any modifications or maintenance that are not specified in the manual should not be undertaken. The manufacturer is not liable for any injury or damage due to non-compliance with the instruction manual. In case of problems or uncertainties, please consult a qualified person that is able to handle the device correctly. This device should only be used for start-up within the limits indicated on the device and in the manual. The safety instructions must be followed. In case of improper or unsafe use, the manufacturer cannot be held responsible![]() Device suitable for indoor use only. Do not expose to rain or excessive moisture.
Device suitable for indoor use only. Do not expose to rain or excessive moisture.
This device may be used by children from age 8 and by persons with reduced physical, sensory or mental capabilities or lack of experience and knowledge, provided that they are under supervision or have been told how to use the device safely and are aware of the potential risks. Children must not use the device as a plaything. Cleaning and servicing tasks may not be carried out by children unless they are supervised.
Do not use for charging non-rechargeable batteries
Do not use any charger other than the one supplied with the machine to charge the batteries.
Do not operate the device with a damaged power supply cord or a damaged mains plug.
Never charge a frozen or damaged battery.
Do not cover the device
Do not place the device near a fire or subject it to heat or to longterm temperatures exceeding 60°C
Do not obstruct the cooling vents. Refer to the installation section before operating the machine.
Risk of explosion or acid projection in case of short-circuit of the clamps or if the 12V booster is connected to a 24V vehicle or vice versa.
The automatic mode of operation and usage restrictions are explained below in these operating instructions.![]() Risk of explosion and fire!
Risk of explosion and fire!
A battery being charged can emit explosive gas.
 During the charge, the battery must be placed in a well ventilated area.
 Avoid flames and sparks. Do not smoke.
- Protect the electrical contacts of the battery against short-circuiting.
 Acid projection hazard!
  Wear safety goggles and protective gloves
 If your eyes or skin come into contact with battery acid, rinse the affected part of the body with plenty of water and seek immediate medical assistance.
Connection / disconnection: Disconnect the power supply before connecting/disconnecting the device to/from the battery.
- The terminal of the battery that is not connected to the car frame must be connected first. The other connection must be made on the car frame, far from the battery and the fuel line.
- After the start-up operation, disconnect the booster. First remove the chassis connection and then the battery connection, in the order shown.
Connection:
 This device must be connected to an earthed power supply.
- This machine is fuse-protected.
- Connection to the mains must be made according to the national installation regulations.
Maintenance:
 If the power supply cable is damaged, it must only be replaced by a cable specified or supplied by the manufacturer or its after-sales service.
- Service should be performed by a qualified person
 Warning! Always remove the power plug from the wall socket before carrying out any work on the device.
- If the internal fuse is blown, it must be replaced by the manufacturer, its after-sales service or an equally qualified person.
- Regularly take off the cover and remove dust with an air gun. Take the opportunity to have a qualified person check the electrical connections with an insulated tool.
- Under no circumstances should solvents or other aggressive cleaning agents be used.
- Clean the device’s surfaces with a soft, dry cloth.
Regulations
 The device complies with European Directive.
- The certificate of compliance is available on our website.
 EAC conformity mark (Eurasian Economic Commission)
 Equipment in compliance with British requirements. The British Declaration of Conformity is available on our website (see home page).
 Equipment in conformity with Moroccan standards. The declaration C م (CMIM) of conformity is available on our website (see cover page).
Disposal:
 This product should be disposed of at an appropriate recycling facility. Do not dispose of in domestic waste.
- The battery fitted in this device is recyclable. Please proceed according to the applicable recycling regulations.
 The battery must be removed from the device before the latter is discarded.
- The device must absolutely be disconnected from the power supply network before removing the battery.
GENERAL DESCRIPTION
The STARTPACK 12.24 CI & PRO 12.24 CI are autonomous starters intended for starting vehicles equipped with a 12 V (6 x 2 V) and 24 V (12 x 2 V) lead-acid battery with liquid or gel electrolyte from light to heavy vehicles. They are powered by 2 high-performance 12 V internal batteries.
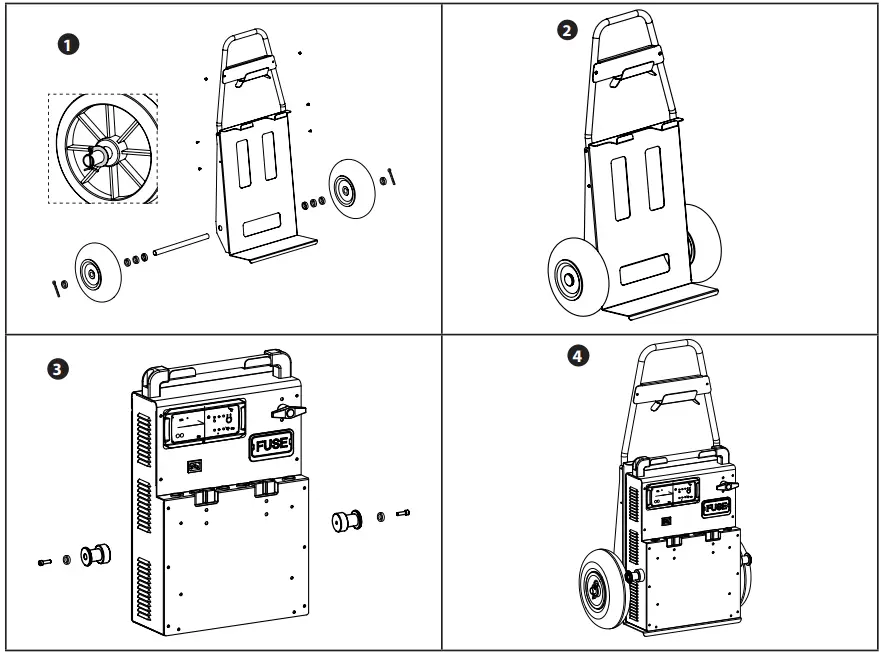
TROLLEY ASSEMBLY (STARTPACK PRO 12.24 CI)
USE IN STARTER MODE
| STARTPACK 12.24 CI | STARTPACK PRO 12.24 CI |
| Before each start-up, check that the “recharging” indicator is off. | |
 • Set the battery switch to OFF. • Set the battery switch to OFF. | |
 • Connect the switch to 12 V or 24 V depending on the vehicle to be started. • Connect the switch to 12 V or 24 V depending on the vehicle to be started. | |
 • Set the switch to 12 V or 24 V depending on the vehicle to be started. • Set the switch to 12 V or 24 V depending on the vehicle to be started. |  • Set the battery switch to ON. • Set the battery switch to ON. |
| • Turn your vehicle key (6 seconds maximum) to activate the starter function. if your engine does not start, wait 3 minutes between 2 start attempts. A vehicle that does not start after the third attempt may have a problem other than a faulty battery: e.g. alternator, glowplug… | |
| | |
 • Once the vehicle has been started, set the battery switch to OFF. • Once the vehicle has been started, set the battery switch to OFF. | |
 • Set the switch to 12V. • Set the switch to 12V. |  • If the selector switch is set to 24 V, connect it to 12 V. • If the selector switch is set to 24 V, connect it to 12 V.If it is already on 12 V, leave the selector switch connected. |
USE IN CHARGER MODE (CHARGE INTERNAL BATTERIES)
For the STARTPACK to be always operational and deliver maximum starting power, it is recommended to charge it after each use and to keep on charge until next used.
The STARTPACK PRO is fitted with an autonomous charger which charges and maintains the internal batteries at 100% and without the need for monitoring (Floating System).
| STARTPACK 12.24 CI | STARTPACK PRO 12.24 CI |
| • After use, set the battery switch to OFF and disconnect the clamps from the vehicle. | |
 • Set the switch to 12V. • Set the switch to 12V. |  • Set the voltage connector to 12 V. • Set the voltage connector to 12 V. |
![]() If the switch (or connector) is not on 12V, charging does not start and/or an alert message appears.
If the switch (or connector) is not on 12V, charging does not start and/or an alert message appears.
For more information on the progress of the state of charge:
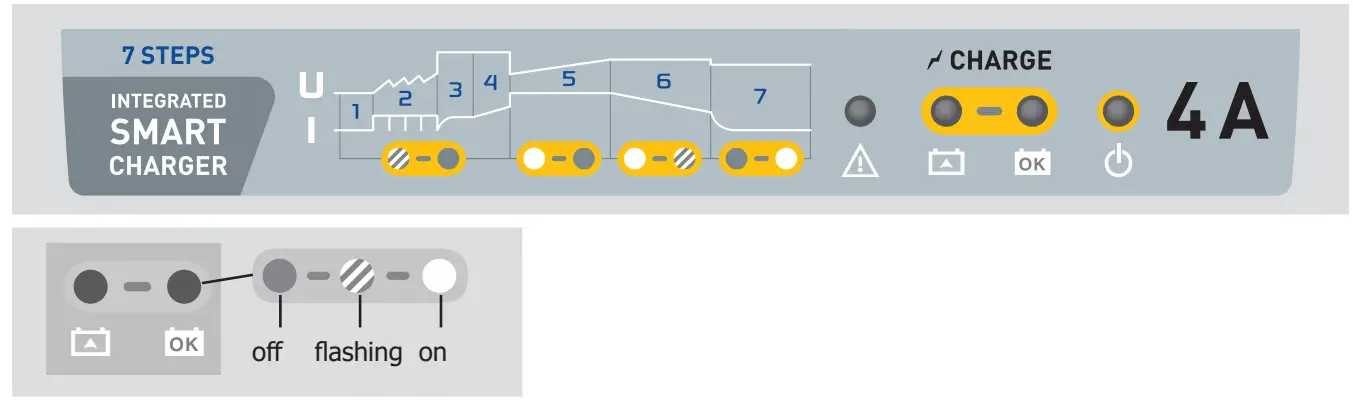
- Analysis
- Recovery
- Sulphation test
- Desulphation
- Charge
- Absorption
- Floating
MAINTENANCE OF THE INTERNAL BATTERY
These high performance batteries require the user to be extra careful. By observing the instructions below, the life of the batteries can be extended:
– Charge the appliance immediately after purchase and after each use.
– Do not use an external charger other than the one supplied with the machine.
– When not in use, set the switch (or battery switch) to OFF.
– Never short-circuit the clamps when the switch is on 12 or 24 V.
– Never connect the red clamp to the negative terminal of the battery and the black clamp (-) to the motor ground. This will short-circuit the batteries in the Startpack.
– Wait 3 minutes before each start attempt. This allows the device to cool down and the batteries’ voltage to recover.
Without this waiting time and if the start test lasts too long, there is a risk of losing power and reducing the chances of starting on the following tests.
A product equipped with a lead battery must not be stored for more than three months from receipt of the goods. If this is not the case, the battery must be recharged in order to keep its performance intact.
As a general rule, we recommend connecting the product permanently to maintain the batteries at their best level of performance and increase their lifetime. If the maintenance rules are not followed, the internal resistance of the battery will increase, causing it to deteriorate irreversibly over time.
The internal resistance is an important indicator for determining:
– if the battery has been well maintained by frequent recharging,
– if the booster has been stored in optimal conditions: in a dry place kept at room temperature (15°C to 25°C).
BATTERY NOT COVERED BY WARRANTY
Batteries are live parts, their life depends on maintenance. After each use of this starter, it is essential to recharge the internal battery. Storage in places with high temperatures greatly reduces the battery charge. In the case of prolonged non-use, it is strongly recommended to recharge the battery before use. In general, we recommend leaving the
product plugged in continuously to maintain the battery at its best performance.
This product is equipped with one high performance battery. If the maintenance instructions are not followed, the battery can deteriorate irreversibly over time.
For this reason, the GYSPACK PRO battery is excluded from the warranty.
TROUBLESHOOTING
| The device beeps and the red LED is on. | The device detects a polarity reversal. | Check the battery polarity. Red clamp to the po- sitive battery terminal (+) and the black clamp to the negative (-). | |
| The «RECHARGE!» indicator flashes. | At some point, the voltage of the internal battery has dropped below 12.7 V following a start or a heavy consumption. | Charge the device after each use. The red light goes out. | |
| Sparks appear when the clamps make contact with the battery terminals. | 12.24 | The switch is on 12V or 24V. | Switch the machine off before connecting the clamps to the battery. |
| PRO 12.24 | The battery switch is ON and/or the selector switch is on 12 V or 24 V. | Before connecting the clamps to the battery, set the battery switch to OFF, disconnect the voltage selector. | |
| The voltage selector switch is in the wrong position. | Check that the vehicle voltage corresponds to the selected voltage. | ||
| Polarity reversal. | Check the battery polarity. | ||
| The unit can no longer start the vehicle and the red light is off. | The voltage of the internal batteries is very low. It may be that the inter- nal batteries are damaged. | Put the device on charge in order to attempt to recover the battery. | |
| The fuse has melted. | Check and replace the fuse. | ||
| Only the indicator | The battery is heavily discharged (<4V). | Internal batteries require replacing | |
| The switch is not connected to 12 V. | Connect correctly the voltage switch to 12V | ||
Indicator  flashes 3 times in succession. flashes 3 times in succession. | Charging time is too long. | Internal batteries require replacing | |
| Indicator . | The battery voltage is too high (> 16 V). | Set the voltage selector switch to “12 V”. | |
| Indicator | Thermal protection of the charger. | The charger is overheating because the room temperature is high. The charger restarts the charge automatically once the temperature falls sufficiently. | |
| The Startpack is connected to the mains. No indicator is on. | No mains voltage. | Check for 100-240V voltage. | |
| The EON card is out of order | Contact the after-sales service. | ||
| The switch is not connected to 12 V. | Connect correctly the voltage switch to 12V | ||
WARRANTY
The warranty covers faulty workmanship for 2 years from the date of purchase (parts and labour).
The warranty does not cover:
- Transit damage.
- Normal wear of parts (eg. : cables, clamps, etc..).
- Damages due to misuse (power supply error, dropping of equipment, disassembling).
- Environment related failures (pollution, rust, dust).
In case of failure, return the unit to your distributor together with:
– The proof of purchase (receipt etc …)
– A description of the fault reported
BATTERY REPLACEMENT
STARTPACK 12.24 CI
| Product | Battery | Type | Voltage (V) | Capacity (Ah) | Dimensions (cm) | Battery ref |
| STARTPACK 12.24 | G16EP | Lead acid battery | 2 x 12 | 2 x 16 | 18 x 8 x 17 | 53131 |
Regardless of how the STARTPACK 12.24 is being used (12V or 24V), always replace both batteries at the same time.
To replace the batteries:
- Disconnect the booster from the mains beforehand.
- Unscrew the back shell ( 1 – 7 screws) and remove it.
- Once the back panel has been removed, the batteries are visible, with one in front of the other (see picture).
- To remove them:
– Remove the screws (see illustrations 2 and 3 ) which allow the connection between the batteries and the rest of the STARTPACK connector system.
– Then unscrew the fixing bar (striped area ![]() ) between the two batteries 4 .
) between the two batteries 4 .
– First remove the front battery.
– And remove the second battery.
![]() Once the first battery is removed, make sure to insulate the terminals to prevent any short circuit. Then remove the second battery.
Once the first battery is removed, make sure to insulate the terminals to prevent any short circuit. Then remove the second battery.![]() When putting new batteries, make sure to match the polarities of both batteries and STARTPACK 12.24 CI. – Terminal on the left, + terminal on the right (see picture).
When putting new batteries, make sure to match the polarities of both batteries and STARTPACK 12.24 CI. – Terminal on the left, + terminal on the right (see picture).
- Reposition and tighten in this order the bottom battery, the front battery and then the fixing bar. Screw the back shell back on again to finish.
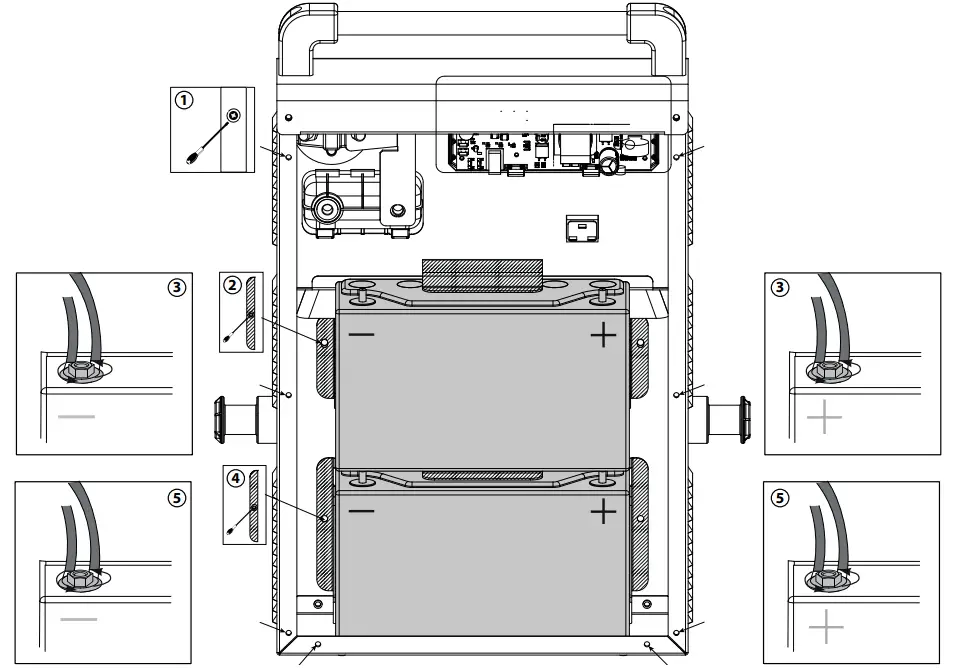
STARTPACK PRO 12.24 CI
| Product | Battery | Type | Voltage (V) | Capacity (Ah) | Dimensions (cm) | Battery ref |
| STARTPACK PRO 12.24 | PC950 | Lead acid battery | 2 x 12 | 2 x 30 | 25 x 9,7 x 15,6 | 53135 |
Regardless of how the STARTPACK PRO 12.24 is being used, always replace both batteries at the same time.
To replace the batteries :
- Disconnect the booster from the mains beforehand.
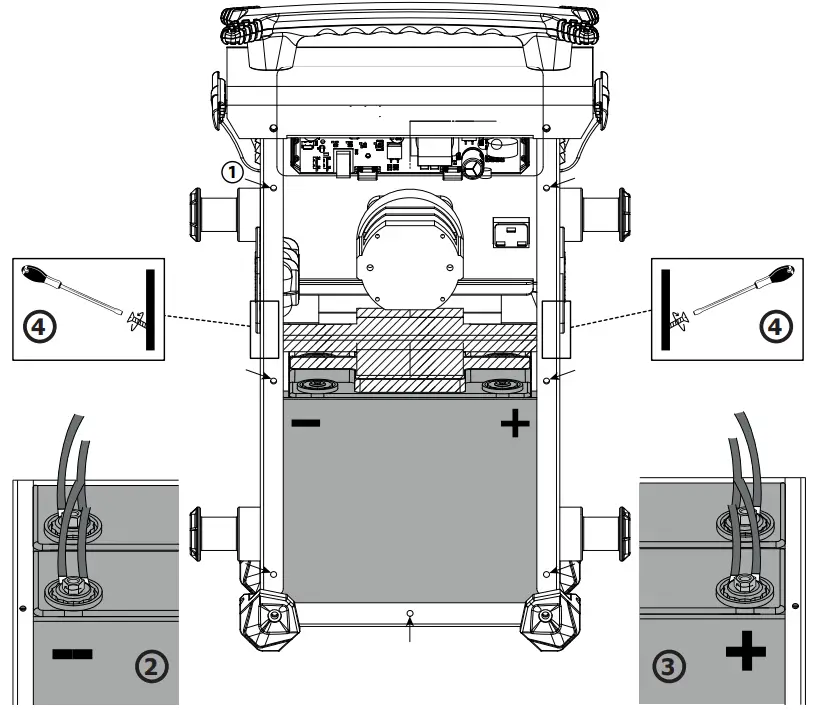
- Unscrew the back shell ( 1 – 8 screws) and remove it.
- Once the back panel is removed, the batteries are visible, one on top of the other (see picture).
- The batteries are maintained by a partition (striped area
 ) and connected to the STARTPACK at two points: at the – terminal and at the + terminal.
 - Start with the top battery. First completely unscrew the retaining wall 2 , then unscrew the two nuts on the – and + side of the battery 3 and remove it. Once the first battery is removed, make sure to insulate the terminals to prevent any short circuit.
- Then, do the same with the bottom battery. Unscrew the partition 4 , then unscrew the two nuts used to connect the battery to the STARTPACK 5 and remove the battery. When putting new batteries, make sure to match the polarities of both batteries and STARTPACK PRO 12.24 CI. Reassemble the batteries in the following order:
- Reposition and tighten slightly the bottom partition 4 . Then insert the battery, screw it back on 5 and tighten the partition completely. Do the same with the bottom battery. Position the partition first and tighten lightly 2 , insert the battery, screw it back 3 and tighten the partition completely. Finally screw the back shell 1 back on.
TECHNICAL SPECIFICATION
| 12.24 CI | PRO 12.24 CI | ||
| Power supply voltage | 220 – 240 V 50/60 Hz | ||
| Maximum nominaler | 65 W | ||
| Charging voltage | 2 V – 15 V | ||
| Charging current | 0 – 4 A | ||
| Nominal charge capacity | 2 x 16 Ah | 2 x 30 Ah | |
| Charging curve | IUoU | ||
| Operating temperature | -10°C à 50°C | ||
| Storage temperature | In charge | -10°C à 50°C | |
| At rest | -10°C à 25°C | ||
| Protection class | IP20 | ||
| Machine’s weight (cables included) | 19 kg | 34 kg | |
| Dimensions (L x l x H) | 26 x 20 x 48 cm | 14 x 35 x 56 cm | |
| Dimensions with Trolley | ̶ | 31 x 93 x 55 cm | |
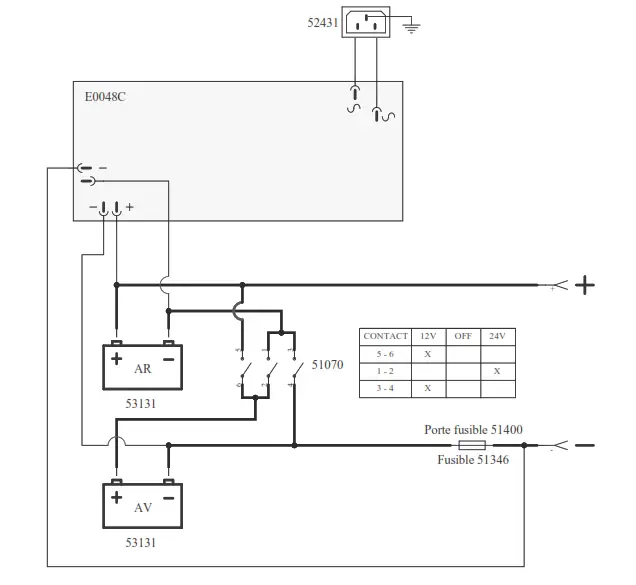
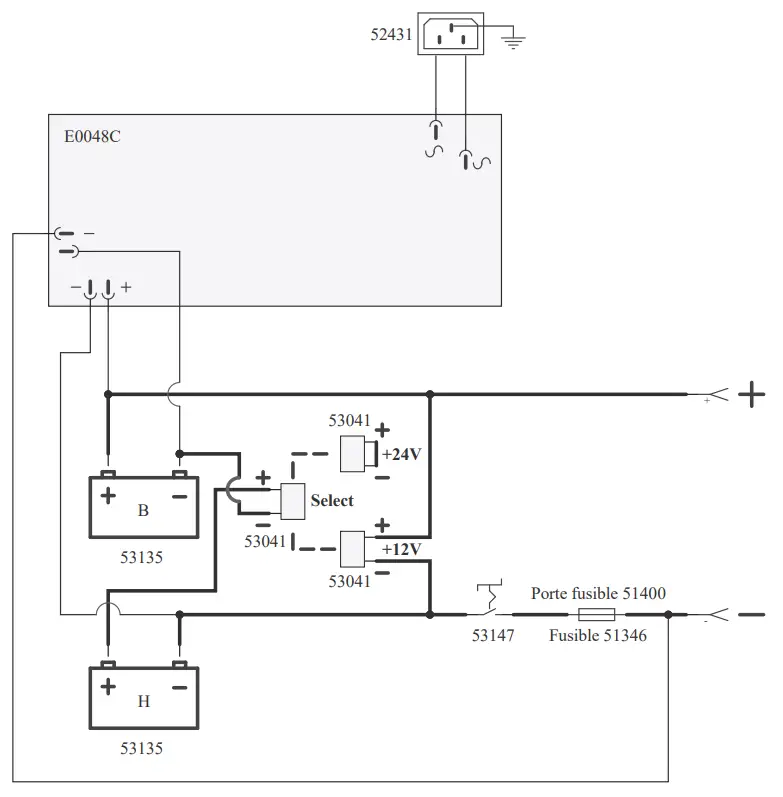
CIRCUIT DIAGRAM
STARTPACK 12.24 CI
STARTPACK PRO 12.24 CI
SPARE PARTS
STARTPACK 12.24 CI
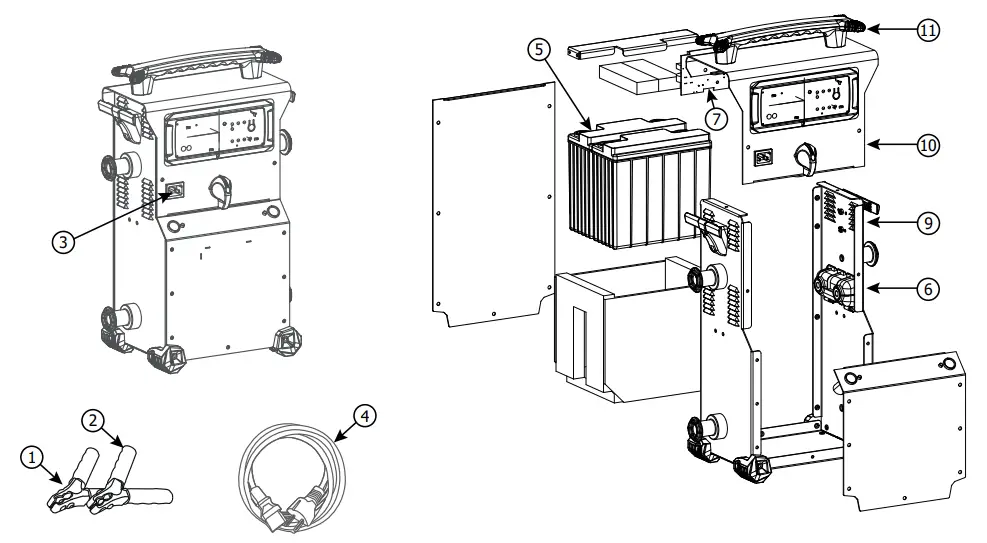
| N° | DESIGNATION | REFERENCE | |
| 1 | Red clamp | 053779 | |
| 2 | Black clamp | 053786 | |
| 3 | Male power plug | 52431 | |
| 4 | Power supply cable | 22314 UK: 22315 | |
| 5 | Battery | 53131 (x2) | |
| 6 | 300 A fuse | 054561 | |
| 7 | STARTPACK circuit | E0048C | |
| 8 | Switch | F0300 | |
| 9 | Board | < 12/2022 | K0258GF |
| > 12/2022 | K0982GF | ||
| 10 | Cap | < 12/2022 | K0256GT5 |
| > 12/2022 | K0983GT5 | ||
| 11 | Handle | < 12/2022 | 56047 |
| > 12/2022 | 56288 | ||
STARTPACK PRO 12.24 CI
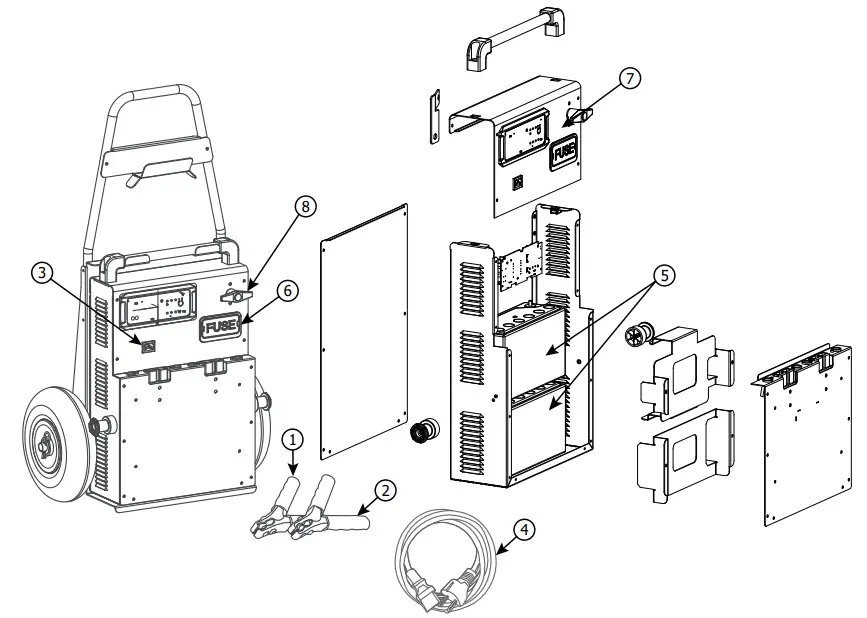
| N° | DESIGNATION | REFERENCE |
| 1 | Red clamp | 053779 |
| 2 | Black clamp | 053786 |
| 3 | Male power plug | 52431 |
| 4 | Power supply cable | 22314 UK : 22315 |
| 5 | Battery | 53135 (x2) |
| 6 | 300 A fuse | 054561 |
| 7 | STARTPACK circuit | E0048C |
| 8 | Battery breaker | 53147 |
SYMBOLS
 | Recyclable product that falls within waste sorting recommendations (according to Decree n° 2014-1577). |
| IP 20 | Protected against rain and against fingers access to dangerous parts. |
< 70dB | Noise level |
![]() GYS SAS
GYS SAS
1, rue de la Croix des Landes CS 54159
53941 SAINT-BERTHEVIN Cedex France


