![]()
Multi-deck Canopy, Shelf, & Rail LEDs
Upgrade Installation Guide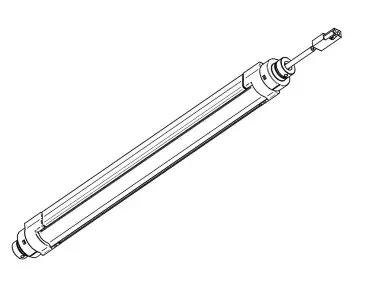
 IMPORTANT
Keep in Store for Future Reference
Installation & Specifications Guide
P/N 0524791_J October 2021
Spanish P/N 0527937
MANUAL-KIT ECOSHINE ULTRA LED, MULTI-DECK
| BEFORE YOU BEGIN Read the safety information completely and carefully. |
SAFETY
Please wear all required personal protective equipment according to OSHA regulations, and be sure to comply with the precautions described in this manual to protect you and others from possible harm. The ANSI definitions below detail and clarify the magnitude and urgency of potential harm, damage and problems arising from misuse or improper installation. Relative to their potential danger, the definitions are divided into four parts as defined by ANSI Z535 Series.
ANSI Z535.5 DEFINITIONS
 DANGER – Indicate[s] a hazardous situation which, if not avoided, will result in death or serious injury.
- WARNING – Indicate[s] a hazardous situation which, if not avoided, could result in death or serious injury.
- CAUTION – Indicate[s] a hazardous situation which, if not avoided, could result in minor or moderate injury.
- NOTICE – Not related to personal injury – Indicates[s] situations, which if not avoided, could result in damage to equipment.
REVISION HISTORY
REVISION J — Added new horizontal ULTRA LEDs
Working Near the Public
Cordon off all work areas with cones, caution tape, warning signs and/or barricades. Maintain a work area of at least 5 feet from the public. Is a second person required to prevent the public from entering the work area when the work area cannot be adequately cordoned off?
Electrical Hazards
Are all live electrical hazards protected from public access; i.e., de-energized/locked out or cordoned off? Is proper signage in place? Make sure the work area is cordoned off.
Electrical / LOTO
Does the project require you to work with live electricity?
If yes, have you received appropriate training? Do you have appropriate locks and tags to de-energize or isolate the electrical supply?
- Read and observe all CAUTIONS and WARNINGS shown throughout these instructions.
- Each person working on or near the installation described must wear safety glasses or goggles.
- Block access to the work area by customers or other personnel to prevent injury.
- Read and follow all industry safety recommendations and established procedures.
- Wiring must be 2 wire with ground and rated for 75°C (176°F).
LED Lighting Canopy, Shelf and Rail
![]() WARNING Risk of fire or electric shock. Luminaire wiring and electrical parts installation requires knowledge of electrical systems. Only qualified service technicians shoould install or service this equipment. If not qualified, do not attempt installation. Contact a qualified electrician.
WARNING Risk of fire or electric shock. Luminaire wiring and electrical parts installation requires knowledge of electrical systems. Only qualified service technicians shoould install or service this equipment. If not qualified, do not attempt installation. Contact a qualified electrician.
![]() WARNING — LOCK OUT / TAG OUT —
WARNING — LOCK OUT / TAG OUT —
To avoid serious injury or death from electrical shock, always disconnect the electrical power at the main disconnect when servicing or replacing any electrical component. This
includes, but is not limited to, such items as doors, lights, fans, heaters, and thermostats.
![]() WARNING — LOCK OUT / TAG OUT —
WARNING — LOCK OUT / TAG OUT —
To avoid serious injury or death from electrical shock, always disconnect the electrical power at the main disconnect when servicing or replacing any electrical component. This includes, but is not limited to, such items as lights, fans, and heaters.
NOTICE Only those open holes indicated in the photographs and/or drawings may be made or altered as a result of kit installation. Do not leave any other open holes in an enclosure of wiring or electrical components.
FOR CALIFORNIA INSTALLATIONS ONLY:![]() WARNING: Cancer and Reproductive Harm www.P65Warnings.ca.gov
WARNING: Cancer and Reproductive Harm www.P65Warnings.ca.gov
August 34, 2018 Sexes
This warning does not mean that Hussmann products will cause cancer or reproductive harm, or is in violation of any product-safety standards or requirements. As clarified by the California State government, Proposition 65 can be considered more of a ‘right to know’ law than a pure product safety law. When used as designed, Aperion believes that our products are not harmful. We provide the Proposition 65 warning to stay in compliance with California State law. It is your responsibility to provide accurate Proposition 65 warning labels to your customers when necessary. For more information on Proposition 65, please visit the California State government website. This warning does not mean that Hussmann products will cause cancer or reproductive harm, or is in violation of any product-safety standards or requirements. As clarified by the California State government, Proposition 65 can be considered more of a ‘right to know’ law than a pure product safety law. When used as designed, Hussmann believes that our products are not harmful. We provide the Proposition 65 warning to stay in compliance with California State law. It is your responsibility to provide accurate Proposition 65 warning labels to your customers when necessary. For more information on Proposition 65, please visit the California State government website.
GENERAL INFORMATION
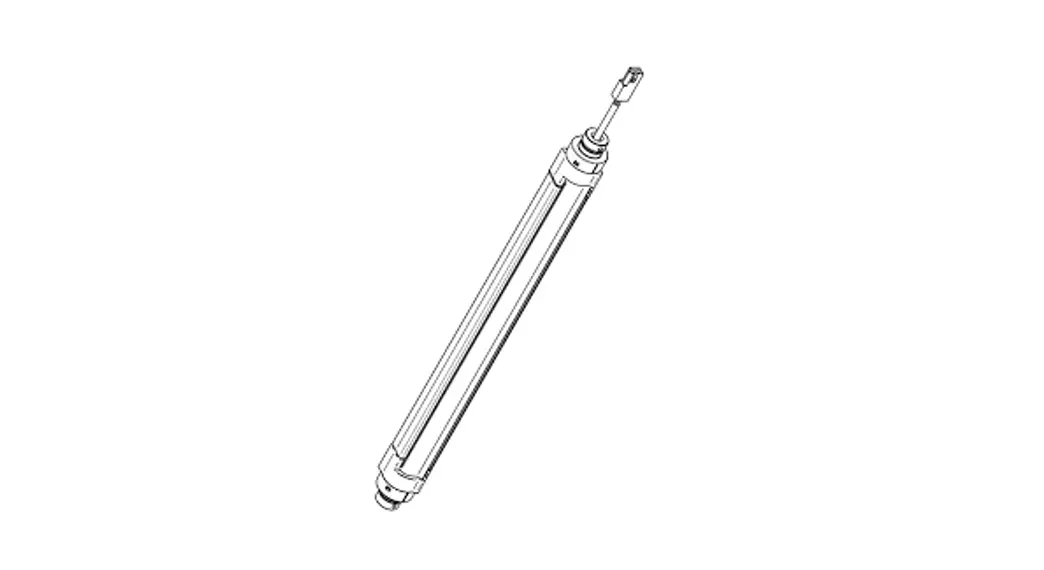
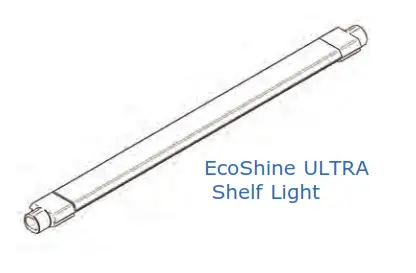
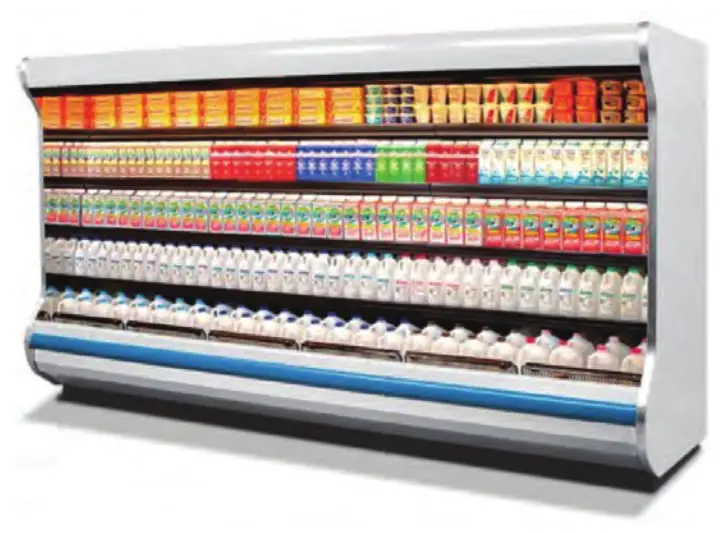
LED LIGHT FIXTURES EcoShine ULTRA LEDs were specifically designed to maximize product appeal and reduce energy costs. These LEDs work well for dimming or on/ off operation using an occupancy sensor (optional kits) . They can be turned on and off in a cold environment with no warm-up time and no negative impact on lamp life. This instruction explains how to remove original equipment manufactured (OEM) fluorescent lamp fixtures and replace them with Hussmann LED light bars .
ELECTRICAL CONNECTIONS
All wiring must be in compliance with NEC and local codes. All electrical connections are to be made in the wireway or mullion or LED light fixture.
IDENTIFICATION OF WIRING
Leads for all electrical circuits are identified by colored plastic bands. These bands correspond to the color code sticker (shown below) located inside the merchandiser’s wire way cover. Anthony’s doors may not conform to this chart. Refer to the manufacturer’s manual for their information.
SHIPPING DAMAGE
All equipment should be thoroughly examined for shipping damage before and during unloading . This equipment has been carefully inspected at our factory. Any claim for loss or damage must be made to the carrier. The carrier will provide any necessary inspection reports and/or claim forms .
Apparent Loss Or Damage
If there is an obvious loss or damage, it must be noted on the freight bill or express receipt and signed by the carrier’s agent; otherwise, the carrier may refuse the claim .
Concealed Loss Or Damage
When loss or damage is not apparent until after the equipment is uncrated, retain all packing materials and submit a written request to the carrier for inspection, within 15 days.
Missing Parts
Every effort is made to ship all parts for the kit . The Hussmann Service Center can be reached by calling
- from U .S . & Canada 1-800-922-1919
- from Mexico 1-800-890-2900
WIRING COLOR CODE
Leads for all electrical circuits are identified by a colored plastic band: neutral wire for each circuit has either White insulation or a White plastic sleeve in addition to the color band.
Pink ……….. RefRig. TheRmosTaT Low TemP.
LighT BLue. RefRig. TheRmosTaT noRm TemP.
DaRk BLue. DefRosT TeRm. TheRmosTaT
PuRPLe ……. conDensaTe heaTeRs
BRown ……. fan moToRs
Green* ……. gRounD *eiTheR coLoReD sLeeVe oR coLoReD insuLaTion
Orange oR
Tan ………..LighTs
maRoon ….RecePTacLes
YeLLow …..DefRosT heaTeRs 120V
ReD ……….DefRosT heaTeRs 208V
ELECTRICIAN NOTE: Use copper conductor wire only.
CASE MUST BE GROUNDED
These aRe maRkeR coLoRs wiRes maY VaRY.
ALWAYS*CLEAR ™ GLASS
Hussmann recommends using a soft cloth with isopropyl (rubbing) alcohol to clean the inside (coated) glass surface. Isopropyl alcohol does not freeze and evaporates without leaving residue. Always allow the surface to dry before closing the door. The use of abrasives may damage the coated surface and void the warranty. Labels (stickers) applied to he coated surface will cause damage and void the warranty .
LED LIGHT FIXTURES
LED (light emitting diode) lights work well for dimming or on/off operation using an occupancy sensor (optional kits) . They can be turned on and off in a cold environment with no warm-up time and no negative impact on lamp life .
CLEANING LED FIXTURES
Use a lint-free cloth to wipe the surface of the luminaires. Do NoT use scouring pads, bleach, solvents, or detergents. This may damage the surface of the clear plastic cover .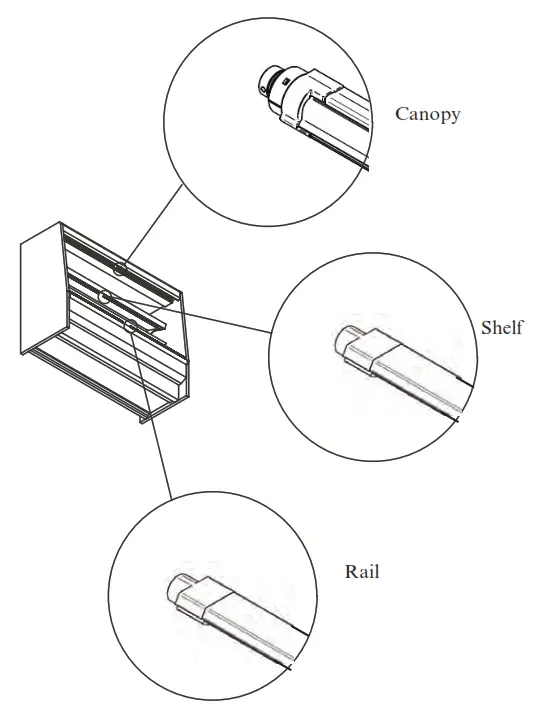
LED Lighting Canopy, Shelf and Rail
GENERAL
This instruction explains how to remove original equipment manufactured (OEM)fluorescent lamp fixtures and replace them with Hussmann LED light fixtures for multideck
merchandiser
FOR YOUR SAFETY
- Read and observe all CAUTIONS and WARNINGS shown throughout these instructions.
- Each person working on or near the installation described must wear safety glasses or goggles.
- Block access to the work area by customers or other personnel to prevent injury.
- Read and follow all industry safety recommendations and established procedures.
- Wiring must be 2 wire with ground and rated for 75°C (176°F) .
ELECTRICAL CONNECTIONS
All wiring must be in compliance with NEC and local codes. All electrical connections are to be made in the wireway or mullion or LED light fixture .
IDENTIFICATION OF WIRING
Leads for all electrical circuits are identified by colored plastic bands. These bands correspond to the color code sticker (shown below) located inside the merchandiser’s wire way cover . Anthony’s doors may not conform to this chart . Refer to the manufacturer’s manual for their information.
SHIPPING DAMAGE
All equipment should be thoroughly examined for shipping damage before and during unloading . This equipment has been carefully inspected at our factory. Any claim for loss or damage must be made to the carrier. The carrier will provide any necessary inspection reports and/or claim forms.
Apparent Loss Or Damage
If there is an obvious loss or damage, it must be noted on the freight bill or express receipt and signed by the carrier’s agent; otherwise, the carrier may refuse claim.
Concealed Loss Or Damage
When loss or damage is not apparent until after the equipment is uncrated, retain all packing materials and submit a written request to the carrier for inspection, within 15 days .
Missing Parts
Every effort is made to ship all parts for the kit. The Hussmann Service Center can be reached by calling
REMOVE EXISTING FLUORESCENT
LIGHTING (if previously installed)
- Remove the product from the merchandiser and store at the appropriate product temperature.
- Turn the light switch to off. The switch is located inside the case on the door mullion.
- Lock out and tag out the circuit breaker for the lighting circuit of the case where the LED light fixtures are being installed.
- If fluorescent lighting is present in the canopy or shelves; it should be removed.
- Remove and discard the lenses covering the fluorescent tubes.
- Remove the fluorescent tubes.
![]() WARNING — LOCK OUT / TAG OUT —
WARNING — LOCK OUT / TAG OUT —
To avoid serious injury or death from electrical shock, always disconnect the electrical power at the main disconnect when servicing or replacing any electrical component. This includes, but is not limited to, such items as doors, lights, fans, heaters, and thermostats.
Fluorescent Lamp Disposal: The United States Environmental Protection Agency has information regarding environmentally-safe fluorescent lamp waste management programs . Please visit the EPA website for more information
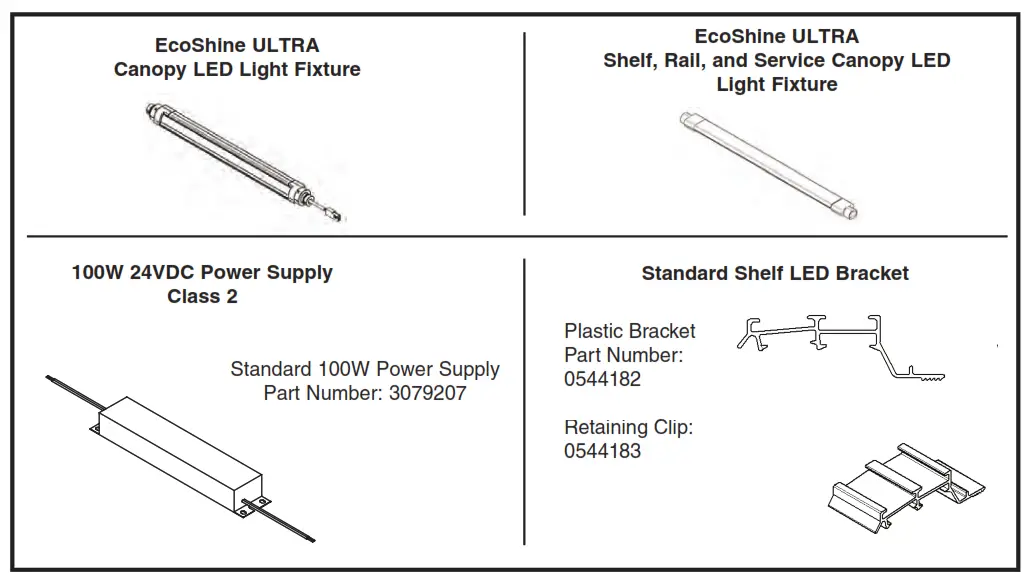
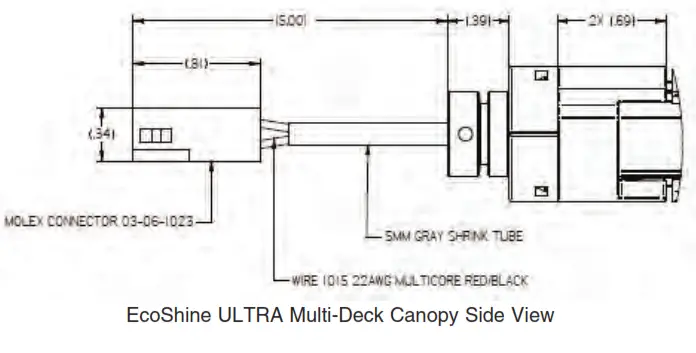
EcoShine ULTRA Canopy LED Lighting for Multi-Deck Merchandisers Factory Replacement and Upgrade Parts
| APPROVED SOURCE OF SUPPLY UNIVERSAL LIGHTING TECHNOLOGY | |||||||
| LINE | PART NUMBER | REVISION | DESCRIPTION | LENGTH | CCT | POWER NI | POSITION |
| 1 | 3089718 | B | LED-ES ULTRA CNPY 121N 3000K | 11. | 3000K | 5. | CANOPY |
| 2 | 3089719 | B | LED-ES ULTRA CNPY 181N 3000K | 17. | 3000K | 7.0 | CANOPY |
| 3 | 3089720 | B | LED-ES ULTRA CNPY 241N 3000K | 21. | 3000K | 87 | CANOPY |
| 4 | 3089721 | B | LED-ES ULTRA CNPY 361N 3000K | 34. | 3000K | 132 | CANOPY |
| 5 | 3089722 | B | LED-ES ULTRA CNPY 481N 3000K | 46. | 3000K | 17. | CANOPY |
| 6 | 3089723 | B | LED-ES ULTRA CNPY 601N 3000K | 59. | 3000K | 24. | CANOPY |
| 7 | 3089724 | B | LED-ES ULTRA CNPY 121N 3500K | 11. | 3500K | 5. | CANOPY |
| 8 | 3089725 | B | LED-ES ULTRA CNPY 181N 3500K | 17. | 3500K | 7.0 | CANOPY |
| 9 | 3089726 | B | LED-ES ULTRA CNPY 241N 3500K | 21. | 3500K | 9. | CANOPY |
| 10 | 3089727 | B | LED-ES ULTRA CNPY 361N 3500K | 34. | 3500K | 14. | CANOPY |
| II | 3089728 | B | LED-ES ULTRA CNPY 481N 3500K | 46. | 3500K | 17. | CANOPY |
| 12 | 3089729 | B | LED-ES ULTRA CNPY 601N 3500K | 59. | 3500K | 24. | CANOPY |
| 13 | 3089730 | B | LED-ES ULTRA CNPY 121N 4000K | 11. | 4000K | 5. | CANOPY |
| 14 | 3089731 | B | LED-ES ULTRA CNPY 181N 4000K | 17. | 4000K | 7.0 | CANOPY |
| 15 | 3089732 | B | LED-ES ULTRA CNPY 241N 4000K | 21. | 4000K | 9. | CANOPY |
| 16 | 3089733 | B | LED-ES ULTRA CNPY 361N 4000K | 34. | 4000K | 14. | CANOPY |
| 17 | 3089734 | B | LED-ES ULTRA CNPY 481N 4000K | 46. | 4000K | 17. | CANOPY |
| 18 | 3089735 | B | LED-ES ULTRA CNPY 601N 4000K | 59. | 4000K | 24. | CANOPY |
| 19 | 3089736 | B | LED-ES ULTRA CNPY 121N 5000K | 11. | 5000K | 5. | CANOPY |
| 20 | 3089737 | B | LED-ES ULTRA CNPY 181N 5000K | 17. | 5000K | 7.0 | CANOPY |
| 21 | 3089738 | B | LED-ES ULTRA CNPY 241N 5000K | 21. | 5000K | 9. | CANOPY |
| 22 | 3089739 | B | LED-ES ULTRA CNPY 361N 5000K | 34. | 5000K | 14. | CANOPY |
| 23 | 3089740 | B | LED-ES ULTRA CNPY 481N 5000K | 46. | 5000K | 17. | CANOPY |
| 24 | 3089741 | B | LED-ES ULTRA CNPY 601N 5000K | 59. | 5000K | 24. | CANOPY |
Part Numbers are subject to change.
Contact your Hussmann Rep. for replacement parts. EcoShine ULTRA Horizontal LED Lighting
- Shelf and Rail for Multi-Deck
- Shelf, Rail and Canopy for Specialty and Service.
Part Numbers are subject to change. Contact your Hussmann Rep. for replacement parts.
Factory Replacement and Upgrade Parts
| ITEM | PORT NUMBER | REV | TITLE | LENGTH | ICCD CORRELATED COLOR TEW | POWER (W) | POSITION |
| 1 | 3133172 | C | LED-ES ULTRA SHLF 12N 3000K | 11.330 in | 3000K | 1. | SWF |
| 2 | 3133173 | C | LED-ES ULTRA SWF 12143500K | 11.330 in | 3500K | 13 | SELF |
| 3 | 3133174 | C | LED-ES ULTRA SHY 12144000K | 11.330 in | 4000( | 13 | SELF |
| 4 | 3133175 | C | LED-ES ULTRA SWF 12145000K | 11.330 in | 5000( | 13 | SELF |
| 5 | 3133176 | C | LED-ES ULTRA 5111 18$1 3000K | 16936 in | 3000( | 21 | SELF |
| 6 | 3133177 | C | LED-ES ULTRA 9.1.F 1814 3500( | 16936 in | 3500K | 21 | SELF |
| 7 | 3133178 | C | LED-ES ULTRA 91..F 1881/21 4000K | 16936 in | 4000K | 21 | SELF |
| 8 | 3133179 | C | LED-ES ULTRA 91..F I8N 5000( | 16936 in | 5000E | 21 | SELF |
| 9 | 3133180 | C | LED-ES ULTRA SH.F 241N 3000K | 22470 in | 3000E | 29 | SELF |
| 10 | 3133181 | C | LED-ES ULTRA SH.F 24IN 3500K | 22470 in | 3500E | 29 | SELF |
| 11 | 3133182 | C | LED-ES ULTRA SH.F 24IN 4000K | 22470 in | 4000K | 29 | SELF |
| 12 | 3133183 | C | LED-ES ULTRA SH.F 24IN 5000K | 22470 in | 5000( | 29 | SELF |
| 13 | 3133184 | C | LED-ES ULTRA SH.F 36IN 3000K | 31609 in | 3000( | 5. | SELF |
| 14 | 3133185 | C | LED-ES ULTRA SWF 36IN 3500K | 31609 in | 3500K | 5. | SELF |
| 15 | 3133186 | C | LED-ES ULTRA SHY 36IN 4000K | 31609 in | 4000( | 5. | SELF |
| 16 | 3133187 | C | LED-ES ULTRA SELF 36IN 5000K | 31609 in | 5000( | 5. | SELF |
| 17 | 3133188 | C | LED-ES ULTRA SWF 36IN 3000K HO | 33.609 in | 3000( | 7. | SELF |
| 18 | 3133189 | C | LED-ES ULTRA SWF 36IN 3500K HO | 33.609 in | 3500K | 7. | SELF |
| 19 | 3133190 | C | LED-ES ULTRA SWF 36IN 4000K HO | 33.609 in | 4000K | 7. | SELF |
| 20 | 3133191 | C | LED-ES ULTRA SWF 36IN 5000K HO | 33.609 in | 5000E | 7. | SELF |
| 21 | 3133192 | C | LED-ES ULTRA 91..F 4811 3000K | 46.591 in | 3000E | 6. | SELF |
| 22 | 3133193 | C | LED-ES ULTRA SWF 48N 3500K | 46.591 in | 3500E | 6. | SELF |
| 23 | 3133194 | C | LED-ES ULTRA 91..F 413N 4000K | 46.591 in | 4000K | 62 | SELF |
| 24 | 3133195 | C | LED-ES ULTRA SWF 48N 5000K | 46.591 in | 5000K | 62 | SELF |
| 25 | 3133196 | C | LED-ES ULTRA SWF 4214 3000K HO | 46.591 in | 3000K | 9 | SELF |
| 26 | 3133197 | C | LED-ES ULTRA SWF 48N 3500K HO | 46.591 in | 3500K | 9 | SHELF |
| 27 | 3133198 | C | LED-ES ULTRA SWF 48144000K HO | 46.591 in | 4000K | 9 | SHELF |
| 28 | 3133318 | C | LED-ES ULTRA 9.1.F 48145000K HO | 46.591 in | 5000K | 9 | SHELF |
| 29 | 3133319 | C | LED-ES ULTRA 9.1.F 57143000K | 55.591 in | 3000K | 7. | SHELF |
| 30 | 3133320 | C | LED-ES ULTRA 9.1.F 57143500K | 55.591 in | 3500K | 7. | SHELF |
| 31 | 3133321 | C | LED-ES ULTRA SHY 57N 4000K | 55.591 in | 4000K | 7:01 | SHELF |
| 32 | 3133322 | C | LED-ES ULTRA SWF 57145000K | 55.591 in | 5000K | 7. | SHELF |
| 33 | 3133323 | C | LED-ES ULTRA SWF 60114 3000K | 57.730 in | 3000K | 7. | SHELF |
| 34 | 3133324 | C | LED-ES ULTRA Sill 601N 3500K | 57.730 in | 3500K | 7A | SHELF |
| 35 | 3133325 | C | LED-ES ULTRA SELF 601N 4000K | 57.730 in | 4000K | 7A | SHELF |
| 36 | 3133326 | C | LED-ES ULTRA SELF 601N 5000K | 57.730 in | 5000K | 7A | SHELF |
| 37 | 3133327 | C | LED-ES ULTRA SWF 72N 3000K | 68870 in | 3000K | 9 | SHELF |
| 38 | 3133329 | C | LED-ES ULTRA SWF 72N 3500K | 68870 in | 3500K | 9 | SHELF |
| 39 | 3133330 | C | LED-ES ULTRA SWF 72144000K | 68870 in | 4000K | 9 | SHELF |
| 40 | 3133331 | C | LED-ES ULTRA 9.1.F 72145000K | 68870 in | 5000K | 9 | SHELF |
| 41 | 3133332 | C | LED-ES ULTRA SELF 75143000K | 73591 in | 3000K | 98 | SHELF |
| 42 | 3133333 | C | LED-ES ULTRA SELF 75143500K | 73591 in | 3500K | 10. | SHELF |
| 43 | 3133334 | C | LED-ES ULTRA SHY 75N 4000K | 73591 in | 4000K | 98 | SHELF |
| 44 | 3133335 | C | LED-ES ULTRA SELF 75N 5000K | 73591 in | 5000K | 98 | SHELF |
PARTS IDENTIFICATION CHART
RECOMMENDED TOOLS anD SUPPLIES
 |  |
Fluorescent Equipment Removal
- Disconnect power to the merchanDiser.
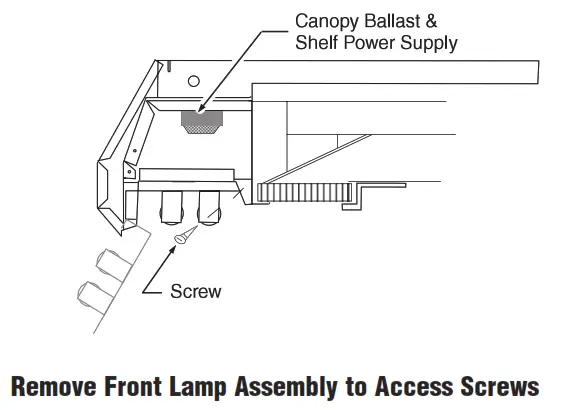
- LED power supplies are installed in the same location as the existing canopy and shelf ballast . These ballasts are located at the top of the merchandiser inside the canopy.
- Remove the screws that secure the lamp panel.

- Grasp the lamp panel at its front edge and carefully pull it down. It will swing freely from its hinged rear edge.
- Disconnect wires from the shelf and canopy ballasts. Note the color of the power source wires.

- Locate and remove the ballasts. Mount the LED power supplies in the canopy. The power supply has a 120V 50/60 Hz input and a 24VDCoutput.
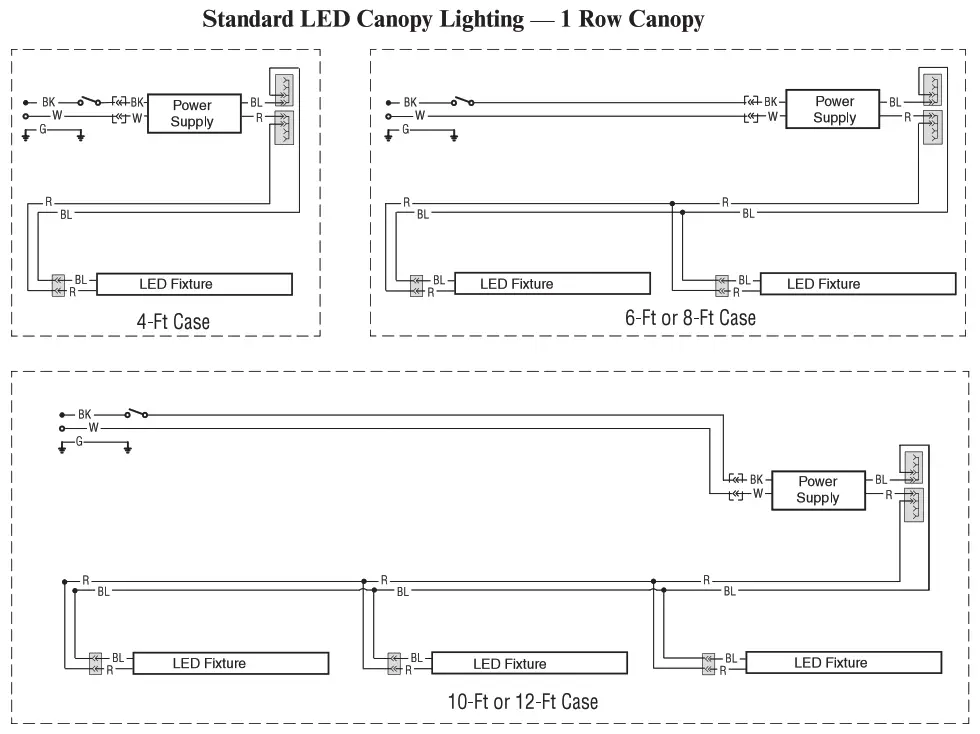
CONNECT WIRING TO POWER SUPPLY
- Tuck the wire leads from the LED fixture, into the canopy, and connect the leads to the power supply. Follow the wiring diagrams on the last two pages as a guide . Connect the original load and neutral wires to LED power supply input wires (black and white wires), and secure them with approved wiring connectors.
- Connect the LED power supply output wires (red and blue wires) to wiring leads .
- Additional wiring may be needed to connect the power supply to existing wiring in the wire way. Use conductors of propersize and rating.

- The power supply case is grounded. Attach the power supply to a ground point in the refrigerated merchandiser, either directly with a screw, or by using a green wire to attach to a remote ground point
Do NOT LEAVE ANY EXPOSED WIRE NUTS OR CONNECTORS. RETROFIT-LED FIXTURES HAVE LONG WIRING LEADS (2M). FISH NEW WIRING
THROUGH MULLION USING EXISTING BALLAST WIRING.

IMPORTANT Ensure that all connection points are sealed for a damp location using the appropriate method per the NEC or local electrical code.
![]() WARNING — LOCK OUT / TAG OUT —
WARNING — LOCK OUT / TAG OUT —
To avoid serious injury or death from electrical shock, always disconnect the electrical power at the main disconnect when servicing or replacing any electrical component. This includes, but is not limited to, such items as doors, lights, fans, heaters, and thermostats.
SHELF LIGHT INSTALLATION
- Remove all existing shelf lights and mounting clips.
- Use magnetic clips or shelf clips to affix the light bar to the underside of the shelf .
NOTE: One power supply can provide power for as many as 10 shelf lights . Rail lights are installed similarly. - Plug the quick-connect plugs into the shelf receptacles at the back of the merchandiser
- Use a tie wrap to contain any excess plug wire. Do not allow the wire to lie on the product or hang loose.
 |  |
NOTE: Free cord length from last clip (strain relief) to outlet must be less than 12 inches (305 mm) . Longer lengths must be constrained. Inspect all shelf lamp plugs and receptacles for arcing, corrosion or other damage. Replace as necessary . 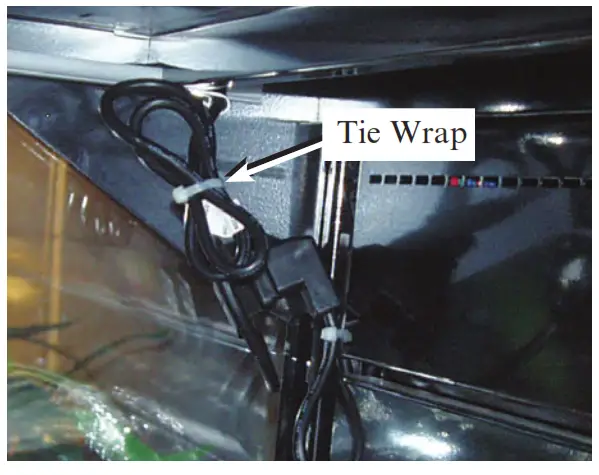
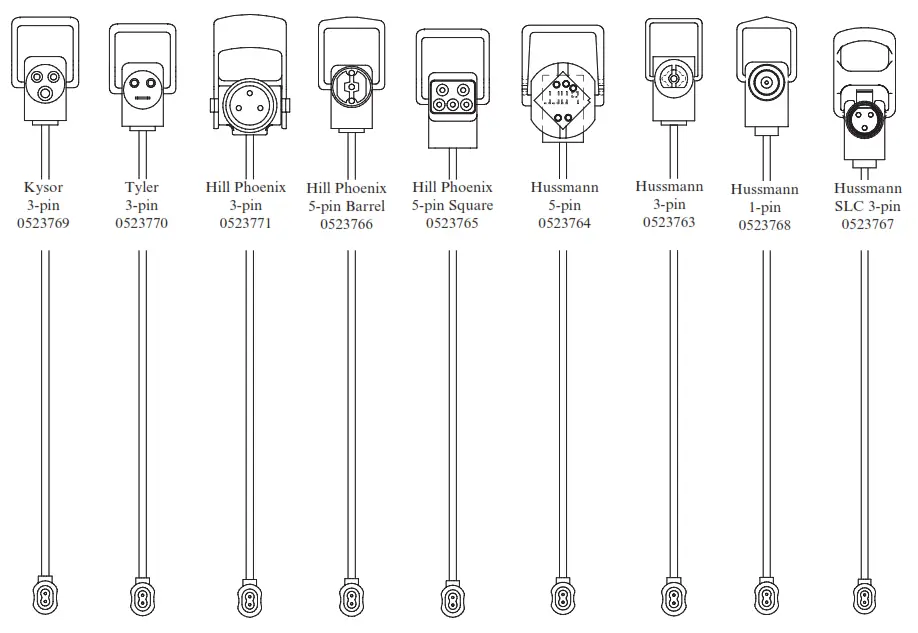
Common Shelf Plugs
Contact your Hussmann representative to order other custom plug types.
 |  |
WARNING
All components must have mechanical ground, and the merchandiser must be grounded.
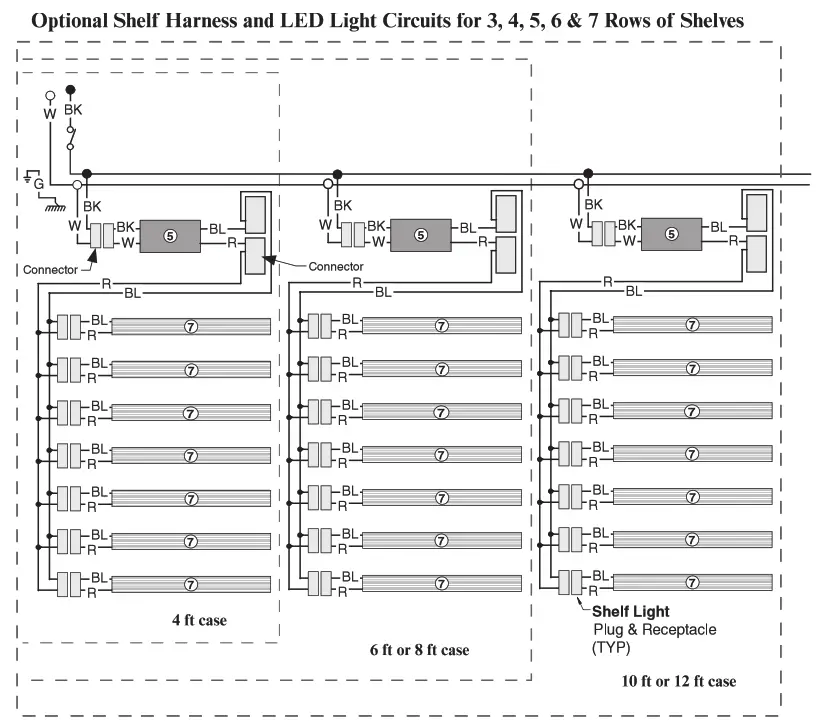
CIRCLED NUMBERS = Parts List Item NuMBERS
R = Red G = Green BL = Blue BK = Black W = White![]() = 120V Power
= 120V Power ![]() = 120V NEUTRAL
= 120V NEUTRAL ![]() = FIELD Group mm = Case GROUND
= FIELD Group mm = Case GROUND
CANOPY LIGHT INSTALLATION
- Turn off the power. Remove existing EcoShine II canopy lights (if applicable) .
- Route electrical wiring connections for the single-row canopy. The connection can be made at the power supply using a Molex connector or use approved wire connectors or heat shrink butt connectors.
- Attach the Canopy LEDs to the canopy using mounting clips and screws.
 EcoShine II and EcoShine ULTRA Canopy Standard Mounting Clip (Canopy for multi-deck)
NOTE: One power supply can provide power for as many as 3 canopy lights . - Restore power to the merchandiser. Verify proper orientation of all canopy light bars.


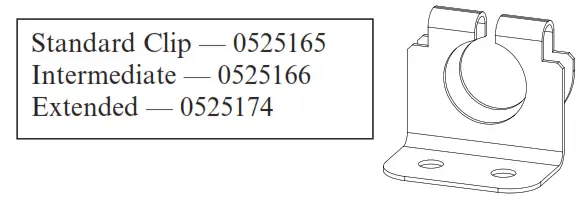 EcoShine II and EcoShine ULTRA Canopy Standard Mounting Clip (Canopy for multi-deck)
To obtain warranty information or other support, contact your Hussmann representative.
Please include the model and serial number of the product.
Hussmann Corporation, Corporate Headquarters: Bridgeton, Missouri, U.S.A.
IMPORTANT
KEEP IN STORE FOR FUTURE REFERENCE
Quality that sets industry standards!
12999 St . Charles Rock Road • Bridgeton, MO 63044-2483
U .S . & Canada 1-800-922-1919 • Mexico 01-800-890-2900
www.hussmann.com
© 2021 Hussmann Corporation
U.S. & Canada 1-800-922-1919 • Mexico 01-800-890-2900 • WWW.HUSSMANN.COM


