![]() USER MANUAL
USER MANUAL
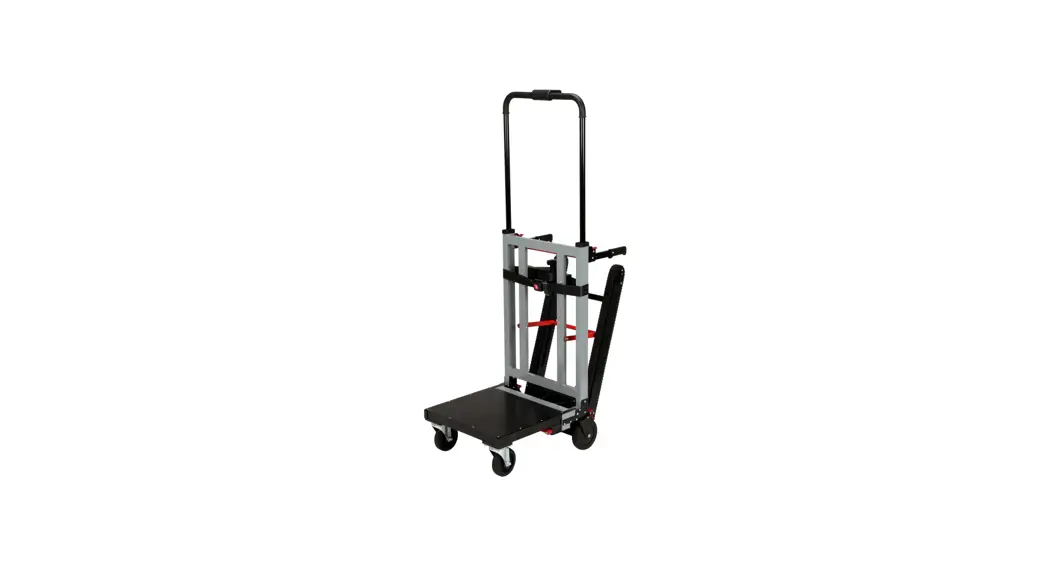
 UNIT DIAGRAM
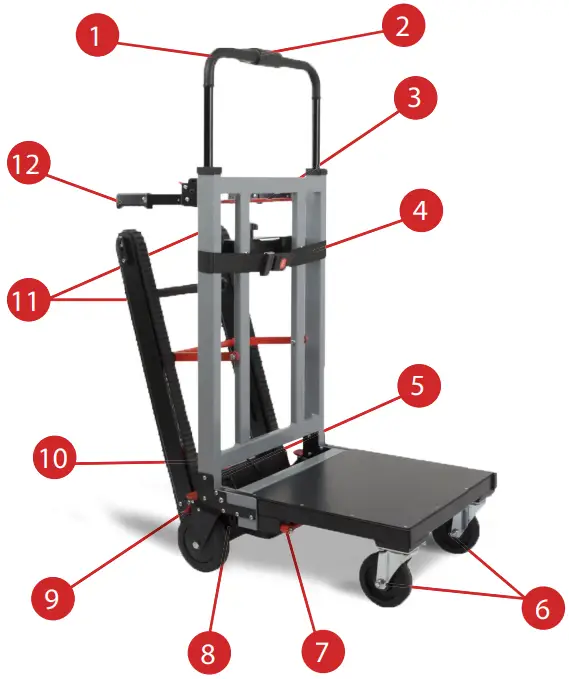
| 1 Main Handlebar 2 Control Panel 3 Handlebar Lock 4 Ratchet Strap | 5 Track Release 6 Front Wheels 7 Platform Lock 8 Motor Housing | 9 Brakes 10 Battery 11 Tracks 12 Back Handles |
COMPONENTS: A CLOSER LOOK
![]() Control Panel
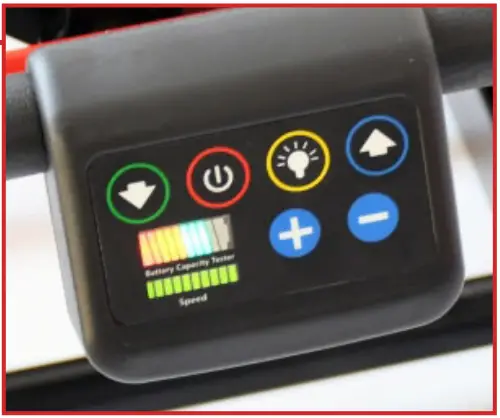
Control Panel
The control panel is located at the top of the main handlebar. The up and down buttons rotate the powered tracks to ascend or descend stairs and can be used with the plus and minus buttons to control the speed. There is also a digital battery power monitor on
the side of the control panel, as well as a utility light.
![]() Track Release
Track Release
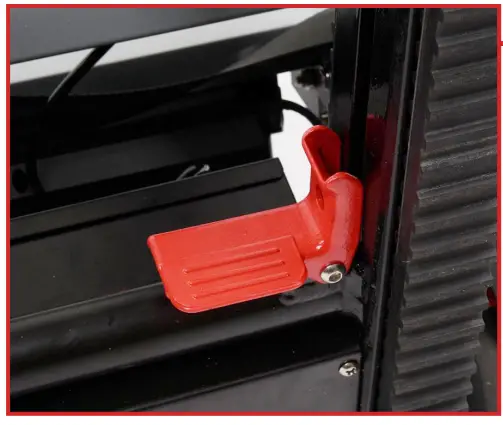
The Voltstair’s tracks must be extended in preparation for an ascent or descent.
The track release is located on the right side of the track housing when standing behind the unit. Simply step down on the flat part of the track release, or press down on it with your hand, and the compressed air pistons will automatically extend the tracks.
![]() Wheel Brakes
Wheel Brakes
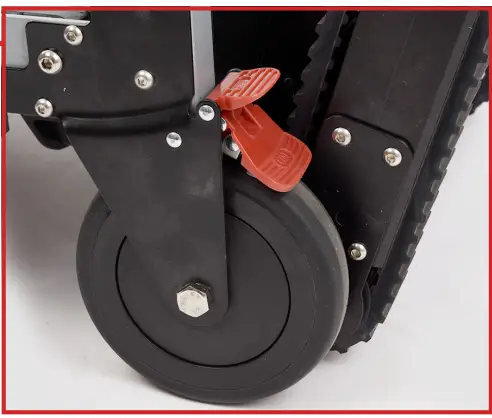
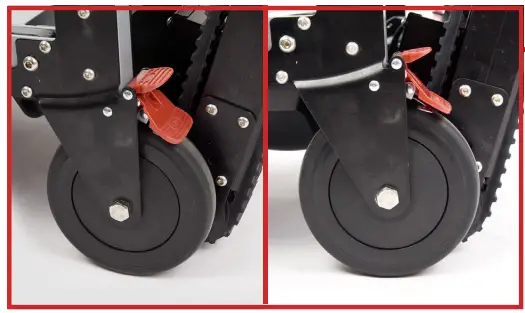
The wheel brakes should be engaged when preparing to ascend or descend a staircase with a load in the Voltstair.
Step down or use your hand to press on the lower red tab labeled “On” to engage the brakes. Step down or use your hand to press the top “Off” tab to disengage the brakes.
![]() Ratchet Strap
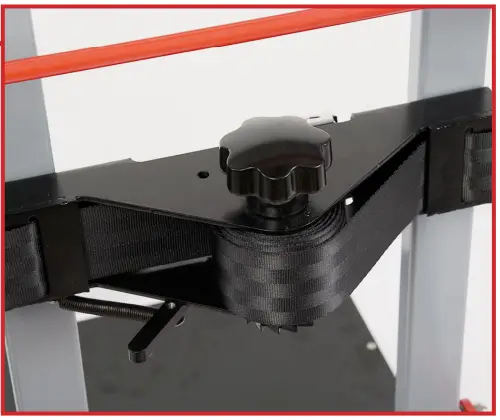
Ratchet Strap
The ratchet strap consists of a rotating ratchet attached to two straps, and male and female seatbelt components. It should always be used to secure loads placed on the Voltstair. Loosen the ratchet until the belts can be joined around the load, and then buckle the fastener and tighten the ratchet by rotating it clockwise until the load is secure.
![]() Handlebar Lock
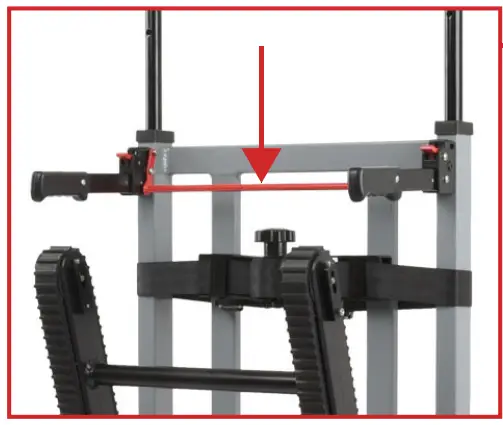
Handlebar Lock
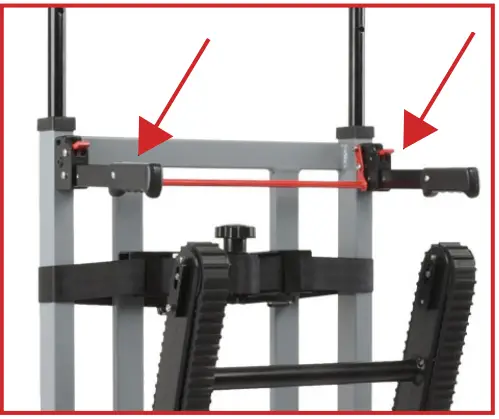
The Voltstair’s main handlebar must be extended in preparation for an ascent or descent. The handlebar lock is a long red bar located in between the back handles.
To to extend the main handlebar, press the red bar towards the front of the unit, and pull up on the handlebar until it locks into place. The handlebar should be raised as high as possible for leverage.
![]() Platform Lock
Platform Lock
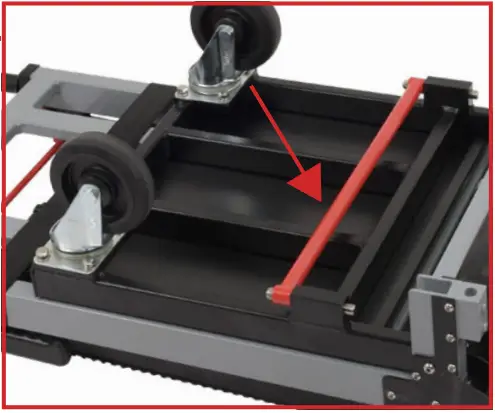
The Voltstair’s load platform can be folded for storage or transportation.
The platform lock is the red bar on the underside of the black platform, and must be pulled simultaneously on both sides towards the front of the unit to either release the platform or to lock it into place. Always ensure the platform is locked when moving cargo.
![]() Back Handles
Back Handles
The back handles are located just below the main handlebar housing. They can be extended and locked into place when transporting loads on flat ground for extended periods. To fold the handles back up, simply press the red tabs on the top of the handles, and press down until they are parallel with the main frame of the Voltstair.
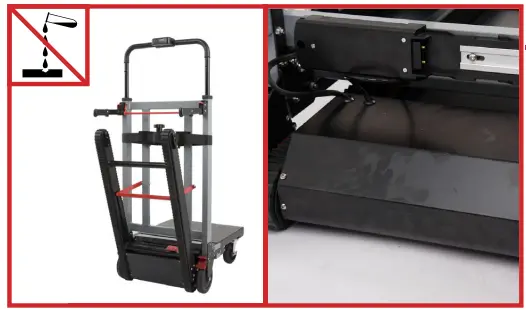
![]() Battery Housing
Battery Housing
The Voltstair’s battery is located beneath the platform, in front of the back wheels.
The battery can be removed from its housing for charging or replacement.
Simply use the key to unlock the battery, and slide it out sideways. Operators should always make sure the battery is locked and secure before ascending or descending a staircase.

![]() Bearing Bolts
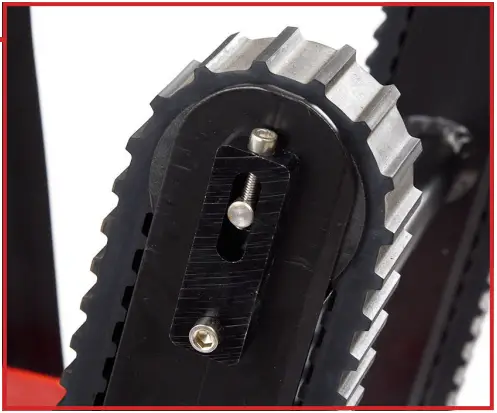
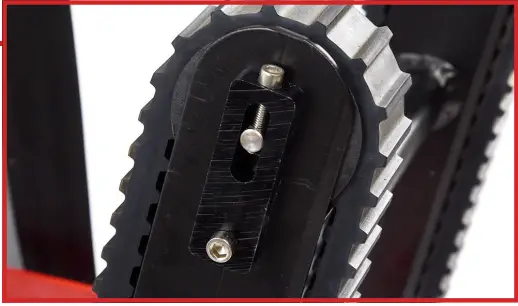
Bearing Bolts
The Voltstairs tracks should be checked periodically for tightness. If the tracks have too much slack, they should be tightened with the bearing bolts before moving cargo. The bolts are on both sides of each track tip. Rotate the top bolt counterclockwise to tighten the track until it cannot be easily pulled away from the housing.
SAFETY PRECAUTIONS
![]() Read this manual in its entirety before using the Voltstair, and maintain and operate it only as described herein.
Read this manual in its entirety before using the Voltstair, and maintain and operate it only as described herein.![]() After thoroughly studying the operating instructions, practice ascending and descending stairs without a load in the Voltstair.
After thoroughly studying the operating instructions, practice ascending and descending stairs without a load in the Voltstair.![]() DO NOT OPEN MOTOR. Contact Voltstair for service.
DO NOT OPEN MOTOR. Contact Voltstair for service.![]() Avoid getting dirt inside the tracks. The Voltstair should be regularly maintained and inspected for dirt and grime.
Avoid getting dirt inside the tracks. The Voltstair should be regularly maintained and inspected for dirt and grime.![]() Never lubricate the rubber tracks. The bearings must be lubricated regularly, but any lubricant that is left directly on the rubber tracks can result in injury.
Never lubricate the rubber tracks. The bearings must be lubricated regularly, but any lubricant that is left directly on the rubber tracks can result in injury.![]() To clean the Voltstair, wipe with a towel and clean water, or non-corrosive cleaning compounds. Dry after cleaning.
To clean the Voltstair, wipe with a towel and clean water, or non-corrosive cleaning compounds. Dry after cleaning.![]() Do not attach any additional items to the Voltstair.
Do not attach any additional items to the Voltstair.![]() Always make sure the extendable handlebar is locked into place before ascending or descending stairs.
Always make sure the extendable handlebar is locked into place before ascending or descending stairs.![]() Do not use 3rd party replacement parts. If replacement parts are needed, please contact Voltstair.
Do not use 3rd party replacement parts. If replacement parts are needed, please contact Voltstair.![]() Voltstair can be reached at (212)366-5483 or [email protected] for all questions regarding service, maintenance, and operation.
Voltstair can be reached at (212)366-5483 or [email protected] for all questions regarding service, maintenance, and operation.
Pre-Operation Checklist
![]() Brake Check
Brake Check
Check the tightness of the track by pulling in the middle of the track to ensure that it is not loose.
If the track is able to be pulled more than an inch from where it begins, use a hex screwdriver to tighten the screw at the top of the track housing, which will pull the track bearing up.
![]() Track Tension
Track Tension
The back brakes should be periodically checked.
Engage each brake by pressing down on the “ON” tab, and trying to move the voltstair. Please note,
that without a load, the wheel may slide on a smooth surface, but as long as the wheels do not turn, the brakes are functioning properly.
![]() Clean Unit
Clean Unit
The motor surface and rubber tracks should be checked for dirt, grime, and lubricant. To clean these components, wipe with a semi-damp cloth, and thoroughly dry before use. Any corrosive cleaning agents should not be used, as they could damage the Voltstair and lead to injury.
Load Balance
When transporting an item with a skewed center of balance, or multiple items at once, make sure that the heaviest part of the load is closest to the upright component of the Voltstair. Additionally, always make sure that the ratchet is secure before attempting to move cargo.

ASCENDING A STAIRCASE
STEP 1
Move the load onto the voltstair, and push it back until it is sitting against the upright component of the unit.
STEP 2
Secure the load with the straps and buckle, and tighten the straps by rotating the ratchet.
STEP 3
Back the Voltstair up to the bottom stair, and stop when the tracks are approximately 10” from the bottom stair, and lock the rear wheels by stepping on the red “on” lever.
STEP 4
Step down on the track release lever next to the right track. Once unlocked, Press the tracks towards you, and the compressed air pistons will extend the tracks.
STEP 5
Press the red handlebar lever forward, while pulling up on the extendable top handlebar to extend it and lock it into place.
STEP 6
Lean the handlebar backward until the tracks are resting on the staircase. STEP 7
When you are ready to begin your ascent, press the up button, and pull the handlebar towards the stairs and begin to walk backwards.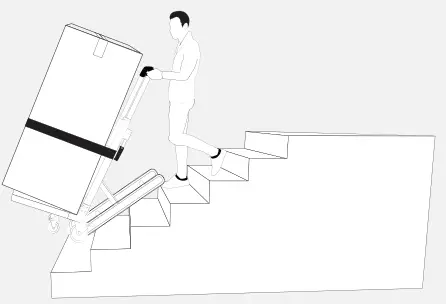 STEP 8
When you reach the top landing of the stairs, continue moving the voltstair well onto the platform while balancing the unit in a tilted position, until the front wheels have completely cleared the edge of the top step and are above the landing.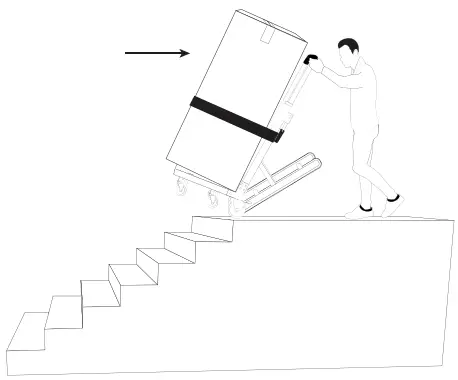 STEP 9
When the front wheels have cleared the edge of the landing, tilt the Voltstair into the upright position, unlock the wheels, and roll the Voltstair to the desired location. 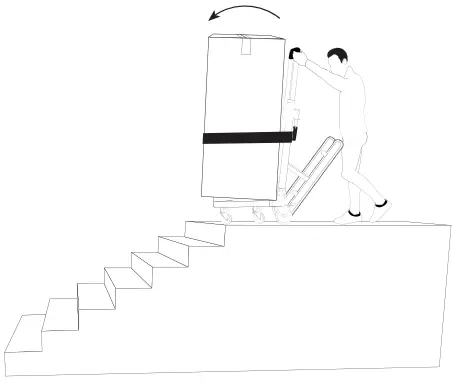
DESCENDING A STAIRCASE
STEP 1
Move the load onto the voltstair, and push it back until it is sitting against the upright component of the unit.
STEP 2
Secure the load with the straps and buckle, and tighten the straps by rotating the ratchet.
STEP 3
Roll the Voltstair towards the stairs with the load facing the stairs, stopping when the front wheels are at least 5” from the edge of the top step.
STEP 4
Step down on the track release lever next to the right track. Once unlocked, Press the tracks towards you, and the compressed air pistons will extend the tracks.
STEP 5
Press the red handlebar lever forward, while pulling up on the extendable top handlebar to extend it and lock it into place.
STEP 6
Tilt the Voltstair back to rest on the bottoms of the tracks, and then lean the unit back until the tracks are at the approximate angle of the stairs you are preparing to descend.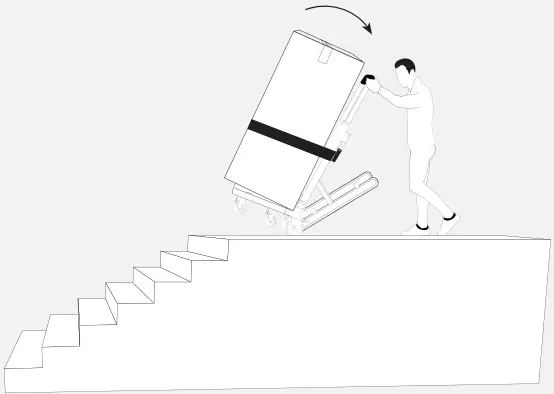
STEP 7
When you are ready to begin your descent, press the down button, and begin to walk the tilted Voltstair down the stairs until the tracks are making full contact with the stairs.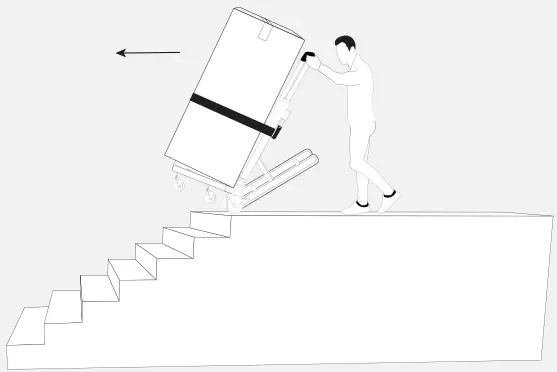
STEP 8
Continue pressing the down button as you walk behind the Voltstair and press the handlebar towards the stairs. 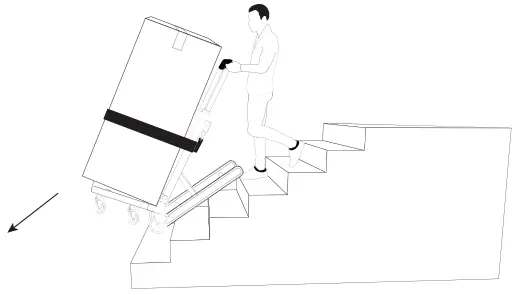
STEP 9
When you reach the bottom of the stairs, tilt the Volstair forward onto its bottom aground wheels, and roll it to the desired destination.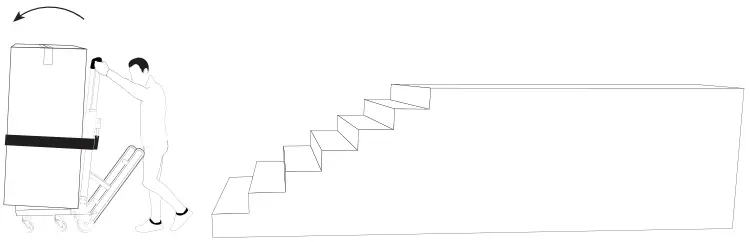
VOLTSTAIR SERVICE
Included with Warranty and Beyond
In order to maximize the Voltstair’s service life, and to prevent operator injury, it is important to make sure that it is regularly inspected, maintained and cleaned.
In general, keep the unit as clean as possible by wiping as needed with a damp towel. Avoid excessive amounts of water when cleaning, and make sure to thoroughly dry before use.
When the unit is stored, it should be in a dry place, and ideally under a dust cover to prevent dirt and grime from entering the its inner workings. Do not store the Voltstair outdoors.
We offer professional service both under the two year warranty, and once the warranty expires for a fee. For service requests, please call (212)366-5483 or email [email protected]
Thank you for purchasing the Voltstair! We hope that our product helps you succeed in your industry.
Sincerely, The Voltstair Team
Product Specifications
Width 20 in Min Height 42.5 in Min Depth 14 in Max Height 64.5 in Max Depth 35 in Platform Req. 48 in x 48 in Front Wheels 4 in Diameter Back Wheels 6 in Diameter | Type Lithium Voltage 24V Charge Time 3-5 Hours Distance/Life 80-100 Flights (on a full charge) |
Net Weight 67 lbs Gross Weight 100 lbs Capacity 440 lbs | Slow Speed 24 Steps/Min Med Speed 30 Steps/Min High Speed 40 Steps/Min Noise 85 Dbs Brake System Rear Clamp |
Questions?
Call (212) 366-5483 or email us at [email protected]
![]()
Climbs 100+ flights on a single charge | Folds down for storage or transportation | Rubber tracks function on cement, wood, metal |
 https://qrco.de/bbbByt
See How it Works!
Scan this code with a smartphone camera, or visit
Voltstair.com/pages/how-it-works
www.voltstair.com


