Kustom 006-0040-10 18″ Inch Display with Slow Down

18″ Inch Display with Slow Down
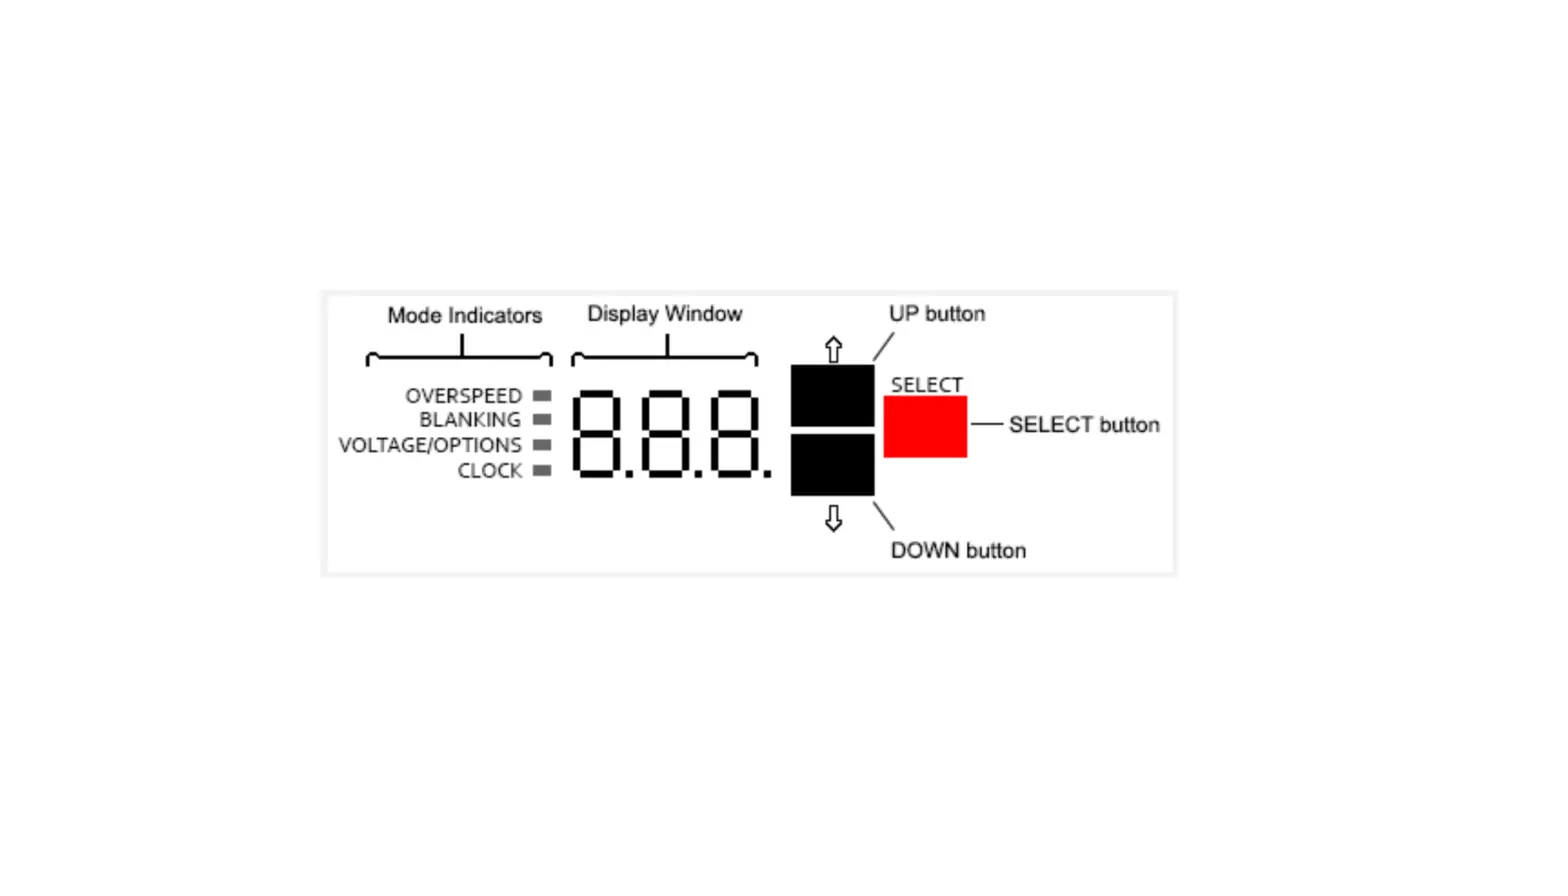
 | UP and DOWN User Interface Buttons: Used to move between menus and to increase/decrease values. |
 | SELECT User Interface Button: Used to select menus and to set values. |
| OVERSPEED | OVERSPEED Indicator: Illuminated whenever a target speed is greater than or equal to any of the overspeed settings. Blinks when in overspeed changing mode. |
| BLANKING Mode Indicator | BLANKING Indicator: Illuminated whenever a target speed is greater than or equal to the high blanking speed setting or lower than or equal to the low blanking speed setting. Blinks when in blanking speed changing mode. |
| VOLTAGE | VOLTAGE LEVEL/Options Indicator: Illuminated when the system voltage is being displayed. Blinks when in system menu or changing options settings. |
| CLOCK Indicator | CLOCK Indicator: Displays the current date and time of the sign. Blinks when changing date and time values. |
 | Display Window: Displays the current target speeds. Also used to view and change the system settings. The rightmost LED is the Power LED which should constantly blink to indicate the system is running. “nc” indicates the communication to the radar has been lost. |
Changing Settings
| OVERSPEED 1 (Flashing Digits/SLOW DOWN) SETTING | To change the Overspeed1 setting, using user interface buttons:
|
| OVERSPEED 2 (Lightbar Strobes) SETTING | To change the Overspeed2 setting, using user interface buttons:
|
| OVERSPEED 3 (White Photo Strobe) SETTING | To change the Overspeed3 setting, using user interface buttons:
|
| BLANKING SPEED HI SETTING | To change the Blanking Speed HIGH setting, using user interface buttons:
|
| BLANKING SPEED LO casc | To change the Blanking Speed LOW setting, using user interface buttons:
|
| DEMO MODE | To engage the demonstration mode, using user interface buttons:
|
| STEALTH MODE | To engage the stealth mode, using user interface buttons:
|
| SPEED CONTROLLED FLASH | To engage the speed controlled flash mode, using user interface buttons:
|
| EXTERNAL STROBES ENABL | To engage the external strobes enable mode, using user interface buttons:
|
| WHITE STROBES ENABLE (if enabled) | To engage the white strobes enable mode, using user interface buttons:
|
| SLOW DOWN ENABLE | To engage the SLOW DOWN enable mode, using user interface buttons:
|
| GPS ENABLE (if enabled) | To engage the GPS mode, using user interface buttons:
|
| SETTING THE DATE/TIME | WARNING: If you have a Traffic Computer installed, please make sure the power (tc) is OFF and reboot the sign before changing the time or date. This will avoid corrupting data in an active traffic study. To change the date and/or time, using user interface buttons:
|
| TRAFFIC COUNTER POWER (if enabled) | To engage the traffic counter enable mode, using user interface buttons:
|
| TRAFFIC COUNTER SCHEDULER ENABLE (if enabled) | To engage the traffic counter scheduler enable mode, using user interface buttons:
|
| STARTING A STUDY (if enabled) | To start a new traffic study:
|
| STOPPING A STUDY (if enabled) | To stop a currently running traffic study:
|
p/n 006-0040-10 Rev 0


