HIDE SKIMMER LID or ACCESS COVER KIT - CONCRETE COLLAR Instructions

1 ESTABLISH THE FINISHED HEIGHT
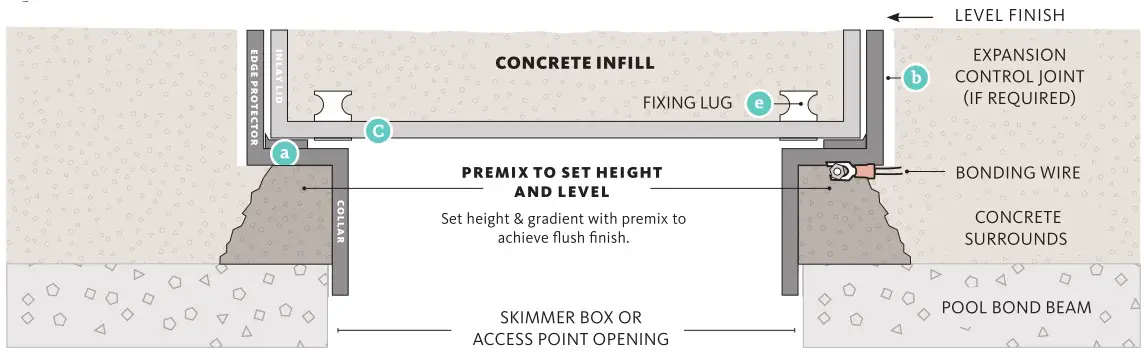
Calculate the height and level required so the top rim of the installed Edge Protector (a) will achieve a flush finish with the surrounding surface.
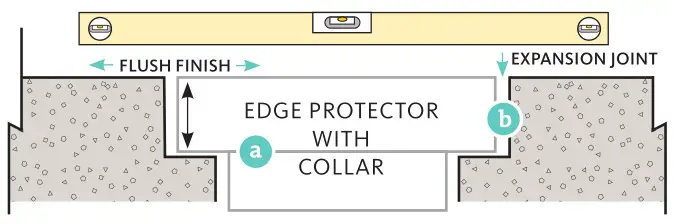
2 ALLOW FOR SLAB MOVEMENT
The Edge Protector (a) will remain in position during the slab pour, being part of the form work around the skimmer lid / Access opening. A clearance/expansion joint (b) may be necessary to allow for slab movement.
To assist concrete cure and stop the concrete inlay cracking, keep the lid wet with water for 2-3 days after pour.
3 EARTHING (BONDING) RULES AND REGULATIONS MAY APPLY IN A POOL AREA
![]() Bonding is the responsibility of the installer, attachment points have been provided to allow for use of bonding devices if required. Check your local regulations to ensure the installation meets electrical safety requirements.
Bonding is the responsibility of the installer, attachment points have been provided to allow for use of bonding devices if required. Check your local regulations to ensure the installation meets electrical safety requirements.
HIDE products are constructed from 316L marine grade stainless steel, and are considered a conductive material.
Safety regulations vary and you should consult your local authority to determine what rules may apply in your area.
4 PREP THE INLAY LID
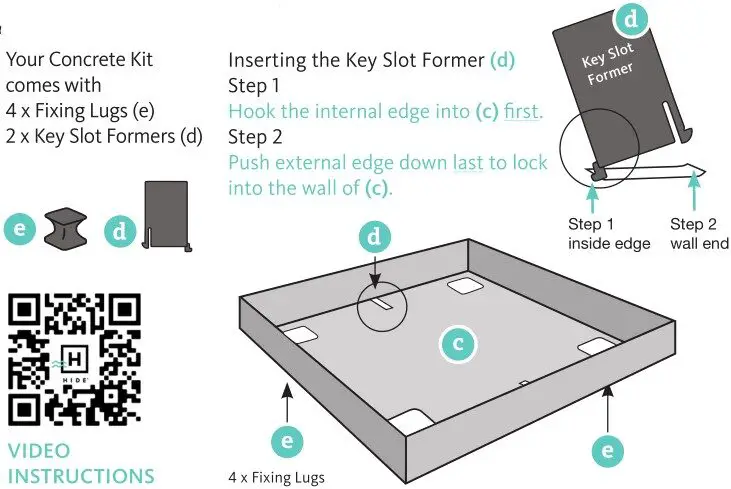
Set the Inlay Lid (c) face-up on a flat work surface away from the main slab pour area. To achieve a seamless finish, the Inlay Lid should be filled with the same concrete mix poured directly around the skimmer box.
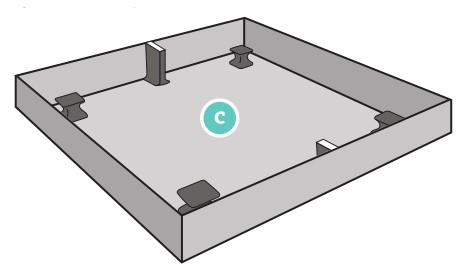
When filling the Inlay Lid (c), place on a flat surface and be sure to allow for any finishing procedure that may change the surface height of the set concrete.
Applying a petroleum-based or non-stick coating to the outside of the Inlay Lid will assist during the final clean-up.
5 CLEAN SURFACES

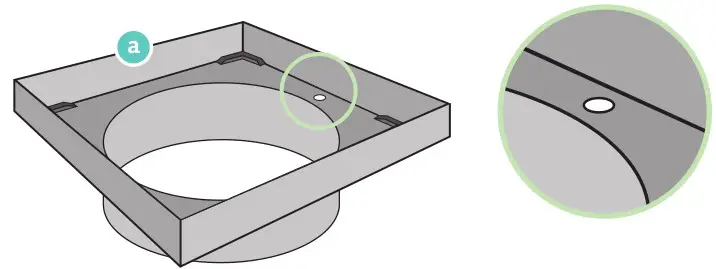
As soon as possible, clean any concrete residue from the exposed parts of the Edge Protector (a) and Inlay Lid (c).
![]() WARNING! DO NOT ALLOW ACID OR CHEMICAL WASH SOLUTIONS TO CONTACT THE HIDE PRODUCT.
WARNING! DO NOT ALLOW ACID OR CHEMICAL WASH SOLUTIONS TO CONTACT THE HIDE PRODUCT.
If washing with acid/chemicals, take protective measures to ensure minimal contact with the stainless steel HIDE components. Before use of acid/chemical wash, apply a water-resistant lubricant to the HIDE parts. When finished, immediately clean the HIDE components thoroughly to remove residual acid/chemicals.
6 COMPLETED INSTALL (CROSS SECTION VIEW)
OPERATION OF THE CONCRETE INLAY LID
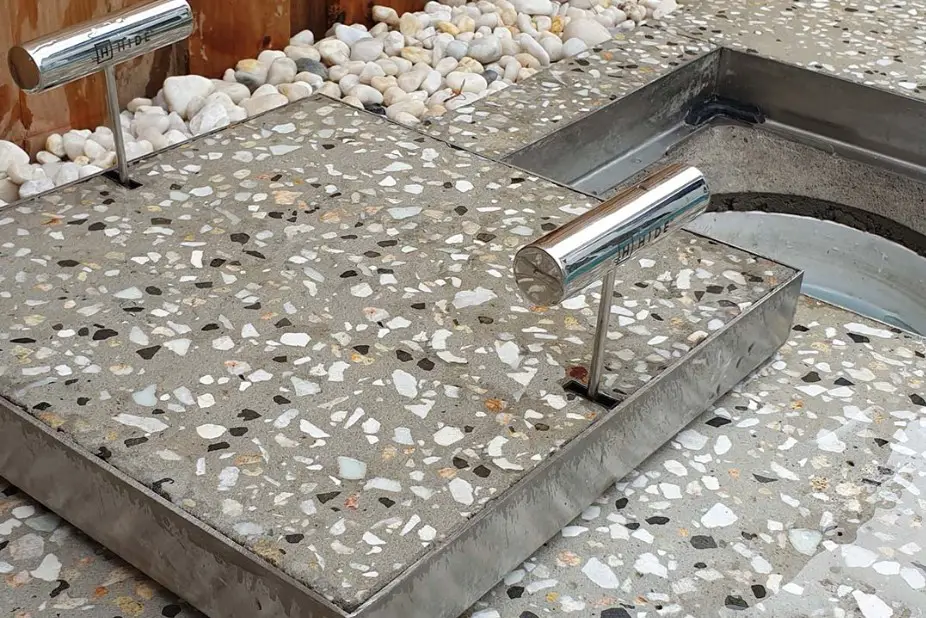
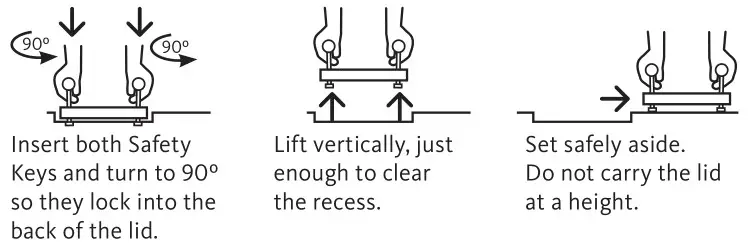
Operation requires a two handed vertical lift by AN ADULT ONLY. Support your back and do not lift a weight beyond your limits. Ensure Safety Keys remain in the locked position at all times. Keep feet away from the lid and recess frame at all times.
OPENING THE DOUBLE KEYWAY HIDE LID
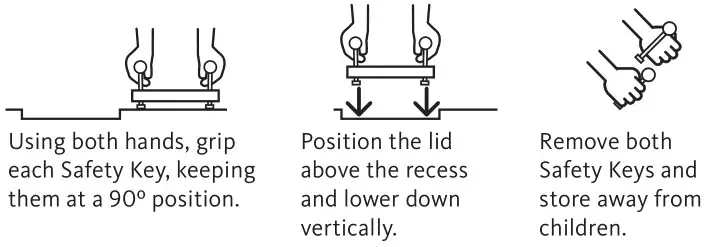
CLOSING THE DOUBLE KEYWAY HIDE LID
NOTE – INSTALLATION IS ONLY COMPLETE WHEN:
REMOVE SAFETY KEY FROM LID
NEVER leave the QUAD Safety Key in the lid for any reason, especially after install. Leaving the Safety Key in an installed lid exposes a contractor to possible legal ramifications if a resulting accident or injury occurs.
PASS TO THE HOMEOWNER
 PASS the Safety Key to the homeowner for secure storage. The “Home Owners Manual” packet should also be given to the homeowner.
!!SAFETY FIRST!!
REMOVE KEY FROM COVER

NEVER leave the HIDE Safety Key in the cover for any reason, especially after install.
Leaving the Safety Key in the top of an installed cover may be dangerous, as it enables children to access the Skimmer.
SAFE WORK PRACTICES

ALWAYS be conscious of your and co-workers’ safety while assembling and installing the HIDE components.
Personal protective equipment (PPE) must be worn, especially when cutting tiles and using adhesive.
Recommended PPE includes eye and ear protection, gloves, dust mask and safety boots.
NO ACID / CHEMICAL WASH CONTACT
![]()
ACID and chemical washes will cause discoloration and/ or rusting on the stainless steel HIDE components. Acid or chemical contact will void the HIDE warranty.
PASS KEY TO HOMEOWNER

DO NOT RISK IT – HIDE recommends that once the cover is installed, the Safety Key is passed to the homeowner and is stored securely.
CONCRETE WET-POUR
SKIMMER BOX COVERS
ACCESS COVERS

DRAIN COVERS
![]()
AUSTRALIA
P: 0427 270 560
M: +61 438 075 641
E: [email protected]
W: www.skimmerlids.com.au
UNITED STATES
P: 1844 500 HIDE (1844 500 4433) toll free
M: +61 438 075 641
E: [email protected]
W: www.skimmercovers.com
PROUDLY MANUFACTURED BY:
![]()
![]() @hideskimmerlids
@hideskimmerlids
![]() Patents: AUST, UK, NZ available: www.skimmerlids.com.au
Patents: AUST, UK, NZ available: www.skimmerlids.com.au
USA/Canada: www.skimmercovers.com (under technical)


