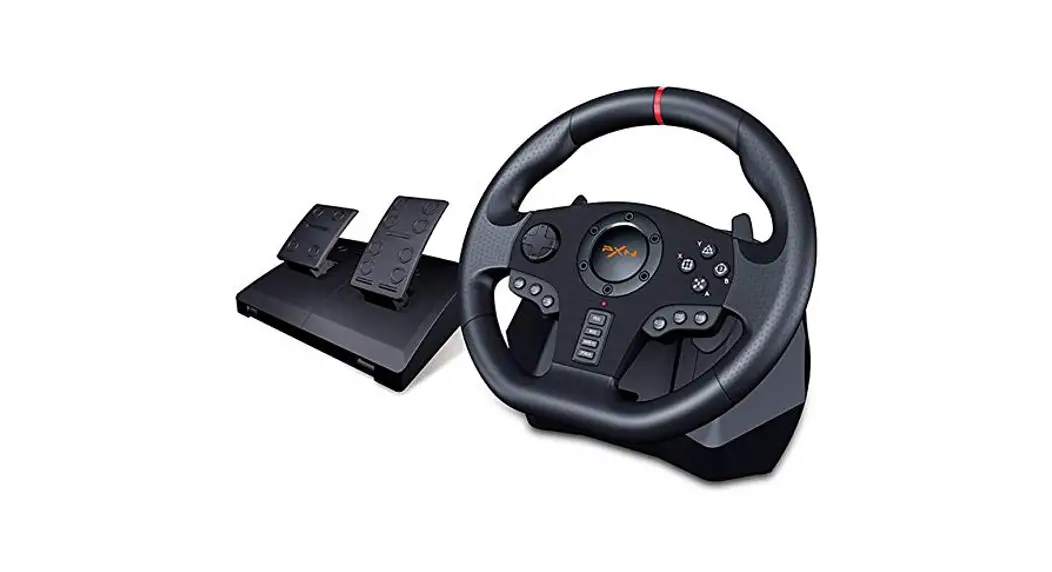
![]() V900 Gaming Steering Racing Wheel
V900 Gaming Steering Racing Wheel
User Manual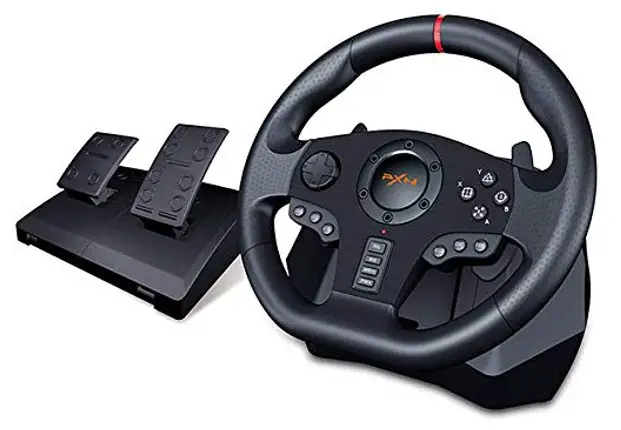
V900 Gaming Steering Racing Wheel
Thank you for choosing PXN’s product and supporting brand. Please read the manual carefully before using.
Product Features
- Compatible with PC / PS3 / PS4 / XBOX ONE / XBOX SERIES X&S / SWITCH.
- Intelligent dual-core for two modes of X-input and D-input in PC.
- Buttons are programmable according to your habits.
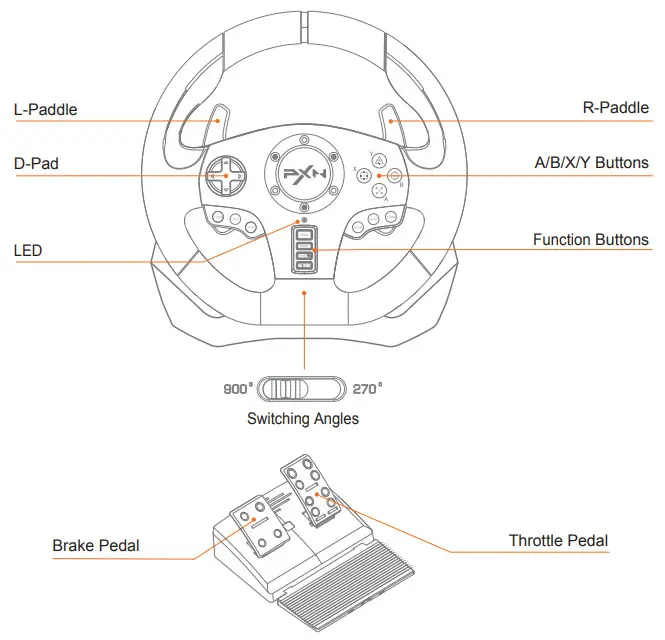
- Switch between 270° and 900° rotation output.
- Support audio communication function at PS4/XBOX ONE / XBOX SERIES X&S.
- Built-in double vibration motors, bring you realistic gaming experience.
- Racing Wheel with ergonomic structure design.
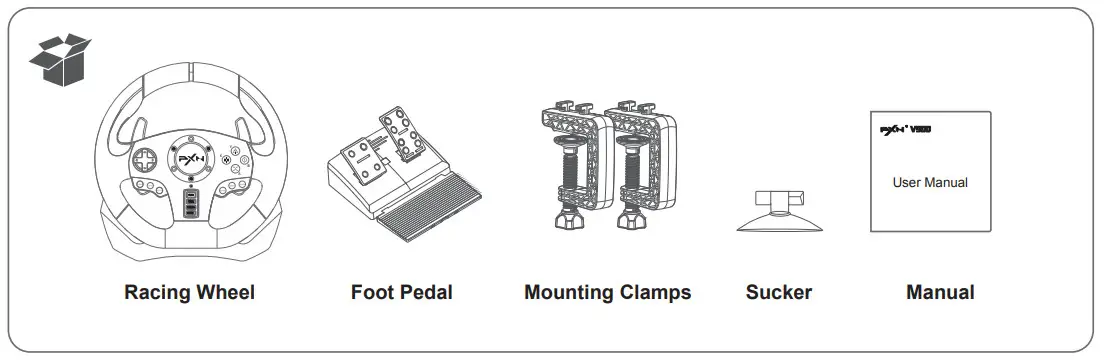
What’s in the box
System Requirements
Support Platform: PC, PS3, PS4, XBOX ONE, XBOX SERIES X&S, SWITCH PC System: Windows 7 / 8 / 10 / 11
Installation
Mounting clamps
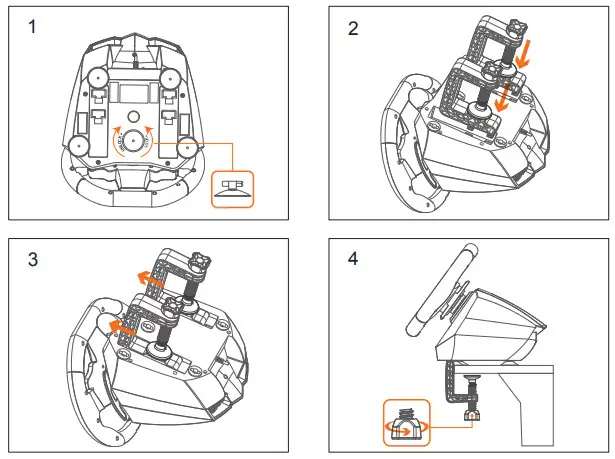 Racing Wheel is equipped with a clamping system for mounting to a table.
Step 1 Match the sucker with racing wheel, and then rotate to lock.
Step 2 Rotate clamp knobs to loosen clamps.
Step 3 Match the clamps with Racing Wheel.
Step 4 Mounting the Racing Wheel to a table and then rotate clamp knobs to tighten clamps.
Using for PC
Step 1 Switch MODE between X-input and D-input. Step 2 Racing Wheel is default to X-input mode when connecting computer, and red LED keeps lighting on.
X-input mode
X-input MODE is compatible with Games for windows, Plug and play.
Recommended Games: “Need for Speed 13” above version, “Dirty2/3/4”, “Ridge Racer” and so on.
D-input mode
D-input MODE is compatible with early PC racing games.
Recommended Games: “Need for Speed 1-12” , “Euro Truck Simulator” and so on. 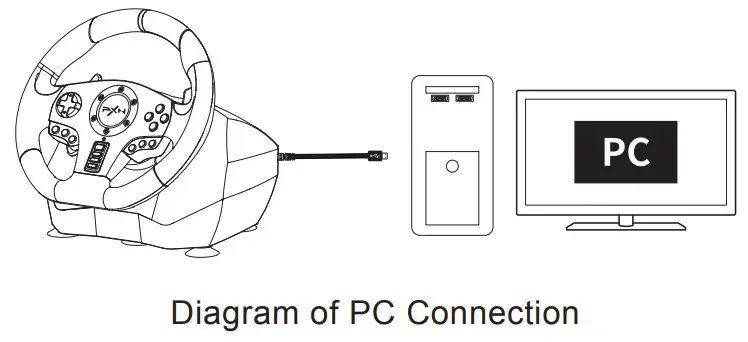
Using for PS3 Console
Step 1 Connect the Racing Wheel to the USB port of the PS3.
Step 2 When the Red LED light keeps on. it can start to play game or set functionson PS3.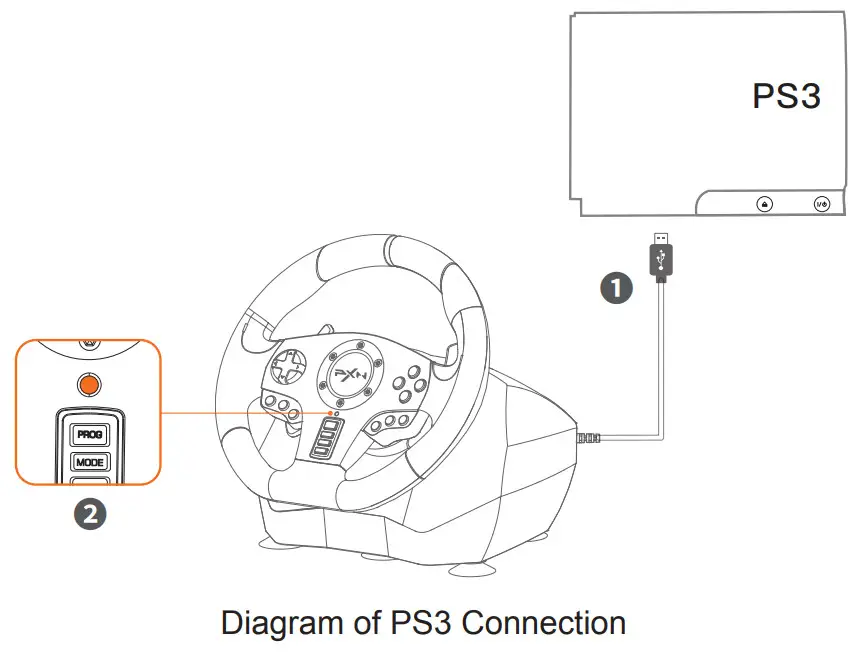
Using for PS4 Console
Step 1 Power off the original controller of PS4.
Step 2 Connect the Racing Wheel with PS4 controller by Micro USB cable.
Step 3 Plug the USB of Racing Wheel into PS4 USB interface.
Step 4 Press the button of “MODE”. After that the Racing Wheel can start to play game and setting.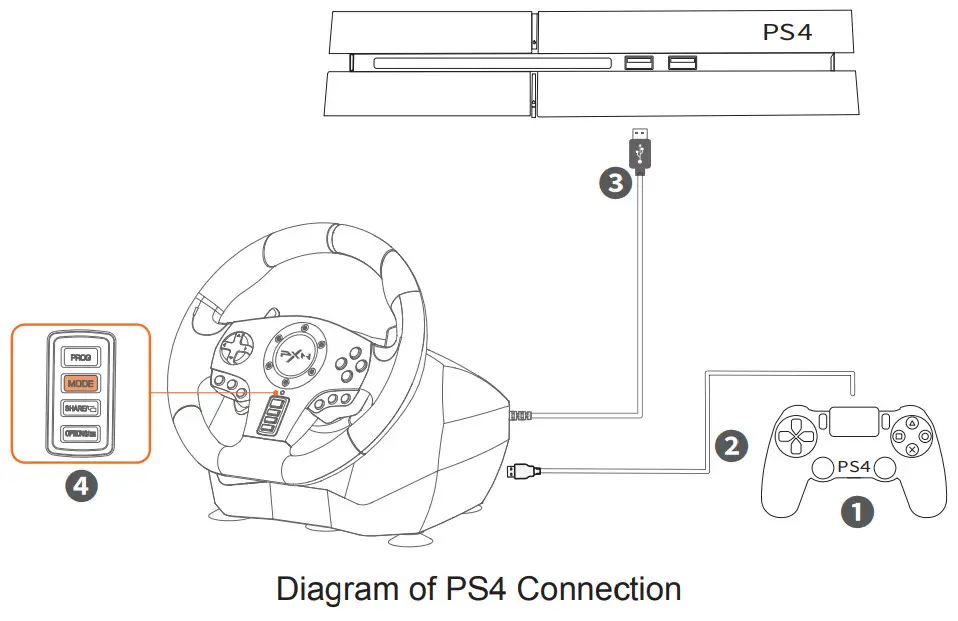
Using for XBOX ONE / XBOX SERIES X&S Console
Step 1 Power off the original controller of XBOX ONE / XBOX SERIES X&S.
Step 2 Connect the Racing Wheel with console controller by Micro USB cable.
Step 3 Plug the USB of Racing Wheel into console USB interface.
Step 4 Press the button of “MODE”. After that the Racing Wheel can start to play game and setting.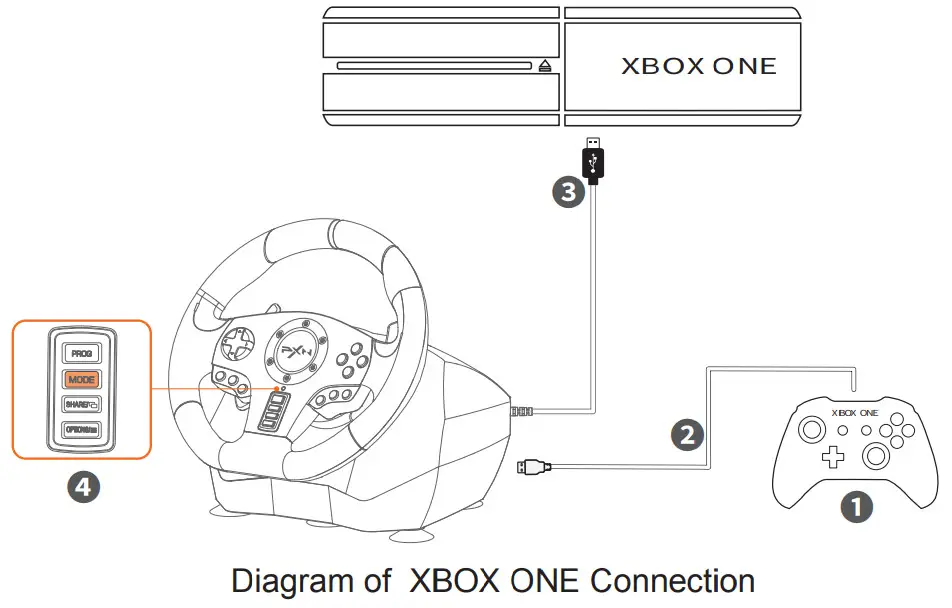
Using for Nintendo Switch
* Enter homepage of SWITCH, select ![]() Setting → Controllers and Sensors → select Pro Controller Wired Connection. Please make sure that the option state is ON.
Setting → Controllers and Sensors → select Pro Controller Wired Connection. Please make sure that the option state is ON.
Connect With Switch Console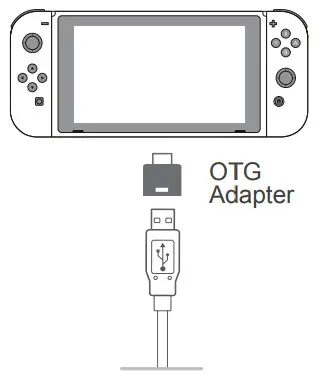 Step 1 Connect the TYPE-C OTG with the USB of Racing Wheel.
Step 2 Connect the USB main cable of the Racing Wheel to Switch Console.
Step 3 Power on switch console to play.
Connect With Switch dock
Step 1 Place the Switch dock and ensure successful connection.
Step 2 Plug the USB of Racing Wheel into Switch dock and power on Switch console.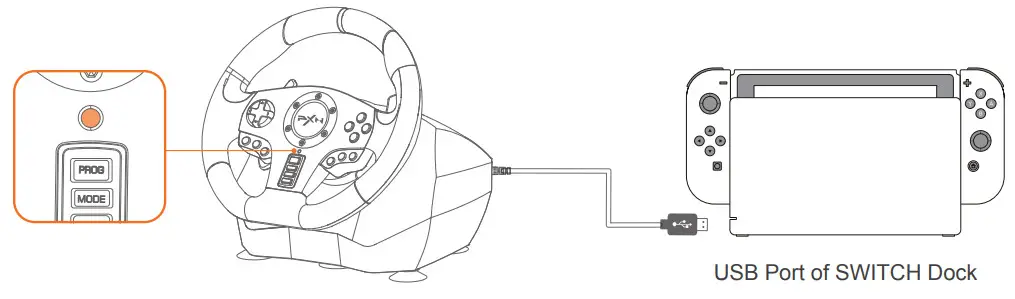
Sensitivity Setting
High sensitivity:
Press the “PROG” Button, the Red LED flashes quickly, press the D-pad ” ↑ ” button. (Recommend for PS3, PS4, XBOX ONE, XBOX SERIES X&S console)
Medium sensitivity:
Press the “PROG” button, the Red LED flashes quickly, press the D-pad ” ← ” button.
Low sensitivity:
Press the “PROG” button, the Red LED flashes quickly, press the D-pad ” ↓ ” button. (Recommend for PC, PS3, PS4, XBOX ONE, XBOX SERIES X&S platform)
Customize maximum effective turn radius
Max effective turn radius:
For example, the Racing Wheel maximum effective turn radius is set to 180°. The actual maximum turn radius is achieved when moving 90° to the left or right, and the rotation exceeding 90° is invalid rotation.
How to setting?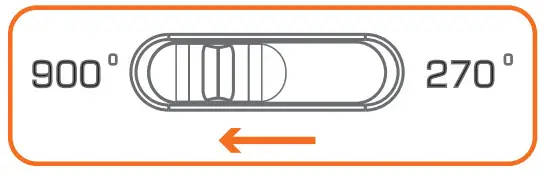 Step 1 Switch to 900°.
Step 2 Press the “PROG” button, the Red LED flashes quickly.
Step 3 Move the Racing Wheel to the desired angle ( more than 60°), press the “OPTIONS” button, the Red LED will keep on.
Setting buttons:L-paddle, R-paddle, L-pedal, R-pedal, L3, R3.
Buttons can be programmed: A /B /X /Y /L1 /L2 /R1 /R2.
How to setting?
Step 1 Press “PROG”, Red LED light flashes quickly.
Step 2 Press setting button, Red led light flashes slowly.
Step 3 Press programmable buttons, The Red LED is on and the setting is complete.
How to clear button programmed function?
Clear single button:
Step 1 Press “PROG”, Red LED light flashes quickly.
Step 3 Press setting button twice, the Red LED is on and the clear is complete.
Clear all buttons:
Step 1 Press “PROG”, Red LED light flashes quickly.
Step 2 Press the “OPTIONS” button for 4 seconds, the Red LED will be on, all the programmed buttons will be restored, and the Racing Wheel rotation sensitivity will return to the highest sensitivity.
Notes
① Press “PROG” button, the Red LED flashes quickly, and then press the “PROG” button again to exit programming. The previous data does not change.
② Press “PROG” button, the Red LED flashes quickly. If there is no action at this time, the programming will automatically exit after 10 seconds.
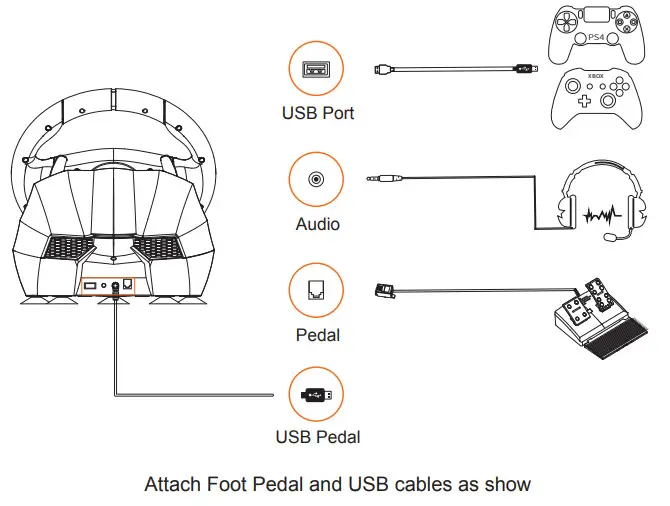
Voice Communication Function
The Racing Wheel supports to connect with headset and microphone, allowing player to connect headset for voice communication on PS4/XBOX ONE/ XBOX SERIES X&S console.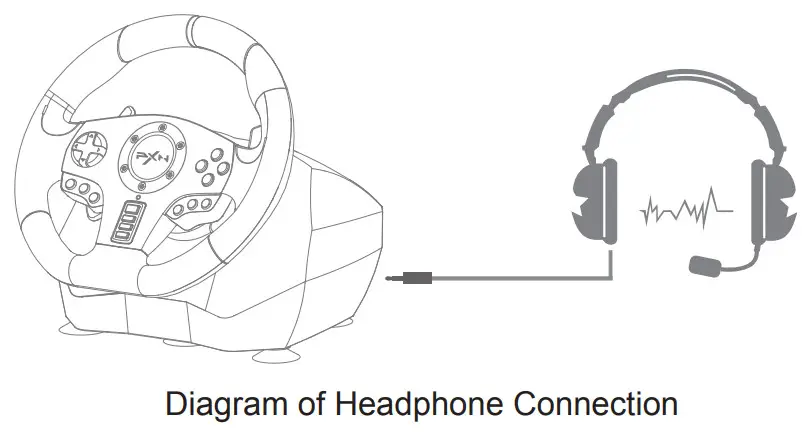
Attentions
- Avoid fierce vibration. Don’t take apart, revise and mend by yourself.
- Don’t let water or other liquid entering inside of the Racing wheel to make any damages.
- Don’t store in places of high humidity, temperature, heavy oil or smoke.
- Don’t drop the Racing wheel into fire or explosion danger may be caused by built-in battery.
- Children should be under the custody of adults to use this product.
Product Specification
| Product Model | PXN-V900 |
| Connection Type | USB Wiring |
| Working Current | 80mA – 150mA |
| Packaging Size | Appro. 410 * 360 * 307 mm |
| Product Size | Appro. 280 * 340 * 285 mm |
| Unit Weight | Appro. 2360 g |
| Usage Temperature | 10-40°C |
| Usage Humidity | 20∼80% |
![]()


