AWE G20 Track-to-Touring Conversion Kit Installation Guide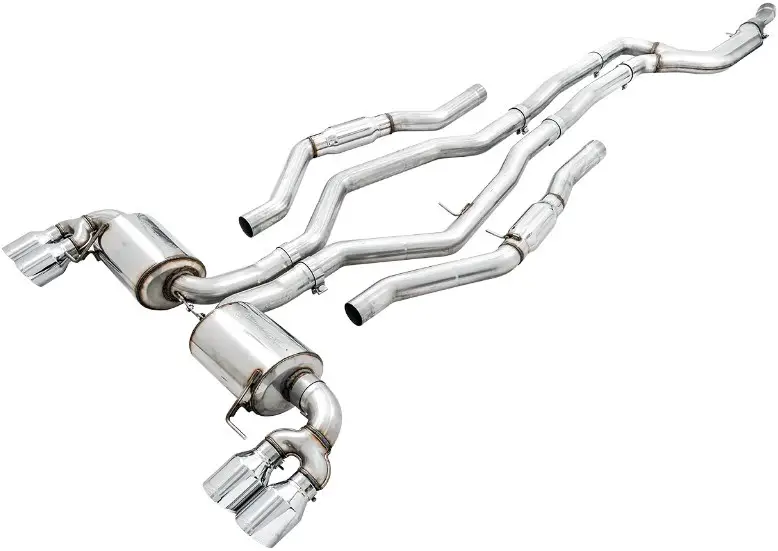
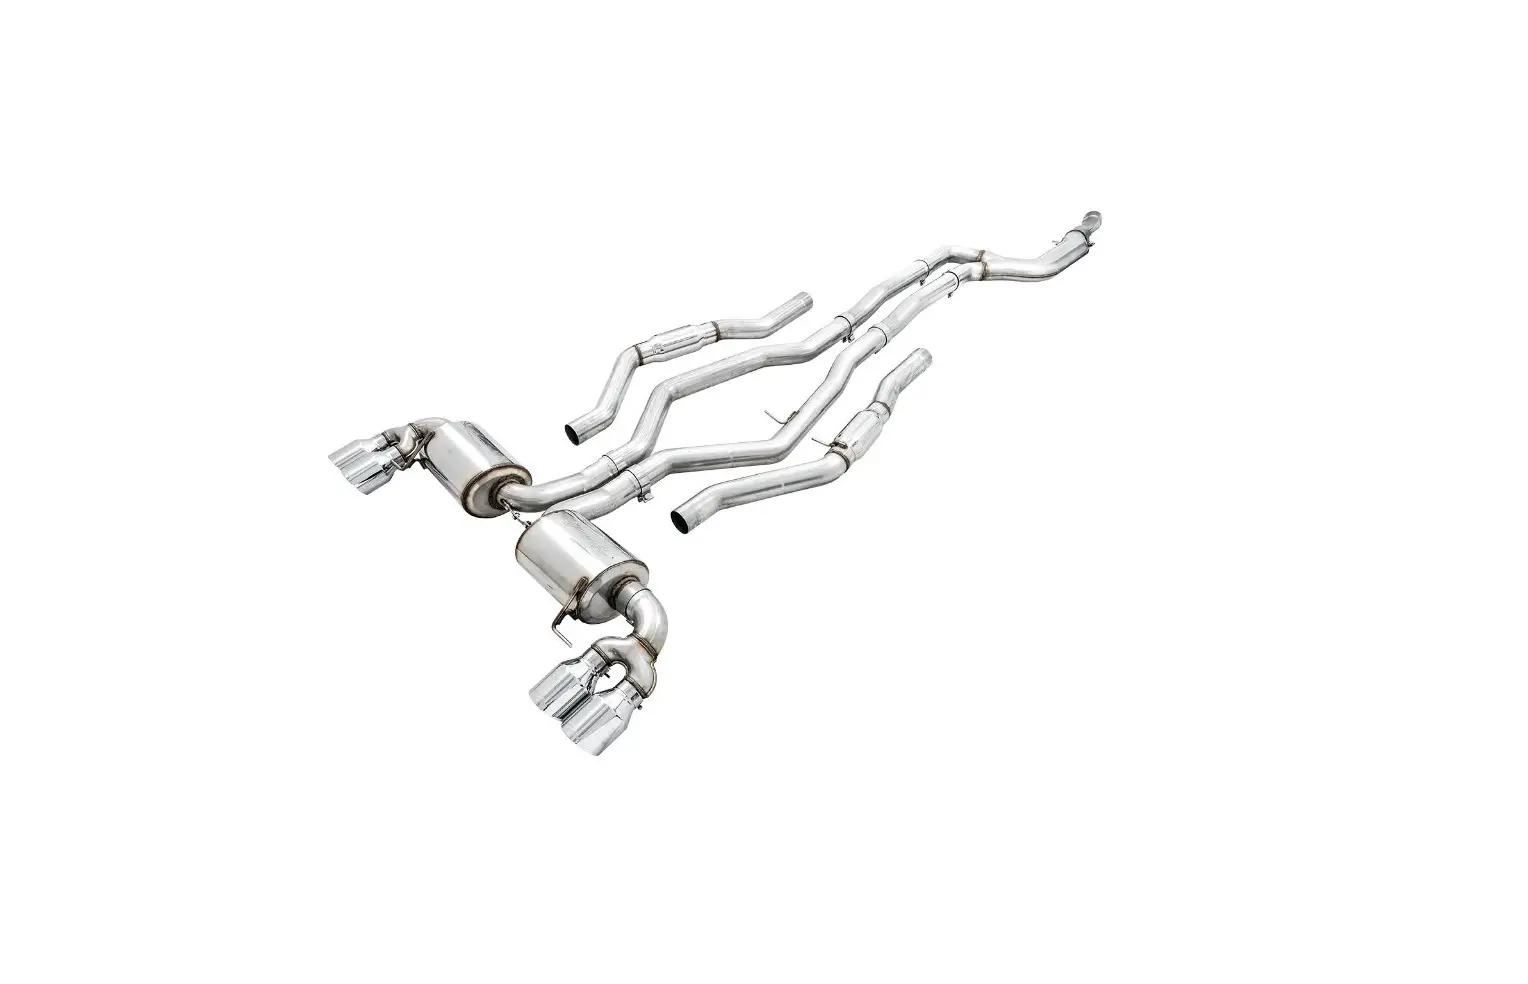
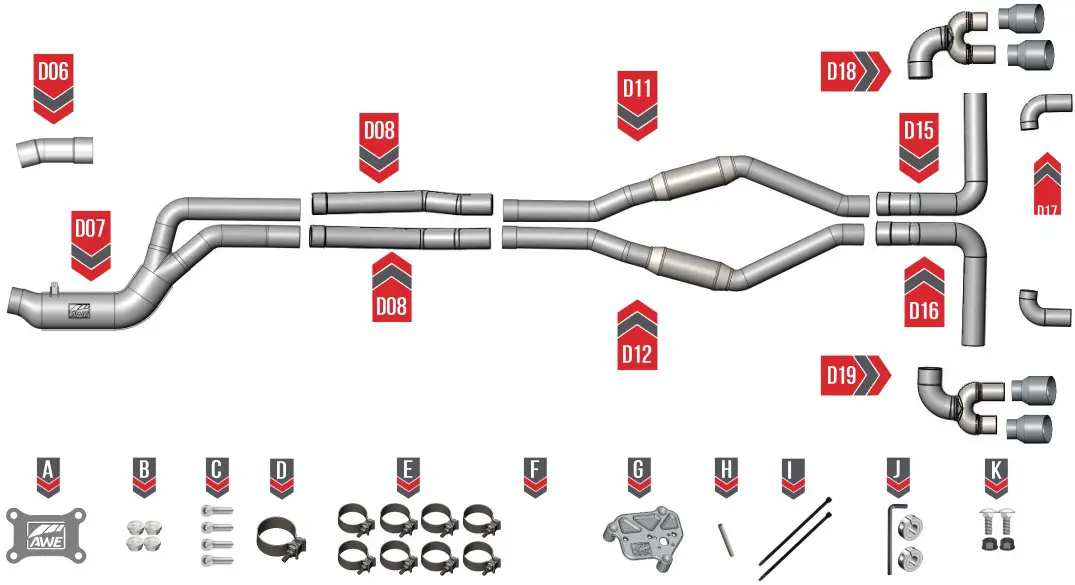
Parts list Trick System
![]() Inspect ALL parts prior to disassembly of vehicle; If damaged OR MISSING, please contact the place of purchase immediately
Inspect ALL parts prior to disassembly of vehicle; If damaged OR MISSING, please contact the place of purchase immediately
| Part Number | Description | Qty |
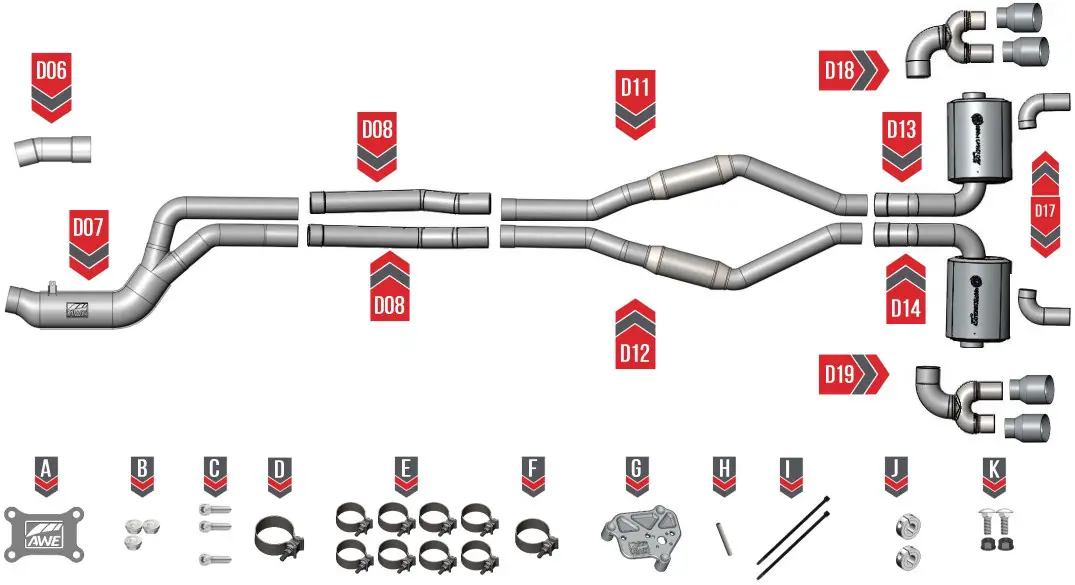
| D06 | OEM downpipe adapter | 1 |
| D07 | Stamped inlet section | 1 |
| D08 | DS/PS mid tube | 2 |
| D11 | DS Res axle tube | 1 |
| D12 | PS res axle tube | 1 |
| D15 | DS track rear section | 1 |
| D16 | PS track rear section | 1 |
| 110032 | Rear section badge | 1 |
| 94920A500 | Serrated flange locknut | 4 |
| 91292A148 | M8x1.25 –25mm socket head bolt | 4 |
| 390350 | 3.5 inch band clamp | 1 |
| 390300 | 3 inch band clamp | 8 |
| 10-0798 | 85mm band clamp | 1 |
| 150004 | SBS valve motor simulator | 1 |
| 98380A457 | 7/64” x 1” dowel | 1 |
| 7130K59 | Medium zip tie | 2 |
| 3910-11034SRC1-037 | 3/8” clamp kit3/8” collar clamp | 12 |
| 7122A17OE Tip systems only | 7/64” Allen key | 1 |
| D17 | DS/PS OE tip outlet | 2 |
| Quad Tip systems only | ||
| D18 | DS quad tip outlet | 1 |
| D19 | PS quad tip outlet | 1 |
| 180008 (chrome) or 180009 (black) | 102mm” Slash cut exhaust tips | 4 |
| 3910-41010 | Integrated tip hardware kit | 4 |
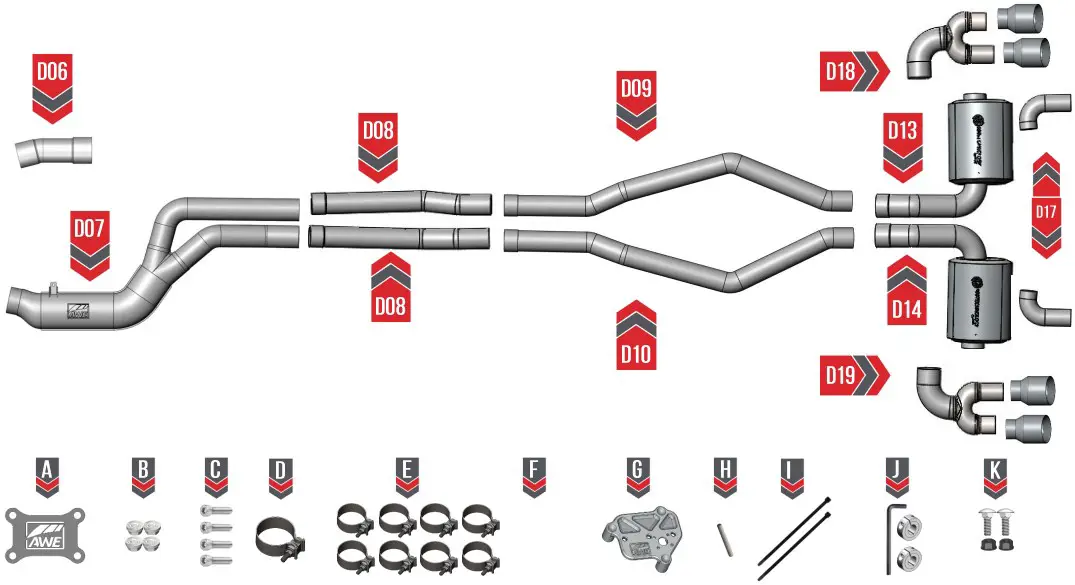
Parts List Non-Resonted touring system
![]() Inspect ALL parts prior to disassembly of vehicle; If damaged OR MISSING, please contact the place of purchase immediately.
Inspect ALL parts prior to disassembly of vehicle; If damaged OR MISSING, please contact the place of purchase immediately.
| Part Number | Description | Qty |
| D06 | OEM downpipe adapter | 1 |
| D07 | Stamped inlet section | 1 |
| D08 | DS/PS mid tube | 2 |
| D09 | DS non res axle tube | 1 |
| D10 | PS non res axle tube | 1 |
| D13 | DS touring rear section | 1 |
| D14 | PS touring rear section | 1 |
| 110032 | Rear section badge | 1 |
| 94920A500 | Serrated flange locknut | 4 |
| 91292A148 | M8x1.25 –25mm socket head bolt | 4 |
| 390350 | 3.5 inch band clamp | 1 |
| 390300 | 3 inch band clamp | 8 |
| 10-0798 | 85mm band clamp | 1 |
| 150004 | SBS valve motor simulator | 1 |
| 98380A457 | 7/64” x 1” dowel | 1 |
| 7130K59 | Medium zip tie | 2 |
| 3910-11034SRC1-037 | 3/8” clamp kit3/8” collar clamp | 12 |
| 7122A17OE Tip systems only | 7/64” Allen key | 1 |
| D17 | DS/PS OE tip outlet | 2 |
| Quad Tip systems only | ||
| D18 | DS quad tip outlet | 1 |
| D19 | PS quad tip outlet | 1 |
| 180008 (chrome) or 180009 (black) | 102mm” Slash cut exhaust tips | 4 |
| 3910-41010 | Integrated tip hardware kit | 4 |
Parts List Resonsted Touring Systems
![]() Inspect ALL parts prior to disassembly of vehicle; If damaged OR MISSING, please contact the place of purchase immediately.
Inspect ALL parts prior to disassembly of vehicle; If damaged OR MISSING, please contact the place of purchase immediately.
| Part Number | Description | Qty |
| D06 | OEM downpipe adapter | 1 |
| D07 | Stamped inlet section | 1 |
| D08 | DS/PS mid tube | 2 |
| D11 | DS Res axle tube | 1 |
| D12 | PS res axle tube | 1 |
| D13 | DS touring rear section | 1 |
| D14 | PS touring rear section | 1 |
| 110032 | Rear section badge | 1 |
| 94920A500 | Serrated flange locknut | 4 |
| 91292A148 | M8x1.25 –25mm socket head bolt | 4 |
| 390350 | 3.5 inch band clamp | 1 |
| 390300 | 3 inch band clamp | 8 |
| 10-0798 | 85mm band clamp | 1 |
| 150004 | SBS valve motor simulator | 1 |
| 98380A457 | 7/64” x 1” dowel | 1 |
| 7130K59 | Medium zip tie | 2 |
| 3910-11034SRC1-037 | 3/8” clamp kit3/8” collar clamp | 12 |
| 7122A17OE Tip systems only | 7/64” Allen key | 1 |
| D17 | DS/PS OE tip outlet | 2 |
| Quad Tip systems only | ||
| D18 | DS quad tip outlet | 1 |
| D19 | PS quad tip outlet | 1 |
| 180008 (chrome) or 180009 (black) | 102mm” Slash cut exhaust tips | 4 |
| 3910-41010 | Integrated tip hardware kit | 4 |
Integrated Tip Clamps

To install the exhaust tips with integrated clamps, first, attach the exhaust tip in the proper orientation onto the exhaust outlet tube. Insert one of the carriage bolts from the hardware kit (3910-41010) through the tab on the exhaust tip and thread on one of the corresponding nuts. Using anti-seize on the bolt threads will help installation and prevent breakage of hardware. This exhaust system only has 2 exhaust tips while the integrated clamp kit has enough hardware for our 4 tip exhaust systems. You will have 2 sets of hardware left over that will not be used.
Troubleshooting
| Issue | Solution |
| Exhaust is not fitting correctly | Most fitment issues are due to improperly adjusted mid pipes. Rotating these pipes will help set proper preload on the rear section hangers and help to properly adjust the system.If you are having issues with aligning your tips try loosening the clamp bolt and then while holding the tip in the correct location, retighten the bolt. This will shift the tip into the proper location. Any other questions head over to our fitment guide for more installation tips. |
| Wrong or missing parts | Double check the parts list for your system and compare them with what you received. Fill out our contact form, found below and let us know what parts you need. |
| Valve motor and pin will not fit in the simulator bracket. | Confirm that the valves were placed in the open position before removal. If not, you will need another person to hold the OEM valve motor onto the simulator plate firmly and cycle the valves until the motor and dowel pin are aligned. |
Care
Once installed properly, your AWE exhaust will provide years of trouble-free performance. The exhaust volume and sound will settle with usage; 800-1000 miles is required to break-in new exhaust systems. Also, please note that the rear 180Technology® resonator has a small drain hole to allow condensation to escape. Water drops from this area are normal. Periodic cleaning of exhaust tips is necessary to maintain proper finish, especially in areas prone to road salt and caustic deicing solutions. Use a mild soap and water solution or car wax to clean the finish. Avoid using abrasive polishes, as they can scratch the finish.
Any questions or comments, please do not hesitate to contact us:
AWE
215-658-1670
CONTACT FORM
Warranty
Up-to-date warranty information is found HERE.


