HOERMANN B168xH238 Aluminium Entrance Door Instruction Manual
Dear Customer,
We are delighted that you have chosen a product from our company.
About these instructions
These instructions are divided into an illustrated section and a text section. The illustrated section can be found after the text section.
Read through all of the instructions carefully. These instructions contain important information on the product. Please pay particular attention to the safety instructions and warnings and follow them.
Keep these instructions in a safe place for later reference.
Expert fitting and careful maintenance increase performance, safety and availability.
The texts and diagrams in this manual have been created with the greatest care possible. Not all detailed information on all variants and conceivable fitting options is contained in the instructions in the interest of clarity. The texts and diagrams published in this manual are merely intended as examples.
If you need additional information, contact the manufacturing factory.
These instructions are an important document for the construction file.
Warnings used
![]() The general warning symbol indicates a danger that can lead to injury or death. In the text, the general warning symbol will be used in connection with the caution levels described below. In the illustrated section, additional instructions refer back to the explanation in the text section.
The general warning symbol indicates a danger that can lead to injury or death. In the text, the general warning symbol will be used in connection with the caution levels described below. In the illustrated section, additional instructions refer back to the explanation in the text section.
![]() DANGER
DANGER
Indicates a danger that immediately leads to death or serious injuries.
ATTENTION
Indicates a danger that can lead to damage or destruction of the product.
Symbols used
 Important note to prevent personal injury and damage to property
 Correct arrangement or activity
 Non-permissible arrangement or activity
 Check
Check Double-shell frame without wall width adjustment
 Double-shell frame with wall width adjustment
 Fitting to partition wall
 Fitting to timber partition wall
 Fitting to brickwork
 Break-in-resistant component RC acc. to DIN EN 1627:2011
 Acoustic insulation
 Protection against weather
 Secure from falling
 exerting limited power
 Indicates steps in the illustrated section that you have to perform in sequence
 Optional
 Removing / disposing of components and packaging
 See text section
Abbreviations used
OFF Finished floor level (FFL)
TTZ Industry association for gates, doors and frames
Safety instructions
![]() DANGER
DANGER
Danger to life when fitting the steel frame
The steel frame and door can fall over during fitting and may cause injuries to persons.
Secure the steel frame and the door against falling over before and during fitting.
Scope of delivery
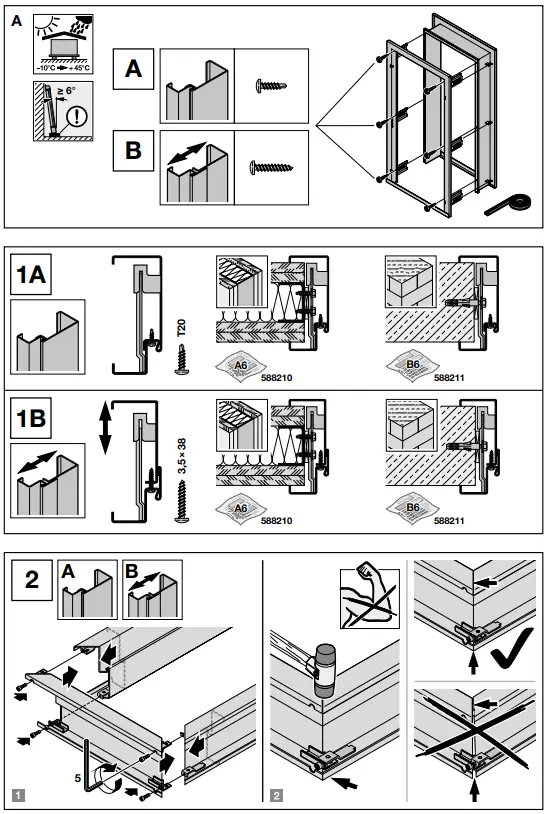
See Figure A
The double-shell steel profile frame with or without wall width adjustment is made for retrofitting in brickwork or partition walls.
The double-shell steel profile frame is suitable for rebated or flush door leaves.
The steel profile frame according to DIN 18111 consists of:
- hot-galvanized sheet steel, 1.5 mm or 2.0 mm
- marked at 1000 mm from FFL
- without floor recess and seal
- with welded trapezoidal anchors in the rebate shell
- and holding clips in the rebate counter shell.
Screw fitting in the base of the groove is made with Torx drilling screws T 20 / self-tapping screws 3.5 × 38 mm with cross recessed head. The steel profile frame is prepared for on-site door hinges from series VS 8900 VN/160 3D, VX 3D or concealed hinges.
For plug-in / screw-in mitred area:
Screws with hexagon socket 6 × 12 (4 × )
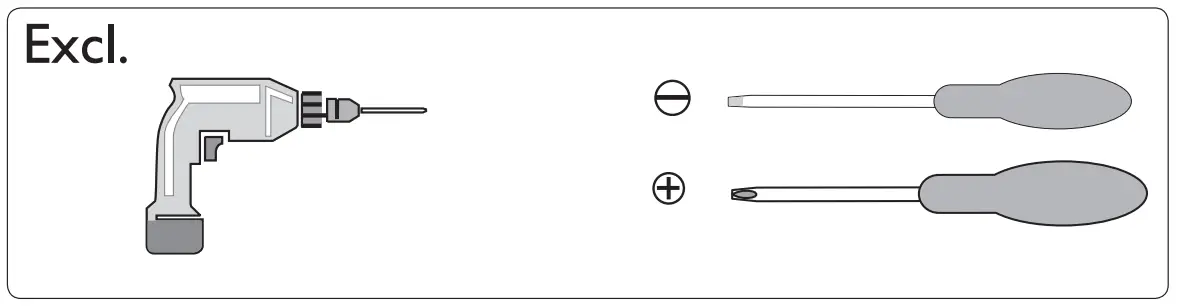
Not included in the scope of delivery:
- Door hinges
- Timber door leaf
- 2C fitting foam, art. no: 588133
- Fitting set A6, art. no: 588210
- Fitting set B6, art. no: 588211
Fitter qualification
Fitting and maintenance must be performed by a competent specialist based on the instructions.
Fitting
For additional notes and information, refer to the TTZ document “Guidelines for fitting steel frames” online at:
 http://www.hoermann-docs.com/208092
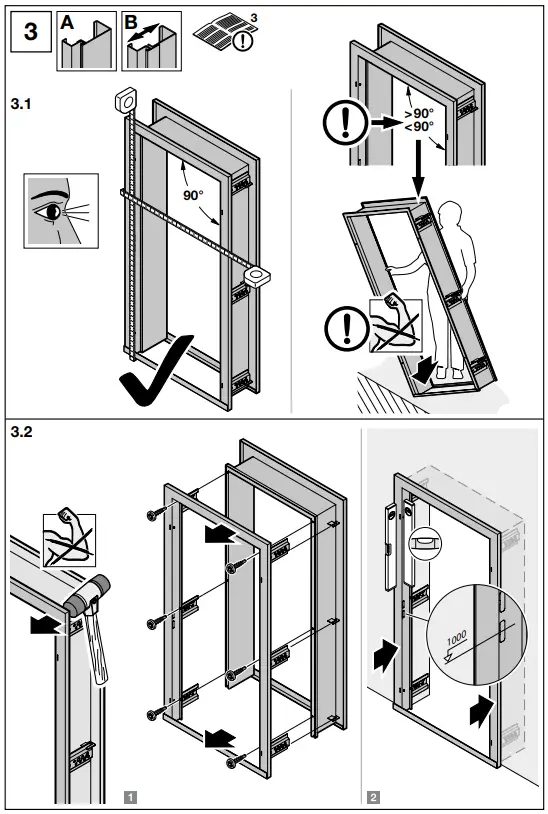
- Check the delivered parts for completeness prior to fitting the frame. Compare the profile geometry, as well as the width and height with the specifications of the building owner (metre line). If necessary, align the steel frame at right angles, e.g. by carefully tilting the right or left side part (see Figure 3.1).
- Adjust for even spacing between the frame overlaps and the walls on each side.
- To observe the frame hold dimension and reveal dimension, widen the steel frame with with a light preload (see Figure 3.5).
- To ensure simple and correct fitting, carefully follow the work steps in the illustrated section.
- Use fastenings and fittings or plugs / screws recommended for the conditions on site.
- If necessary, fix the frame at all prepared fixing points.
- Make sure that the partition walls and partition wall profiles can withstand the loads during use. Consider the load values of the doors.
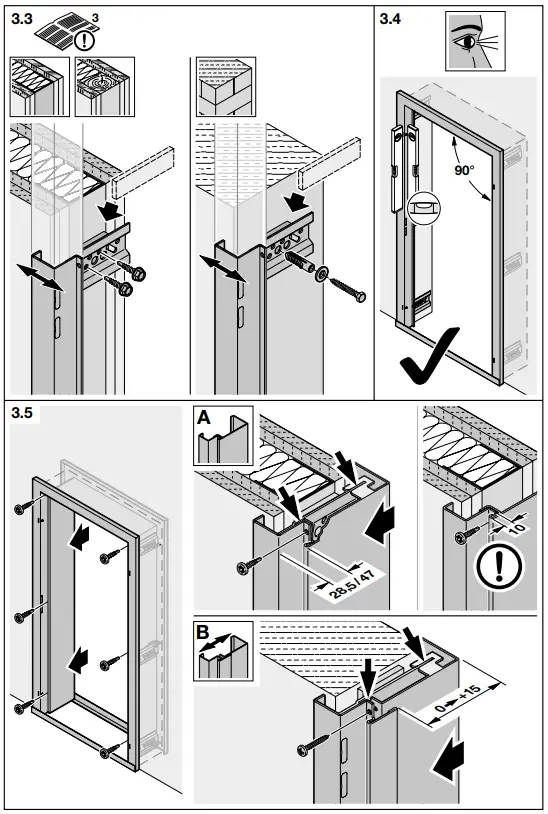
- Observe the centre line and edge spacing for the plugs required for the wall type. Follow the fitting information and processing guidelines of the plug manufacturer.
- Backfill the fixing points so they are resistant to pressure and torsion with suitable materials such as hardwood or sheet metal. This allows you to compensate for unevenness in the wall (see Figure 3.3).
- Slide the counter-rebate shell onto the rebate shell. Make sure that the trapezoidal anchors engage in the retaining brackets.
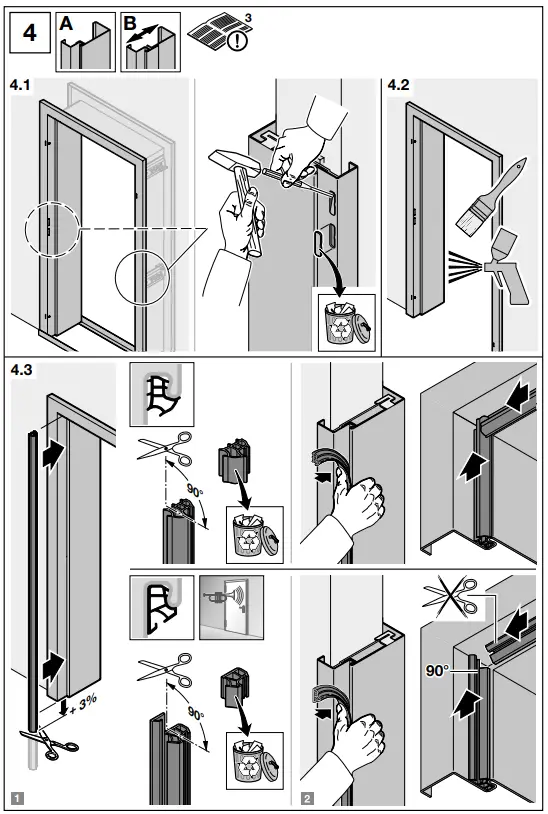
Put the shells together without wall width adjustment and gap-free (see Figure 3.5). Connect the two shells non-positive with the unscrewed drilling screws. - If necessary, remove the catch recesses and the bolt recesses with light hammer strokes (see Figure 4.1).
- In case of changes to standard components, such as electric strikes or hinges with single cladding.
- If necessary, open the wall in the area of the hinge reinforcement / lock protective boxes. Chisel the brickwork or notch the gypsum boards for partition walls. If necessary, notch the dry construction structural post. Reinforce the structural post as required.
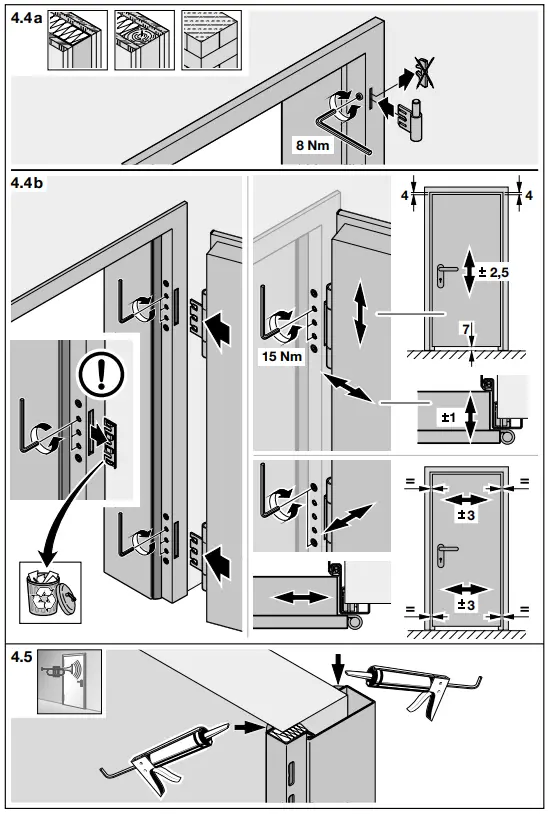
- In case of on-site wall unevenness or due to hygiene reasons, seal the transition between the frame overlap and the wall with elastic sealing compound (see Figure 4.5).
- When fitting the frame with break-in-resistance, observe the additional measures in the product-specific instructions. For this, please contact the owner of the approval.
Notes on the illustrated section
| See item | Description |
| 1 A | Overview, double-shell frame without wall width adjustment |
| 1 B | Overview, double-shell frame with wall width adjustment |
| 2 | Frame fitting for version to screw or clamp |
| 3 | Fitting the frame with rebate shell |
| 3.1 | Checking the dimensions, adjusting the frame |
| 3.2 | Separating the rebate shell and counter-rebate shell |
| 3.3 | Fixing with brickwork and partition walls |
| 3.4 | Checking the dimensions |
| See item | Description |
| 3.5 | Connecting the rebate shell and counter-rebate shell, checking the rebate dimensions |
| 4.1 | Recesses for latch and bolt |
| 4.2 | Applying finishing coat on site as needed |
| 4.3 | Seal fitting |
| 4.4a | Hinge reinforcement V 8000 for brickwork and partition walls |
| 4.4b | Hinge reinforcement VX 3D |
| 4.5 | Acoustic insulation requirements |
Approved wall structures for break-in resistance according to DIN EN 1627 ff
Tested door set consisting of frame, lock, fittings, door leaf and seals.
Expert report:
RC 2: 18-001199-PR12 (HUGA),
RC 3: 45-31/19 (HUGA)
| Wall types | RC 2 | RC 3 |
| Brickwork according to DIN 1053-1 (without plastering), compression strength class of bricks ≥ 12, at least mortar group MG II/DG | ≥ 115 | |
| Steel concrete according to DIN 1045 strength class C25/30 | ≥ 100 | ≥ 120 |
| Wall made of gas concrete precision blocks according to DIN EN 771-4, com- pression strength class of the bricks ≥ 4 | ≥ 170 | ≥ 240 |
| Timber panelled walls according to DIN EN 1627 Table NA.4 | ≥ 210 | |
| Timber posts | 120 × 120 | – |
All dimensions are in mm
Acoustic insulation requirements
In case of acoustic insulation requirements, fill the rebate shell cavity with mineral wool on site. You can use 2C fitting foam as an alternative to mineral wool.
When using fitting foam, you also have to seal the hinge reinforcement and the wall protective caps.
Seal the transition between the frame overlap and the wall with elastic sealing compound (see Figure 4.5).
Tested acoustic values
| Component | Acoustic insula- tion value (labor- atory value) | Acoustic rating cat- egory |
| Frame | ≤ 46 dB | 4 |
| Standard seal | ≤ 35 dB | 2 |
| Seal for acoustic insula- tion requirements | ≤ 42 dB | 3 |
The acoustic insulation values for internal doors include a fully tested door set. The door set consists of a frame, door leaf and seals (door leaf seals, retractable bottom seals).
The test values / expert opinions and instructions for the door set (door leaf manufacturer) are decisive.
Cleaning and care
Primed in an electrophoresis process or colour treatment
- Sand the priming with a fine sand paper, e.g. 240 grain size, without fully abrading the coating. Then remove any abrasive dust. The frame must be free of:
- Oiling
- Lubrication
- Tensides
- Fingerprints
- Abrasive residues
- Repair transport or fitting damage.
- Use standard coating substances for the finishing coat or intermediate coat. Paints based on acrylate resin are recommended. Paints based on alkyd resin are generally unsuitable.
- Observe the product information sheet of the paint manufacturer.
- Perform a test coat.
- Only fix the seal once the paint coating has fully dried.
ATTENTION
Aggressive solvents
Aggressive solvents or harsh paint materials can damage the priming and the sealing profile.
- Only use standard coating substances. With professional application, this ensures faultless adhesion.
- Always take note of the manufacturer information for the paint.
- The warranty for the surface ceases to apply if a powder coating is applied on-site.
Powder coating
ATTENTION
Packaging, handling
Improper storage can result in damage to the final powder coating. The packaging acts as a means of transport protection.
- Protect the frame from the effects of the weather such as sunlight, rain, wet, and high and low temperatures.
- Store the frames in dry rooms.
The polyester-based final powder coating is the ideal, high-quality finish for interior use. The coating is UV- and corrosion-resistant and environmentally friendly.
Cleaning powder-coated surface finishes
- Remove minor soiling using just a sponge and neutral cleaning agents.
- Never use strongly alkaline or acidic substances or substances with an abrasive effect.
Stainless steel surface
ATTENTION
Packaging, handling
Improper storage can result in damage to the stainless steel surface. The packaging acts as a means of transport protection.
- Protect the frame from adverse weather effects such as sunlight, rain, wet, and high and low temperatures.
- Store the frames in dry rooms.

TTZ guidelines for maintaining stainless steel frames
www.hoermann-docs.com/208095
Inspection and maintenance
The operator is responsible for the perfect condition of the door set (frame, door leaf, fitting components and other accessories).
Only commission qualified and trained fitters with maintenance work.
Only use original spare parts from the manufacturer
Dismantling, recycling and disposal
Dismantling the steel frame is done in the reverse order of the assembly.
After dismantling, separate the steel frame into individual components. Recycle or dispose of the components in accordance with local official regulations.
HÖRMANN KG Verkaufsgesellschaft
Upheider Weg 94-98
33803 Steinhagen
Deutschland


