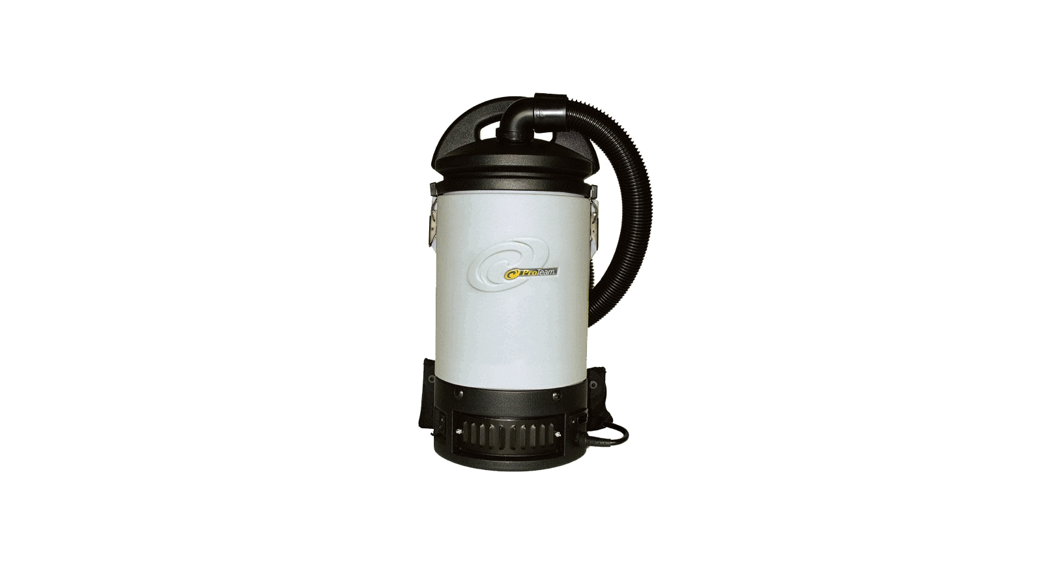
![]() Sierra Backpack Vacuum Cleaner and Power Nozzle Kit
Sierra Backpack Vacuum Cleaner and Power Nozzle Kit
Owner’s Manual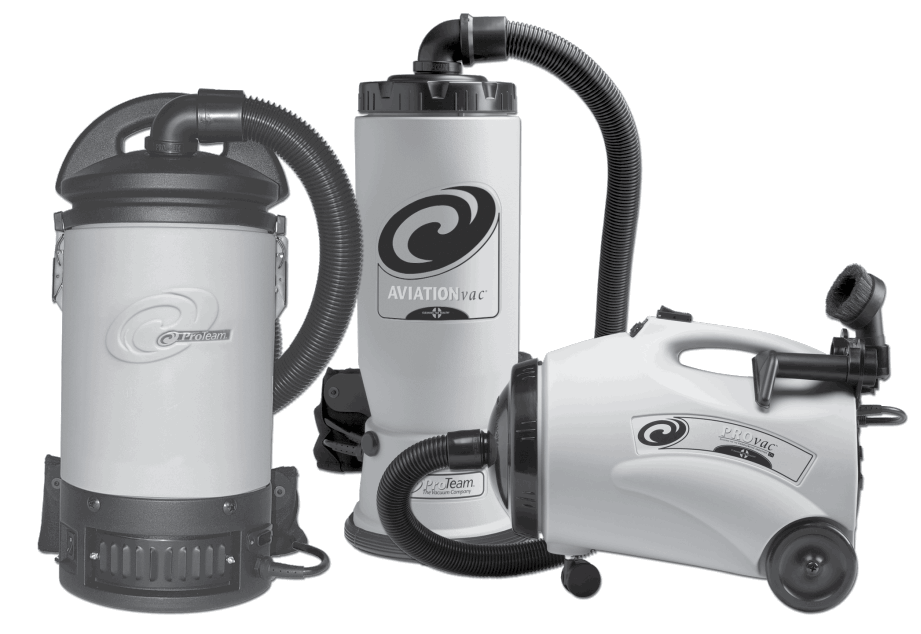
Sierra Backpack Vacuum Cleaner and Power Nozzle Kit
INSPECTION UPON RECEIPT
Carefully unpack and inspect your new ProTeam vacuum for shipping damage. Each unit is tested and thoroughly inspected before shipping.For instructions regarding any shipping damage, contact ProTeam Customer Service immediately (866) 888-2168. Keep this manual available at all times and instruct all operators to read this manual.
The contents of this manual are based on the latest product information available at the time of publication. ProTeam reserves the right to make changes or improvements to its machines or components with- out notice. The products that are covered by this instruction manual are intended for commercial use.
Read all instructions before using. Save these instructions. Following the cleaning instructions will prolong the life of your ProTeam vacuum.
Serial No………..
Date of Purchase…………
Contact Person……………………
Trademarks and Patents:
© 2008-2016 ProTeam, Inc. All Rights Reserved.
ProTeam, AviationVac, ProVac, Sierra, Four Level, Intercept Micro and Cleaning for Health are registered trademarks of ProTeam, Inc. ManageMen is a registered trademark of ManageMen in the USA. Velcro is a registered trademark of Velcro Industries in the USA.
Go to www.proteam.emerson.com to register your new vacuum.
Important safety InstructIons
When using an electrical appliance, basic precautions should always be followed, including the following:![]() WARNING Read Owner’s Manual before usingthis product. Failure to do so can result in serious injury or death. To reduce the risk of fire, electric shock, or injury:
WARNING Read Owner’s Manual before usingthis product. Failure to do so can result in serious injury or death. To reduce the risk of fire, electric shock, or injury:
- Use only as described in this manual. Use only the recommended attachments and replacement parts.
- DO NOT leave any ProTeam vacuum plugged in when not in use. Unplug unit from the outlet before servicing.
- DO NOT leave running while unattended.
- DO NOT use outdoors or on wet surfaces.
- DO NOT try to recover any liquid with this vacuum. This vacuum is for DRY RECOVERY only.
- DO NOT USE A FRAYED, WORN OR DAMAGED CORD ORPLUG. If the unit is not working as it should, or if it has been dropped, damaged, left outdoors, or exposed to water, take it toan authorized ProTeam Warranty Station for inspection and repair6. DO NOT allow the vacuum to be used as a toy. Pay close attention when using the vacuum near children.
- This vacuum cleaner is not intended for use by persons (including children) with reduced physical, sensory, or mental capabilities, or lack of experience and knowledge, unless they have beengiven supervision or instruction concerning use of the applianceby a person responsible for their safety.
- DO NOT pull or carry the vacuum by the cord or use the cordas a handle. DO NOT close a door on the cord or pull the cordaround sharp edges or corners. DO NOT run over the cord.
Keep the cord away from heated surfaces. - DO NOT pull on the cord to unplug. Grasp and pull the plug, not the cord.
- DO NOT handle the plug, switch, or vacuum with wet hands.
- DO NOT put any objects into openings. DO NOT use with anyopening blocked; keep free of dust, lint, hair, and anything thatmay reduce air flow.
- Keep hair, loose clothing, fingers, and all parts of body away from openings and moving parts.
- Turn off the unit before unplugging.
- Use with extra care when cleaning stairs.
- DO NOT vacuum flammable or combustible materials or anything that is burning or smoking, such as cigarettes, matches, orhot ashes.
- Sparks inside the motor can ignite flammable vapors or dust. Treduce the risk of fire or explosion,
DO NOT use near combustible liquids, gases, or dusts, such as gasoline or other fuels, lighterfluid, cleaners, oil-based paints, or natural gas. - To reduce the risk of inhaling toxic vapors or dust, DO NOT vacuum or use near toxic or hazardous materials.
- Empty the Intercept Micro® Filter after every use and before storage. Some types of wood dust and debris may catch on fire,if stored in the vacuum.
- DO NOT use without filters in place.
- Connect to a properly grounded outlet only. See Grounding Instructions. Only use three-wire outdoor extension cords that have three-prong grounding plugs and rounding receptaclesthat accept the vacuum’s plug.
SAVE THESE INSTRUCTIONS
Violation of any of these instructions may void any and all warranties.
IntroductIon
To reduce the risk of fire, electric shock, or injury:![]() WARNING
WARNING
- DO NOT place backpack vacuum on ground while running for an extendedperiod of time.
MOTOR
Electric thru-flow vacuum motors must never be used in applications in whichwet or moist conditions are involved, where dry chemicals or other volatile materials are present, or where airflow may be restricted or blocked. Such motors are designed to permit the vacuumed air to pass over the electrical wiringto cool it. Therefore, any liquid (including water), dry chemical, or other foreignsubstance which would come in contact with electrical conductors could causecombustion (depending on volatility) or electrical shock. Failure to observe these precautions could result in property damage and personal injury, including death in extreme cases.
ELECTRICAL
All backpack models are available in 120 volt/60 Hz. Some ProTeam models are available in 220 volt/50 Hz. Call ProTeam for availability of 220 volt/50 Hz vacuums. This document only applies to 120 volt/60 Hz, or 120 volt/400 Hz models. Severe changes in voltage, high or low, can cause damage to the motor and cause premature motor failure. Model numbers and specifications can be obtained by calling ProTeam.
Each vacuum cleaner described in this manual is equipped with a thermal protection cutoff switch which will remove power from the vacuum motor if excessively high operating temperatures are detected. This condition may arise as the result of a blocked vacuum passage, or clogged or full filters.
If a thermal trip takes place, immediately turn OFF the vacuum and inspect for an airflow blockage in the hose and verify the condition of the filter bag. Replace or empty the filter bag as required. The vacuum will require several minutes to cool down to a safe operating temperature. When this temperature is attained, the thermal switch will automatically reset and the vacuum will be able to be used in the normal manner.
Make sure your extension cord is in good condition and is 16 AWG or larger. If in doubt, use the next heavier gauge. The smaller the gauge number, the heavier the cord. An undersized extension cord will cause a drop in line voltage resulting in loss of power.
Maintain Vacuum With Care – Inspect extension cords periodically and replace if damaged.
To reduce the risk of personal injury due to a loose electrical connection between the vacuum’s pigtail plug and extension cord, firmly and fully attach the plug to the extension cord and use the provided cord holder to secure the extension cord. The cord holder will eliminate the “pull apart” force from the connection. DO NOT KNOT THE CORDS, as this can damage the conductors and cause overheating and sparking. Periodically check the connection while operating to ensure it is fully attached. Do not use an extension cord that provides a loose connection. A loose connection or knotted cords could result in overheating and fire, and increases the risk of being burned.
To reduce the risk of accidental disconnection of the Vacuum cord from the extension cord during operation, secure the extension cord to the vacuum plug and use the cord holder as shown in figure M and described in the Operating Instructions on page 6 Step 1.`
GroundIng InstructIons
THESE VACUUMS MUST BE GROUNDED. If a vacuum should malfunction or stop working, grounding provides a path of least resistance for electrical current, thereby reducing the risk of electrical shock. This unit is equipped with a cord that has an equipment-grounding conductor and grounding plug.
The plug must be inserted in an appropriate outlet that is properly installed and grounded in accordance with all local codes and ordinances. Cutting off the ground wire or using a cord that is not equipped with a ground plug will void the warranty on the unit, and ProTeam will accept NO liability associated with the unit.
Improper connection of the equipment-![]() WARNING
WARNING
grounding conductor can result in a risk of electrical shock. Check with a qualified electrician or service person if you are unsure that the outlet is properly grounded. Do not modify the plug provided with the vacuum. If it will not fit the outlet, have a proper outlet installed by a qualified electrician. The vacuum cleaners in this manual are for use on a nominal 120-volt circuit, and have a grounded plug that looks like the plug illustrated in sketch A in Figure AA. A temporary adaptor that looks like the adaptor illustrated in sketches B and C may be used to connect this plug to a 2-pole receptacle as shown in sketch B if a properly grounded outlet is not available. The temporary adaptor should be used only until a properly grounded outlet (sketch A) can be installed by a qualified electrician. The green colored rigid ear, lug, or the like extending from the adaptor must be connected to a permanent ground such as a properly grounded outlet box cover. Whenever the adaptor is used, it must be held in place by a metal screw.
Note: In Canada, the use of a temporary adaptor is not permitted by the Canadian Electrical Code. For Canada – This appliance is for use on a nominal 120-volt circuit and as a grounded attachment plug that looks like the plug illustrated in sketch A in Figure AA. Make sure that the vacuums are connected to an outlet having the same onfiguration as the plug. No adaptor should be used with the vacuums detailed in this manual. 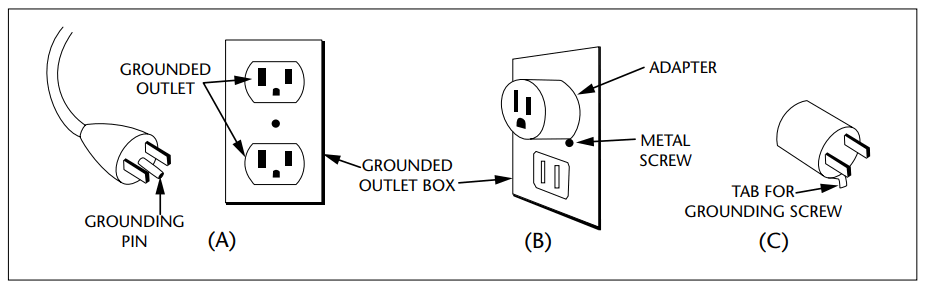
Recommended preventIve maIntenance (all vacuums)
![]() WARNING
WARNING
- UNPLUG the vacuum when performing any maintenance.
- CHECK the condition of all electrical cords before each use.
UPON RECEIPT
Check unit for any defects, missing or broken parts. Call ProTeam with this information, along with any questions you may have.
DAILY/AFTER EACH USE
Check Intercept Micro Filter. Replace or empty if full. Use only genuine ProTeam replacement filters to ensure optimal performance, achieve improved indoor air quality, and to maintain a valid vacuum warranty. Check Micro Cloth Filter. If dirty, rinse out and airdry before replacing back into vacuum. All filtersmust be in place to operate vacuum. This will optimize airflow and prevent the motor from laboring.
PERIODICALLY
Check harness for fit and comfort. Replace lost or damaged pieces.
ELECTRICAL CORD CARE
NEVER stretch the cord tightly between the vacuum and the outlet. A cord thatis stretched or pulled may not function properly, can damage the cord or plug,and creates a tripping hazard.
DO NOT tie extension cord and power cord together in a knot in an effort to keep the connection together. Doing so will result in damage to both cords and will not be covered under warranty. Instead, use the provided cord holder After vacuuming, unplug the extension cord at both ends and wind it up loosely.
- Wind the cord from the female receptacle to the male plug.
- Lay the cord out, as straight as possible, on the floor before winding.
- DO NOT wind the cord up by wrapping it around your hand and elbow, as repeated winding in this manner will result in twisted cord that is hard to wind and unwind.
- If the supply cord is damaged, it must be replaced by ProTeam, its service agent or similarly qualified persons in order to avoid a hazard. Use only a ProTeam replacement extension cord, or one that is properly sized for your application. Extension cord jacket type should be SJT or better and rated for outdoor use. Extension cords in poor condition or too small in wire size can pose fire and shock hazards. To reduce the risk of these hazards, be sure the cord is in good condition and that liquid does not contact the connection. Do not use an extension cord with conductors smaller than 16 gauge(AWG) in size. To reduce power loss, use a 14 gauge extension cord if longer than 100 ft (30 m). Any other servicing should be performed by an authorized service representative.
PROPER STORAGE
When the vacuum is not in use, the vacuum and extension cord should be stored indoors and in a dry place.![]() WARNING
WARNING
- The following information is for use by qualified service personnel only, and provides guidance for trouble shooting and maintenance under normal working conditions.
- UNPLUG the vacuum before working on the motor or any electrical part.
MOTOR SERVICE
Only a ProTeam-authorized service or warranty center should replace the carbon motor brushes or motor. Replacement schedule for motors with replaceable brushes:
- After the first 800 hours of operation.
- Again after the next 400 hours of operation.
- Again after the next 200 hours of operation.
Limited Warranty
This limited warranty applies to all ProTeam®, Inc. products, including, without limitation, Backpacks, Canisters, Hipstyles, Uprights, Air Movers, and Wet/Dry product lines, and certain batteries and chargers (collectively, the “products”). Specific warranty terms for certain product parts, motors, batteries and accessories are stated below.
If you have any questions or need assistance regarding the warranty of your product, please call ProTeam Customer Service department at (866) 888-2168 between the hours of 8:00 a.m. – 5:00 p.m. Central Time or at any time via emailor fax. Customer service hours may vary and will be updated on the ProTeam website at proteam.emerson.com. Limited Warranty ProTeam, Inc., located at 8100 W. Florissant Ave, Building T, St. Louis, MO 63136 (“ProTeam” or “we”) warrants to the original purchaser only (“you” or “your”), subject to “Warranty Exclusions” (as applicable), that the product parts, motor, battery and/or charger identified below will be free from defects in materials and workmanship, including labor costs in connection therewith, whenunder normal use and service beginning on the original date of purchase and continuing for the orresponding period (each a “Warranty Period”). This limited warranty terminates if you transfer the product to any other person or entity.
Molded Body Parts
- All molded body parts, except as indicated below – expected lifetime of theproduct
- Super HalfVac® Pro – 3 years
- All Uprights – 3 years
Motors
- Backpacks (other than specified below), Canisters, Uprights and GoCartVac® products – 3 years or 1400 hours, whichever comes first, subject to your compliance with the following carbon brush replacement and maintenance schedule. Proof of such compliance may be required:
- 1st change – after the first 800 hours of operation
- 2nd change – after the next 400 hours of operation
- 3rd change – after the next 200 hours of operation
- ProGuard® Wet/Dry 10, 15, 16 MD, 20 – 3 years or 1400 hours, whichevercomes first, subject to your compliance with the following carbon brush replacement and maintenance schedule. Proof of such compliance may be required:
- 1st change – after the first 400 hours of operation
- 2nd change – after the next 400 hours of operation
- 3rd change – after the next 300 hours of operation
- Super HalfVac Pro – 1 year
- GoFree® Flex Pro 12 Ah and 6 Ah – 2 years
- ProForce® Uprights – brush roll motor – 2 years
- ProGuard 4 Portable Wet/Dry – 1 year
- ProGuard LI 3 Cordless – 1 year
- ProBlitz® AirMovers – 3 years
Batteries, Chargers and Battery Packs
- GoFree Flex Pro 12 Ah and 6 Ah battery pack and charger – 2 years
- GoCartVac batteries – 6 months
- GoCartVac charger and battery control module – 1 year
- ProGuard LI 3 – 1 Year on battery and charger (see Limited Warranty for Lithium Ion Battery below)
Additional Limited Warranty for Lithium Ion Battery Charger for ProGuard LI 3 Cordless - 90-day Satisfaction Guarantee – In addition to the limited warranty above during the first 90 days of ownership, with respect to the charger only, the charger may be returned for full refund or exchange.
Component Parts
- All component parts not otherwise listed above – 3 years
What is Not Covered – Warranty Exclusions
This limited warranty does not extend to and expressly excludes: - Normal wear and tear on the product and/or attachments and accessories including, without limitation, extension cords, hoses, filters, switches, carbon motor brushes and other vacuum attachments and accessories not specifically listed.
- Damage or burnout of the product motor resulting from failure to clear a blockage occurring during the normal course of use.
- Loss or damage to the product resulting from conditions beyond ProTeam’scontrol including without limitation, misuse, accident, abuse, neglect, negligence (other than ProTeam’s), use beyond listed capacity, or improper installation, maintenance or application.
- Unauthorized modification or alteration.
- Loss or damage to the product resulting from failure to follow the required maintenance schedule, or failure to use the product in accordance with ProTeam’s written instructions, guidelines or the terms of its Owner’s Manual.
- Lithium Ion Battery Charger limited warranty applies only to defects arising under normal usage. All other damages are expressly excluded.
How to Notify ProTeam
If you discover that your product has a defect that you believe is covered by this limited warranty, you must notify ProTeam or the ProTeam authorized dealer whosold you the product within the applicable Warranty Period. You may contact ProTeam Customer Service department at (866) 888-2168 between the hours of 8:00 a.m. and 5:00 p.m. Central Time or at any time via the fax number or the email address listed in your Owner’s Manual or at proteam.emerson.com. Customer service hours may vary and will be updated on the ProTeam website. In order for a warranty claim to be processed as quickly as possible, we suggest that you complete the registration card made available to you on the ProTeam website at proteam.emerson.com. If you do not complete a registration card, you will be required to present a dated sales receipt in order to receive warranty service. Warranty coverage for all products is subject to your compliance with thelisted notification and repair procedures. Notification procedures for the GoFree Flex Pro backpack battery pack are set forth below.
What We Will Do to Correct Problems
ProTeam or your local ProTeam authorized dealer will determine whether your claim is covered by this limited warranty, subject to the limitations or exclusions described above, and whether the claim is within the applicable Warranty Period.For all warranty claims other than for the GoFree Flex Pro backpack battery pack, provided your claim is covered under this limited warranty, ProTeam or its authorized dealer will, at ProTeam’s sole option and discretion, (a) repair or replace the defective portion of your product or (b) replace your entire product. For GoFree Flex Pro backpack battery packs, your local ProTeam authorized dealer will repair your product, ship your product to an authorized repair facility, or contact ProTeam for a replacement. If ProTeam is unable repair your product or GoFree Flex Pro backpack battery pack or provide you with a suitable replacement, you will receive a refund of your purchase price or a credit to be used toward the purchase of a new product or GoFree Flex Pro backpack battery pack. Products repaired or replaced during the Warranty Period shall be covered for the remainder of the original Warranty Period. Unauthorized repairs or modifications, or
useof any parts other than genuine ProTeam parts, will nullify this limited warranty.
GoFree Flex Pro Backpack Battery Pack Notification Procedures
The GoFree Flex Pro backpack battery pack is not field serviceable and must receive special handling instructions for shipping. ContactProTeam Customer Service at 866.888.2168 for shipping instructions and service options. A Return Authorization Number (RAN) must be issued prior to shipping a product.
Please call the Customer Service department number above or visit the ProTeam websiteto request a RAN. If you have not submitted a completed registration card, you must include a dated, written proof-of-purchase and a statement explaining the nature of the malfunction with the RAN. If there is no local ProTeam authorized dealer, ProTeam’s Customer Service department will give you the name and address of the nearest field service representative or will provide you with the RAN and instructions for shipping your product to the ProTeam repair facility.
No Other Express Warranty Applies
THE LIMITED WARRANTIES PROVIDED ABOVE ARE THE SOLE AND EXCLUSIVE WARRANTIES PROVIDED BY PROTEAM TO YOU, AND ARE IN LIEU OF ALL OTH- ER WARRANTIES, WRITTEN OR ORAL, EXPRESS OR IMPLIED, WHETHER ARISING BY OPERATION OF LAW OR OTHERWISE, INCLUDING, WITHOUT LIMITATION, WARRANTIES OF MERCHANTABILITY OR FITNESS FOR A PARTICULAR PURPOSE, WHETHER OR NOT THE PURPOSE HAS BEEN DISCLOSED AND WHETHER OR NOT THE PRODUCT HAS BEEN SPECIFICALLY DESIGNED OR MANUFACTUREDFOR YOUR USE OR PURPOSE. THE FOLLOWING SENTENCE APPLIES ONLY TO CONSUMER PURCHASERS: DISCLAIMERS OF IMPLIED WARRANTIES, INCLUDING WITHOUT LIMITATION, IMPLIED WARRANTIES OF MERCHANTABILITY ANDFITNESS FOR A PARTICULAR PURPOSE, SHALL NOT TAKE EFFECT UNTIL THE END OF THE WARRANTY PERIOD. No employee, agent, dealer, or other personis authorized to alter this limited warranty or make any other warranty on behalfof ProTeam. The terms of this limited warranty shall not be modified by ProTeam,the original owner, or their respective successors or assigns.
Limitation of Liability
TO THE EXTENT PERMITTED BY LAW, IN NO EVENT SHALL PROTEAM BE LIABLEFOR ANY INCIDENTAL, SPECIAL, INDIRECT, OR CONSEQUENTIAL DAMAGES, INCLUDING ANY ECONOMIC LOSS, WHETHER RESULTING FROM NONPERFORMANCE, USE, MISUSE OR INABILITY TO USE THE PRODUCT OR PROTEAM’SNEGLIGENCE. SELLER SHALL NOT BE LIABLE FOR DAMAGES CAUSED BY DELAIN PERFORMANCE AND IN NO EVENT, REGARDLESS OF THE FORM OF THE CLAIM OR CAUSE OF ACTION (WHETHER BASED IN CONTRACT, INFRINGEMENT, NEGLIGENCE, STRICT LIABILITY, OTHER TORT OR OTHERWISE), SHALLPROTEAM’S LIABILITY TO YOU AND/OR YOUR CUSTOMERS EXCEED THE PURCHASE PRICE PAID BY YOU FOR THE PRODUCT. The term “consequential damages” shall include, but not be limited to, loss of anticipated profits, businessinterruption, loss of use or revenue, cost of capital or loss or damage to propertyor equipment.
Some states do not allow the exclusion or limitation of incidental or consequential damages, so the above limitation may not apply to you.
This limited warranty gives you specific legal rights, and you may also have otherrights which vary from State to State.
This limited warranty is governed by the laws of the State of Missouri, U.S.A., without regard to conflicts of law provisions.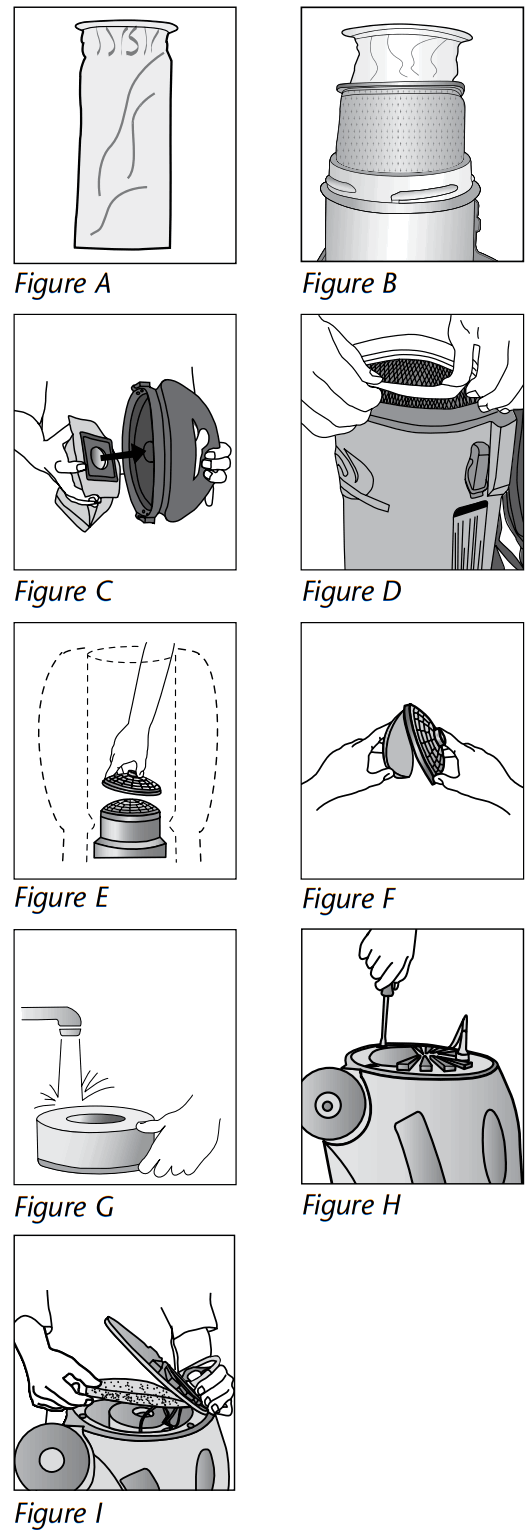 Filter Maintenance
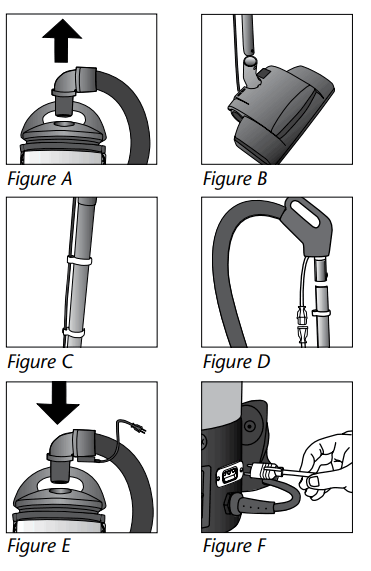
- Empty and inspect the Intercept Micro Filter every time you start and finish vacuuming (Figure A). Replace if necessary. A clogged and dirty filter restricts airflow and results in reduced suction and overheating.
- To replace the Intercept Micro Filter, slide filter into the Cloth Filter and secure into vacuum (Figure B). To replace the Intercept Micro Filter on the Sierra, slide the gasket of the Intercept Micro Filter over the inlet on the inside of the top cap, then replace the cap (Figure C) making sure that the lip of the filter completely covers the rim of the vacuum (Figure D).
- Once a month, or as necessary, hand or machine wash the Cloth Filter and let it air dry. DO NOT put it in the dryer.
- Once a week, or as necessary, clean the Dome Filter. a. First, remove the Intercept Micro Filter and Cloth Filter. Reach into the vacuum body and pull the top piece of the Dome Filter off and remove the foam media (Figure E).
b. Shake it out, rinse it and let it air dry thoroughly (Figure F).
c. Once dry, replace and firmly snap the top piece of the Dome Filter into place.
NOTE: If using a high filtration disc in place of the foam media, check it every two to three weeks. When the disc becomes discolored, replace it with a new disc. The life of
the high filtration disc will depend greatly on the use and care of the Intercept Micro Filter and Cloth Filter. - Once a month (or more often if necessary) clean the exhaust diffuser. AviationVac: Rinse (Figure G), air dry, and return the foam filter/diffuser at the bottom of the vacuum below the motor.
ProVac CN: With a Phillips screwdriver, remove the four screws from the vented exhaust cover (Figure H). Pull back the cover and remove the foam diffuser (Figure I). Rinse the diffuser, and let it air dry thoroughly (Figure G). Before the next use, return the diffuser to its place. - Following the above instructions is the best way to prolong the life of the vacuum.
To Reorder Intercept Micro Filters: Contact your local ProTeam distributor. Contact ProTeam Customer Service at 866.888.2168 for directions on finding a local distributor.
Filters can also be purchased on www.proteamvacs.com.
Reorder # 100431 AviationVac Reorder # 104544 ProVac CN Reorder # 103227 Sierra
Backpack Vacuums
OVERVIEW
- Vacuum (1)
- Extension Cord (2)
- Hose (3)
- Accessories (4)
- Intercept Micro Filter (5)
- Micro Cloth Filter (6)
- Dome Filter (7)
- Exhaust Filter (8)
QUICK START
- Unscrew the cap on the top of the vacuum unit (Figure A). Unlatch the cap on the top of the vacuum unit Sierra: Figure B).
- Remove filters (Figure C).
- Check to make sure the Dome Filter did not shift during shipping (Figure D).
- Replace the Intercept Micro Filter and the Micro Cloth Filter into the vacuum (Figure C).
- Replace the cap (Figure E). On the Sierra, make sure the side latches are engaged.
- Push the hose into the cap opening (Figure F).
PROPER VACUUMING MOTION FOR LARGE AREAS
- Begin with the wand parallel to your body.
- Draw the top of the wand in toward your waist and twist at the waist walking backward or forward, in a side-to-side motion (Figure G).
- The motion is similar to mopping and keeps the upper body and arms from tiring.
BACKPACK ERGONOMICS
- The weight of the vacuum should be evenly distributed on your hips.
- Adjust the padded waist belt and shoulder straps for a custom fit.
- The backpacks have a ventilated backplate to keep the operator cool.
- The on/off switch is conveniently located on the waist belt of the backpack vacuums. Use pocket on waist belt to avoid damage to the switch cord.
- Use the proper attachments for the job. ProTeam has attachments to perform most jobs without requiring you to bend over or get into difficult positions.
 WEARING THE BACKPACK VACUUM
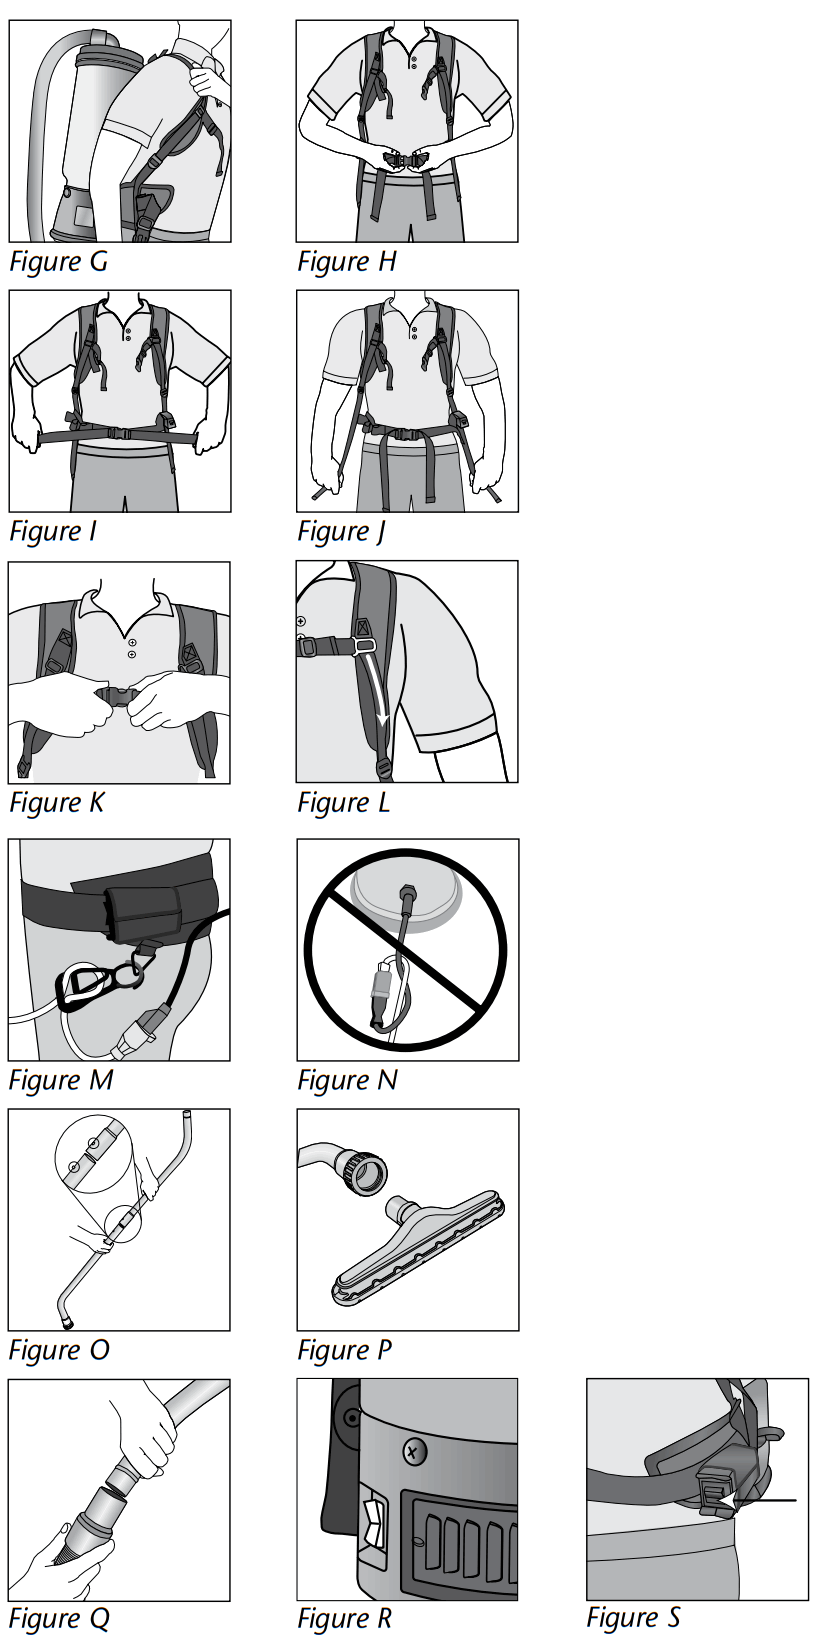
- Loosen the shoulder straps and the waist belt. Lift the vacuum and slide your arms through the straps (Figure G).
- Connect the waist strap (Figure H).
- Tighten the waist belt. It is very important that the weight of the unit be concentrated on your hips rather than your shoulders (Figure I).
- Adjust the shoulder straps so that the unit fits comfortably, but the weight is still concentrated on your hips (Figure J).
- Connect the sternum straps (Figure K).
- Slide the buckle up or down the strap for best fit (Figure L).
OPERATING THE BACKPACK VACUUM
- To reduce the risk of disconnection of the power cord from the extension cord during operation, thread the extension cord through the Cord Holder and attach to the vacuum plug as shown (Figure M).
- Do not tie extension cord and power cord together. Doing so will result in damage to both cords and will not be covered under warranty (Figure N).
- Fasten the ends of the wands together, snapping them into place (Figure O).
- Attach the floor tool to end of wand. Align the brass ring with the groove on the floor tool to ensure a secure fit (Figure P).
- Twist the wand into the end of the hose (Figure Q).
- Plug the power cord into the wall. Turn the unit on, and proceed with vacuuming.
- The on/off switch on the Sierra is located on the bottom side of the vacuum body (Figure R). The on/off switch is conveniently located on the waist belt of the AviationVac (Figure S).
Note: An optional wheel upgrade kit is available for purchase to convert the Sierra to a canister.
To ensure a valid vacuum warranty, optimal performance and improved indoor air quality,
BE SURE TO USE GENUINE PROTEAM INTERCEPT MICRO® FILTERS
- CAPTURE & CONTAIN
Intercept microbial treatment contains odors and prevents growth of mold and bacteria. - LONGER FILTER LIFE
Fully laminated inner liner eliminates shredding. - LARGE CAPACITY
21% more filtration area than non-pleated filters. - IMPROVED INDOOR AIR QUALITY
Dual layered construction contains fine particles, Improving Indoor Air Quality.
The Air We Breathe — is full of particles that trigger asthma and allergic reactions. Dust, mold, pollen and bacteria, invisible to the human eye, come from many different sources and quickly travel from one environment to the next. ProTeam’s exclusive Four Level Filtration system successfully contains microscopic debris and provides extremely high levels of protection against the reintroduction of these pollutants back into an environment.
INTERCEPT MICRO®
Replacement Filters ![]()
![]() NO COMBUSTIBLES!
NO COMBUSTIBLES!![]() NO LIQUIDS!
NO LIQUIDS!
ProTeam, Intercept Micro, and Sierra are trademarks and registered trademarks of ProTeam, Inc. © 2006-2011 ProTeam, Inc. All Rights Reserved.
To Reorder Intercept Micro Filters: Contact your local ProTeam distributor. Contact ProTeam Customer Service at 866.888.2168 for directions on finding a local distributor.
Filters can also be purchased on www.proteamvacs.com.
- Reorder # 100431 AviationVac
- Reorder # 104544 ProVac CN
- Reorder # 103227 Sierra
AviationVac Assembly
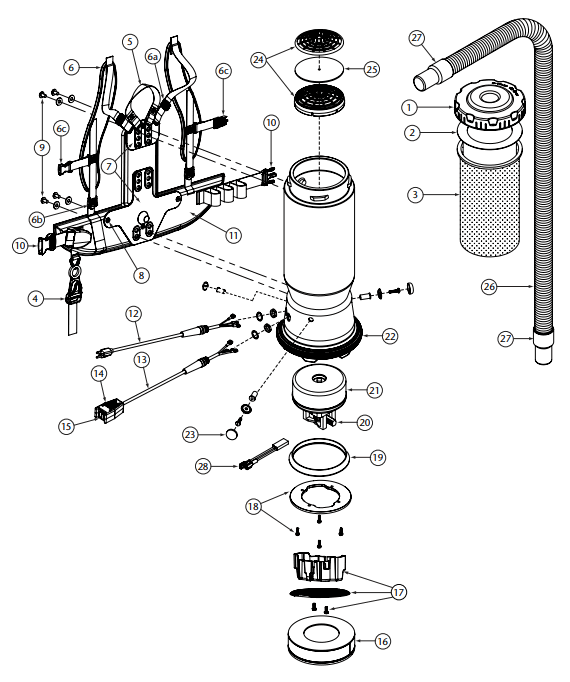 AVIATIONVAC PARTS LIST
| No. | Product Name | Qty | |
| 1 | 104273 | Twist Cap (Black) | 1 ea. |
| 2 | 100431 | Intercept Micro Filter | 10/pk |
| 3 | 100564 | Micro Cloth Filter | 1 ea. |
| 4 | 102604 | Cord Holder | 1 ea. |
| 5 | 101737 | Carry Handle w/Rivet and Washer Set | 1 set |
| 6 | 100356 | Shoulder Strap Assembly (includes: #5a, 5b, 5c) | 1 set |
| 6a | 100358 | Shoulder Strap Plastic Adjustment Buckle (Top) | 1 ea. |
| 6b | 100357 | Shoulder Strap Plastic Adjustment Buckle (Bottom) | 1 ea. |
| 6c | 103627 | Sternum Strap Buckles (Latch and Keeper) | 1 set |
| 7 | 105046 | Backplate (includes: #7) | 1 ea. |
| 8 | 100375 | Barrel Nut Connection Set for Backplate (Replacement) | 1 set |
| 9 | 100716 | Backplate (Black) Connection Set: 4 Screws w/Washers | 1 set |
| 10 | 106719 | Waist Belt Keeper and Latch | 1 ea. |
| 11 | 100359 | Waist Belt (includes: #9) | 1 ea. |
| 100354 | Strap Assembly Complete (includes: #5, 10) | 1 set | |
| 103166 | Backplate (Black) System Complete (includes: #4, 5, 6, 8, 10) | 1 set | |
| 12 | 100641 | Power Cord Assembly | 1 set |
| 13 | 101717 | Switch Cord Assembly Complete w/Switch and Box (AviationVac) | 1 ea. |
| 101715 | Switch Cord w/Crimps (AviationVac) | 1 ea. | |
| 14 | 101472 | Switch Box w/Velcro and New Lamb Switch | 1 set |
| 106287 | Switch Box w/Velcro and Screws | 1 ea. | |
| 15 | 106066 | On/Off Switch (must use with #106287) | 1 ea. |
| 16 | 105800 | Sound Muffler | 1 ea. |
| 17 | 105044 | Motor Shroud Diffuser w/Screw Set: 2 Screws | 1 set |
| 18 | 100335 | Motor Compression Ring w/Screws | 1 set |
| 100378 | Compression Ring Screw Set: 4 Screws | 1 set | |
| 19 | 100014 | Tetraseal | 1 ea. |
| 20 | 105697 | Carbon Brush Set (Domel Motor) | 1 set |
| 100424 | Carbon Brush Set (Ametek Motor) (116311-00) | 1 set | |
| 106904 | Carbon Brush Set (Ametek Motor) (122157-00) | 1 set | |
| 100173 | Carbon Brush Set for 400 Hz Motor (AviationVac) | 1 set | |
| 21 | 100422 | Motor/Fan (120 V) w/Crimps | 1 ea. |
| 100171 | Motor/Fan w/Rectifier and Crimps (400 Hz) | 1 ea. | |
| 100174 | Motor Rectifier | 1 ea. | |
| 100379 | Motor Ground and Wire Clamp Set w/Screws | 1 set | |
| 100380 | Motor Crimp Set: 4 Female, 4 Male, Ground Crimp Connector | 1 set | |
| 22 | 100586 | Bottom Bumper | 1 ea. |
| 23 | 100368 | Motor Mounting System Set: 3 Well Nuts, 3 Bolts, 3 Washers, 3 Covers | 1 set |
| 24 | 100030 | Dome Filter w/Foam Media | 1 ea. |
| 25 | 100343 | Foam Filter Media for Dome Filter | 1 ea. |
| 101220 | High Filtration Disk (optional) | 2/pk | |
| 26 | 103237 | Static-Dissipating Hose w/Cuffs (Black) 1¼” (AviationVac) | 1 ea. |
| 103048 | Static-Dissipating Hose (Black) 1½” (AviationVac) | 1 ea. | |
| 27 | 102715 | Replacement Double Swivel Elbow Cuff (Black) 1¼” (AviationVac) | 1 ea. |
| 103279 | Replacement Swivel Cuff (Black) 1¼” (AviationVac) | 1 ea. | |
| 28 | 103476 | Thermal Protector | 1 ea. |
| 101678 | 50′ Extension Cord (Not Shown) | 1 ea. |
Sierra Assembly AVIATIONVAC PARTS LIST
| No. | Product Name | Qty | |
| 1 | 104273 | Twist Cap (Black) | 1 ea. |
| 2 | 100431 | Intercept Micro Filter | 10/pk |
| 3 | 100564 | Micro Cloth Filter | 1 ea. |
| 4 | 102604 | Cord Holder | 1 ea. |
| 5 | 101737 | Carry Handle w/Rivet and Washer Set | 1 set |
| 6 | 100356 | Shoulder Strap Assembly (includes: #5a, 5b, 5c) | 1 set |
| 6a | 100358 | Shoulder Strap Plastic Adjustment Buckle (Top) | 1 ea. |
| 6b | 100357 | Shoulder Strap Plastic Adjustment Buckle (Bottom) | 1 ea. |
| 6c | 103627 | Sternum Strap Buckles (Latch and Keeper) | 1 set |
| 7 | 105046 | Backplate (includes: #7) | 1 ea. |
| 8 | 100375 | Barrel Nut Connection Set for Backplate (Replacement) | 1 set |
| 9 | 100716 | Backplate (Black) Connection Set: 4 Screws w/Washers | 1 set |
| 10 | 106719 | Waist Belt Keeper and Latch | 1 ea. |
| 11 | 100359 | Waist Belt (includes: #9) | 1 ea. |
| 100354 | Strap Assembly Complete (includes: #5, 10) | 1 set | |
| 12 | 103166 | Backplate (Black) System Complete (includes: #4, 5, 6, 8, 10) | 1 set |
| 13 | 100641 | Power Cord Assembly | 1 set |
| 101717 | Switch Cord Assembly Complete w/Switch and Box (AviationVac) | 1 ea. | |
| 14 | 101715 | Switch Cord w/Crimps (AviationVac) | 1 ea. |
| 101472 | Switch Box w/Velcro and New Lamb Switch | 1 set | |
| 15 | 106287 | Switch Box w/Velcro and Screws | 1 ea. |
| 16 | 106066 | On/Off Switch (must use with #106287) | 1 ea. |
| 17 | 105800 | Sound Muffler | 1 ea. |
| 18 | 105044 | Motor Shroud Diffuser w/Screw Set: 2 Screws | 1 set |
| 100335 | Motor Compression Ring w/Screws | 1 set | |
| 19 | 100378 | Compression Ring Screw Set: 4 Screws | 1 set |
| 20 | 100014 | Tetraseal | 1 ea. |
| 105697 | Carbon Brush Set (Domel Motor) | 1 set | |
| 100424 | Carbon Brush Set (Ametek Motor) (116311-00) | 1 set | |
| 106904 | Carbon Brush Set (Ametek Motor) (122157-00) | 1 set | |
| 100173 | Carbon Brush Set for 400 Hz Motor (AviationVac) | 1 set | |
| 21 | 100422 | Motor/Fan (120 V) w/Crimps | 1 ea. |
| 100171 | Motor/Fan w/Rectifier and Crimps (400 Hz) | 1 ea. | |
| 100174 | Motor Rectifier | 1 ea. | |
| 100379 | Motor Ground and Wire Clamp Set w/Screws | 1 set | |
| 100380 | Motor Crimp Set: 4 Female, 4 Male, Ground Crimp Connector | 1 set | |
| 22 | 100586 | Bottom Bumper | 1 ea. |
| 23 | 100368 | Motor Mounting System Set: 3 Well Nuts, 3 Bolts, 3 Washers, 3 Covers | 1 set |
| 24 | 100030 | Dome Filter w/Foam Media | 1 ea. |
| 25 | 100343 | Foam Filter Media for Dome Filter | 1 ea. |
| 101220 | High Filtration Disk (optional) | 2/pk | |
| 26 | 103237 | Static-Dissipating Hose w/Cuffs (Black) 1¼” (AviationVac) | 1 ea. |
| 103048 | Static-Dissipating Hose (Black) 1½” (AviationVac) | 1 ea. | |
| 27 | 102715 | Replacement Double Swivel Elbow Cuff (Black) 1¼” AviationVac) | 1 ea. |
| 103279 | Replacement Swivel Cuff (Black) 1¼” (AviationVac) | 1 ea. | |
| 28 | 103476 | Thermal Protector | 1 ea. |
| 101678 | 50′ Extension Cord (Not Shown) | 1 ea. |
 PREPARING THE SIERRA FOR USE WITH THE WESSEL POWER NOZZLE
- Remove hose from cap (Figure A). Set aside hose, wand and attachment.
- Connect two button lock wands together. Attach base of wand to power nozzle neck. Button lock connection will snap into place (Figure B).
- Feed power cord up the wand and snap cord into wand guides (Figure C).
- Push hose assembly into top of wand until button lock connection snaps into place. (Figure D).
- Push power nozzle cord into gas pump cord. (Figure D).
- Push electrified hose cuff into cap opening (Figure E).
- Plug power cord attached to hose into receptacle on vacuum. (Figure F).
 Canister Vacuums
OVERVIEW
- Vacuum (1)
- Extension Cord (2)
- Hose (3)
- Accessories (4)
- Intercept Micro Filter (5)
- Micro Cloth Filter (6)
- Dome Filter (7)
- Exhaust Filter (8)
QUICK START
- Tip the vacuum upright and remove the top cap (Figure A).
- Remove filters (Figure B).
- Check to make sure the dome filter has not shifted during shipping (Figure C).
- Replace the filters and cap (Figure D).
- Push the long cuff on the end of the hose completely into the cap opening (Figure E).
NOTE: To easily remove the hose, twist off the top cap. Set the cap on any flat surface so that the center of the cap rests on the top lip of the vacuum canister and push down on the cap (Figure F). The hose can then easily be pulled out of the cap.
OPERATING THE CANISTER VACUUM
- Fasten the ends of the wands together, snapping them into place (Figure G).
- Attach the floor tool to the end of the wand. Align the brass ring with the groove on the floor tool, this will ensure a secure fit (Figure H).
- Twist the wand into the end of the hose (Figure I).
- Turn the unit on, and proceed with vacuuming. The on/off switch is conveniently located on the top of the canister.
CANISTER ERGONOMICS
- The vacuum is lightweight and rolls smoothly.
- The weight of the vacuum is very well-balanced and easy to carry by the handle.
- Use the proper attachments for the job. ProTeam has attachments to perform most jobs without requiring you to bend over or get into difficult positions.
ProVac CN Assembly PROVAC CN PARTS LIST
| No. | Product Name | Qty | |
| 1 | 103318 | Top Cap, Black | 1 ea. |
| 2 | 104544 | Intercept Micro Filter | 10/pk |
| 3 | 103115 | Micro Cloth Filter | 1 ea. |
| 4 | 103327 | On/Off Switch | 1 ea. |
| 5 | 103212 | Wire Harness Assembly: 3 Wires and Strain Relief | 1 set |
| 6 | 106110 | Gasket | 1 ea. |
| 7 | 105047 | Receptacle Assembly for Powerhead | 1 ea. |
| 8 | 103236 | Motor Seal | 1 ea. |
| 8a | 105430 | Upper Foam Compression Ring | 1 ea. |
| 9 | 102784 | Dome Filter w/Filter Media | 1 ea. |
| 10 | 101949 | Replacement Foam Media for Dome Filter | 1 ea. |
| 102761 | High Filtration Disk (Optional) | 2/pk | |
| 11 | 105687 | Motor/Fan (120V) | 1 ea. |
| 12 | 105164 | Carbon Brush Set (Domel Motor) | 1 set |
| 101720 | Carbon Brush Set (Ametek Motor) | 1 set | |
| 13 | 103121 | Motor Mount | 1 ea. |
| 14 | 103117 | Tool Dock | 1 ea. |
| 15 | 103266 | Motor Mount and Vented Exhaust Cover Screw Kit | 1 set |
| 16 | 103215 | Power Cord Assembly w/Locknut and Washer | 1 ea. |
| 17 | 103123 | Exhaust Foam | 1 ea. |
| 18 | 103360 | Cover Assembly, Vented Exhaust | 1 ea. |
| 19 | 103256 | Rear Foam Diffuser | 1 ea. |
| 103124 | Foam Inlet Damper A (not shown) | 1 ea. | |
| 103125 | Foam Inlet Damper B (not shown) | 1 ea. | |
| 20 | 103267 | Rear Wheel Assembly Kit: 2 Wheels, 2 Spacers, 2 Screws | 1 set |
| 21 | 103268 | Rear Wheel Mounting Screw Kit: 2 Screws | 1 set |
| 22 | 103114 | Swivel Caster (Front Wheel) | 1 ea. |
| 23 | 103545 | Conical Washer for Swivel Caster | 1 set |
| 24 | 103172 | 78″ Static Dissipating Hose w/Cuffs (Black) 1½” | 1 set |
| 25 | 100694 | Replacement Swivel Cuff (Black) 1½” | 1 ea. |
| 26 | 103150 | Replacement Long Swivel Cuff (Black) 1½” | 1 ea. |
| 27 | 103476 | Thermal Protector | 1 ea. |
| 28 | 103441 | Cord Lock | 1 ea. |
| 101678 | 50′ Extension Cord (Not Shown) | 1 ea. |
List of Sales Representatives
United States
- Ryan, Saffel & Associates
AK, WA, OR, HI
336 Park Ave. N.
Renton, WA 98057
(425) 277-1200 (800) 869-7053
FAX (425) 271-8282 [email protected] - Nexus
Northern CA, Northern NV 14470 Doolittle Drive
San Leandro, CA 94577 (510) 567-1000 (800) 482-6088
FAX (510) 567-1005 [email protected] - Access Partners
Southern CA, Southern NV
1250 Mountain View Circle
Azusa, CA 91702 (626) 815-4200
FAX (626) 815-4300 [email protected] - TRC Marketing, Inc.
MT, ID, WY, UT, CO, AZ, NM, El Paso 4665 Joliet Street
Denver, CO 80239 (303) 373-1940 (800) 748-2290
FAX (303) 371-1557 [email protected] - D.C. Brown, Inc.
ND, SD, MN, Northwest WI
7104 Ohms Lane, Ste. 214
Minneapolis, MN 55439-2129 (952) 896-1890
FAX (952) 896-1970 [email protected] - Mid-America Distributor Sales
NE, IA, KS, MO
533 N. Lindenwood, Suite A Olathe, KS 66062 (913) 627-9961
FAX (913) 393-0543 [email protected] - Demlow Marketing
OK, AR, TX, LA
4910 Darling St.
Houston, TX 77007 (713) 864-2947 (800) 334-4923
FAX (713) 864-7054 [email protected] - Osborne Sales Group
IN, OH, Western PA, KY, WV
4010 North Bend Road, Suite 101
Cincinnati, OH 45211 (513) 481-6200 (800) 837-4933
FAX (513) 389-3992 [email protected] - Hinton Sales, Inc.
TN, MS, AL, GA
6659-D Peachtree Industrial Blvd.
Norcross, GA 30092 (770) 326-6455 (800) 344-2638
FAX (770) 326-6189 [email protected] - Robert George Sales
Upstate NY
6605 Pittsford-Palmyra Road, Suite E3
Fairport, NY 14450 (585) 223-5900 (888) 655-6556
FAX (585) 223-5911 [email protected] - Market Advantage Plus
VT, NH, ME, MA, CT, RI
56 Leonard St., Unit 4
Foxboro, MA 02035 (508) 543-3605 (800) 564-6320 (New England only)
FAX (508) 543-7147 [email protected] - Bull’s Eye
Northern NJ, Metro NY, Long Island, NY
73 Cedar Avenue
Hershey, PA 17033 (717) 533-3601 (888) 381-8892
FAX (717) 533-4671 [email protected] - Buckley & Associates
Eastern PA, DE, MD, DC, VA, NC,
SC, Southern NJ
5707 Centre Square Dr.
Centreville, VA 20120 (703) 631-8138
FAX (703) 631-7841 [email protected] - The DeBolt Company, Inc.
FL, Caribbean
3650 Coral Ridge Dr., Suite 112
Coral Springs, FL 33065 (954) 255-5061 (800) 866-0618
FAX (800) 860-0618 [email protected] - The RTF Group, Inc.
IL, WI
49 Sherwood Terrace, #49C
Lake Bluff, IL 60044 (847) 234-7300 (800) 860-6162
FAX (847) 234-7301 [email protected] - Apex MI
305 Canal Street
Lemont, IL 60439 (630) 257-0001
FAX (630) 257-0005 [email protected]
Canada - British Columbia Ryan, Saffel & Associates
2731 152nd Avenue, NE
Redmond, WA 98052-5544 (425) 885-7090 (800) 869-7053
FAX (425) 881-8733 [email protected] - Western Canada (except BC) Rev Sales & Marketing, Inc.
AB
3107 16 Street SW
Calgary, AB Canada T2T 4G8
(403) 400-2024 [email protected]
MB, SK
1345 Niakawa Road East
Winnipeg, MB R2J 3T5
(204) 962-1849 [email protected] - Eastern Canada
McConnell-Spadafora
ON, QC, NB, NS, PEI, NL 850 Legion Road, Unit 4
Burlington, ON Canada L7S 1T5 (905) 681-9563(866) 700-8889
FAX (905) 681-1727 [email protected]
Mexico - Contact Customer Service (866) 888-2168
 how to reach us
mail: 8100 W. Florissant Ave, Building T
St. Louis, MO 63136
phone: 866.888.2168 800.541.1456
fax: 800.844.4995
web: www.pro-team.com
email: [email protected]


