![]() Digital Projector Installation Guide
Digital Projector Installation Guide
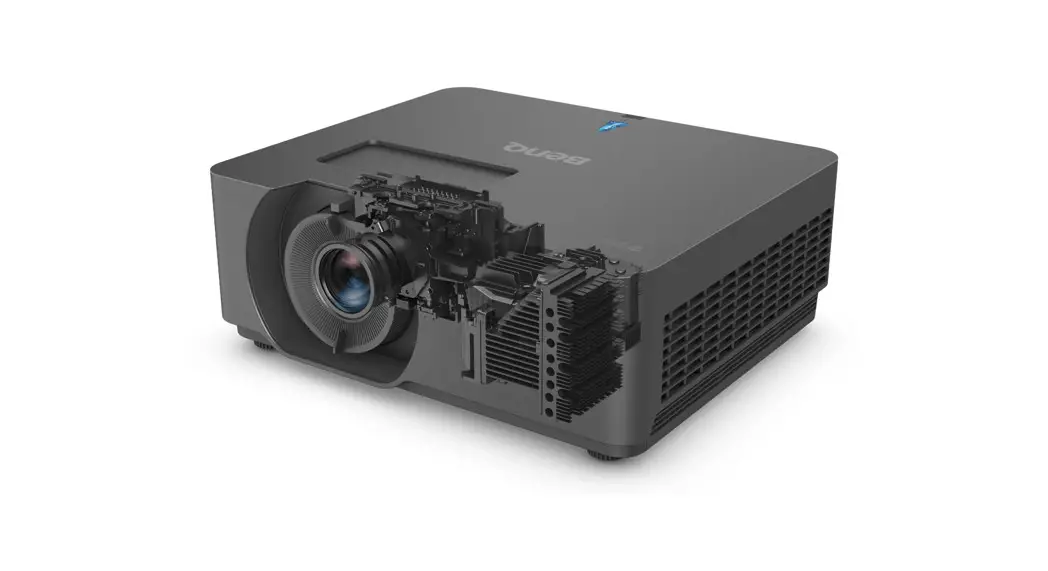
Installation Projector LU960ST / LU960
Notice
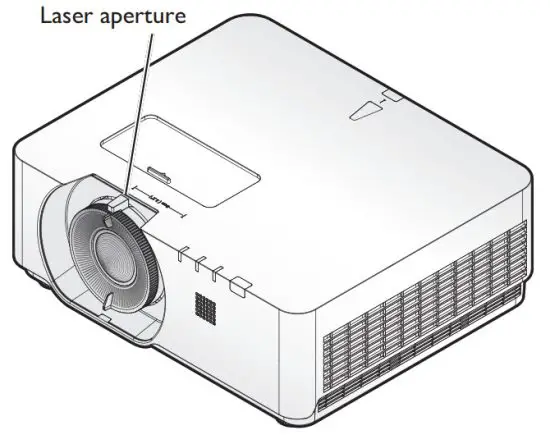
Notice on laser
Caution – Use of controls or adjustments or performance of procedures other than those specified herein may result in hazardous radiation exposure. Do not point laser or allow laser light to be directed or reflected toward other people or reflective objects. Direct or scattered light can be hazardous to the eyes and skin. There is a potential hazard of eye exposure to laser radiation if the included instructions are not followed. Do not allow to look into the projector beam at any distance from the projector. An adult should supervise the children to prevent exposure risks. Check that there is no one looking at the lens when using the remote control for starting the projector. Do not look at the projected light using optical devices(binoculars, telescopes, magnifying glasses, reflectors, etc).
- Laser class
This Laser Product is designated as Class 1 during all procedures of operation and complies with IEC/EN 60825-1:2014. - Laser parameters
| Wavelength Mode of operation Pulse width Pulse repetition rate Maximum laser energy Total internal power Apparent source size Divergence | 449nm – 461nm (Blue) Pulsed, due to frame rate 1.15ms 120Hz 0.76mJ >100w >10mm, at lens stop >100 mili Radian |
- Laser light instruction
Cooling notice
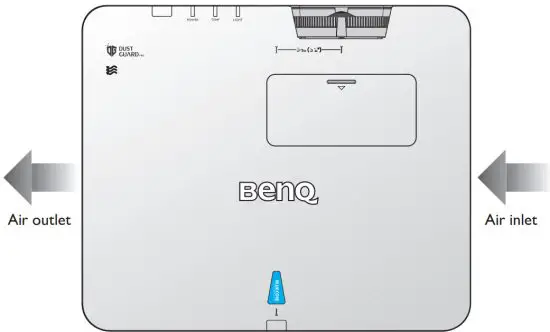
Allow at least 50 cm (19.7 inches) for clearance around the exhaust vent. Make sure no objects block air inlet within 50 cm (19.7 inches).
Keep the outlet at least 1 m away from the inlets of other projectors.
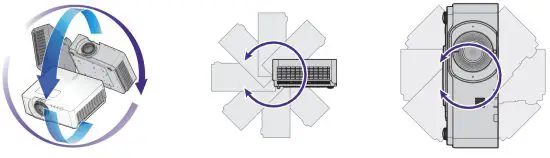
- The projector can be installed at any angle. 360-degree projection
![]() Caution:
Caution:
Installation of the projector should be performed carefully Incomplete or improper installation may cause the projector to fall, resulting in personal injury or property damage.
- Allow at least 50 cm of clearance around the exhaust vent.
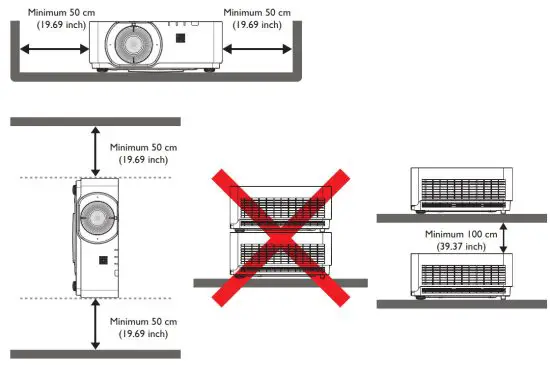
- Ensure that the air intake vents do not recycle hot air from the exhaust vent.
- When operating in an enclosed space, make sure that the surrounding air temperature does not exceed the projector’s operating temperature and that the air intake and exhaust vents are unobstructed.
All enclosures should pass a certified thermal evaluation to ensure that the projector does not recycle exhaust air. Recycling exhaust air may cause the projector to shut down even if the ambient temperature is within the acceptable operating temperature range.
Product information
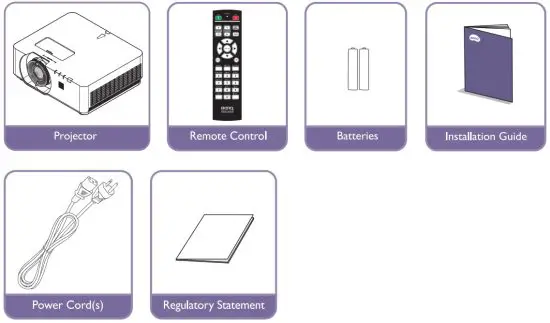
Packing content
Specification
| Projection system | LU960ST LU960 | |
| 1-CHIP DMD | ||
| Native resolution | 1920*1200 pixels, 16:10 | |
| Light source | Laser diodes | |
| Throw ratio | 0.77 — 0.84 | 1.13 — 1.70 |
| Power consumption | 450Watts (Normal mode)/ 350Watts (Eco mode) | |
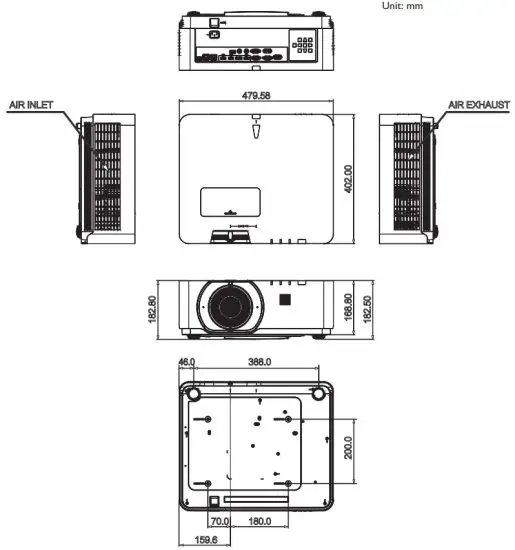
| Dimension | 479.6 x 402 x 182.8 mm | |
| Weight | 12 kg | |
![]() Note:
Note:
- The brightness output will vary depending on each unit and actual usage.
- Please find the latest user manual on the local website.
Terminals

MINI-B
Support Mini USB type B for service only.
LAN
For connection to RJ45 Cat5/Cat6 Ethernet cable to control the projector through a network.
HDBaseT
For connection to an HDBaseT transmitter via an Ethernet cable (Cat5/Cat6) to input up to 4K 30Hz, The RS232 control signal and IR control signal. The HDBaseT port supports RS-232/ IR/LAN Control, which can be selected in OSD.
HDMI 2
Connection to HDMI source.
HDMI 1
Connection to HDMI source.
DISPLAYPORT
Connection to a Display Port source.
HDMI OUT
Connection to HDMI device.
PC IN
15-pin VGA port for connection to RGB, component HD source, or PC.
MONITOR OUT
Connection to other display equipment for concurrent playback display.
AUDIO OUT
Connection to a speaker amplifier or headset.
AUDIO IN
Connection to an audio input source via an audio cable.
REAR LIGHT
Illumination for terminals.
USB 1.5A
Support 5V/1.5A output.
3D SYNC IN
Connect 3D-sync in the cable from a computer or an enabled device.
3D SYNC OUT
Connection to 3D IR sync signal transmitter.
RS-232 IN
Standard 9-pin D-sub interfaces for connection to PC control system and projector maintenance.
12V TRIGGER
3.5mm mini earphone jack, employs 200mA display relay to provide 12(+/-1.5)V output and short circuit protection.
WIRED REMOTE
Connection to wire remote controller.![]() Caution:
Caution:
Make sure the port is valid before inserting a wired remote controller. The remote controller may be damaged in case of an invalid port, e.g. a wired remote controller is connected to trigger output. For more information about upgrading firmware via Lan, please contact BenQ service.
Remote control
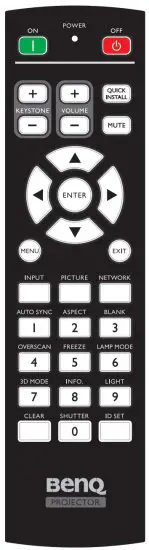 ON / OFF
Toggles the projector between standby mode and on.
KEYSTONE+/KEYSTONEManually
corrects distorted images resulting from an angled projection.
VOLUME +/VOLUME
Increases/decreases the projector volume.
QUICK INSTALL
Displays the Quick Install OSD menu.
MUTE
Toggles projector audio between on and off.
Arrow keys (▲ Up, ▼ Down, ◄ Left, ► Right)
When the On-Screen Display (OSD) menu is activated, the arrow keys are used as directional arrows to select the desired menu items and to make adjustments.
ENTER
Selects an available picture setup mode. Activates the selected OnScreen Display (OSD) menu item.
MENU
Turns on the On-Screen Display (OSD) menu. Goes back to the previous OSD menu, exits, and saves menu settings.
EXIT
Goes back to the previous OSD menu, exits, and saves menu settings.
INPUT
Selects an input source for display.
PICTURE
Press to display Picture menu.
NETWORK
Selects Network Display as the input signal source.
AUTO-SYNC
Automatically determines the best picture timings for the displayed image.
ASPECT
Selects the display aspect ratio.
BLANK
Used to hide the screen picture.
OVERSCAN
Press to select overscan mode.
FREEZE
Freezes the projected image.
LAMP MODE
Press to display OSD menu to select desired light mode.
3D MODE
Press to display 3D setup menu.
INFO.
Press to display INFORMATION menu.
LIGHT
Press to open the backlight of the remote controller.
CLEAR
Clear remote ID SET assigned to all projectors. Press CLEAR and ID SET for five seconds. The LED blinks three times then the ID setting is cleared.
SHUTTER
The function is not available on this projector.
ID SET
- Remote control ID SET (set the particular remote code) Press to set remote ID. Press ID SET for three seconds. The POWER indicator on the remote control blinks, then presses 01~99 to designate an ID.
 Note:
Note:
The remote control number (Remote control ID) must match the Projector ID Setting number for accurate control. - Clear Remote ID SET (set remote code to all) Press CLEAR and ID SET for five seconds. The POWER indicator on the remote control blinks a single instance to reset remote code to all, can control projector no matter projector id setting.
Numeric buttons
Enters numbers in network settings.
Numeric buttons 1, 2, 3, 4 cannot be pressed when asked to enter a password.
WIRE REMOTE jack
Connect to a projector for wire remote control.
Installation
Lens Cap / Lens Lock
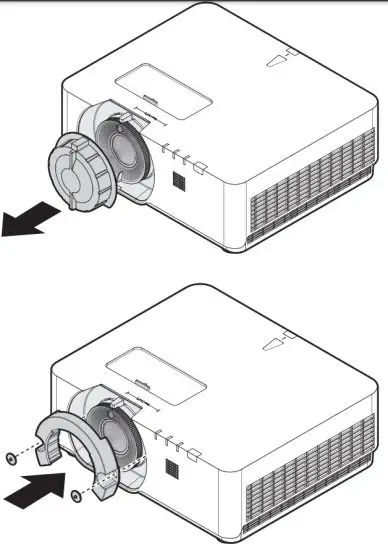
- Remove lens cap before booting.
- Install lens lock
- Secure with screws, do not fully tighten
- Adjust the focus
- Tighten the screws
Projection table
• LU960ST
The screen aspect ratio is 16:10 and the projected picture is 16:10.
![]() Note:
Note:
To optimize the projection quality, we suggest projecting images in an area without grayscale.
| Image size | Distance | ||||||||||
| Diagonal | Width | Height | Min distance – Wide | Average | Max distance – Tele | ||||||
| Inch | mm | Inch | mm | Inch | mm | Inch | mm | Inch | mm | Inch | mm |
| 60 | 1524 | 51. | 1292 | 32. | 808 | 39. | 995 | 41. | 1043 | 43. | 1091 |
| 100 | 2540 | 85. | 2154 | 53.0 | 1346 | 65. | 1659 | 68. | 1738 | 72. | 1818 |
| 130 | 3302 | 110. | 2800 | 69. | 1750 | 85. | 2156 | 89.0 | 2260 | 93.0 | 2363 |
| 150 | 3810 | 127. | 3231 | 80. | 2019 | 98. | 2488 | 103. | 2607 | 107. | 2727 |
| 160 | 4064 | 136. | 3446 | 85. | 2154 | 105. | 2654 | 110. | 2781 | 115. | 2909 |
| 170 | 4318 | 144. | 3662 | 90. | 2289 | 111.0 | 2819 | 116. | 2955 | 122. | 3090 |
| 180 | 4572 | 153. | 3877 | 95. | 2423 | 118. | 2985 | 123. | 3129 | 129. | 3272 |
| 190 | 4826 | 161. | 4092 | 101. | 2558 | 124. | 3151 | 130.0 | 3303 | 136.0 | 3454 |
| 200 | 5080 | 170. | 4308 | 106.0 | 2692 | 131. | 3317 | 137. | 3476 | 143. | 3636 |
| 250 | 6350 | 212.0 | 5385 | 133. | 3365 | 163. | 4146 | 171. | 4346 | 179. | 4545 |
| 300 | 7620 | 254. | 6462 | 159.0 | 4039 | 196. | 4976 | 205. | 5215 | 215. | 5454 |
• LU960
The screen aspect ratio is 16:10 and the projected picture is 16:10.![]() Note:
Note:
To optimize the projection quality, we suggest to project images in an area without grayscale.
| Image size | Distance | ||||||||||
| Diagonal | Width | Height | Min distance – Wide | Average | Max distance – Tele | ||||||
| Inch | mm | Inch | mm | Inch | mm | Inch | mm | Inch | mm | Inch | mm |
| 60 | 1524 | 51. | 1292 | 32. | 808 | 57. | 1456 | 72. | 1825 | 86. | 2193 |
| 100 | 2540 | 85. | 2154 | 53.0 | 1346 | 96. | 2427 | 120. | 3041 | 144. | 3655 |
| 130 | 3302 | 110. | 2800 | 69. | 1750 | 124. | 3156 | 156. | 3954 | 187. | 4752 |
| 150 | 3810 | 127. | 3231 | 80. | 2019 | 143. | 3641 | 180. | 4562 | 216. | 5483 |
| 160 | 4064 | 136. | 3446 | 85. | 2154 | 153. | 3884 | 192. | 4866 | 230. | 5848 |
| 170 | 4318 | 144. | 3662 | 90. | 2289 | 163. | 4127 | 204. | 5170 | 245. | 6214 |
| 180 | 4572 | 153. | 3877 | 95. | 2423 | 172.0 | 4369 | 216. | 5474 | 259.0 | 6579 |
| 190 | 4826 | 161. | 4092 | 101. | 2558 | 182. | 4612 | 228. | 5779 | 273. | 6945 |
| 200 | 5080 | 170. | 4308 | 106.0 | 2692 | 191. | 4855 | 240. | 6083 | 288. | 7310 |
| 250 | 6350 | 212.0 | 5385 | 133. | 3365 | 239. | 6069 | 299. | 7603 | 360. | 9138 |
| 300 | 7620 | 254. | 6462 | 159.0 | 4039 | 287. | 7282 | 359. | 9124 | 432. | 10966 |
![]() Note:
Note:
- For more visualized instructions, please go to the BenQ calculator website http://projectorcalculator.benq.com/.
- Ceiling installation must be done by a qualified professional. Contact your dealer for more information. It is not recommended you install the projector yourself.
- Only use the projector on a solid, level surface. Serious injury and damage can occur if the projector is dropped.
- Do not use the projector in an environment where extreme temperature occurs. The projector must be used at temperatures between 41 degrees Fahrenheit (5 degrees Celsius) and 104 degrees Fahrenheit (40 degrees Celsius).
- Screen damage will occur if the projector is exposed to moisture, dust or smoke.
- Do not cover the vents on the projector. Proper ventilation is required to dissipate heat. Damage to the projector will occur if the vents are covered.
- Lens shift range diagram
- LU960ST / LU960
![]() Note:
Note:
- “To optimize the projection quality, we suggest utilizing the lens shift within vertical 50% and horizontal 20%.
- Black corner may occur when reaching the mechanical limitation”
LED indicator
- LED Usage
| LED Name | Detailed Description |
| Power LED | Display the power on/off sequence status Orange: Power Off (Green + Red) Green: Power On Blink: Warming up/Shutting Down & Cooling / Error Code |
| Temperature Status LED | Display the Thermal status (Fan Fail, Over Temperature, etc.) Red: Thermal Over Temperature Blink: Error Code |
| Lamp Status LED | Display the Lamp status (Lamp fail, Lamp spoil, etc.) Red: Lamp Fail Blink: Error Code |
System message
| Power | Temp | Light | Status & Description |
| Orange | Stand-by | ||
| Green Flashing | – | – | Powering up |
| Green | – | – | Normal operation |
| Orange Flashing | – | – | Normal power-down cooling |
| Red Flashing | Red Flashing | Red Flashing | Download |
| Green | Red | CW start fails | |
| Green | – | Red Fl ashi | Phosphor Wheel start fails |
| Orange | – | Red | Case open |
| Orange | – | ed FlasR hing | Filter replaces warning |
| Orange | Green Flashing | – | Thermal break sensor error |
Burn-In Messages
| Power | Temp | Light | Status & Description |
| Green | – | – | Burn-in ON |
| Green | Green | Green | Burn-in OFF |
Lamp Error Messages
| Power | Temp | Light | Status & Description |
| – | Red | The lamp I error in normal operation | |
| – | Red Flashing | The lamp is not lit up |
Thermal Error Messages
| Power | Temp | Light | Status & Description |
| Red | Red | – | Fan I error (the actual fan speed is outside the desired speed) |
| Red | Red Flashing | – | Fan 2 error (the actual fan speed is outside the desired speed) |
| Red | Green | – | Fan 3 error(the actual fan speed is outside the desired speed)eed) |
| Red | Green Flashing | – | Fan 4 error (the actual fan speed is outside the desired speed) |
| Red Flashing | Red | – | Fan 5 error (the actual fan speed is outside the desired speed) |
| Red Flashing | Red Flashing | Fan 6 error (the actual fan speed is outside the desired speed) | |
| Red Flashing | Green | – | Fan 7 error (the actual fan speed is outside the desired speed) |
| Green | Red | – | Temperature I error (over limited temperature) |
| Green | Red ng Fl ashi | – | Thermal Sensor I open error |
| Green | Green | – | Thermal Sensor I short error |
| Green | Green Flashing | – | Thermal IC #1 I2C Connection error |
| Green Flashing | Red | – | Temperature 2 error (over limited temperature) |
| Green Flashing | Red Flashing | – | Thermal Sensor 2 open error |
| Green Flashing | Green | – | Thermal Sensor 2 short error |
| Green Flashing | Green Flashing | – | Thermal IC #2 12C Connection error |
| Green | Red | Red | Temperature 3 error (over limited temperature) |
| Power | Temp | Light | Status & Description |
| Green | Red | Red Flashing | Thermal Sensor 3 open error |
| Green | Red | Green | Thermal Sensor 3 short error |
| Green | Red | Green Flashing | Thermal IC #3 12C Connection error |
| Green | Red Flashing | Red | Temperature 4 error (over limited temperature) |
| Green | Red Flashing | Red Flas hing | Thermal Sensor 4 open error |
| Green | Red Flas ping | Green | Thermal Sensor 4short error |
| Green | Red Flashing | Gre F lashing in | Thermal IC #412C Connection error |
Projector dimension
RS232 command control
RS232 pin assignment
| No. | Serial | |
| 1 | N.C | 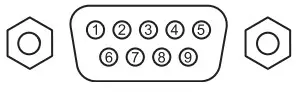 |
| 2 | RDX | |
| 3 | TXD | |
| 4 | N.C | |
| 5 | Ground | |
| 6 | N.C | |
| 7 | Short with pin8 | |
| 8 | Short with pin7 | |
| 9 | N.C |
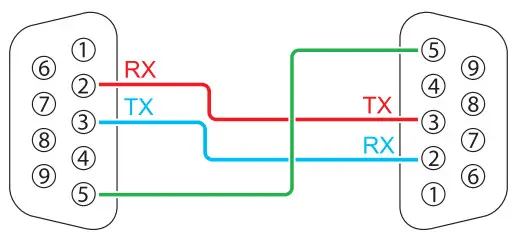
RS232 serial port with a crossover cable
| Function | Type | Operation | ASCII |
| Power | Write | Power On | <CR>*pow=on#<CR> |
| Write | Power Off | <CR>*pow=off#<CR> | |
| Read | Power Status | <CR>*pow=?#<CR> | |
| Source Selection | Write | COMPUTER/YPbPr | <CR>*sour=RGB#<CR> |
| Write | HDMI(MHL) | <CR>*sour=hdmi#<CR> | |
| Write | HDMI 2(MHL2) | <CR>*sour=hdmi2#<CR> | |
| Write | HDBaseT | <CR>*sour=hdbaset#<CR> | |
| Write | DisplayPort | <CR>*sour=dp#<CR> | |
| Read | Current source | <CR>*sour=?#<CR> | |
| Audio Control | Write | Mute On | <CR>*mute=on#<CR> |
| Write | Mute Off | <CR>*mute=off#<CR> | |
| Read | Mute Status | <CR>*mute=?#<CR> | |
| Write | Volume + | <CR>*vol=+#<CR> | |
| Write | Volume – | <CR>*vo1=-#<CR> | |
| Write | Volume level for customer | <CR>*vol=value#<CR> | |
| Read | Volume Status | <CR>*vol=?#<CR> |
| Function | Type | Operation | ASCII |
| Audio Source Select | Write | Audio pass Through off | <CR>*audiosour=off#<CR> |
| Write | Audio-Computerl | <CR>*audiosour=RGB#<CR> | |
| Write | Audio-HDMI | <CR>*audiosour=hdmi#<CR> | |
| Write | Audio-HDMI2 | <CR>*audiosour=hdmi2#<CR> | |
| Write | DisplayPort | <CR>*audiosour=dp#<CR> | |
| Write | HDBaseT | <CR>*audiosour=hdbaset#<CR> | |
| Read | Audio pass Status | <CR>*audiosour=?#<CR> | |
| Picture Mode | Write | Presentation | <CR>*appmod=preset#<CR> |
| Write | sRGB | <CR>*appmod=srgb#<CR> | |
| Write | Bright | <CR>*appmod=bright#<CR> | |
| Write | DICOM | <CR>*appmod=dicom#<CR> | |
| Write | Infographic | <CR>*appmodrinfographic#<CR> | |
| Write | Userl | <CR>*appmod=userl#<CR> | |
| Write | User2 | <CR>*appmodr user2#<CR> | |
| Write | 3D | <CR>*appmodrthreed#<CR> | |
| Write | HDRI 0 | <CR>*appmodr hdr<CR> | |
| Write | HLG | <CR>*appmodr hIg<CR> | |
| Write | Video | <CR>*appmod=video<CR> | |
| Read | Picture Mode | <CR>*appmod=?#<CR> | |
| Picture Setting | Write | Contrast + | <CR>*con=+#<CR> |
| Write | Contrast – | <CR>*con=-#<CR> | |
| Write | Set Contrast value | <CR>*con=value#<CR> | |
| Read | Contrast value | <CR>*con=?#<CR> | |
| Write | Brightness + | <CR>Thri=+#<CR> | |
| Write | Brightness – | <CR>thri=-#<CR> | |
| Write | Set Brightness value | <CR>Thri=value#<CR> | |
| Read | Brightness value | <CR>thri=?#<CR> | |
| Write | Color + | <CR>*color=+#<CR> | |
| Write | Color – | <CR>*color=-#<CR> | |
| Write | Set Color value | <CR>*color=value#<CR> | |
| Read | Color value | <CR>*color=?#<CR> | |
| Write | Sharpness + | <CR>*sharp=+#<CR> | |
| Write | Sharpness – | <CR>*sharp=-#<CR> | |
| Write | Set Sharpness value | <CR>*sharp=value#<CR> | |
| Read | Sharpness value | <CR>*sharp=?#<CR> | |
| Write | Color Temperature-Warm | <CR>*tt=warm#<CR> | |
| Write | Color Temperature-Normal | <CR>*ct=normal#<CR> | |
| Write | Color Temperature-Cool | <CR>*ct=cool#<CR> | |
| Read | Color Temperature Status | <CR>’ct=?#<CR> | |
| Write | Aspect 4:3 | <CR>tasp=4:3#<CR> | |
| Write | Aspect 16:9 | <CR>tasp= I 6:9#<CR> | |
| Write | Aspect 16:10 | <CR>*asp= I 6:1 0#<CR> |
| Function | Type | Operation | ASCII |
| Picture Setting | Write | Aspect Auto | <CR>xasp=AUTO#<CR> |
| Write | Aspect Real | <CR>*asp=REAL#<CR> | |
| Write | Aspect 2.4:1 | <CR>*asp=2.4#<CR> | |
| Read | Aspect Status | <CR>xasp=?#<CR> | |
| Write | Vertical Keystone + | <CR>*vkeystone=+#<CR> | |
| Write | Vertical Keystone – | <CR>*vkeystone=-#<CR> | |
| Write | Set Vertical Keystone value | <CR>* vkeystone=value#<CR> | |
| Read | Vertical Keystone value | <CR>tvkeystone=?#<CR> | |
| Write | Horizontal Keystone + | <CR>*hkeystone=+#<CR> | |
| Write | Horizontal Keystone – | <CR>*hkeystone=-#<CR> | |
| Write | Set Horizontal Keystone value | <CR>* hkeystone=value#<CR> | |
| Read | Horizontal Keystone value | <CR>*hkeystone=?#<CR> | |
| Write | Overscan Adjustment + | <CR>*overscan=+#<CR> | |
| Write | Overscan Adjustment – | <CR>*overscan=-#<CR> | |
| Read | Overscan Adjustment value | <CR>*overscan=?#<CR> | |
| Write | 4 Corners Top-Left-X Decrease | <CR>*cornerfittlx=-#<CR> | |
| Write | 4 Corners Top-Left-X Increase | <CR>*cornerfittlx=+#<CR> | |
| Read | 4 Corners Top-Left-X Status | <CR>*cornerfittlx=?#<CR> | |
| Write | 4 Corners Top-Left-Y Decrease | <CR>*cornerfittly=-#<CR> | |
| Write | 4 Corners Top-Left-Y Increase | <CR>*cornerfittly=+#<CR> | |
| Read | 4 Corners Top-Left-Y Status | <CR>*cornerfittly=?#<CR> | |
| Write | 4 Corners Top-Right-X Decrease | <CR>*cornerfittrx=-#<CR> | |
| Write | 4 Corners Top-Right-X Increase | <CR>*cornerfittrx=+#<CR> | |
| Read | 4 Corners Top-Right-X Status | <CR>*cornerfittrx=?#<CR> | |
| Write | 4 Corners Top-Right-Y Decrease | <CR>*cornerfittry=-#<CR> | |
| Write | 4 Corners Top-Right-Y Increase | <CR>*cornerfittry=+#<CR> | |
| Read | 4 Corners Top-Right-Y Status | <CR>*cornerfittry=?#<CR> | |
| Write | 4 Corners Bottom-Left-X Decrease | <CR>*cornerfitblx=-#<CR> | |
| Write | 4 Corners Bottom-Left-X Increase | <CR>*cornerfitblx=+#<CR> | |
| Read | 4 Corners Bottom-Left-X Status | <CR>*cornerfitblx=?#<CR> | |
| Write | 4 Corners Bottom-Left-Y Decrease | <CR>*cornerfitbly=-#<CR> | |
| Write | 4 Corners Bottom-Left-Y Increase | <CR>*cornerfitbly=+#<CR> | |
| Read | 4 Corners Bottom-Left-Y Status | <CR>*cornerfitbly=?#<CR> | |
| Write | 4 Corners Bottom-Right-X Decrease | <CR>*cornerfitbrx=-#<CR> | |
| Write | 4 Corners Bottom-Right-X Increase | <CR>*cornerfitbrx=+#<CR> | |
| Read | 4 Corners Bottom-Right-X Status | <CR>*cornerfitbrx=?#<CR> | |
| Write | 4 Corners Bottom-Right-Y Decrease | <CR>*cornerfitbry=-#<CR> | |
| Write | 4 Corners Bottom-Right-Y Increase | <CR>*cornerfitbry=+#<CR> | |
| Read | 4 Corners Bottom-Right-Y Status | <CR>*cornerfitbry=?#<CR> | |
| Write | Digital Zoom In | <CR>*zooml#<CR> | |
| Write | Digital Zoom out | <CR>xzoom0#<CR> | |
| Write | Auto | <CR>*auto#<CR> |
| Function | Type | Operation | ASCII |
| Picture Setting | Write | Brilliant color + | <CR>I3C=+#<CR> |
| Write | Brilliant color – | <CR>13C=-#<CR> | |
| Write | Brilliant color set value | <CR>*BC=value#<CR> | |
| Read | Brilliant color status | <CR>*BC=?#<CR> | |
| Write | Auto(HDR) | <CR>*hdr=auto#<CR> | |
| Write | SDR | <CR>*hdr=sdr#<CR> | |
| Write | HDRIO | <CR>*hdr=hdr#<CR> | |
| Write | HLG | <CR>*hdr=hIg#<CR> | |
| Read | HDR status | <CR>*hdr=?#<CR> | |
| Write | Reset current picture settings | <CR>*rstcurpicsetting#<CR> | |
| Write | Reset all picture settings | <CR>*rstallpicsetting#<CR> | |
| Operation Settings | Write | Projector Position-Front Table | <CR>xpp=FT#<CR> |
| Write | Projector Position-Rear Table | <CR>*pp=RE#<CR> | |
| Write | Projector Position-Rear Ceiling | <CR>*pp=RC#<CR> | |
| Write | Projector Position-Front Ceiling | <CR>*pp=FC#<CR> | |
| Read | Projector Position Status | <CR>sap=?#<CR> | |
| Write | Quick auto search | <CR>*QAS=on#<CR> | |
| Write | Quick auto search | <CR>*QAS=off#<CR> | |
| Read | Quick auto search status | <CR>*QAS=?#<CR> | |
| Write | Menu Position – Center | <CR>tmenuposition=center#<CR> | |
| Write | Menu Position – Top-Left | <CR>tmenuposition=t1#<CR> | |
| Write | Menu Position – Top-Right | <CR>*menuposition=tr#<CR> | |
| Write | Menu Position – Bottom-Right | <CR>*menuposition=br#<CR> | |
| Write | Menu Position – Bottom-Left | <CR>*menuRosition=b1#<CR> | |
| Read | Menu Position Status | <CR>*menuRosition=?#<CR> | |
| Write | Direct Power On-on | <CR>*directpower=on#<CR> | |
| Write | Direct Power On-off | <CR>*directpower=off#<CR> | |
| Read | Direct Power On-Status | <CR>*directpower=?#<CR> | |
| Write | Signal Power On-on | <CR>*autopower=on#<CR> | |
| Write | Signal Power On-off | <CR>*autopower=off#<CR> | |
| Read | Signal Power On-Status | <CR>*autopower=?#<CR> | |
| Baud Rate | Write | 2400 | <CR>thaud=2400#<CR> |
| Write | 4800 | <CR>thaud=4800#<CR> | |
| Write | 9600 | <CR>xbaud=9600#<CR> | |
| Write | 14400 | <CR>xbaud=14400#<CR> | |
| Write | 19200 | <CR>xbaud=19200#<CR> | |
| Write | 38400 | <CR>*baud=38400#<CR> | |
| Write | 57600 | <CR>*baud=57600#<CR> | |
| Write | 115200 | <CR>*baud= I I 5200#<CR> | |
| Read | Current Baud Rate | <CR>*baud=?#<CR> | |
| Lamp Control | Read | Lamp Hour | <CR>Itim=?#<CR> |
| Write | Normal mode | <CR>lampm=lnor#<CR> |
| Function | Type | Operation | ASCII |
| Lamp Control | Write | Eco mode | <CR>xlampmreco#<CR> |
| Write | Dimming mode | <CR>lampm=dimming#<CR> | |
| Write | Custom mode | <CR>lampm=custom#<CR> | |
| Write | Light level for custom mode | <CR>lampcustom=value#<CR> | |
| Read | Light level status for custom mode | <CR>lampcustom=?#<CR> | |
| Read | Lamp Mode Status | <CR>lampm=?#<CR> | |
| Miscellaneous | Read | Model Name | <CR>*modelname=?#<CR> |
| Read | System F/W Version | <CR>*sysfwversion=?#<CR> | |
| Read | Scaler F/W Version | <CR>*scalerfwversion=?#<CR> | |
| Read | Lan F/W Version | <CR>lanfwversion=?#<CR> | |
| Read | MCU F/W Version | <CR>*mcufwversion=?#<CR> | |
| Write | Blank On | <CR>thlank=on#<CR> | |
| Write | Blank Off | <CR>*blank=off#<CR> | |
| Read | Blank Status | <CR>*blank=?#<CR> | |
| Write | Freeze On | <CR>*freeze=on#<CR> | |
| Write | Freeze Off | <CR>*freeze=off#<CR> | |
| Read | Freeze Status | <CR>*freeze=?#<CR> | |
| Write | Menu On | <CR>*menu=on#<CR> | |
| Write | Menu Off | <CR>*menu=off#<CR> | |
| Read | Menu Status | <CR>*menu=?#<CR> | |
| Write | Up | <CR>*up#<CR> | |
| Write | Down | <CR>*down#<CR> | |
| Write | Right | <CR>*right#<CR> | |
| Write | Left | <CR>left#<CR> | |
| Write | Enter | <CR>*enter#<CR> | |
| Write | Back | <CR>*back#<CR> | |
| Write | Source Menu On | <CR>*sourmenu=on#<CR> | |
| Write | Source Menu Off | <CR>*sourmenu=off#<CR> | |
| Read | Source Menu Status | <CR>xsourmenu=?#<CR> | |
| Write | 3D Sync Off | <CR>8d=off#<CR> | |
| Write | 3D Auto | <CR>*3d=auto#<CR> | |
| Write | 3D Sync Top Bottom | <CR>9d=tb#<CR> | |
| Write | 3D Sync Frame Sequential | <CR>*3d=fs#<CR> | |
| Write | 3D Frame packing | <CR>8d=fp#<CR> | |
| Write | 3D Side by side | <CR>Id=sbs#<CR> | |
| Write | 3D inverter disable | <CR>9d=da#<CR> | |
| Write | 3D inverter | <CR>*3d=iv#<CR> | |
| Write | 3D nVIDIA | <CR>9d=nvidia#<CR> | |
| Read | 3D Sync Status | <CR>*3d=?#<CR> | |
| Write | Remote Receiver-front | <CR>*rr=1#<CR> | |
| Write | Remote Receiver-top | <CR>*rr=t#<CR> | |
| Write | Remote Receiver-top+front | <CR>*rr=tf#<CR> |
| Function | Type | Operation | ASCII |
| Miscellaneous | Read | Remote Receiver Status | <CR>*rr=?#<CR> |
| Write | AMX Device Discovery-on | <CR>*amxdd=on#<CR> | |
| Write | AMX Device Discovery-off | <CR>*amxdd=off#<CR> | |
| Read | AMX Device Discovery Status | <CR>*amxdd=?#<CR> | |
| Read | Mac Address | <CR>*macaddr=?#<CR> | |
| Read | Serial Number | <CR>*serialnumber=?#<CR> | |
| Write | High Altitude mode on | <CR>*Highaltitude=on#<CR> | |
| Write | High Altitude mode off | <CR>9-lighaltitude=off#<CR> | |
| Read | High Altitude mode status | <CR>*Highaltitude=?#<CR> | |
| Color Calibration | Write | Tint + | <CR>int=+#<CR> |
| Write | Tint – | <CR>*tint=-#<CR> | |
| Write | Set Tint value | <CR>stint=value#<CR> | |
| Read | Get Tint value | <CR>xtint=?#<CR> | |
| Write | Set gamma value | <CR>*gamma=value#<CR> | |
| Read | Gamma value status | <CR xgamma=?#<CR> | |
| Write | Set HDR Brightness value | <CR>*hdrbri=value#<CR> | |
| Read | Get HDR Brightness value | <CR>thdrbri=?#<CR> | |
| Write | Red Gain + | <CR>*RGain=+#<CR> | |
| Write | Red Gain – | <CR>*RGain=-#<CR> | |
| Write | Set Red Gain value | <CR>*RGain=value#<CR> | |
| Read | Get Red Gain value | <CR>*RGain=?#<CR> | |
| Write | Green Gain + | <CR>*GGain=+#<CR> | |
| Write | Green Gain – | <CR>xGGain=-#<CR> | |
| Write | Set Green Gain value | <CR>*GGain=value#<CR> | |
| Read | Get Green Gain value | <CR>xGGain=?#<CR> | |
| Write | Blue Gain + | <CR>*BGain=+#<CR> | |
| Write | Blue Gain – | <CR>*BGain=-#<CR> | |
| Write | Set Blue Gain value | <CR>*BGain=value#<CR> | |
| Read | Get Blue Gain value | <CR>*BGain=?#<CR> | |
| Write | Red Offset + | <CR>*ROffset=+#<CR> | |
| Write | Red Offset – | <CR>*ROffset=-#<CR> | |
| Write | Set Red Offset value | <CR>*ROffset=value#<CR> | |
| Read | Get Red Offset value | <CR>*ROffset=?#<CR> | |
| Write | Green Offset + | <CR>*GOffset=+#<CR> | |
| Write | Green Offset – | <CR>*GOffset =-#<CR> | |
| Write | Set Green Offset value | <CR>*GOffset=value#<CR> | |
| Read | Get Green Offset value | <CR *GOffset=?#<CR> | |
| Write | Blue Offset + | <CR *BOffset=+#<CR> | |
| Write | Blue Offset – | <CR *BOffset=-#<CR> | |
| Write | Set Blue Offset value | <CR>*BOffservalue#<CR> | |
| Read | Get Blue Offset value | <CR>*80ffset=?#<CR> | |
| Write | Primary Color | <CR>*primcr=value#<CR> |
| Function | Type | Operation | ASCII |
| Color Calibration | Read | Primary Color Status | <CR>*primcr=?#<CR> |
| Write | Hue + | <CR>*hue=+#<CR> | |
| Write | Hue – | <CR>thue=-#<CR> | |
| Write | Set Hue value | <CR>*hue=value#<CR> | |
| Read | Get Hue value | <CR>thue=?#<CR> | |
| Write | Saturation + | <CR>*saturation=+#<CR> | |
| Write | Saturation – | <CR>*saturation=-#<CR> | |
| Write | Set Saturation value | <CR>*saturation=value#<CR> | |
| Read | Get Saturation value | <CR>*saturation=?#<CR> | |
| Write | Gain + | <CR>*gain=+#<CR> | |
| Write | Gain – | <CR>tgain=-#<CR> | |
| Write | Set Gain value | <CR>*gain=value#<CR> | |
| Read | Get Gain value | <CR>tgain=?#<CR> | |
| Service | Read | Error Code report | <CR>*error=report#<CR> |
| Read | FAN I speed | <CR>sfanl=?#<CR> | |
| Read | FAN 2 speed | <CR>sfan2=?#<CR> | |
| Read | FAN 3 speed | <CR>*fan3=?#<CR> | |
| Read | FAN 4 speed | <CR>tlan4=?#<CR> | |
| Read | FAN 5 speed | <CR>tlan5=?#<CR> | |
| Read | FAN 6 speed | <CR>tfan6=?#<CR> | |
| Read | FAN 7 speed | <CR>lian7=?#<CR> | |
| Read | Temperature I | <CR>*tmpl=?#<CR> | |
| Read | Temperature 2 | <CR>*tmp2=?#<CR> | |
| Read | Temperature 3 | <CR>*tmp3=?#<CR> | |
| Read | Temperature 4 | <CR>ttmp4=?#<CR> | |
| Read | LED indicator | <CR>*led=?#<CR> |
PJLink
- PJLink protocal
The network function of this projector supports the PJLink class 1, and the PJLink protocol can be used to perform projector setting and projector status query operations from a computer. - Control commands
The following table lists the PJLink protocol commands that can be used to control the projector. - x characters in the table are non-specific characters.
| Command | Control Details | Parameter/ Return String | Remark | ||
| POWR | Power supply control | 0 I | Standby Power on | ||
| POWR? | Power supply status query | 0 I | Standby Power on | ||
| INPT | Input selection | II 12 21 31 32 33 34 | PCI / YPbPrI PC2 / YPbPr2 VIDEO HDMII HDMI2 DVI-D HDBaseT | ||
| INPT? | Input status que- ry | ||||
| AVMT | Mute | 11 10 21 20 31 30 | Video mute On Video mute Off Audio mute On Audio mute Off Video & Audio mute On Video & Audio mute Off | ||
| AVMT? | Mute query | ||||
| ERST? | Error status query | xxxxxx | Ist byte | Indicates fan errors, and returns 0 – 2 | 0 — No error is detected I = Warning |
| 2nd byte | Indicates light source errors, and returns 0 – 2 | ||||
| 3rd byte | Indicates temperature errors. and returns 0 – 2 | ||||
| 4th byte | 2 = Error Return 0 | ||||
| 5th byte | Return 0 | ||||
| 6th byte | Indicates other errors, and returns 0 – 2 | ||||
| LAMP? | Light source status query | xxxxxxxxxxxx | 1st numbe (1-S digitals): Light source I runtime | ||
| INST? | Input selection list query | 11 12 21 31 32 33 34 | LU960ST | ||
| Command | Control Details | Parameter/ Return String | Remark |
| NAME? | Projector name query | xxxxx | Returns the name set in [PROJECTOR NAME] of [NET-WORK SETUP] |
| INFI? | Manufacturer name query | BenQ | Returns manufacturer name |
| INF2? | Model name query | LU960ST | Returns model name |
| INFO? | Other informadon queries | xxxxx | Returns information such as version number |
| CLASS? | Class information query | I | Returns class for PJLink |
![]() Note:
Note:
RS-232 baud rate options are 2400, 4800, 9600, 14400, 19200, 38400, 57600 and 115200 (Default : 115200).

![]()

BenQ.com
2019 BenQ Corporation. All rights reserved.
Rights of modification reserved. P/N: 4J.J N501.00I


