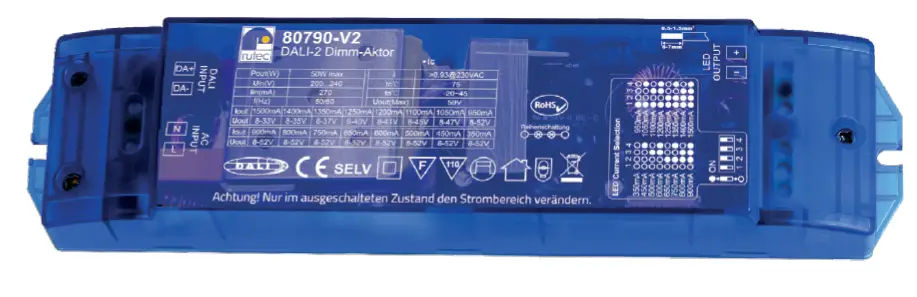
rutec 80790-V2 DALI-2 Dimm-Actor
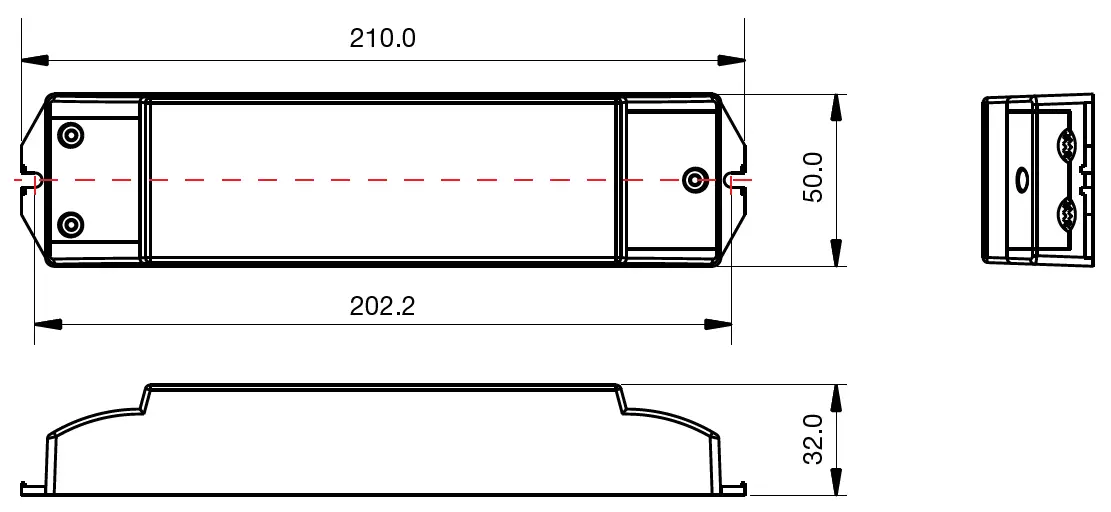
PRODUCT DIMENSIONS
DIP switches setting options
| PN(W) (max. power) | 50 W | 0.93 | |||||||||
| UN(V) (input voltage ) | (200-240)V AC | tc | 75 | ||||||||
| IN(mA) (input current ) | 270 | ta | -20~45 | ||||||||
| fN(Hz) | 50/60 | Uo | 8-52 V | ||||||||
| Io | 350 mA | 450 mA | 500 mA | 600 mA | 650 mA | 700 mA | 800 mA | 900 mA | |||
| Uo | 8-52 V | 8-52 V | 8-52 V | 8-52 V | 8-52 V | 8-52 V | 8-52 V | 8-52 V | |||
| Io | 950 mA | 1050 mA | 1100 mA | 1200 mA | 1250 mA | 1350 mA | 1400 mA | 1500 mA |
| Uo | 8-52 V | 8-47 V | 8-45 V | 8-41 V | 8-40 V | 8-37 V | 8-35 V | 8-33 V |
WIRING DIAMETER
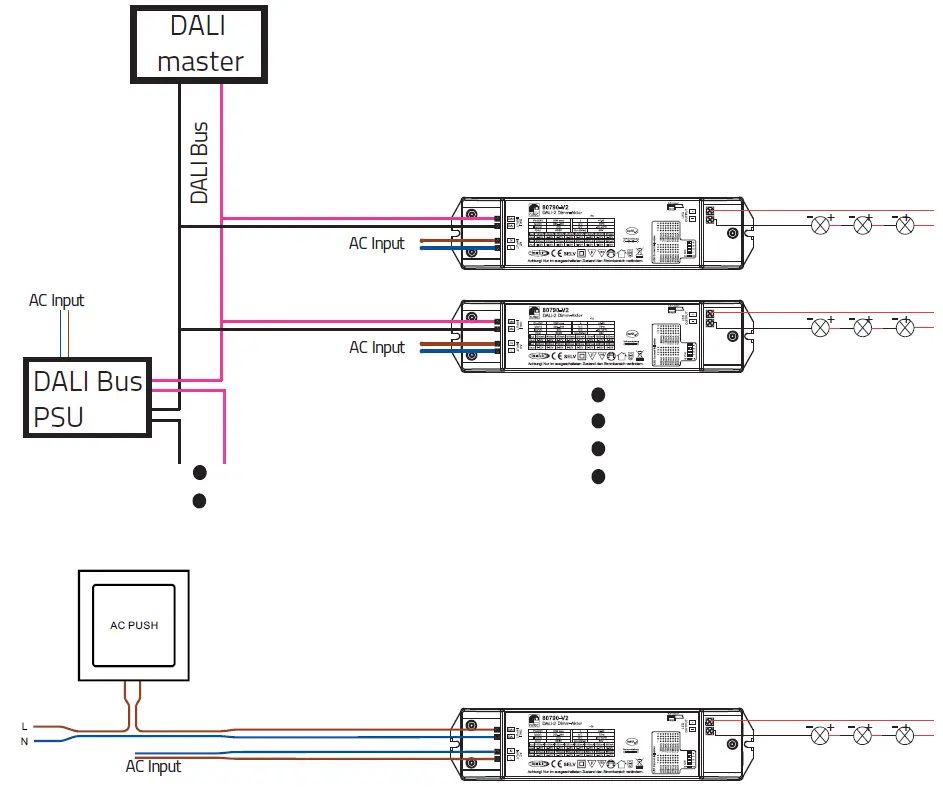
OPERATING INSTRUCTIONS
Please install the DALI-2 dimming actuator as shown in the wiring diagram above. Before connect the LEDs, please set the desired current range using the DIP switch.
Setting the dali addresses
- Automatic setting
The DALI-2 master unit assigns the addresses automatically. The function can be found in the manual of the of the master. - push-dim
As soon as the terminals Da+(L’) and Da-(N) have been connected to the 230 V AC push-button, the operating mode changes to push dim.- Pressing briefly switches the outputs On/Off.
- Pressing and holding dims the light strip to the desired brightness value.
- Press and hold again to dim the continuous row.
- The dimming range is 1-100 %.
SAFETY INSTRUCTIONS
- Be sure to have a professional electrician complete installation. There is no warranty coverage for any lights installed without observing european safety directives.
- The LED controller is not waterproof. Please protect the controller from direct sunlight and avoid rain. For outdoor installation, please ensure that the controller is installed in a waterproof housing.
- Always ensure that the unit is installed in a location with good ventilation to ensure correct operating temperature.
- Check that the voltage and the power adapter are suitable for the controller and that the designation of the anode and cathode matches those of the controller.
- Please ensure that an appropriate cable diameter is used for the connection between the controller and the LED.
- Never connect the cables when the power is on, check that the connections are correct and check for short circuits before switching on the power.
- Please do not carry out any repairs yourself. This will invalidate the manufacturer’s warranty.
To further upgrade your suspension, use other QA1 suspension products such as coil-overs, shocks, struts, springs, K-members, torque arms, panhard rods, sub-frame connectors, strut tower braces, rod ends, sway bars, tubular control arms, spherical bearings, carbon fiber driveshafts and more. For more information, please visit www.QA1.net


